Clarity Matters Blog Tutorial: Diagonal Circle Grid – Joy
Hello hello! Grace here.
I hope this finds you well, safe and enjoying your Sunday morning.
We are joined today by the spectacular Jane Telford. She has generously put together a grid work tutorial for us. I’ll hand you over to our teacher!

How to Use the Diagonal Circle Grids
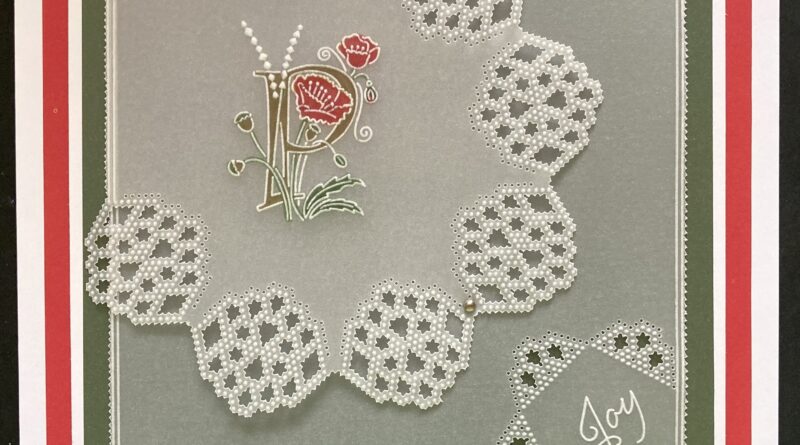
Joy, Lace and Poppy
I love all the circle grids that Josie has designed but I think these new diagonal designs are so pretty. I wanted to do something a bit different with them rather than just do a circle.
This is where we are headed.

Ingredients
Joy Circle Lace Pattern Grid (GRO-GG-42310)
Barbara’s Bijou Floral Alphabet A4 Groovi Plate (GRO-WO-42081-16)
Nested Squares A5 Sq Groovi Plate (GRO-PA-40037-03)
Groovi Plate Mate for A5 Sq Grids (GRO-CO-41706-08)
Groovi A4 Clear Parchment Paper (GRO-AC-40024-A4)
Black Dual-Purpose Groovi Mat A4 (GRO-AC-40194-A4)
Groovi Guard (GRO-AC-40345-XX)
Lightwave Led Light Panel + Free A4 Translucent Piercing Mat (ACC-LP-30352-A4)
Groovi® Embossing Tool 0.8mm – 1.3mm (GRO-AC-40026-XX)
Groovi® Embossing Tool 2.0mm – 2.8mm (GRO-AC-40027-XX)
1-Needle Bold Perforating Tool (PER-TO-70028-XX)
2-Needle Perforating Tool (PER-TO-70037-XX)
Perga Colours Exclusive (PER-CO-70060-XX)
Shenandoah Companion Paper (ACC-CA-31666-88)
Rainbow River Companion Paper (ACC-CA-31665-88)
Stencil card 7″x7″ (ACC-CA-30095-77)
5 Silver Brads (PER-AC-70275-XX)
7×7 Card Blank (ACC-CA-31672-77)
Ringlock Scissors (PER-TO-70041-XX)
Method
1. Take a piece of clear parchment and cut 3 inches off one end to make it square. This makes it easier to attach to the parchment to the Plate Mate. Wipe well with the tumble drier sheet on both sides. Put the Grid Plate in the Plate Mate so that the holes are nearest to you. It makes it easier to perforate first and also if the holes are closer to you. Put the parchment over the plate but at an angle as shown. Perforate all the holes on the plate but don’t rotate the parchment to complete the circle.

2. Turn the parchment over and attach it over the dotted pattern, lining up the 3 sections on the plate. Use the Number 2 tool to emboss the dots.

3. TOP TIP: Put the Groovi Guard over each section as you emboss the dots. It helps you focus on that part but it also protects your hand from the rough perforations.

4. Once you have all the dots embossed, line the shape up on the Nested Square plate. The outer square should be positioned on the 2nd dot in from the edge of the outer shapes as shown.

5. Use the number 1 tool to emboss the corner to join up the lace sections.

6. Use the narrow lines on the plate mate to add a second line around the outside of the corner.

7. Take a second piece of parchment and emboss the largest square from the nested square plate.

8. Add the narrow line around the outside of this complete square using the same lines as before, in step 6.

9. Turn the parchment over to the front and line up the perforation pattern from the centre of the plate. Perforate all the holes.

10. Turn the parchment over and emboss the dots in the perforated areas.

11. Reposition the parchment and emboss the word Joy in the corner. Put this to one side until later.

12. Get the first piece of parchment back. In the area created, emboss the letter P from the Bijou Floral Alphabet plate.

13. Using the Groovi tools, emboss white work in the Poppy design.

14. Add colour to the Poppy design with Perga pens. I used numbers 1, 7, 17, 18 and 26.

15. Working on the front of the parchment, use the 2-Needle Tool to perforate around the corner of the first piece and around the full square of the second piece.

16. Use your scissors or snips to remove waste from the lace areas first. Snip around the full square piece. Then, snip the lace and square corner of the other piece.

17. Cut a piece of dark green paper to 5¾”x 5¾”, red to 6½”x 6½” and a piece of thin white card to 6″x 6″. Have a 7×7 card blank ready and also 5 silver brads. Stick the red paper to the card blank. Then add the white piece in the centre of the red.

18. Attach the full square of parchment to the green paper using 3 brads leaving the top left corner free.

19. Line up the corner of the top piece with the lines on the square underneath. Attach with a brad in the top left-hand corner and in the centre of the lace edge as shown.

20. You have now completed your project!

What a stunning project! I love it, as I’m sure you at home do too…
We hope to see your versions of this card and the techniques shared on Groovi Worldwide and Pergamano Worldwide.
Thank you so much, Jane, for sharing this detailed and helpful bloggy tutorial with us. Yet another fabulous step-by-step project that we are sure will encourage and inspire those at home!
Everything that Jane has used in this particular project is available in a shopping list, HERE.
Now, looking at the week ahead…
Monday 29th July:
In the SHAC with Barbara – 10am Live on Facebook & YouTube
Tuesday 30th July:
Groovi Tuesday with Paul – 10am Live on Facebook & YouTube
Thursday 1st August:
Craft Along with Barbara – 7pm – Jayne’s Winter Scenes A4 Sampler
Sunday 4th August:
Clarity Classics with Barb on Create and Craft – 3pm – 5pm
See you there!
Travel gently, friends.
Lotsa love, Grace & Jane xoxo
Clarity – The Home of Art, Craft, and Well-Being.
Thank you Jane and Grace for this tutorial love it.
Looking forward to the Summer Retreat in August with my two grandchildren.
regards
Janet Cummings x
Thank you Grace and Jane, great tutorial. I received Josie’s new plate set yesterday, looking forward to having a go at this lovely inspiration. xx
Thank you Grace for doing this blog & Jane for another great Sunday project. I saw the card when the plates were launched on TV & thought it was another great way to use them – now I have no excuse to try it as I now have a step by step tutorial to follow !!
Have a good week everyone x
Beautiful.
Thank you Grace for bringing us Jane’s glorious step by step using Josie’s very clever grids and Barbs beautiful bijou artwork. Great combination, Jane.