Clarity’s Blog Tutorial: How To Easy Layout meets Butterflies!
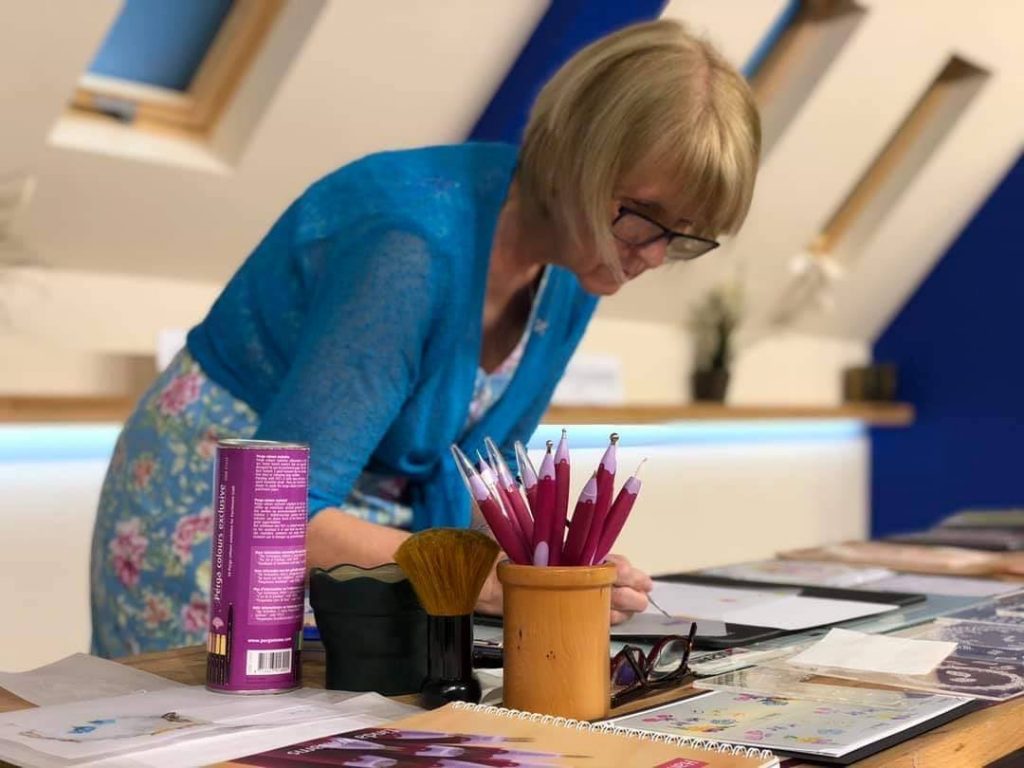
Hello hello! Grace here.
I hope this finds you well and enjoying your Sunday.
We are joined by the insanely talented Linda Williams. Did you catch Paul Church on Wednesday with our Create & Create Clarity One Day Special? Mum’s blog earlier in the week pitched it perfectly, and has loads of stunning artwork samples! Check it out here.
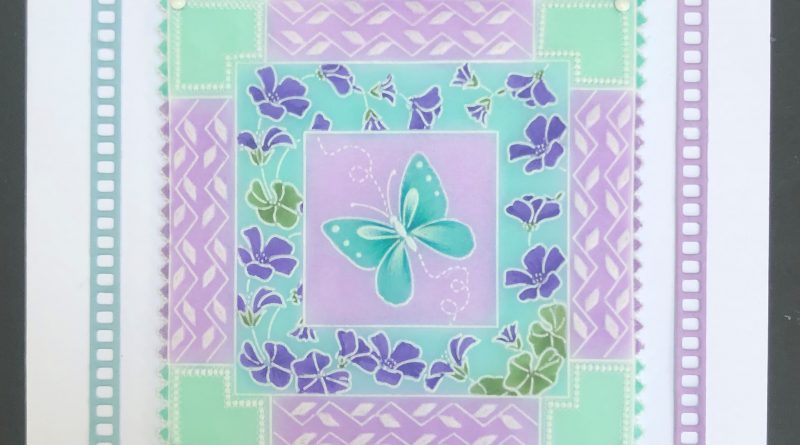
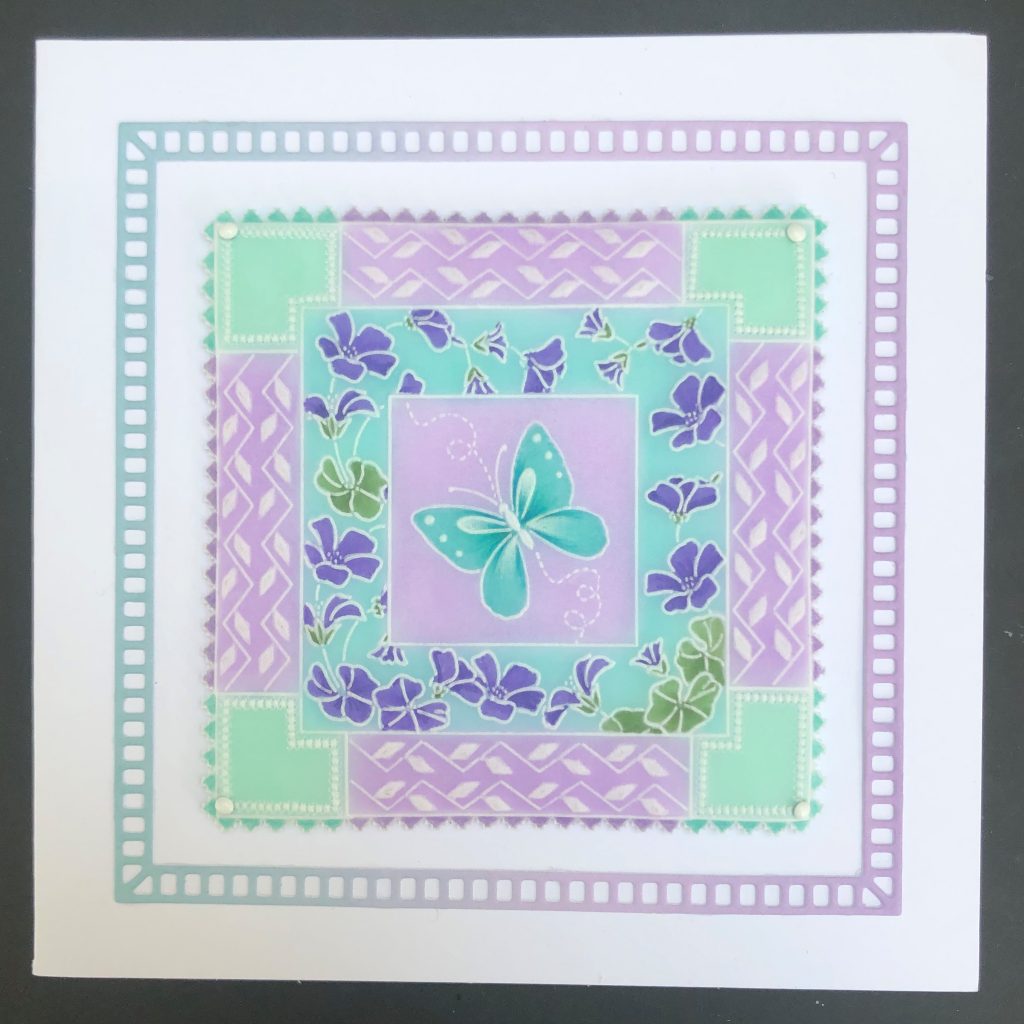
Mini Butterfly Layout
Ingredients
Linda Williams Gardener Easy Layout Plate (GRO-LW-41978-03)
Linda’s 123 – E Butterfly, Lavender & Mallow A5 Sq Plate (GRO-FL-40993-03)
A5 Square Plate Mate (GRO-MA-40002-07)
Pergamano Embossing Mat (PER-AC-70075-XX)
No 1 & 2 Groovi Embossing Tool (GRO-AC-40026-XX)
Pergamano Ball Embossing Tool 1.5mm (PER-TO-70004-XX)
Pergamano Ball Embossing Tool 3mm (PER-TO-70005-XX)
Picot Foam Mat (GRO-AC-40625-XX)
Super Foam Perforating Mat (GRO-AC-40603-A4)
Angle Perforating Tool (PER-TO-70029-XX)
4 Needle Perforating Tool (PER-TO-70036-XX)
1 Needle Perforating Tool (PER-TO-70035-XX)
Pergamano Scissors (PER-TO-70040-XX)
Polychromos Pencils (ACC-PE-30797-XX)
Dorso Oil (PER-CO-70066-XX)
Blending Nibs (PER-AC-70299-XX)
Blending Pen (PER-AC-70300-XX)
Faber Castell Eraser Pencil (ACC-PE-30612-XX)
Perga Colours Exclusive (PER-CO-70060-XX)
Groovi Guard (GRO-AC-40345-XX)
Groovi Tabs (GRO-AC-40437-XX)
Groovi Parchment Paper (GRO-AC-40024-XX)
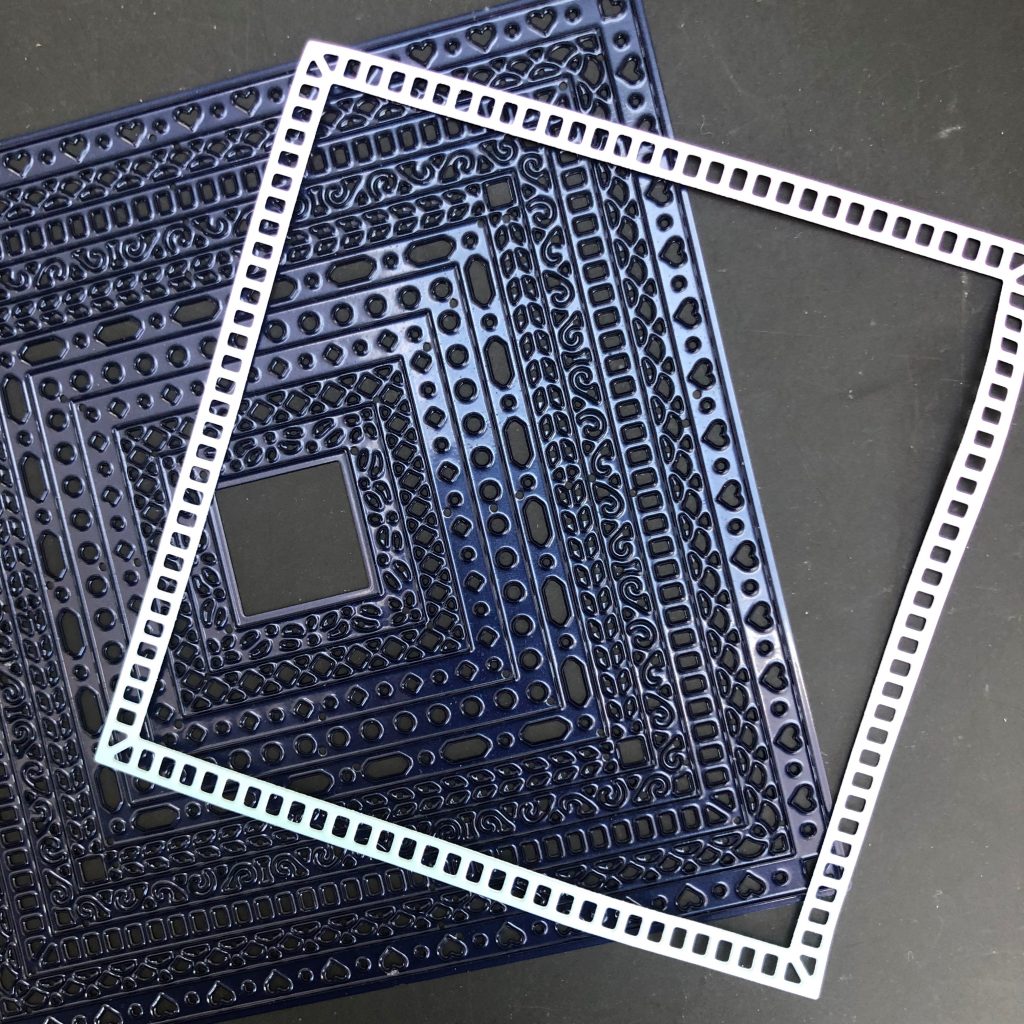
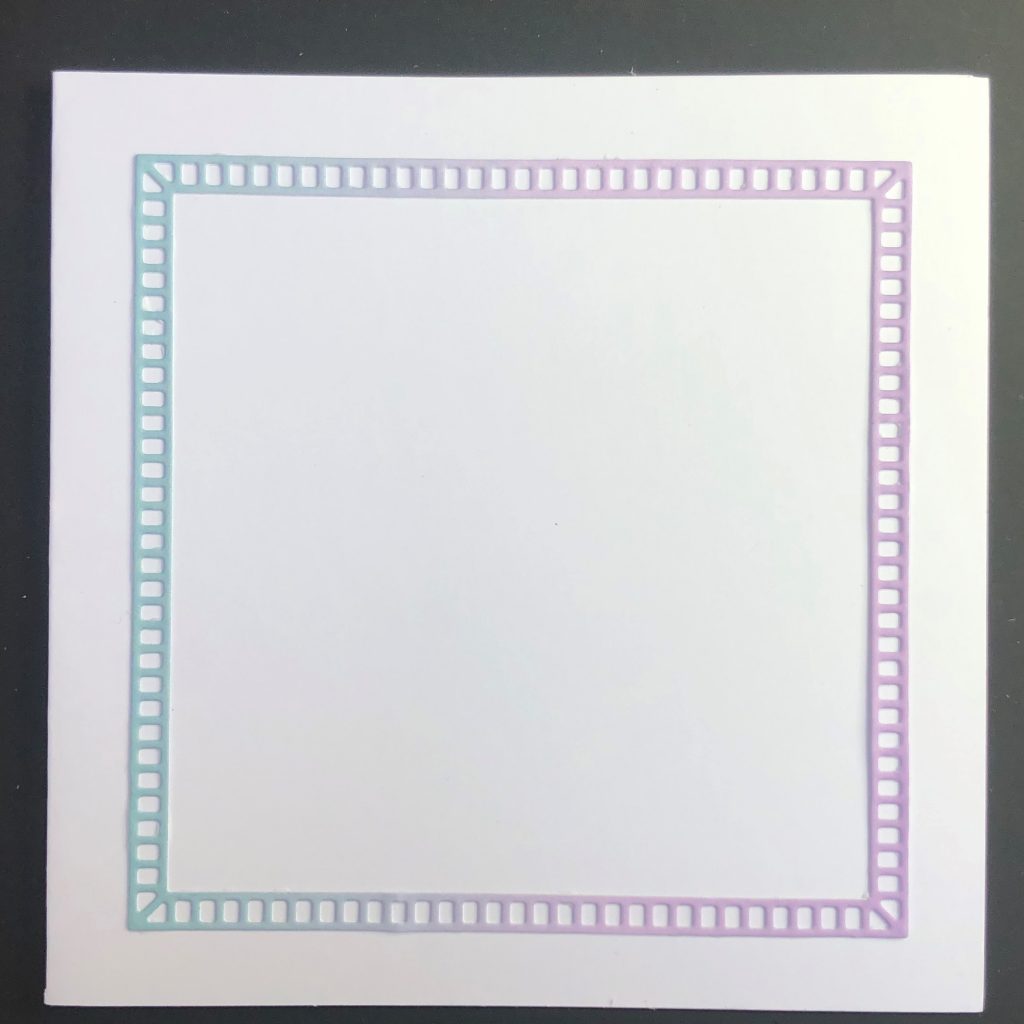
Nested Square Doodle Frame-Its Frame (ACC-DI-31157-66)
Rainbow Paper – Lavender Fields A4 (GRO-AC-42016-XX)
White Card Blank 6″ x 6″ (ACC-CA-30618-66)
White Card Stock ()
4 x White Pergamano Brads (PER-AC-70269-XX)
Claritystamp Tape Runner (ACC-MS-31065-XX)
Perga Glue (PER-AC-70133-XX)
Method
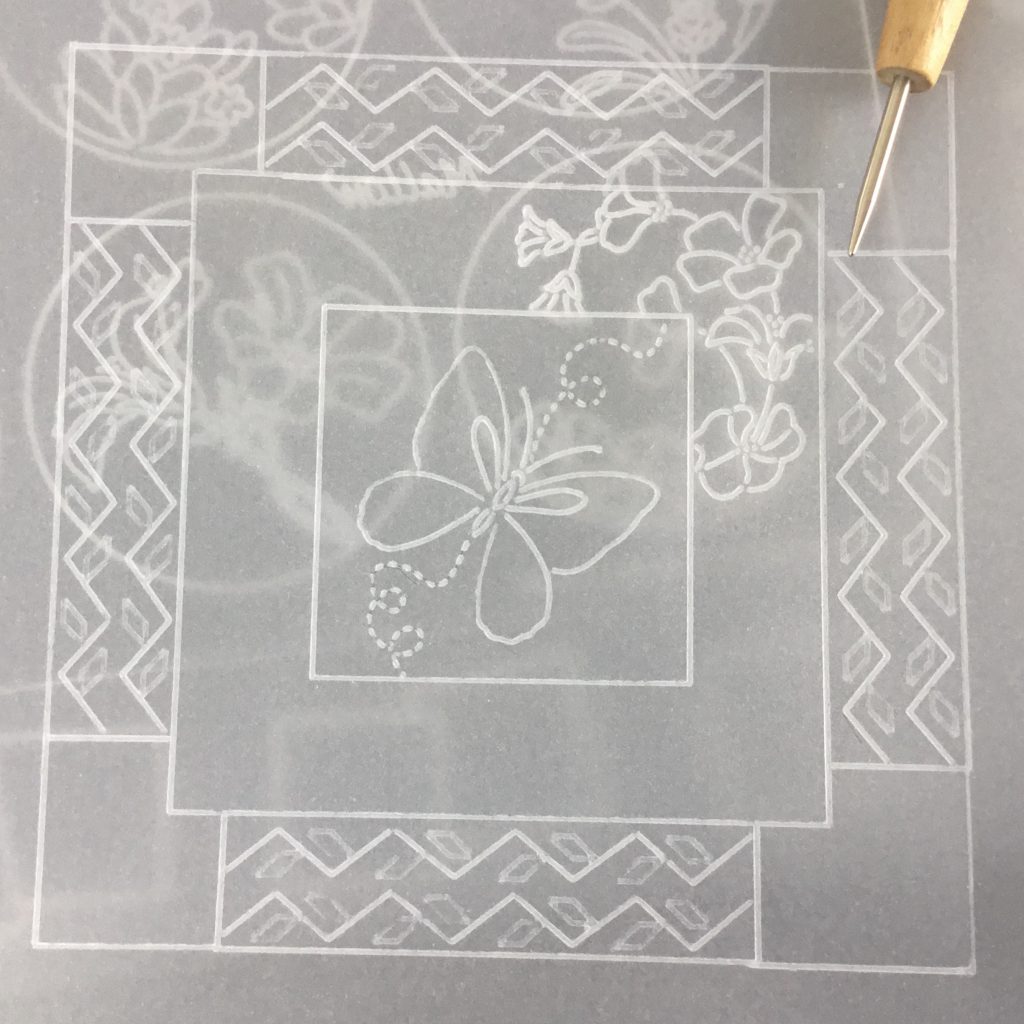
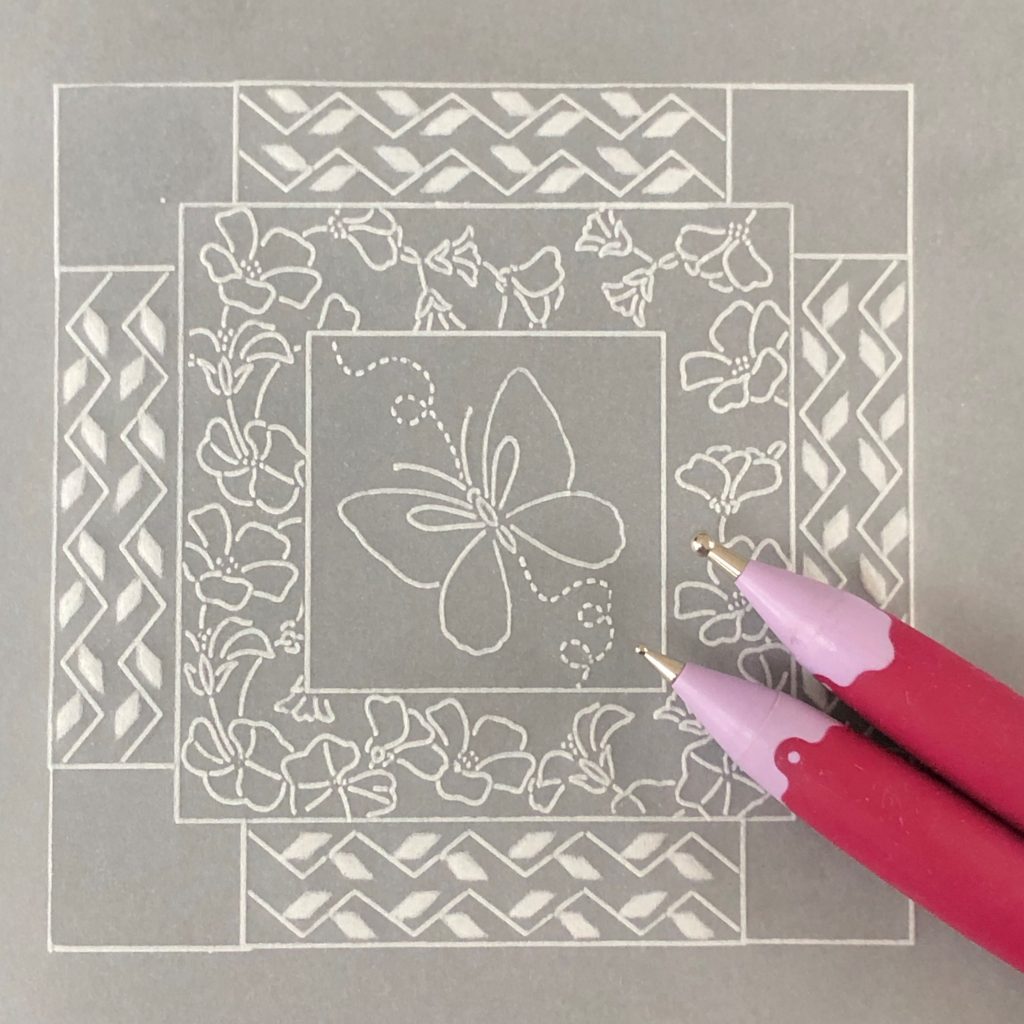
Step 1: On ordinary parchment paper and using the Gardener- Easy Layout Plate, emboss the square frame in the centre of the plate. Also, emboss the attached rectangle and leafy decorations. Use the no 1 Groovi tool for all the lines and the no 2 Groovi tool for the leaves.
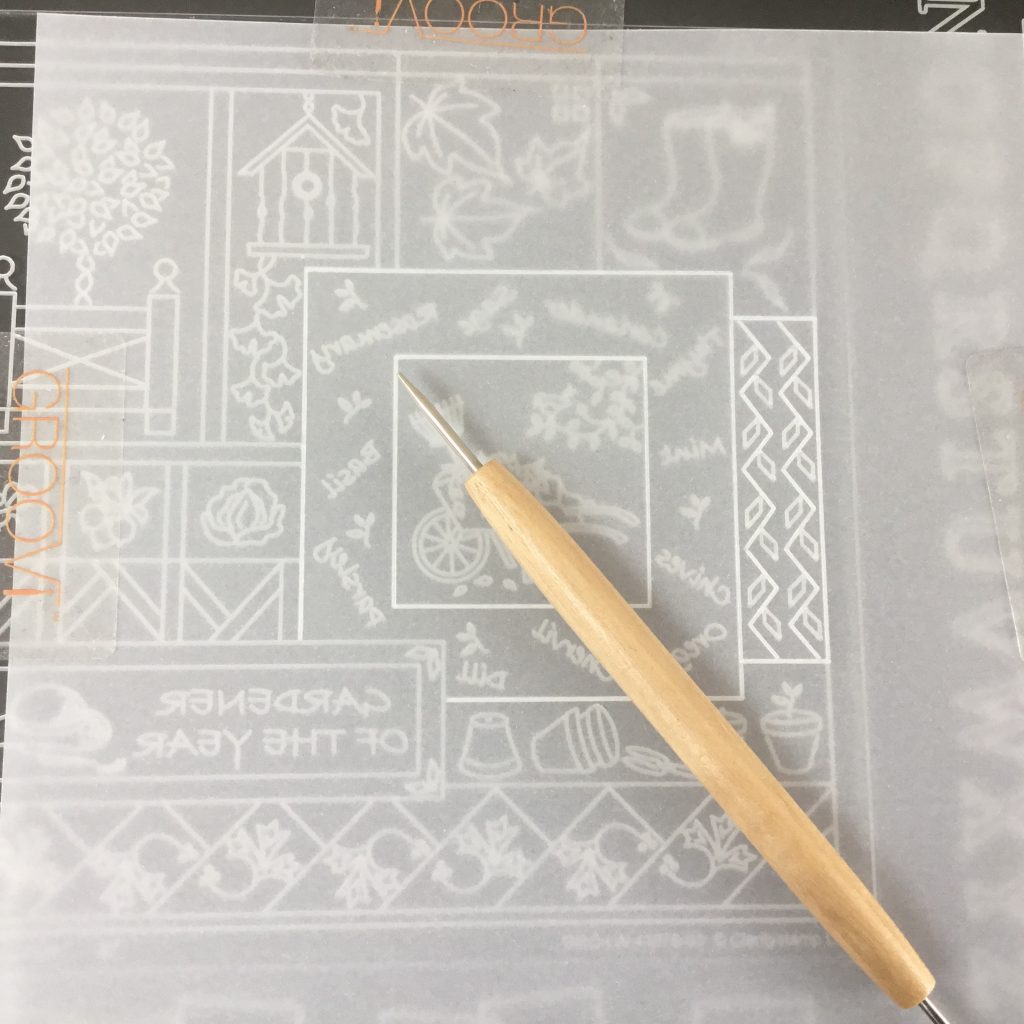
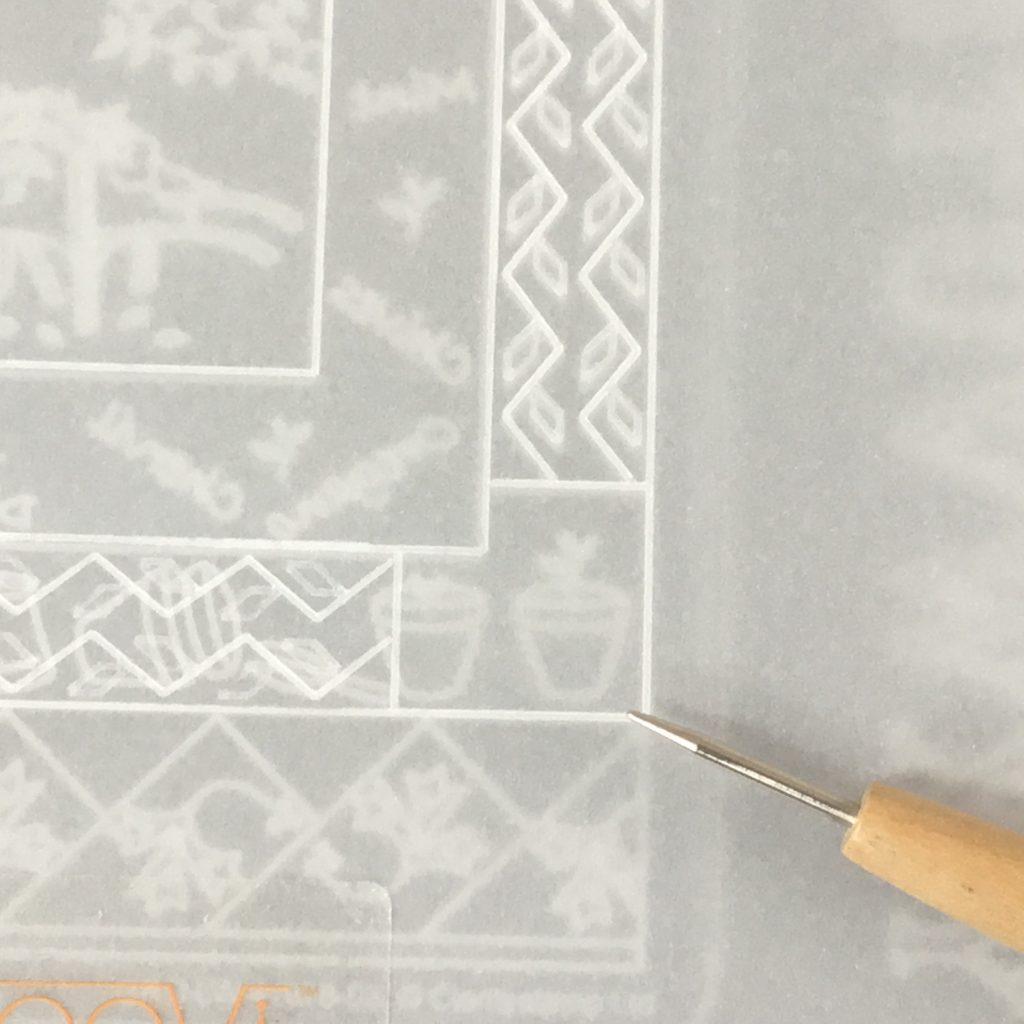
Step 2: Turn the parchment 90 degrees, lining up the straight lines and corners of the frame. Complete the frame and add another side panel.
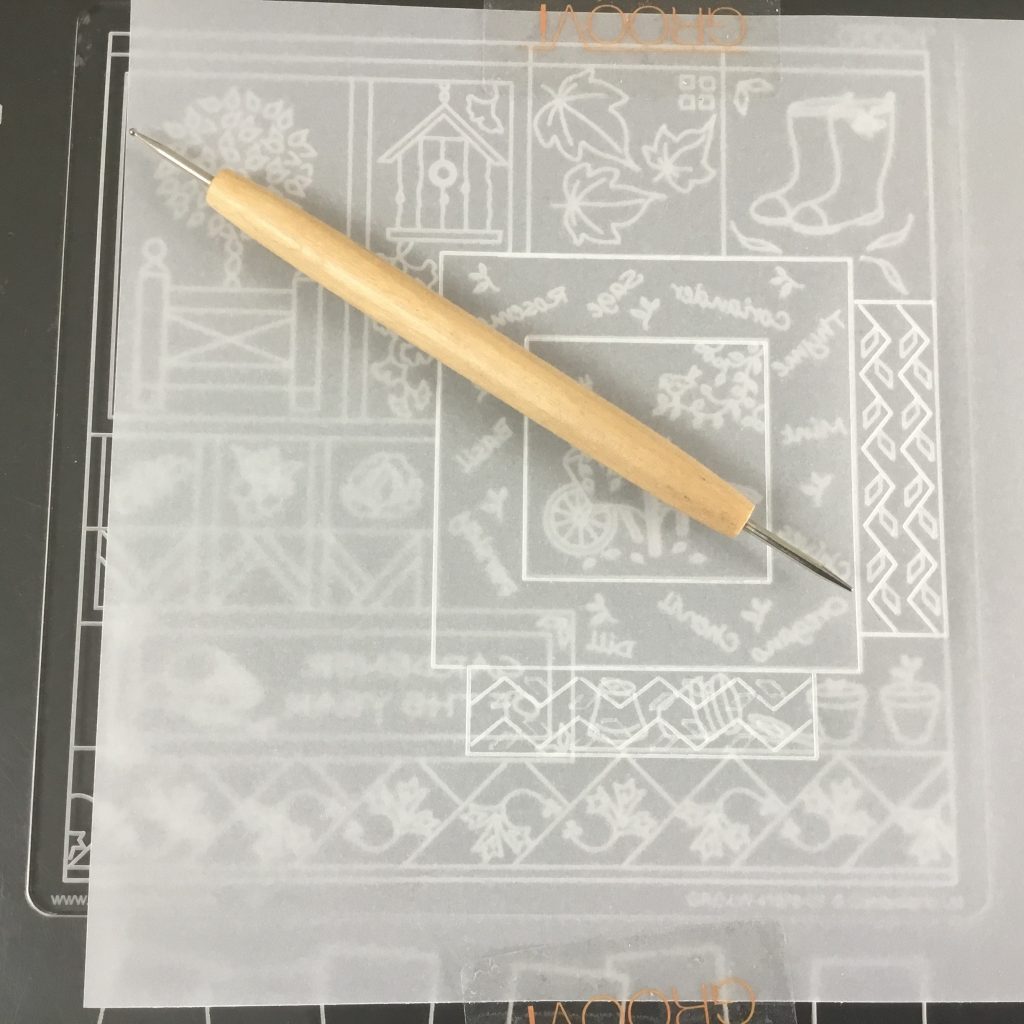
Step 3: Continue in this way until you have four side panels attached to the centre frame.
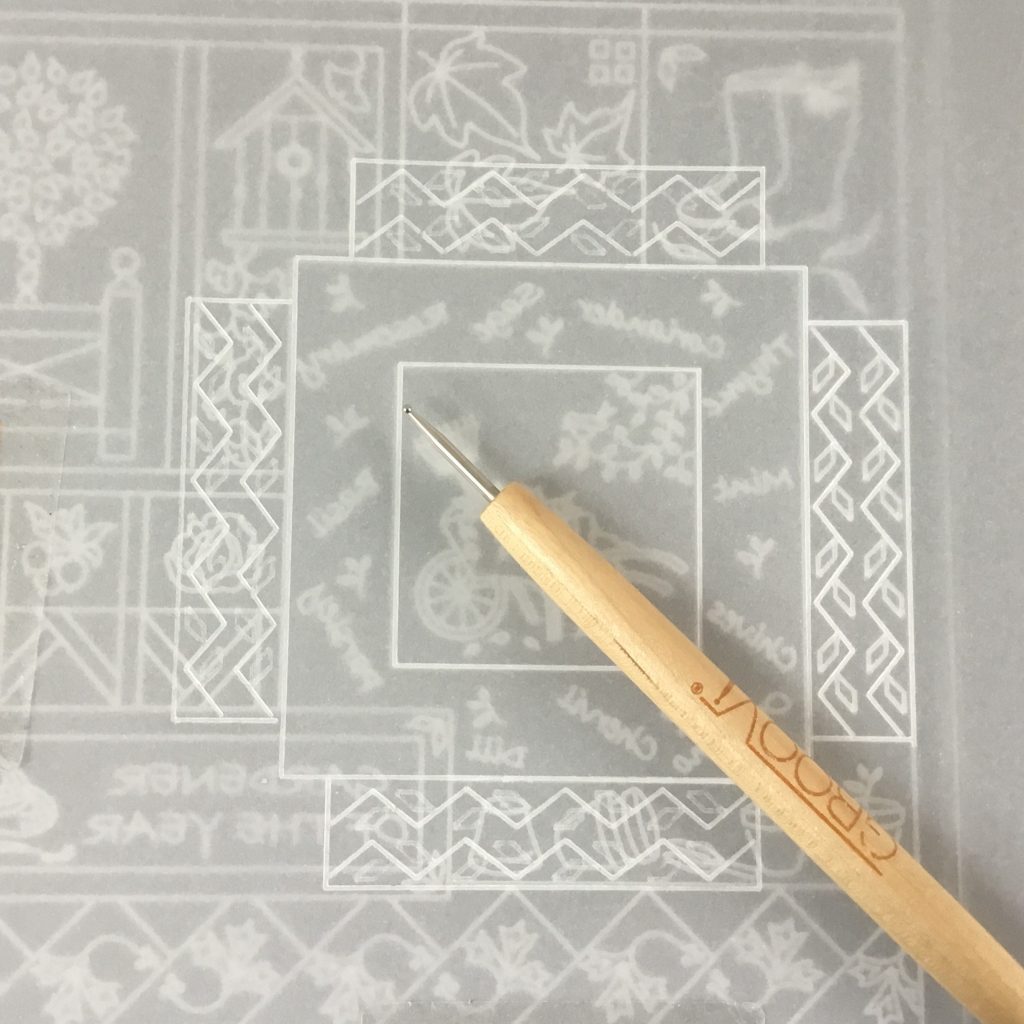
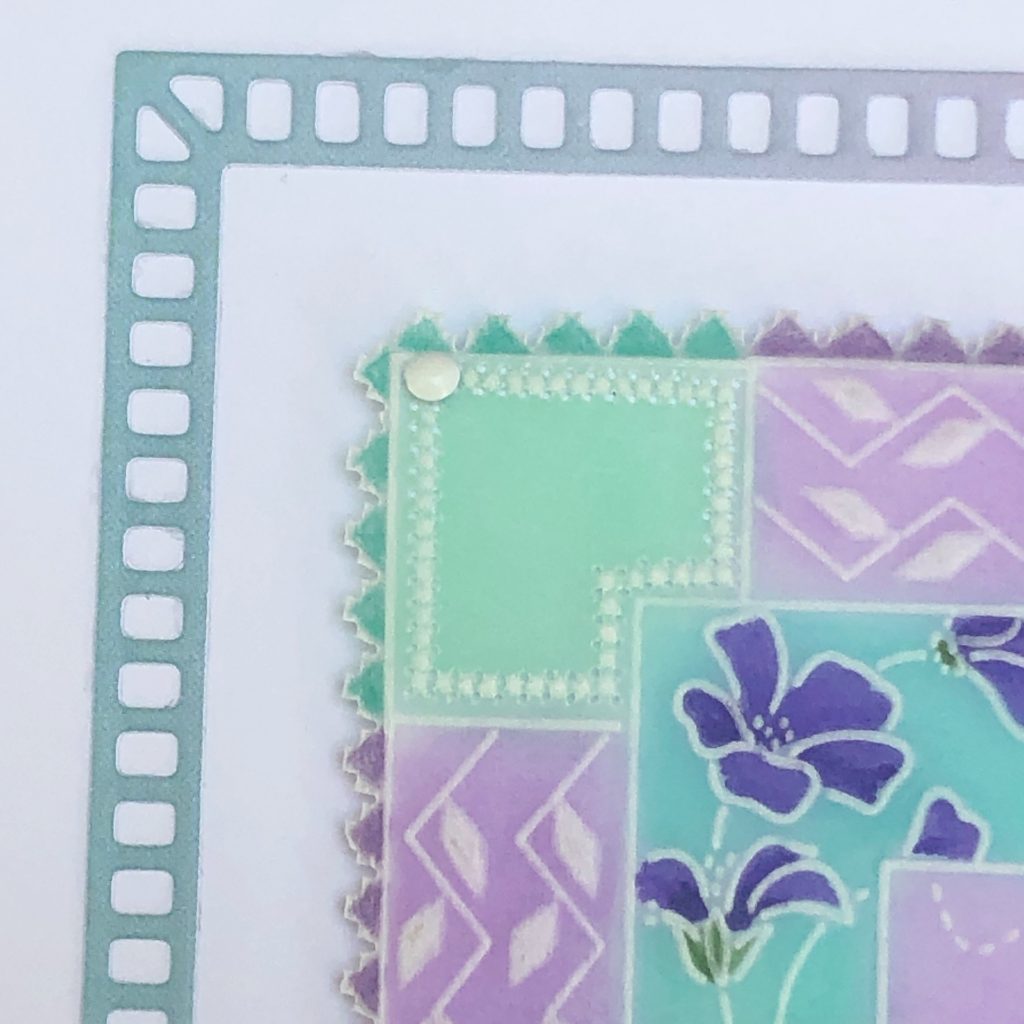
Step 4: Add in the four corners to complete the square. Make sure you line up the outer lines. Don’t worry about the inner ones.
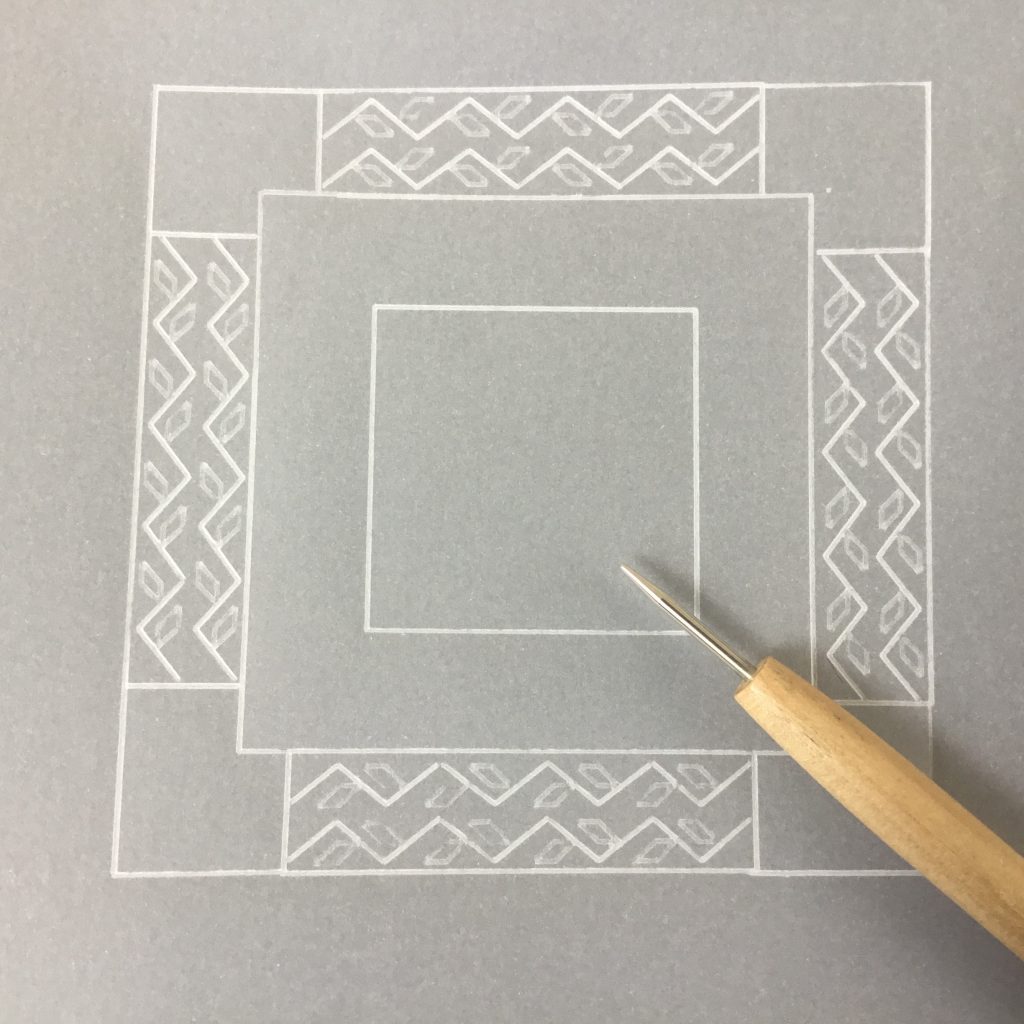
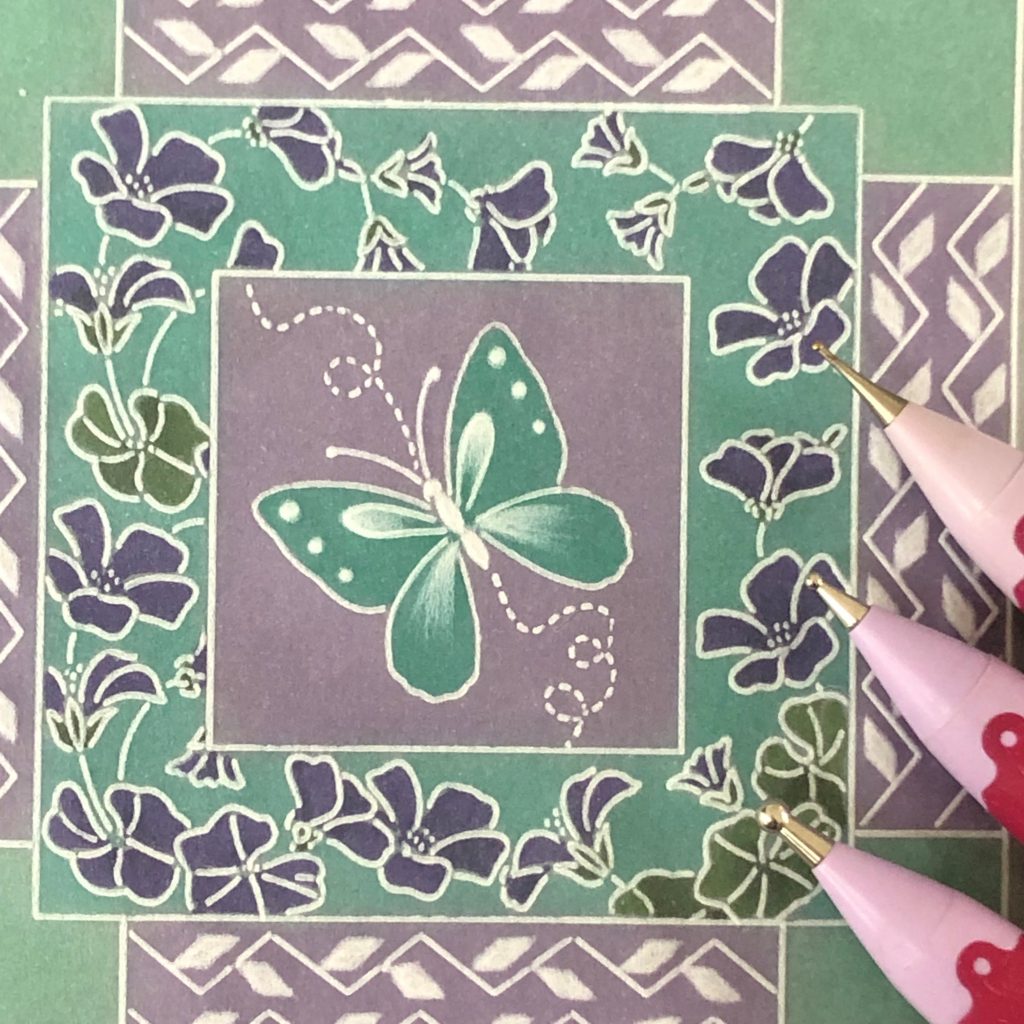
Step 5: Now fill in your spaces with whatever you want. You can use any Groovi plates, grids or needle tools. The world is your oyster! I used the medium butterfly from the 123-EButterfly, Lavender & Mallow A5 Square Plate. I didn’t emboss all the decoration within the butterfly as I wanted to keep it plain for colouring, only adding the two small tear drop shapes. Add in the broken lines of the butterfly trail too.
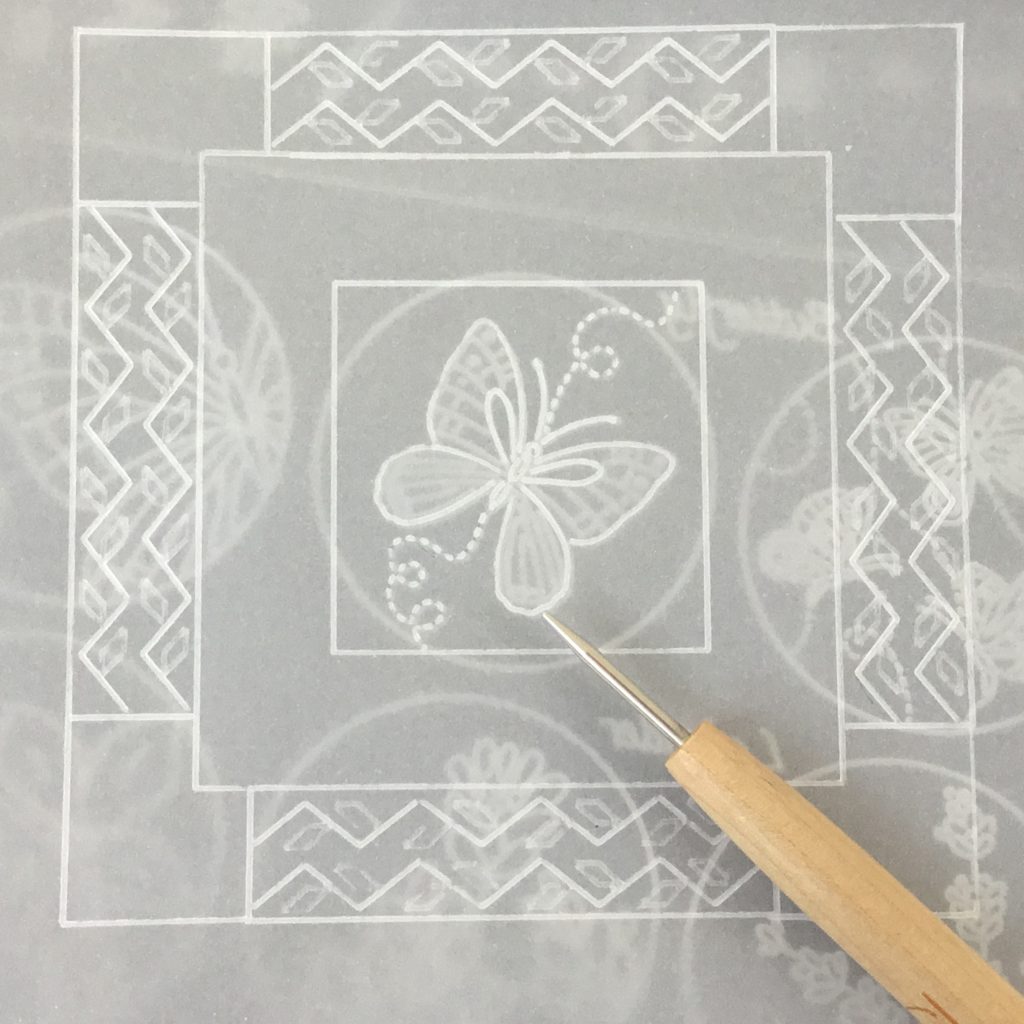
Step 6: Use the smallest mallow flower and leaves to randomly fill in the frame around the butterfly square. I used the number 1 Groovi tool for this because I wanted sharp white lines.
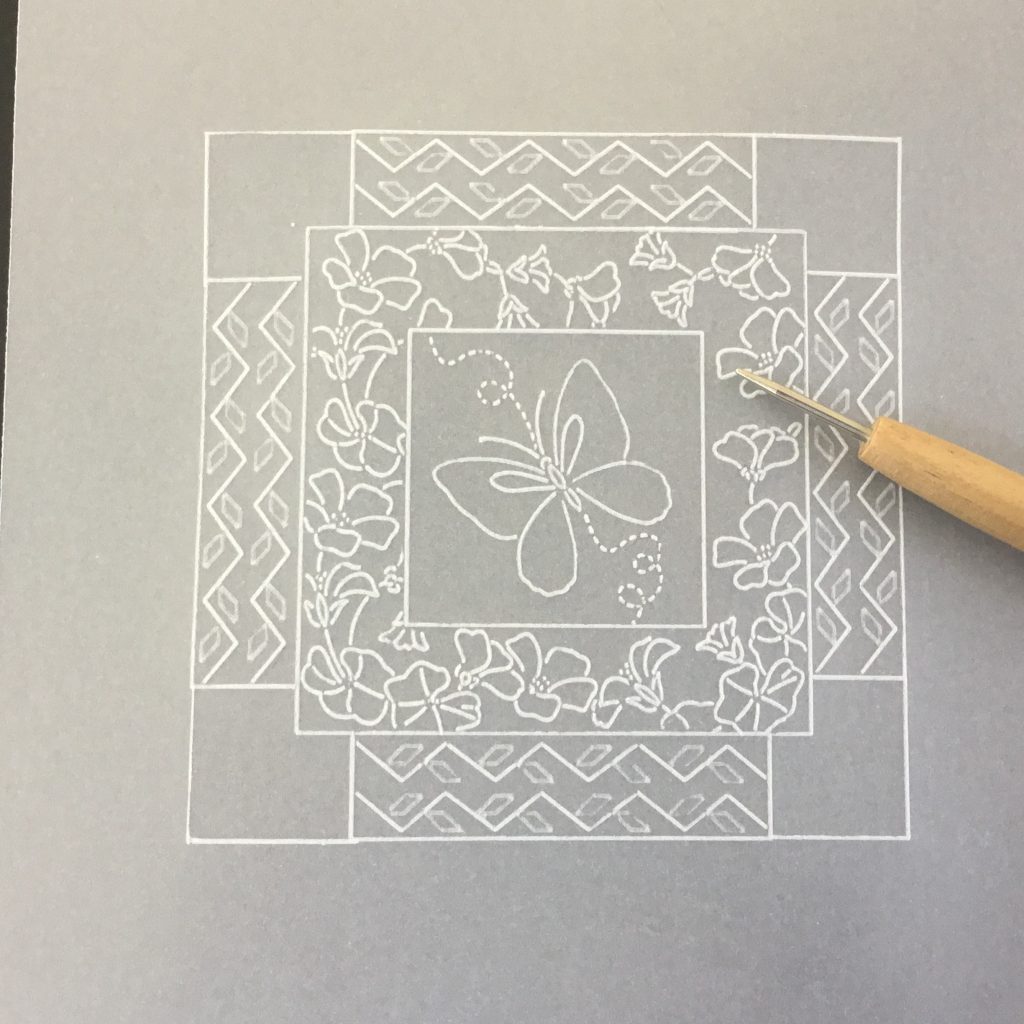
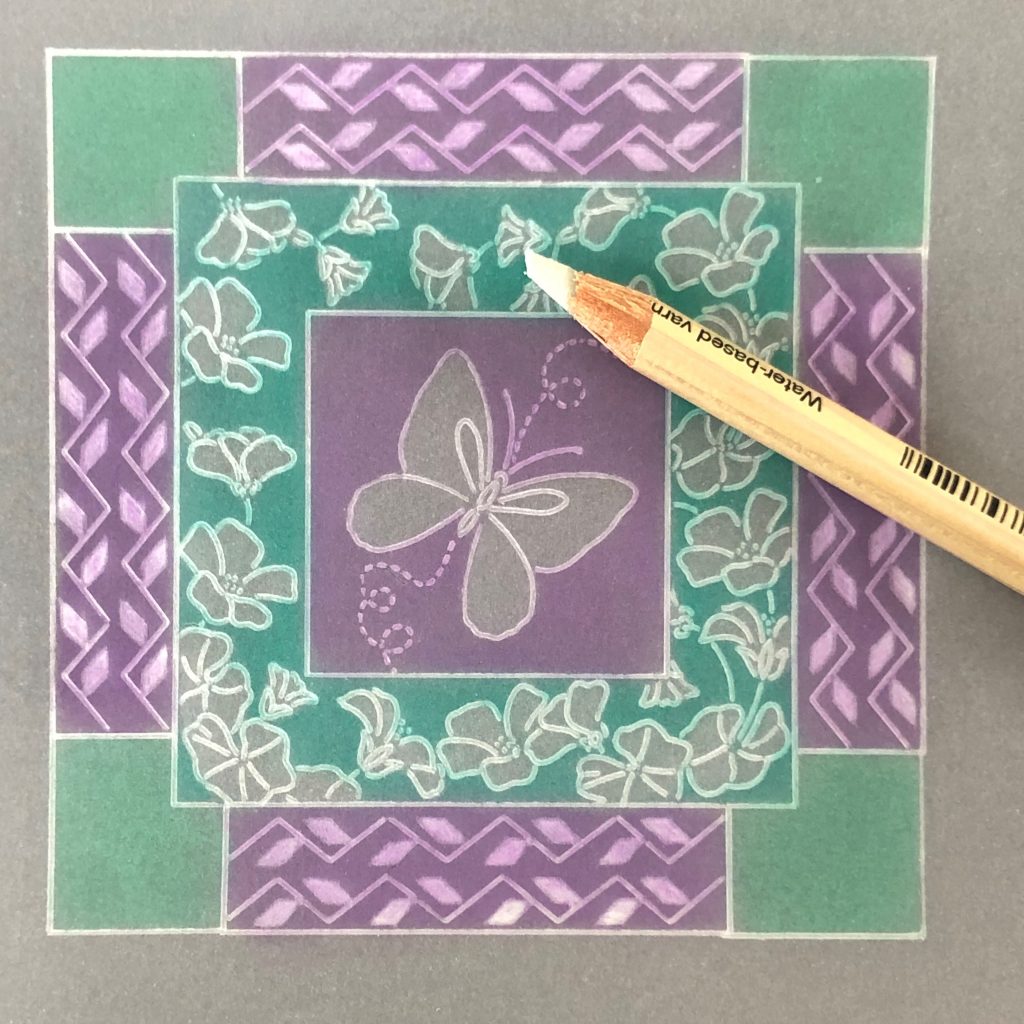
Step 7: Place your parchment face down on your embossing mat. Using the 3mm embossing tool, emboss the leaves gently. Do this in stages and come back to them later after the parchment has rested.
Step 8: Keep adding light layers until you are satisfied. Then finally you can use the 1.5mm and 1mm ball tools to sharpen up the points.
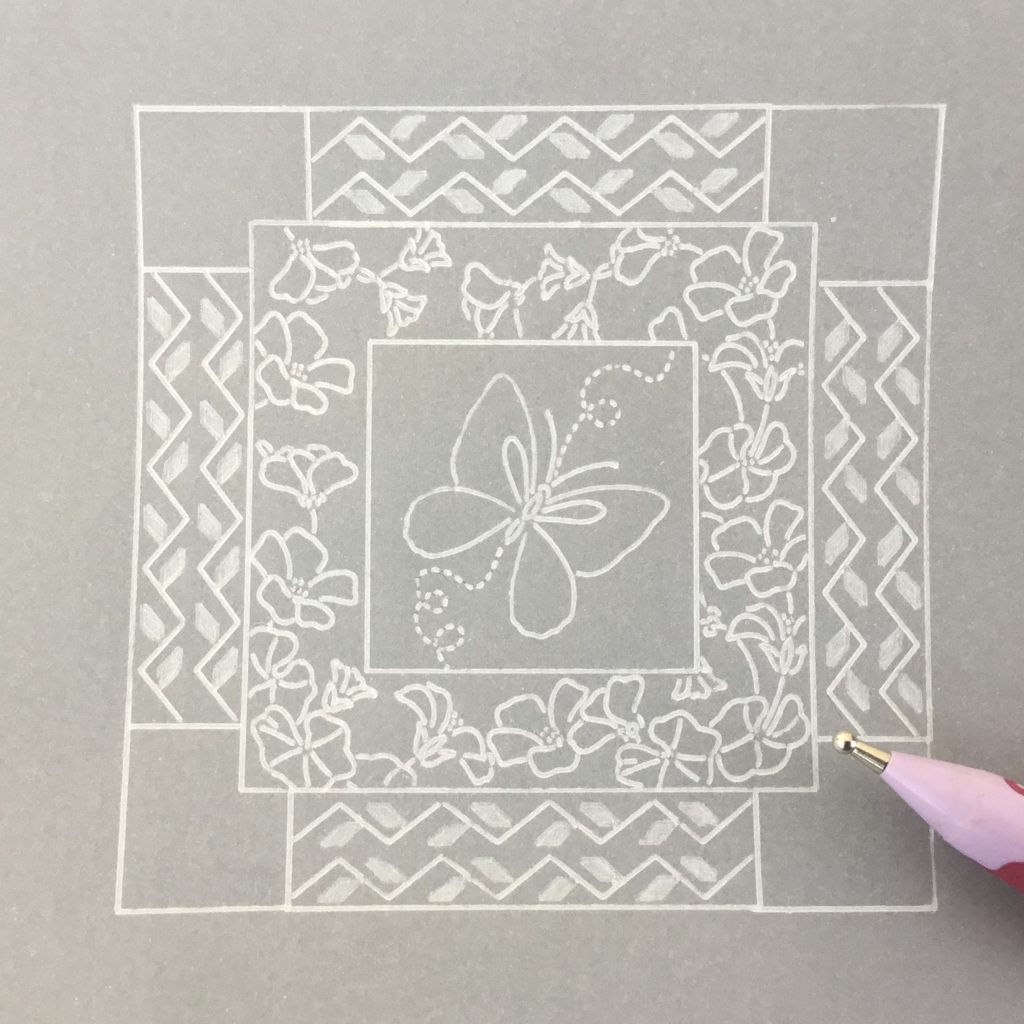
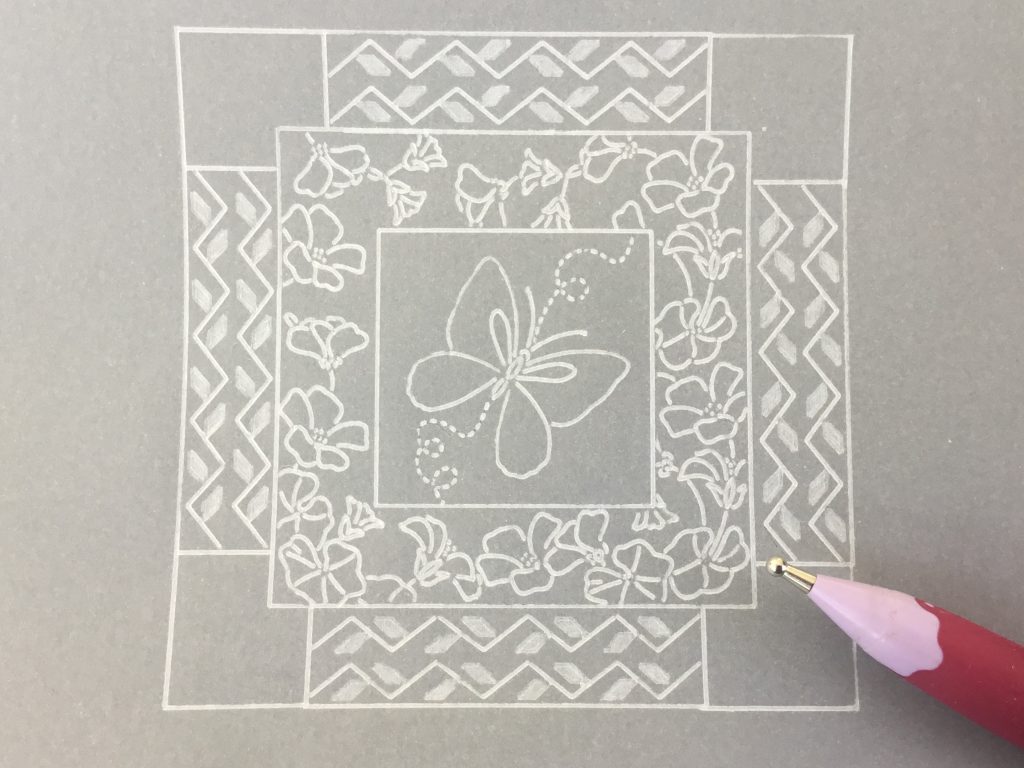
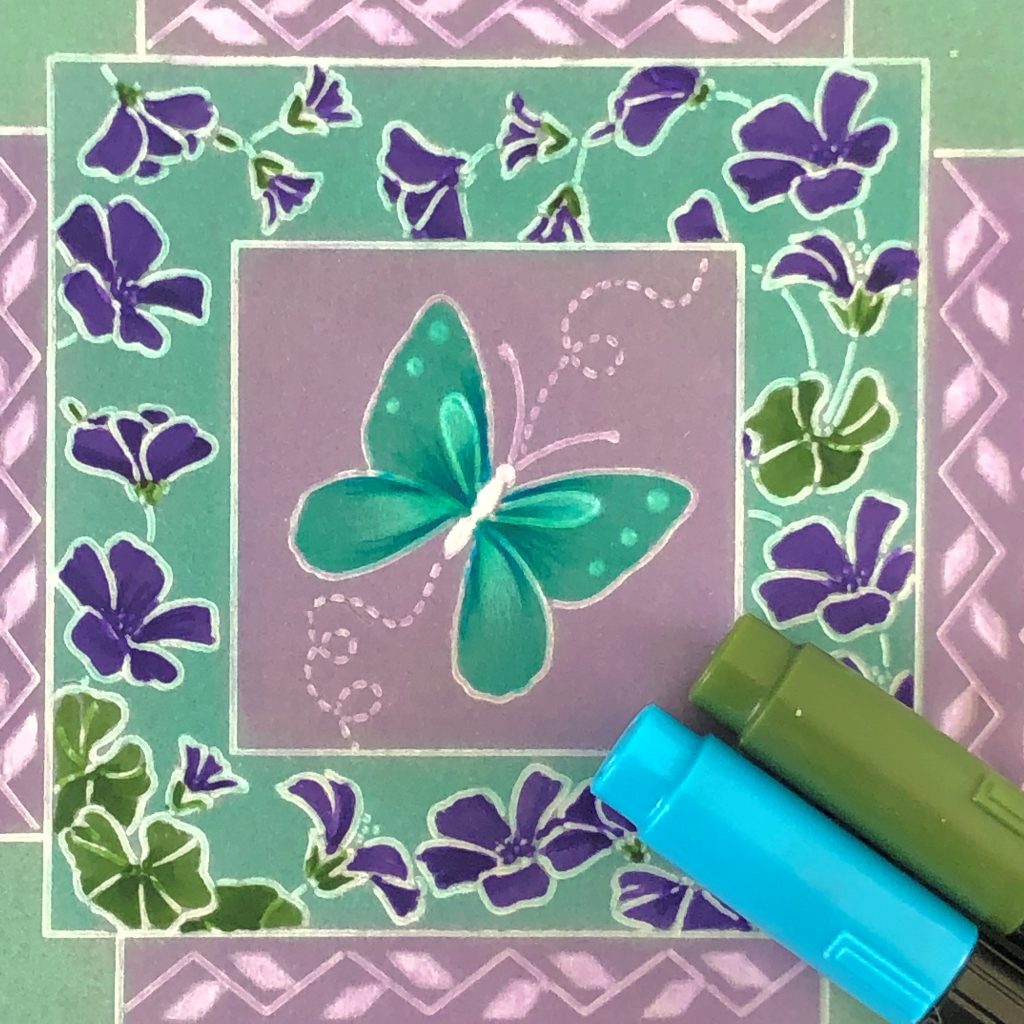
Step 9: It’s time to add colour. Place your parchment face down on a hard surface. Rub over your chosen colour in the space that you want to fill and then blend with a blending nib and Dorso oil. Do one panel at a time using a clean nib for each colour. I used Purple Violet 136, Light Phthalo Green 162 and Phthalo Green 161.

Step 10: Use the Faber Castell eraser to rub out the colour on the butterfly and flowers. I find it easier to do it this way rather than try to spread the Dorso colour around the shapes. It’s too fiddly.
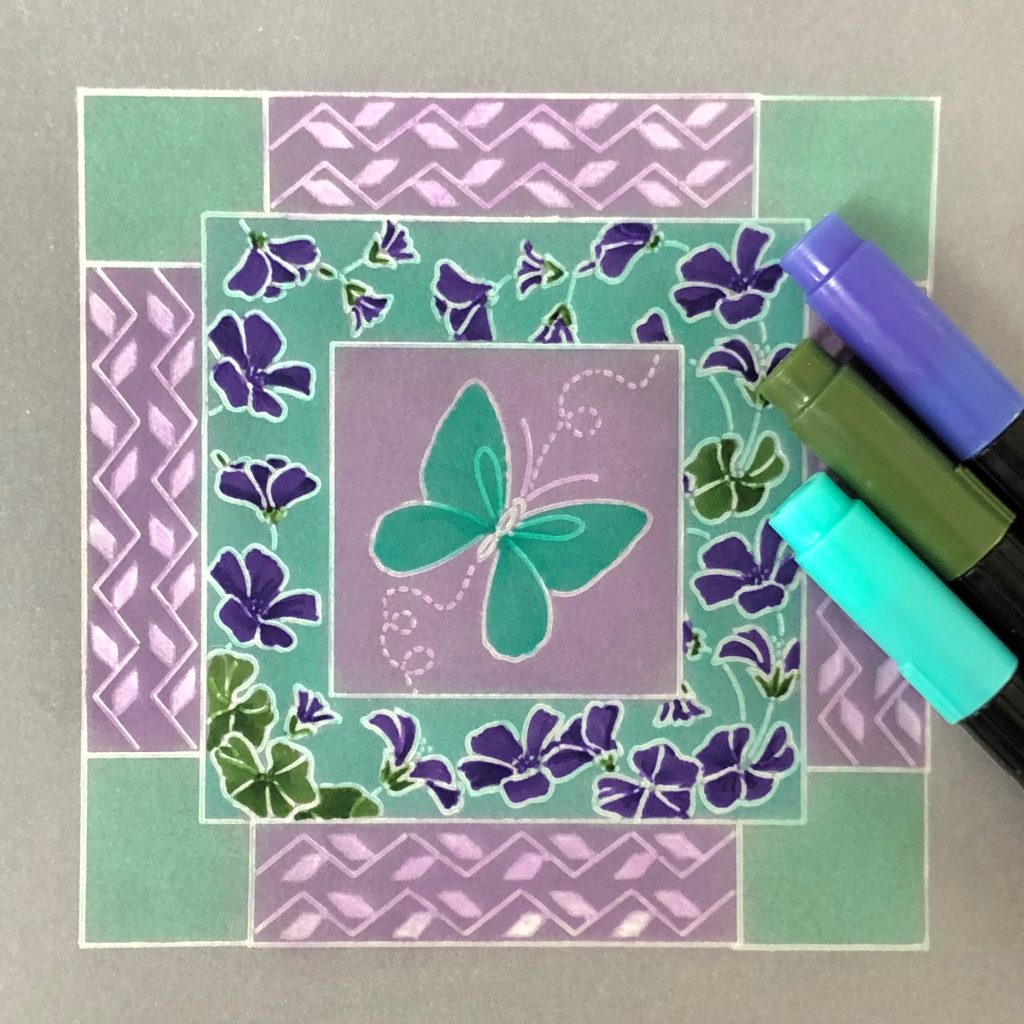
Step 11: Colour the flowers and butterfly on the back using the Perga Colours Exclusive. I used PCE 10 for the flowers, PCE 17 for the leaves and PCE 27 for the butterfly.
Step 12: Place your work back on the embossing mat, right side down. Emboss the butterfly and add detail if you want. I embossed the tear drop shapes using the 3mm ball tool followed by the 1.5mm ball tool. I also embossed the lower wings from the centre out with the same tools. Emboss three dots decreasing in size using the 1.5mm ball tool.
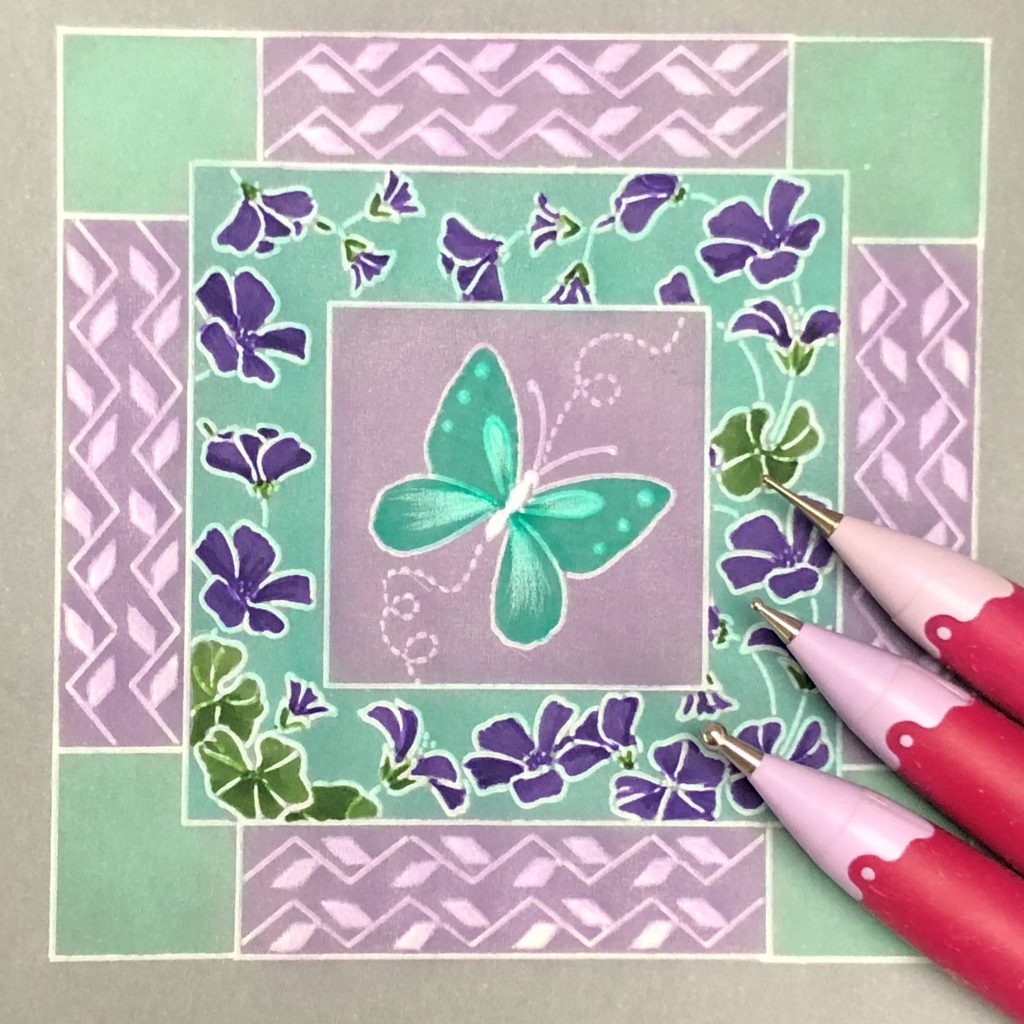
Step 13: Add some shading into the butterfly and leaves. Use PCE 27 for shading on the butterfly wings. Use the fine tip of the pen and flick the colour out from the centre. Do this lightly, do not press too hard. The aim is to get fine light lines. Use PCE 17 to add some shading on the leaves.
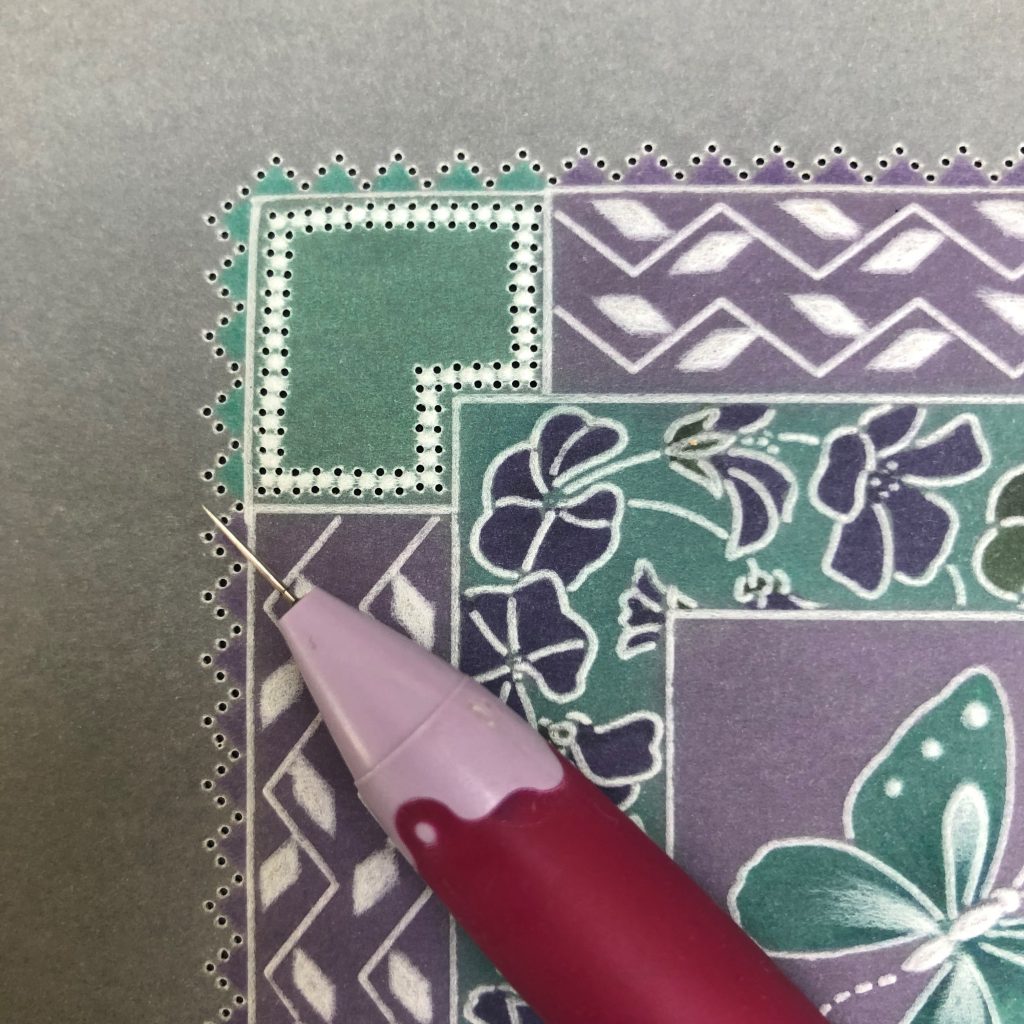
Step 14: Place the parchment right side up, onto the picot foam mat. Using the 4-needle tool, perforate shallow within the corner boxes. Place one perforation in the inner corner first and work from there. Try not to go too close to the lines. Leave this stage out if you are not confident or practice first on a spare piece of parchment. Always reinsert two of the needles in order to keep the perforations evenly spaced.
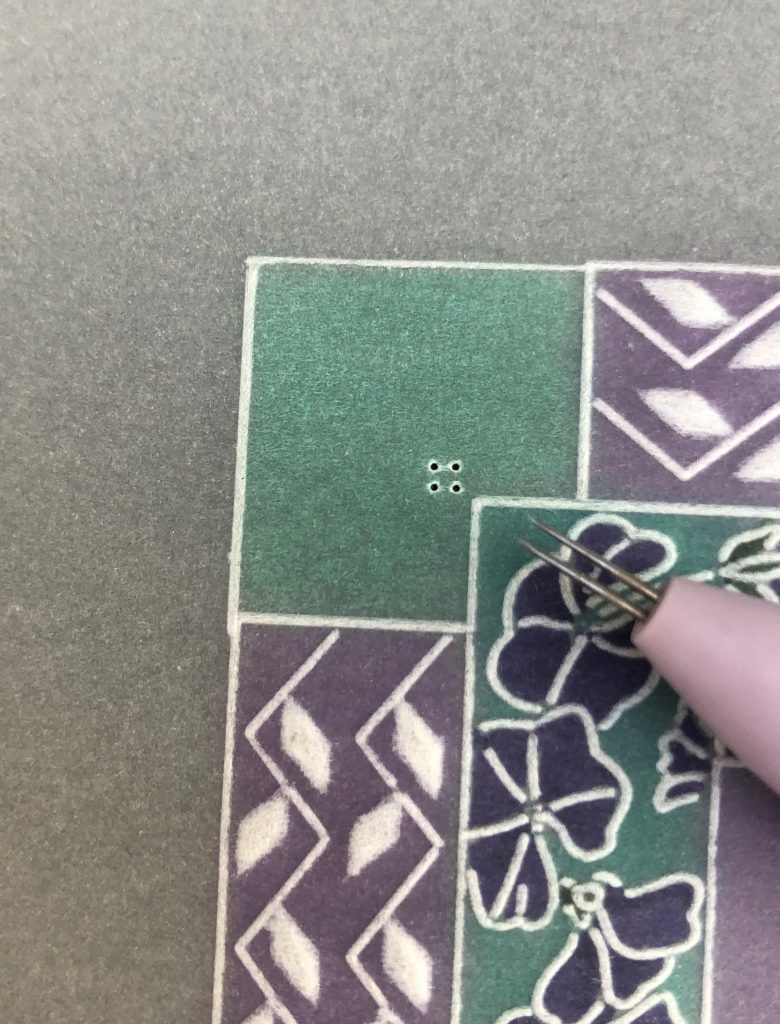
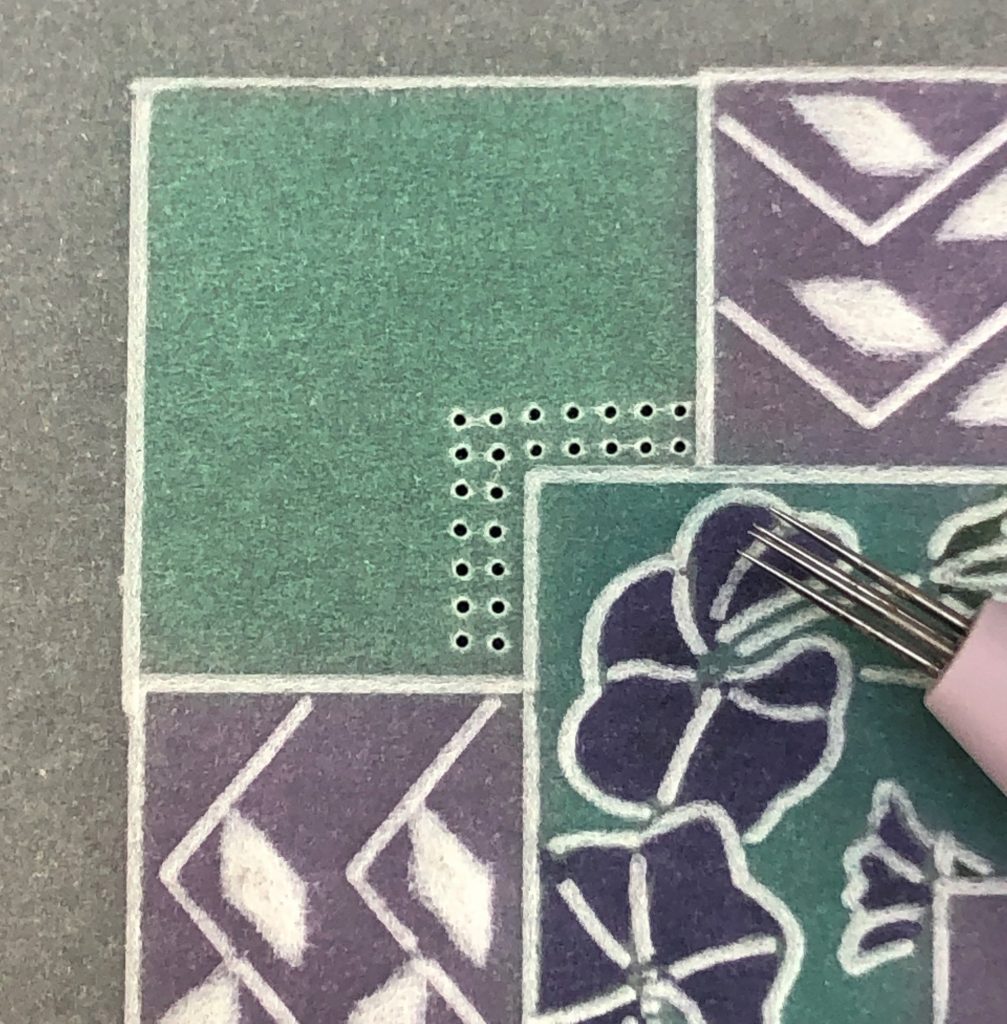
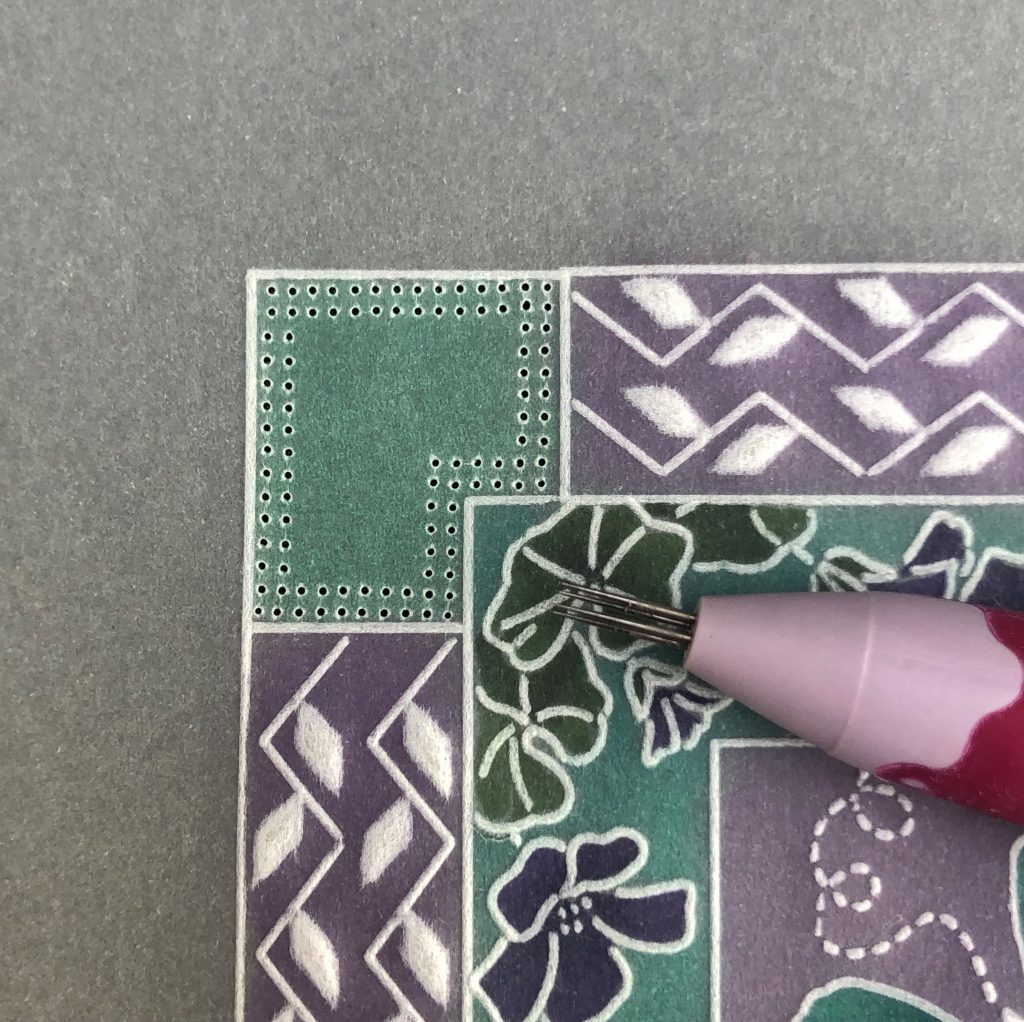
Step 15: Place the parchment back on the embossing mat, right side down. Gently emboss a dot within each 4-needle combo with the 1mm ball tool. Be very careful here, do not press too hard. Place on the super foam, right side up, and re-perforate using the 1–needle perforating tool.
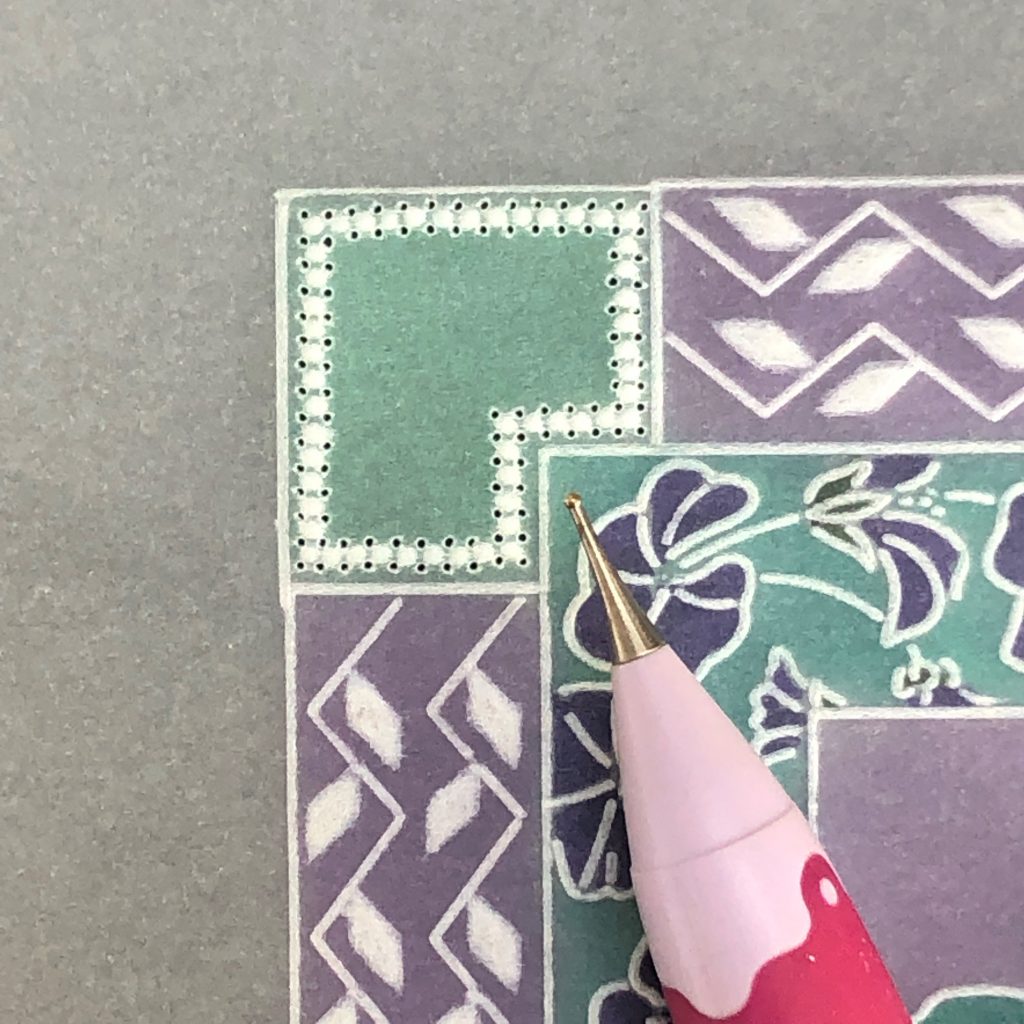
Step 16: Using the angle perforating tool, shallow perforate around the outside of your project.
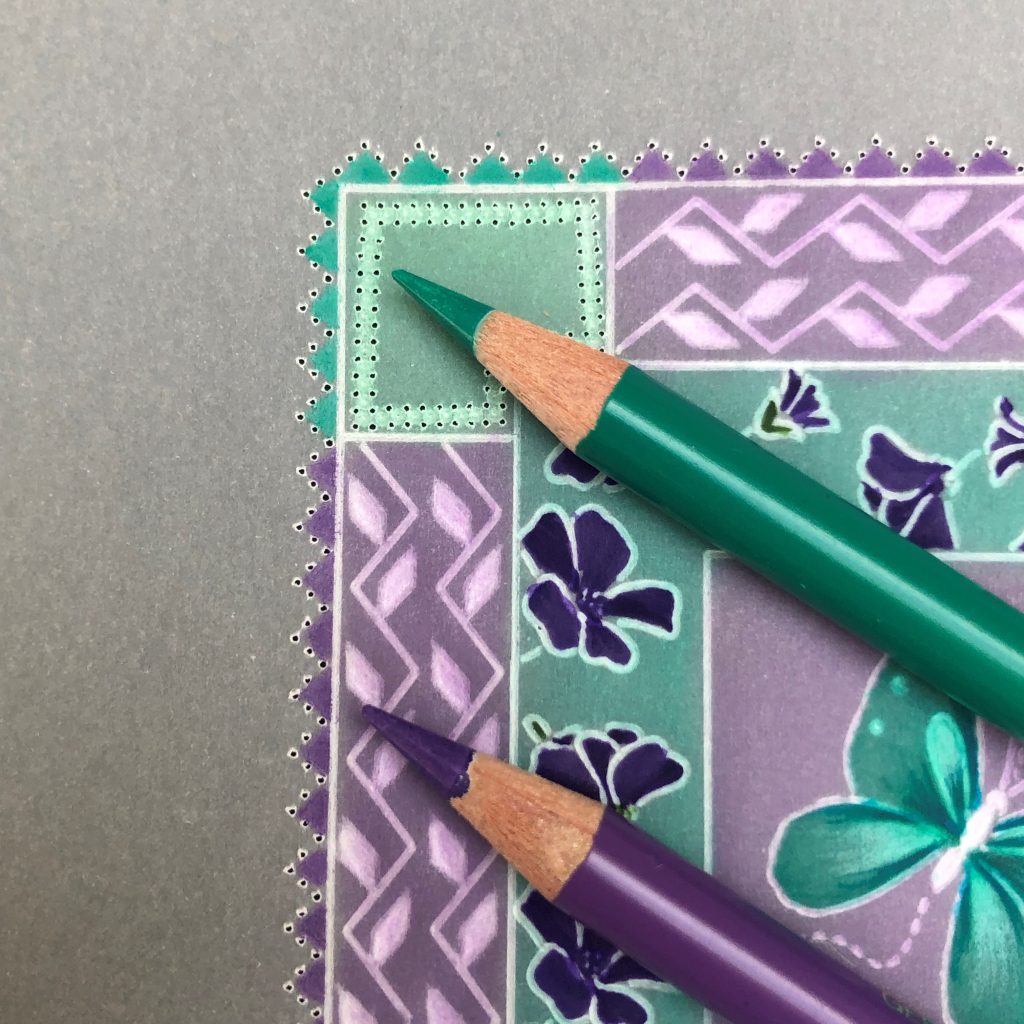
Step 17: With the Purple Violet and Phthalo Green pencils colour in the triangles. Make sure you are on a hard surface and have sharp pencils.
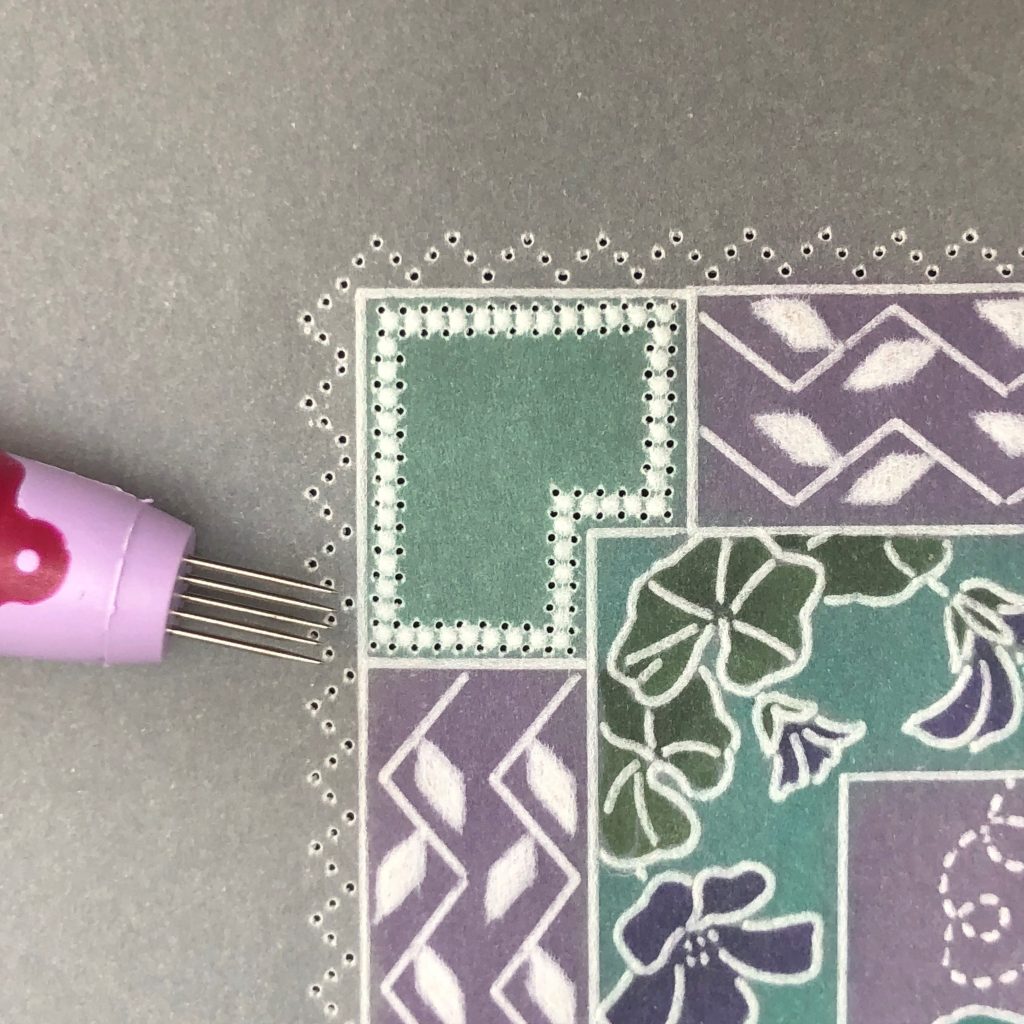
Step 18: Perforate deep with the 1-needle tool. Picot cut out around the outside border with your Pergamano scissors.
Step 19: With the Nested Square Heart Doodle Aperture Frame-Its, cut out the appropriate square out of the Lavender Fields shaded paper and white card. Stick the two together using Perga Glue. Then stick onto your card blank.
Step 20: Cut a piece of white card to measure 9.5cm x 9.5cm.
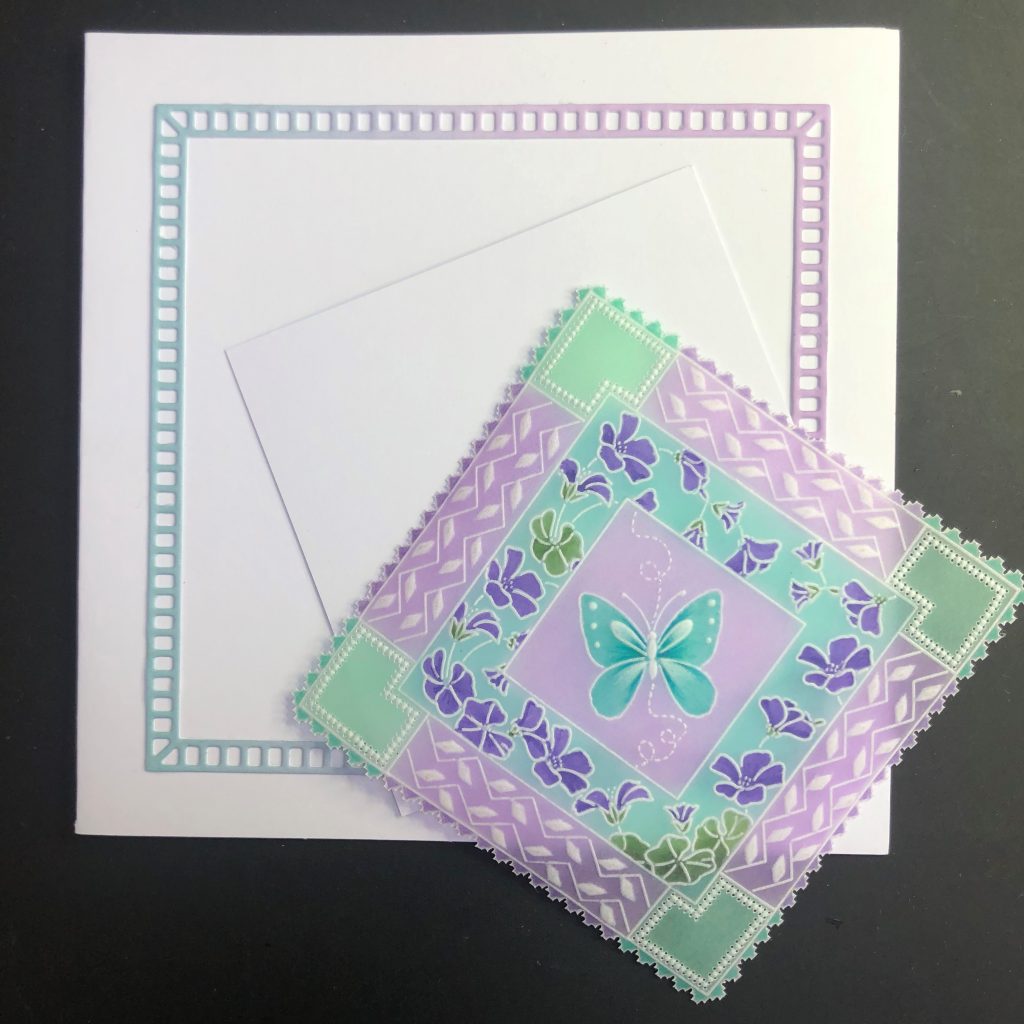
Step 21: Attach your parchment to this using the white brads. Stick onto your card blank using the tape runner.
Enjoy
Linda x
A gorgeous step-by-step project! Thank you, Linda. That’s so stunning. And actually very achievable when you break it down into steps.
Everything that Linda has used can be found HERE on the Clarity website.
Looking at the week ahead at Clarity Towers:
The summer retreats in Ditton kick off on Monday until Saturday with Mum, Paul & Jilly. Mum has some fantastic projects lined up and I know she is looking forward to meeting up with so many friends, old and new.
Fear not if you are unable to attend, the lovely Leonie and Tina will be bringing you some amazing shows on Create and Craft:
Wednesday, August 17th:
Let Leonie Loose on Create and Craft – 11am & 3pm
Thursday, August 18th:
The Pergamano Show with Paul on Create and Craft – 11am & 3pm
Saturday, August 20th:
Get Groovi with Tina on Create and Craft – 1pm & 5pm
Right, we’re off to enjoy the rest of the weekend. I hope you do the same!
Travel gently, friends.
Lotsa love, Grace & Linda xoxo
Clarity – The Home of Art, Craft, and Well-Being.
That looks a great project, thank you Linda. On the list of ingredients it says you can get everything on the website but the white brads are still out of stock after several months. Will they be coming back?
We’re working on their restock at the moment! Hopefully very soon, Linda!
Thank you Grace. Sorry I had to ask as I know its busy at Clarity Towers, it seemed strange we could get the others but not the white. Nearly all the projects seemed to say white. Thanks again for the info
Thats a really beautiful project thank you for the wonderful inspiration 💖
Hi Grace, another great project from Linda. With the fantastic step by step guide it is so achievable even when you first look at it & think it is far too complex. I have the plates but they are at home so it will have to wait, meanwhile I have brought last weeks project with me to do today or tomorrow evening. I think it is Tina that is doing the show on Thursday as Paul will be at Ditton unless perhaps they have cloned him !!
Thanks Linda for sharing this weeks project.
Another warm day here so stay safe & cool & have a good week everyone x
Beautiful project from a talented lady. I still have some Permigano magazines which feature designs by Linda pre Groovi which I often turn to.
This looks a lovely project. Thank you Linda. Will definitely give it a go. Have a lovely weekend everyone and keep safe and cool.
Thank you Linda for a fabulous and what looks like an easily achievable project. Hope everyone has a good week xx
Thank you so much Grace and Linda. Something to ease the pain of not being able to go to the retreats, and keep us focused! Enjoy your weekend whatever you are doing.xx
What a fabulous tutorial and a stunning colour combination. Thank you Linda, I shall definitely be giving it a try.
Sorry for not commenting on yesterday’s blog Grace, but I didn’t get the chance to look. The cards you included were gorgeous and well done to all those whose work was chosen. X
Thank you Grace for putting together another fabulous blog and also to Linda for giving us this lovely project and excellent tutorial. It shows just how achievable it is when it’s broken down into stages.
If anyone has a go please share it to Groovi worldwide and tag Claritystamp into it too.
Lots of love
Jane x
This is so pretty, thank you Linda and Grace. Enjoy the rest of the weekend. xx
Great easy to follow steps by Linda. What a great teacher she is! And thanks Grace, for such uplifting blogs! X
GREAT PROJECT!!! I realy like these because there is so much scope!!!