Clarity’s Matters Blog Tutorial: How To Pattern Build with Groovi
Hello hello! Grace here.
Happy Sunday! Back in the crafty mood today. We hope you are too! Surely Sundays are the best day for it.
Especially when there are top-notch demonstrations going on! Don’t forget Barb’s last tv show of 2022! This afternoon from 3-5pm on Create and Craft.
Create and Craft – Sky 683, Virgin 748, Freesat 813, Freeview 85
And more crafty (and free!) tutoring here. The super talent, Glynis Whitehead, has kindly put together a festive step-by-step project for us. I’ll hand you right over to Glynis…

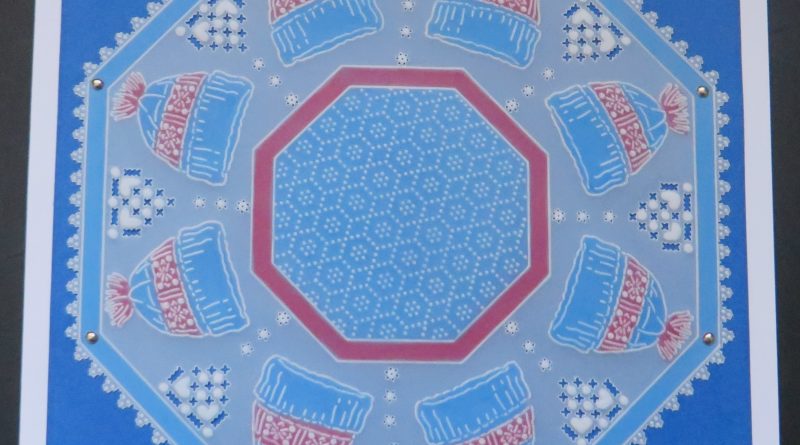
Be Cosy and Warm with a Woolly Hat!
Ingredients
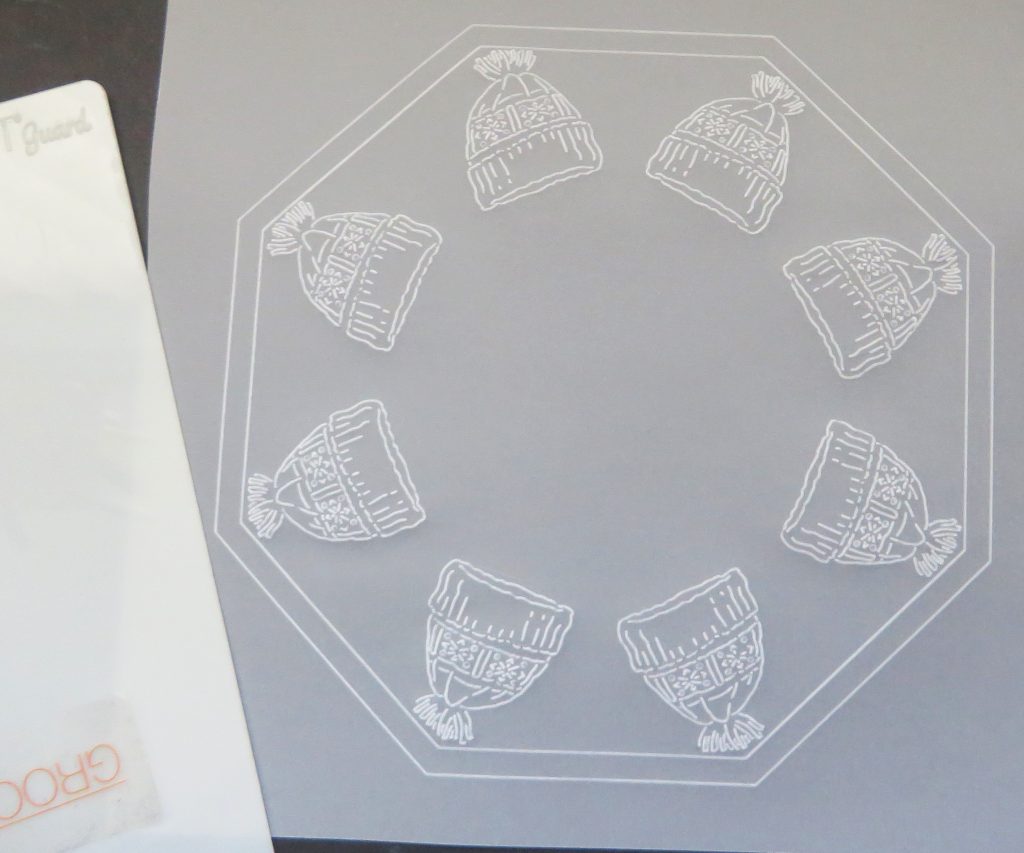
Christmas Jumper A5 Plate (GRO-CH-41914-04)
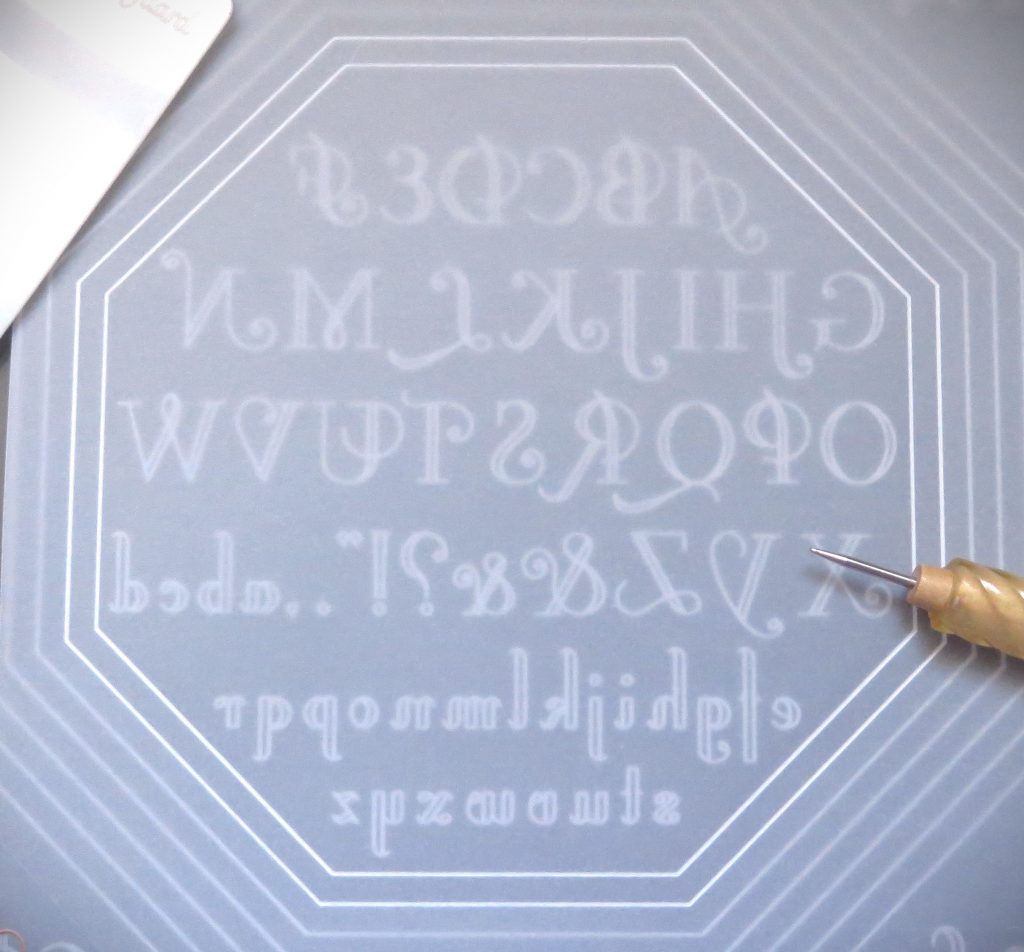
Octagon Extension & Art Deco Alphabet A4 Sq Plate (GRO-PA-40552-15)
Nested Octagons A5 Sq Plate (GRO-PA-40119-03)
Josie’s Diagonal Embossed Patterns 2 A4 Sq Plate (GRO-GG-41793-24)
Diagonal Pattern No 1 Groovi Border Piercing Grid (GRO-GG-40354-14)
Pergamano Multi-Needle Tools Book Vol 1 by Linda Williams (PER-BO-70291-XX)
Plain Parchment (GRO-AC-40024-A4)
Perga Liner Pencils (B) (PER-CO-70063-XX)
Polychromos Colour Pencils (ACC-PE-30797-XX)
Pergamano Embossing Tools:
1 Needle Fine (PER-TO-70035-XX)
4 Needle Fine (PER-TO-70036-XX)
Five in a Circle (PER-TO-70025-XX)
Flower (PER-TO-70018-XX)
Picot V Small (PER-TO-70281-XX)
Groovi Embossing tools:
Groovi Starter Kit number 1 (GRO-AC-40026-XX)
1.5mm Tool (PER-TO-70004-XX)
3mm Tool (PER-TO-70005-XX)
Method
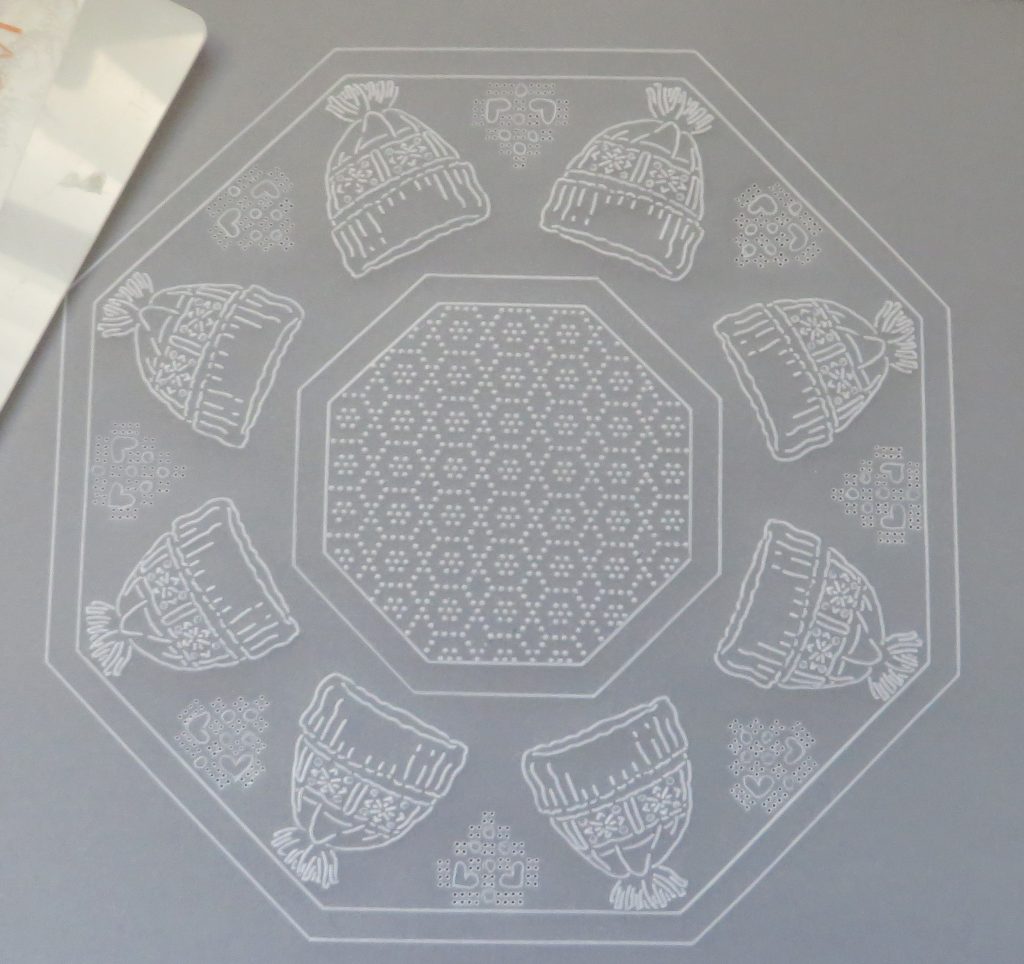
Step 1. Line up the parchment onto the A4 Square Nested Octagon plate and using the number 1 tool, emboss the first and second lines from the centre of the plate.
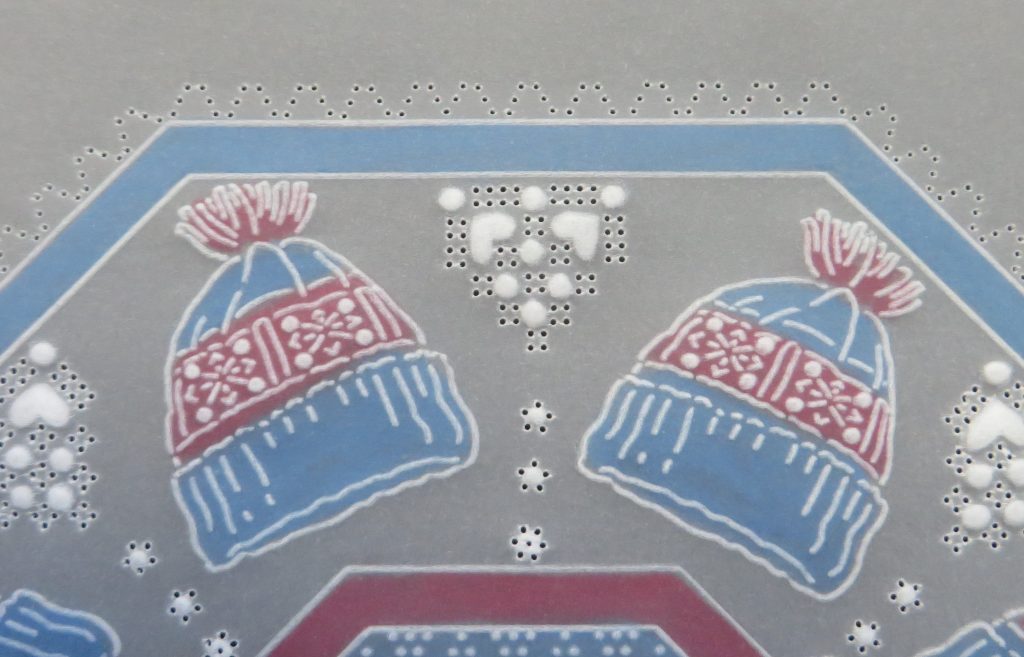
Step 2. Trim off the excess parchment to save for future projects. Line up the parchment so that the tassels of the hat fit into each corner of the octagon. Turn the parchment so that a hat fits into every corner.
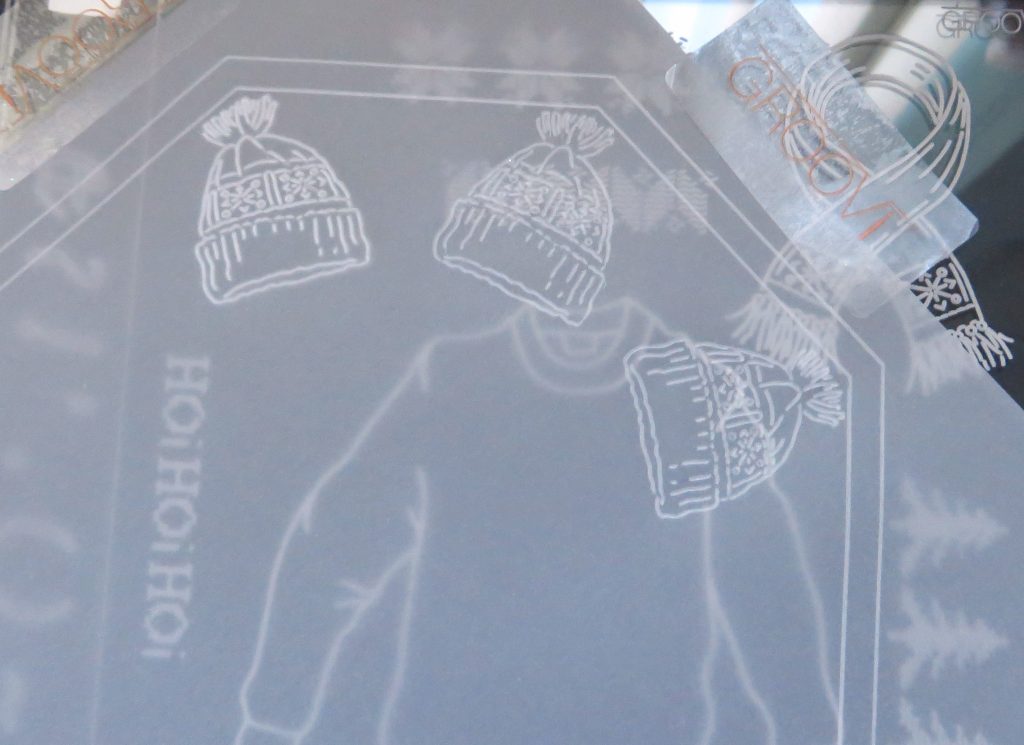
Step 3. Be careful to line the hats up so that they are as near equally distanced as possible.
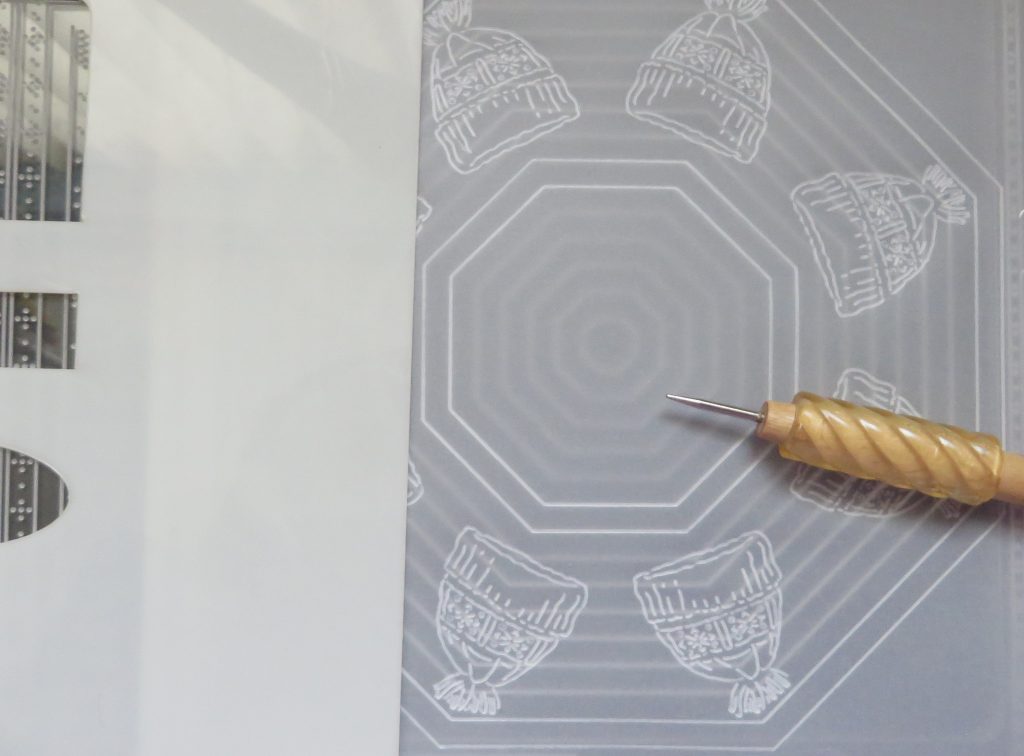
Step 4. Attach the parchment over the A5 square octagon plate, so that the hats make a circular gap in the middle. Emboss the 6th and 7th line out from the centre.
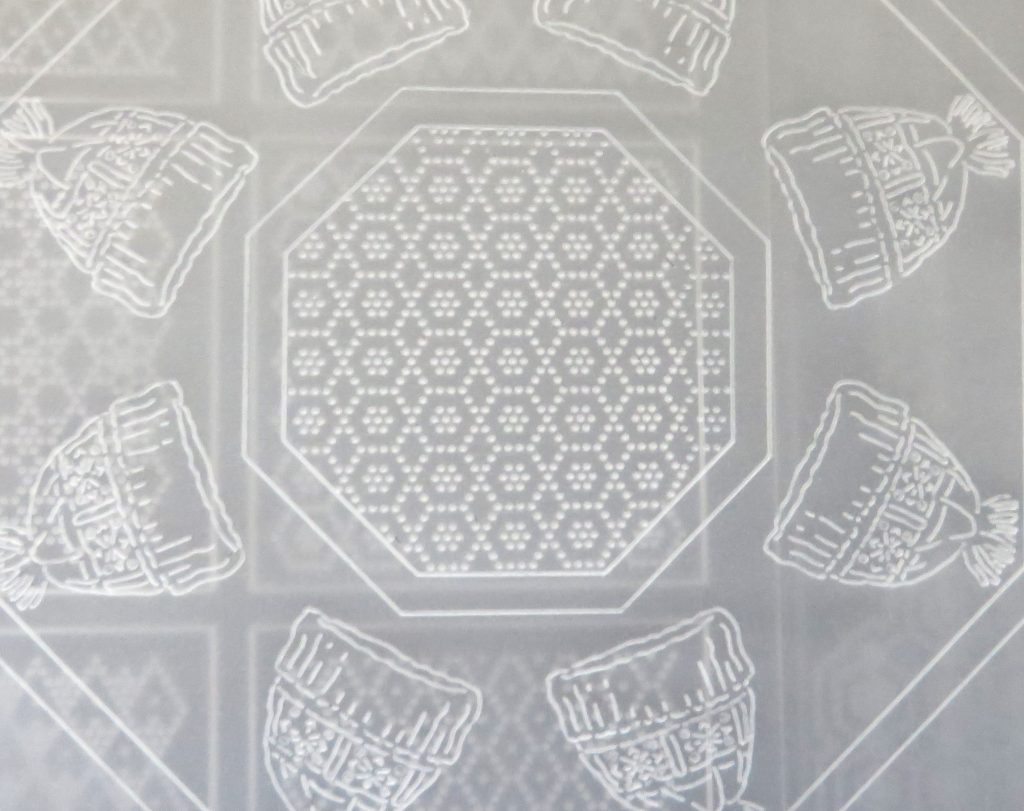
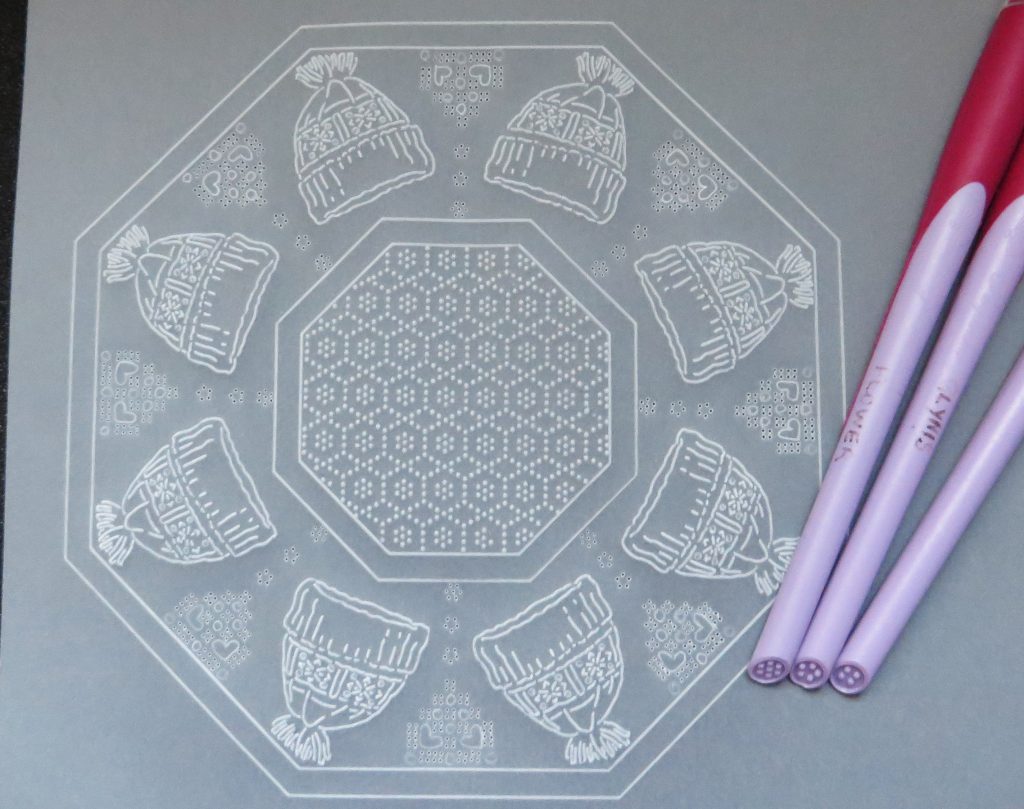
Step 5. Now attach the parchment to the grid sampler plate. Choose the pattern you like best and align the pattern so that it fits into the octagon shape. Do not worry if the pattern does not fill the space, the pattern tessellates, so you can move it along and re-align it. You can leave this space free for a nice sentiment, if you wish to.
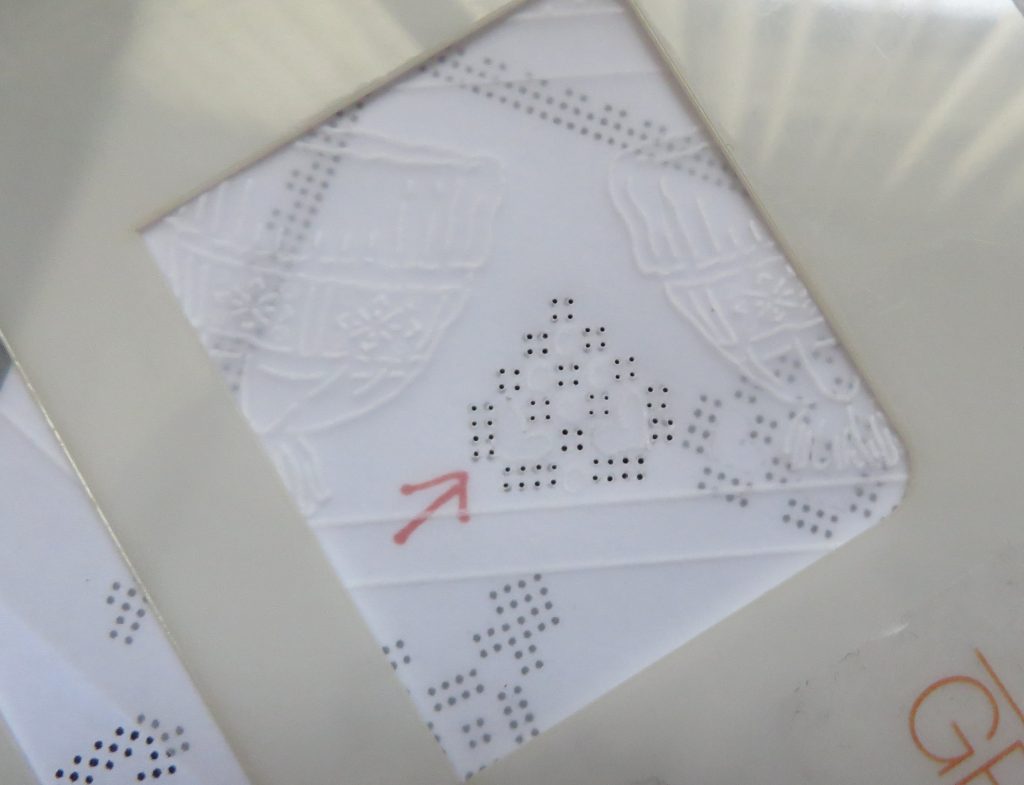
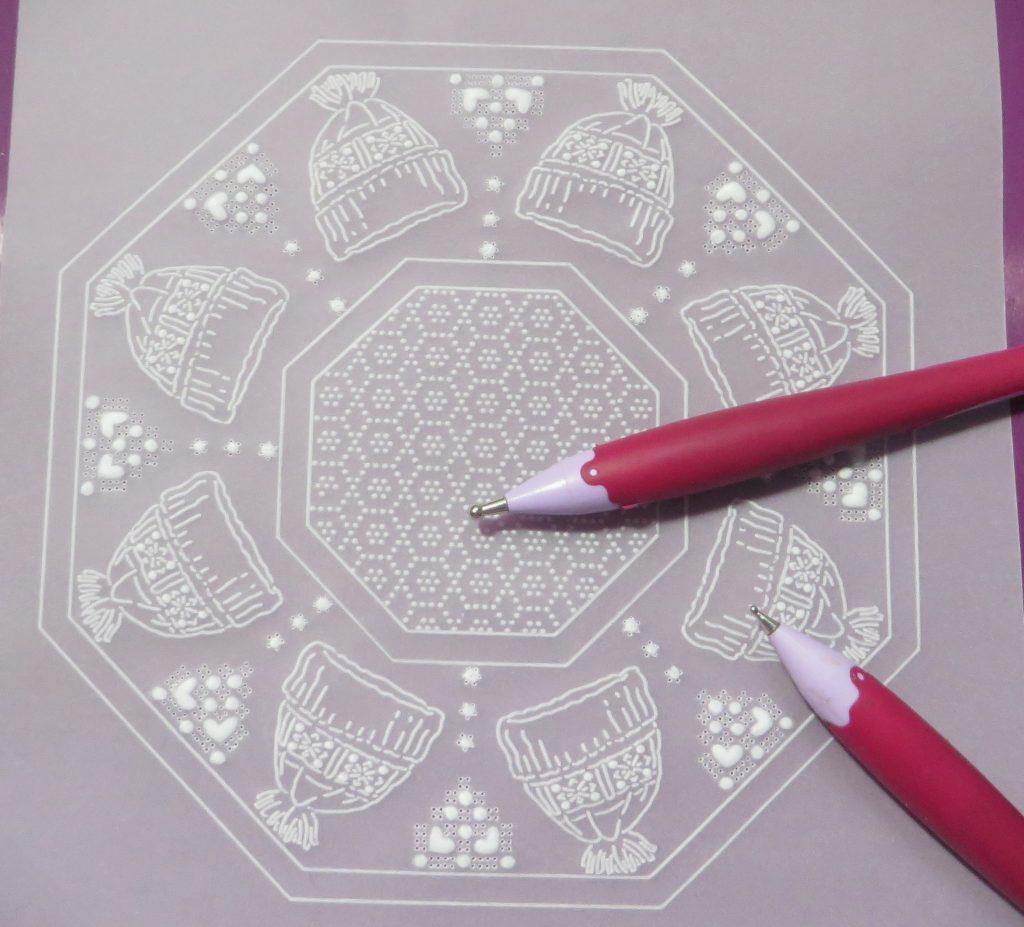
Step 6. The needle tool pattern used between the hats comes from the multi-needle tool book (page 21). I have marked the pattern used with a red pen. Photocopy the page, then lay the pattern onto picot foam and shallow perforate through the parchment and the pattern, matching the needles of the 4 needle tool to the dots underneath. You can draw the hearts and dots afterwards or use a white pencil to trace them from the pattern.
Step 7. Repeat this another 7 times, between the hats.
Step 8. Use the flower perforating tool to shallow perforate near the centre octagonal border. Place them halfway along, and then add two 5-in-a-circle perforations between the flower and the four-needle pattern.
Step 9. Emboss the hearts and dots within the four-needle pattern, around the centre hole of the flower and a dot into the middle of the 5 in a circle pattern. You also need to emboss the tiny dots in the woolly hat.
TOP TIP: Don’t forget to emboss in layers, especially the heart shapes.
Step 10. Deeply perforate the needle patterns using the fine one-needle tool. It is much easier this way, rather than trying to relocate multiple needles. Then it is time to add your colours. Apply pencil to the back of the work (your chosen colours) and then blend them out using Dorso oil and blending nibs.
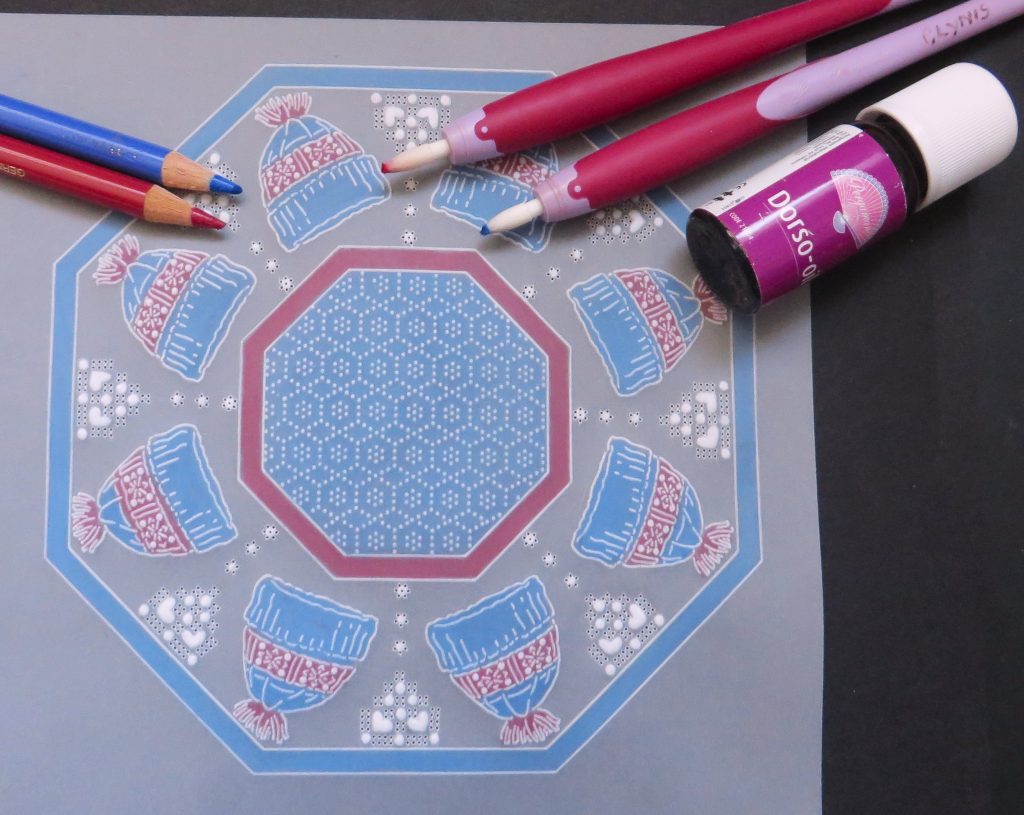
Step 11. Go around the edges, shallow perforating, with the Picot V Small perforating tool. Start at each corner, working your way to the middle of that section, spacing them out to fit in. See the picture of the finished version at this stage.
Step 1`2. Working on the back, use the diagonal border grid (you can use any diagonal Groovi grid that has a triangle of 3 dots) and you can emboss into each shallowly perforating picot.
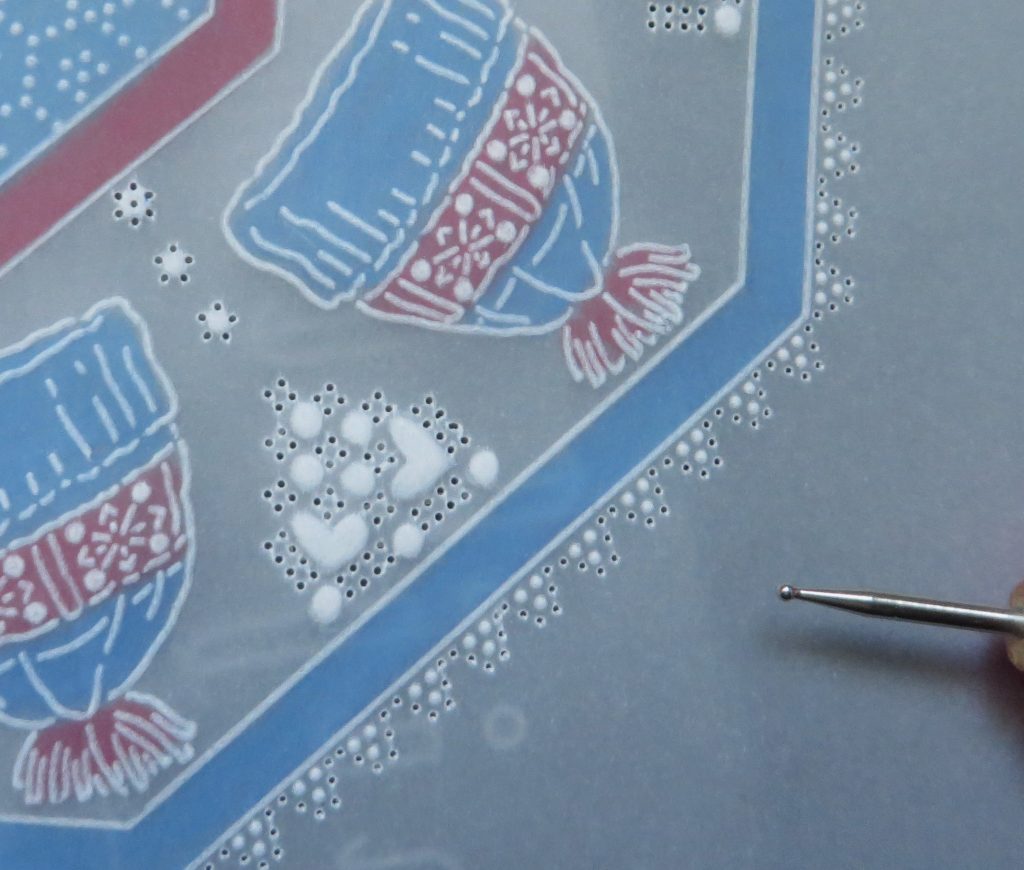
Step 13. Deeply perforate all the picots and then snip out the work. Also snip all the crosses and slots within the tool work. The piece is now ready for matting and layering onto your chosen backing paper OF 6.5 x 6.5 inches, and card blank, 7 x 7 inches. You’re all done!
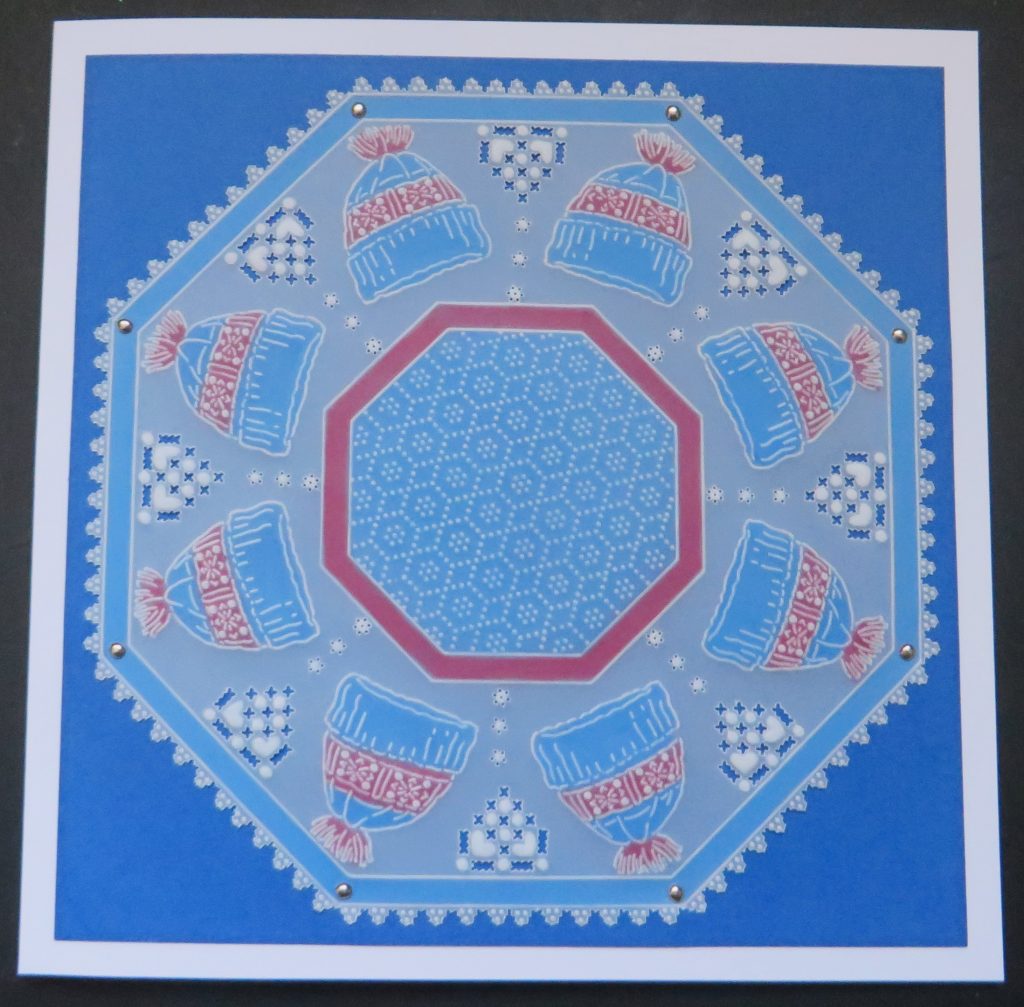
Thank you so much, Glynis. That’s such a lovely festive card! It makes me smile. I’ve certainly been wearing my woolly hats every time I leave the house now! It is CHILLY in New York.
We’d love to see your versions of this fab project (and any of the projects!). Please share your work on Groovi Worldwide and/or email it to me at grace@claritystamp.com
Everything that Glynis has used can be found on the Clarity website HERE and don’t forget that we have our Annual Gnome Hunt, so why not join the fun and see if you can find where they are hiding each day – click HERE for more information and to see the previous clues

Looking at the week ahead
Sunday 4th Dec:
Clarity Classics with Barbara on Create and Craft at 3pm-5pm
Monday 5th Dec:
SHAC Shack with Barbara – 10am Live on Facebook and YouTube
Tuesday 6th Dec:
Groovi Tuesday with Paul – 10am Live on Facebook and YouTube
Wednesday 7th Dec:
One Day Special with Paul on Create and Craft at 6pm and 9pm
Thursday 8th Dec:
One Day Special with Paul on Create and Craft at 10am and 2pm
Thursday 8th Dec:
SHAC Shack with Barbara – 10am Live on Facebook and YouTube
Travel gently, friends.
Lotsa love, Grace & Glynis xoxo
Clarity – The Home of Art, Craft, and Well-Being.
Great project mixing traditional and Groovi!!! Good for advancing your skills!!! Thank you!!!
Great project using some of the different Pergamano tools, for those new to all this the shopping list should read Pergamano perforating tools not embossing tools. A project for the New Year I think as I have made all my large cards for this year. In fact I need to see if I can downsize it to a 6 x 6 as the larger cards need a large letter stamp or just give it someone I can deliver to by hand. It will be a good start to next years cards as I always intend to start early but still find myself rushing at the end of November.
Thanks Glynis & Grace for sharing this project with us – it must take hours to work out where everything will fit on the parchment.
Off to get my jobs done so I can sit down & watch Barbara this afternoon
Stay safe & warm everyone x
Great project, thank you ! X
Great step by step, lovely card. Thank you. x
Thank you for another wonderful tutorial
Love Seta Xx