Clarity’s Blog Tutorial: How To Create A Fancy Frame
Hello hello! Grace here.
I hope you’re enjoying your Sunday morning.
We’re joined today by the brilliant Maggie Byford. She has prepared a terrific step-by-step project for us, to show how to create a brilliant frame. I’ll hand you right over! 🙂

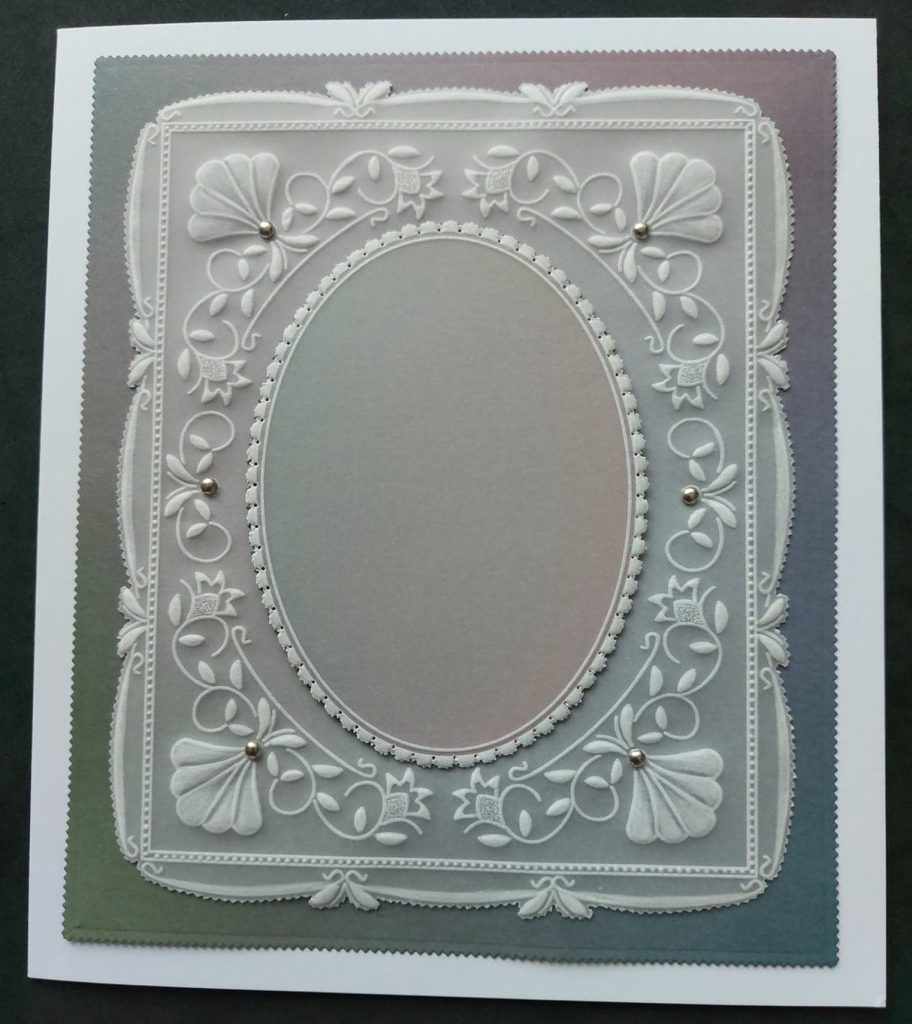
A FANCY FRAME FOR YOUR MINIATURE ARTWORK
This Groovi card involves the creative use of a single design from the Lace Corners Border Plate. The step-by-step project shows how to make a fancy outer border, fancy inner corners and somewhere specific to place your brads! It also has a pretty 3D oval centrepiece on which you can create your very own miniature work of art. Here’s what you’ll need…
INGREDIENTS
Groovi A5 Clear Parchment Paper (20 sheets) (GRO-AC-40020-XX)
Groovi Sticker Tabs x16 (GRO-AC-40437-XX)
A5 Black Super Foam (GRO-AC-41765-XX)
A4 Picot Cut Foam (GRO-AC-40625-XX)
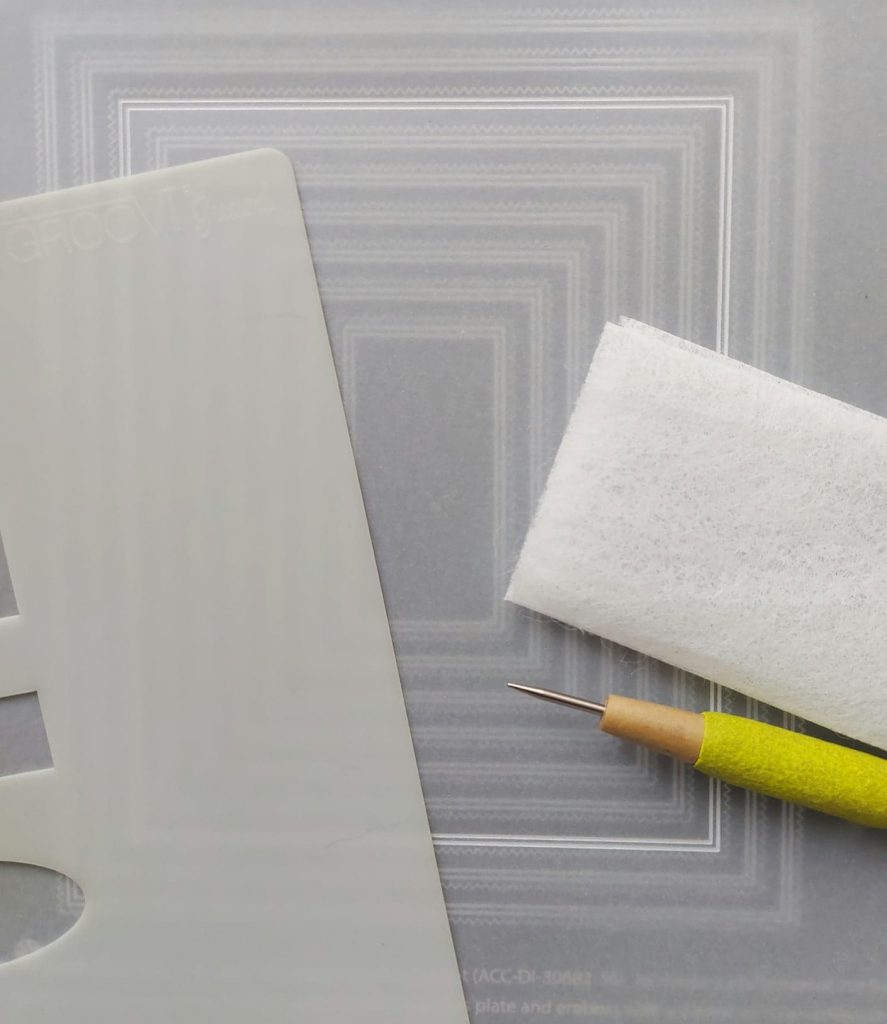
Pergamano Excellent Embossing Mat (PER-AC-70075-XX)
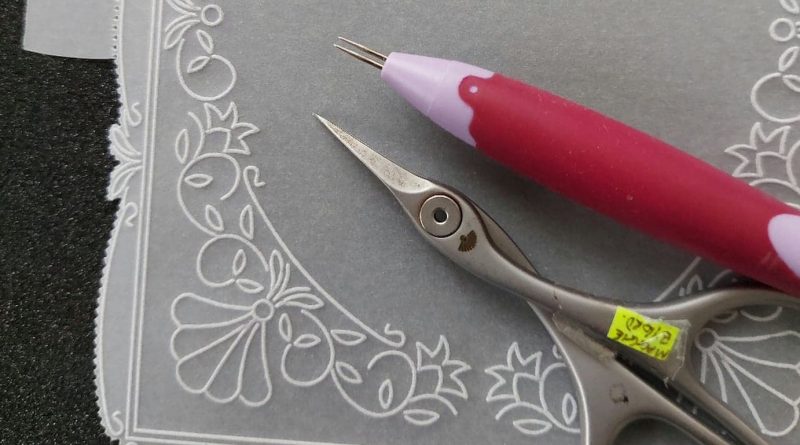
Ringlock Scissors (PER-TO-70041-XX)
Groovi 1&2 Tool – 0.8mm-1.3mm (GRO-AC-40026-XX)
or Pergamano 1mm Ball Tool (PER-TO-70012-XX)
Pergamano 3mm Ball Tool (PER-TO-70005-XX) (currently out of stock)
Pergamano 1-Needle Fine Perforating Tool (PER-TO-70035-XX) (currently out of stock)
Pergamano 1-Needle Bold Perforating Tool (PER-TO-70028-XX)
Pergamano 2-Needle Bold Perforating Tool (PER-TO-70279-XX)
Pergamano Semi Circle Mini Perforating Tool (PER-TO-70034-XX)
Lace Corners Groovi Border Plate (GRO-PA-40126-09)
Art Deco Alphabet Groovi Border Plate Mate (GRO-MA-40348-13)
Nested Rectangles Picot Cut A4 Square Groovi Plate (GRO-PA-41067-15)
Nested Rectangles Die Set Clarity Fresh Cut Dies (ACC-DI-30631-56) (optional)
Nested Ovals Picot Cut A4 Square Groovi Plate (GRO-PA-41068-15)
Nested Ovals Picot Cut Die Set Clarity Fresh Cut Dies (ACC-DI-30681-56)
Pergamano Brads Bundle (PER-70433-XX)
Rainbow River Designer Paper (ACC-CA-30539-88) optional
Pergamano Perga Glue (PER-AC-70133-XX)
Ruler and a pencil
Small piece of fine sandpaper or mountboard (optional)
Method
Step 1. Attach a sheet of plain parchment to the Nested Rectangles Picot Cut plate. Wipe a dry tumble dryer sheet across the surface to make embossing easier, and use the Groovi number 1 tool to emboss the third double outline from the outside of the plate.
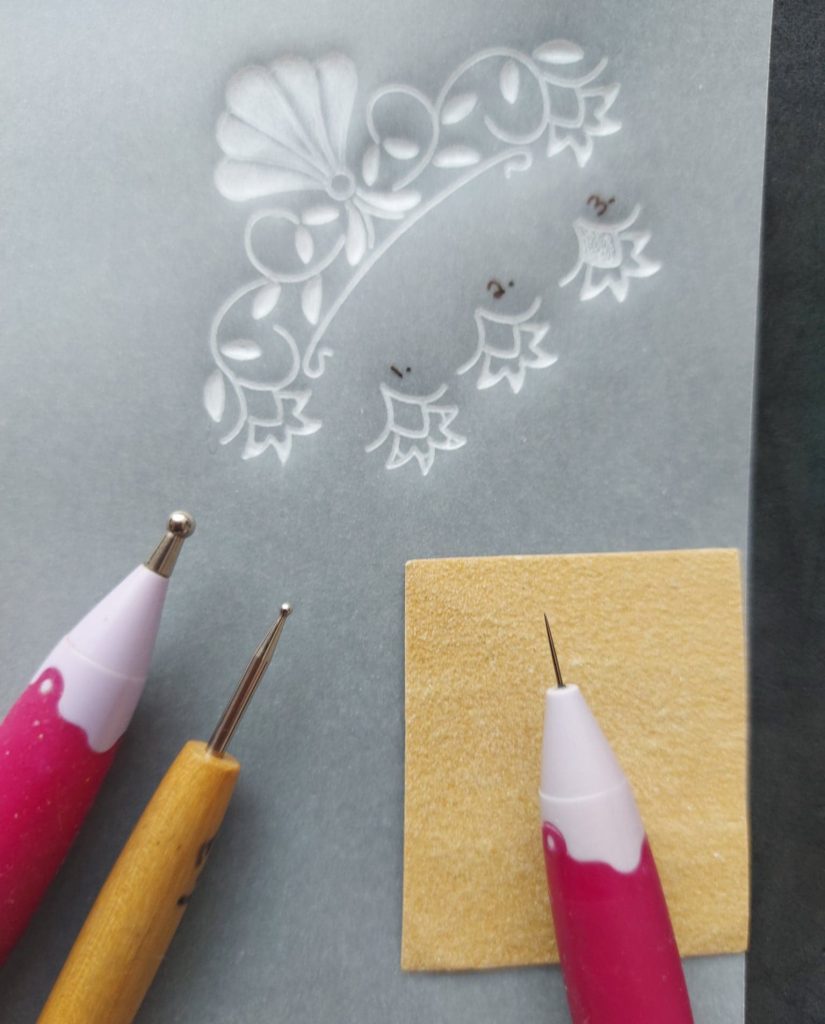
Step 2. Referring to the next picture (which shows the 5 elements of the floral corner image we’ll now be working with) use the Lace Corners Border Plate to emboss element A in each of the 4 corners of your parchment. Make sure not to place the design too far into the corners.
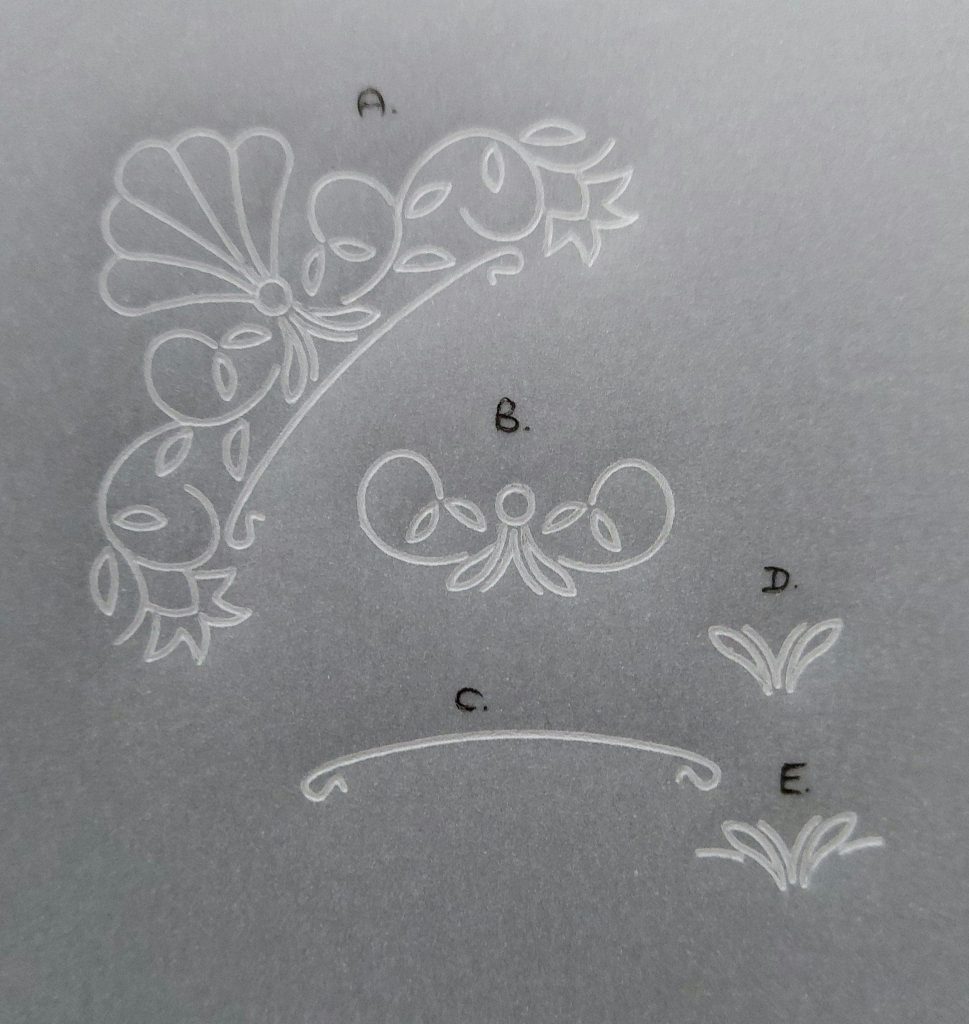
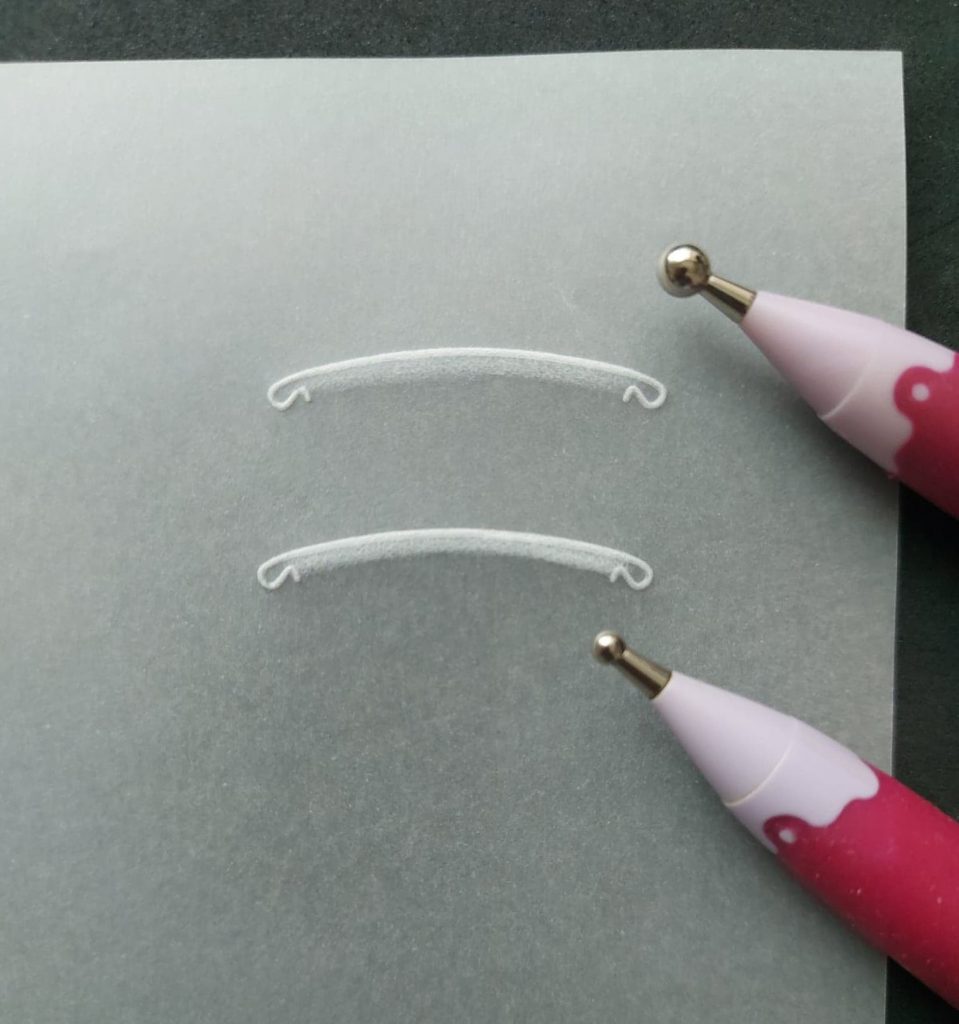
Step 3. Emboss element B in the left and right side gaps of the floral frame.
Step 4. Emboss element C along the outside edges of the long and short sides of the rectangle frame, positioned as shown in the picture.
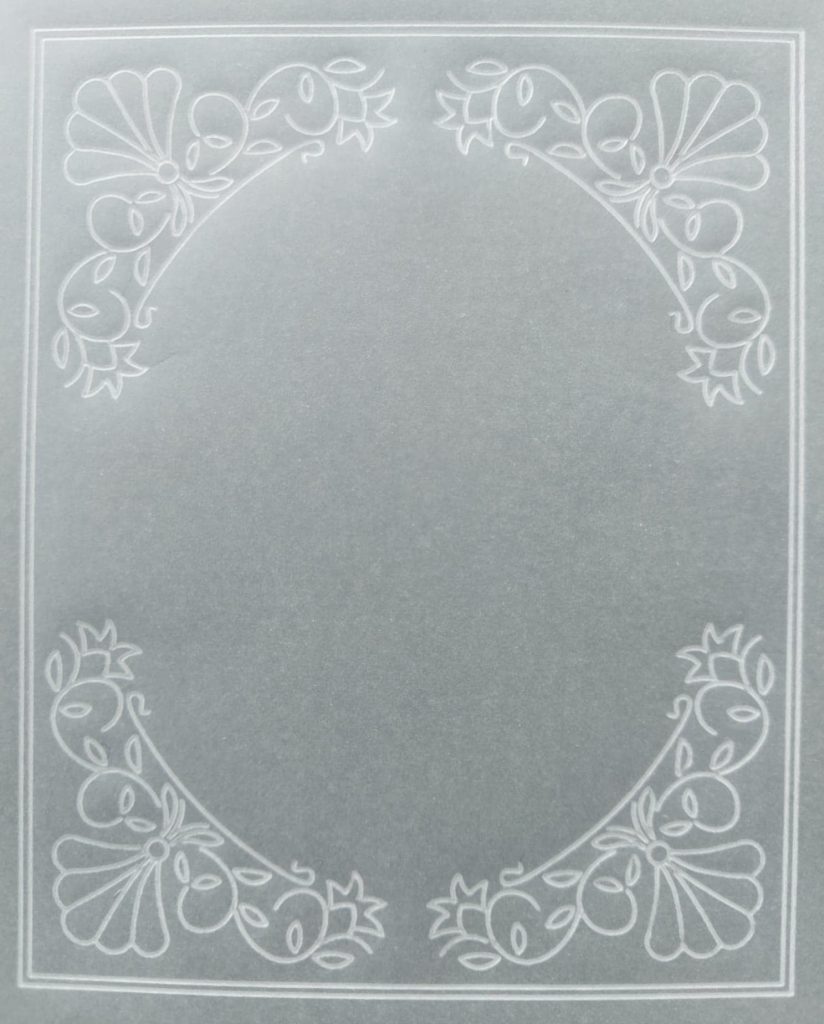
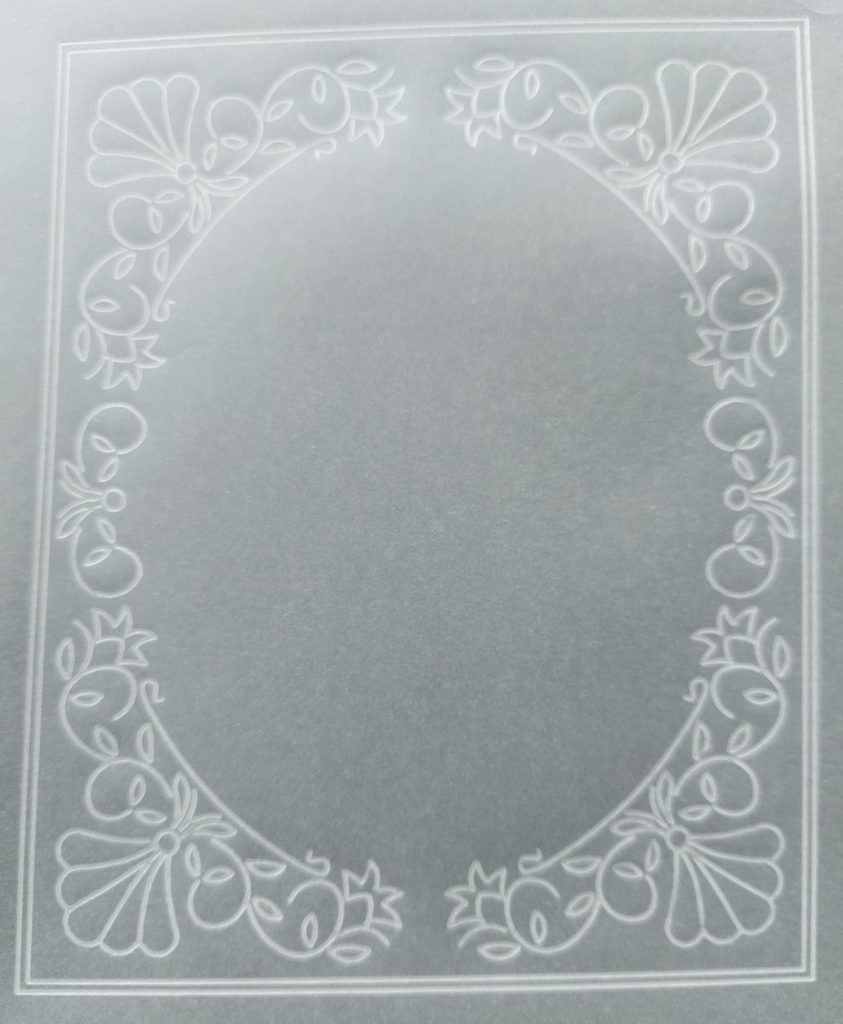
Step 5. On the 2 short sides of the rectangle frame, emboss element D in-between element C; on the 2 long sides emboss element E in-between element C. Your finished line art should look like this.

Step 6. On the back of your parchment, use embossing tools Number 3 and Groovi number 2 to add white work to the flowers and petals. To emboss the tips of the 2 x pointed leaves follow steps 1, 2 and 3 from the picture below.

Step 7. Stippling: You may note that there is also some stippling on the bases of the pointed leaves. To stipple place the particular image on your parchment face down over a piece of fine sandpaper or cardboard. Hold the Fine 1-Needle tool upright and use a gentle but firm hammering action to stipple tiny holes as close together as you can within the area as shown in the same photo below.
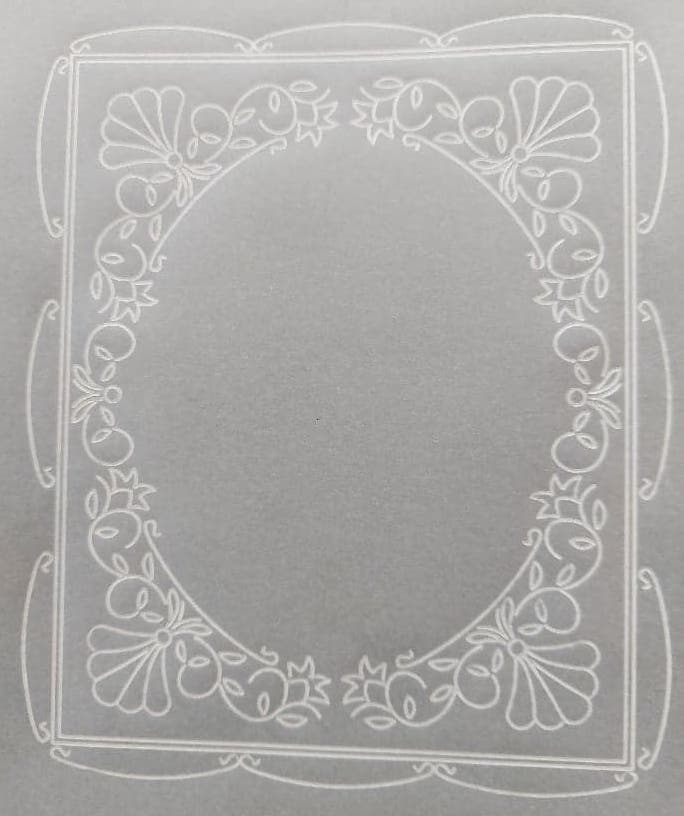
Step 8. Use the 4.5mm embossing tool to emboss a shadow line underneath element C in the outer frame. Then emboss over it a second time with the Number 3 tool to whiten.
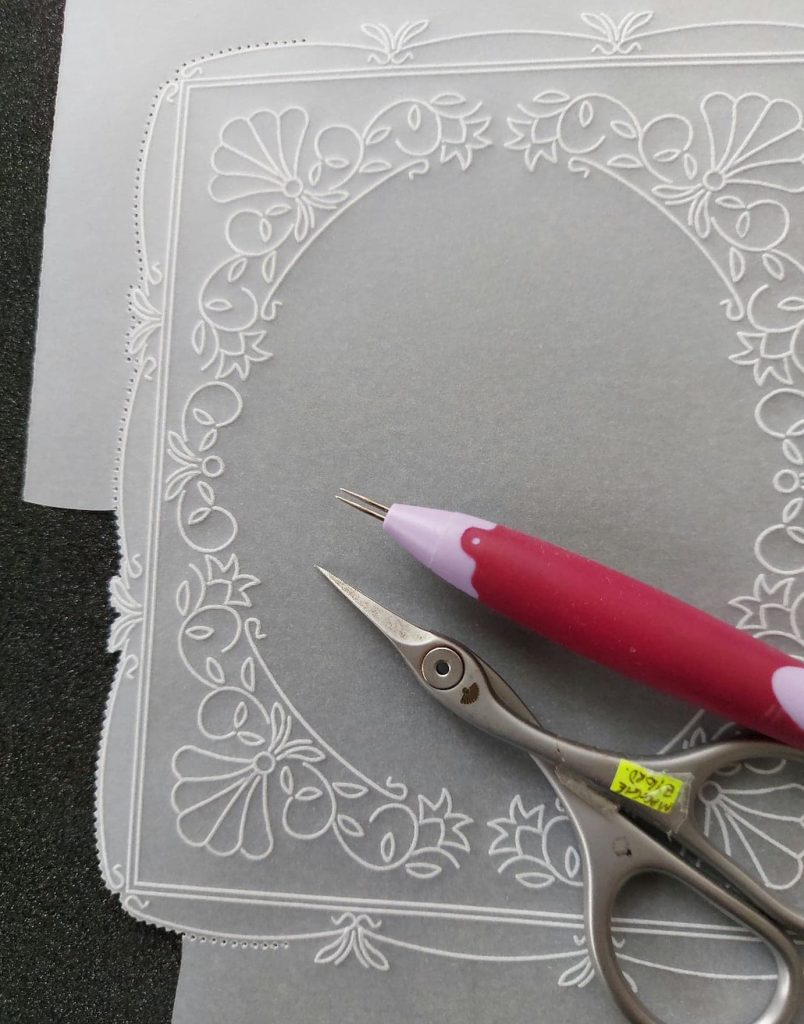
Step 9. Use a 2-Needle Bold tool and your choice of parchment scissors (or snips) to perforate and picot-cut all around the outside edges of your work, as shown in the example.
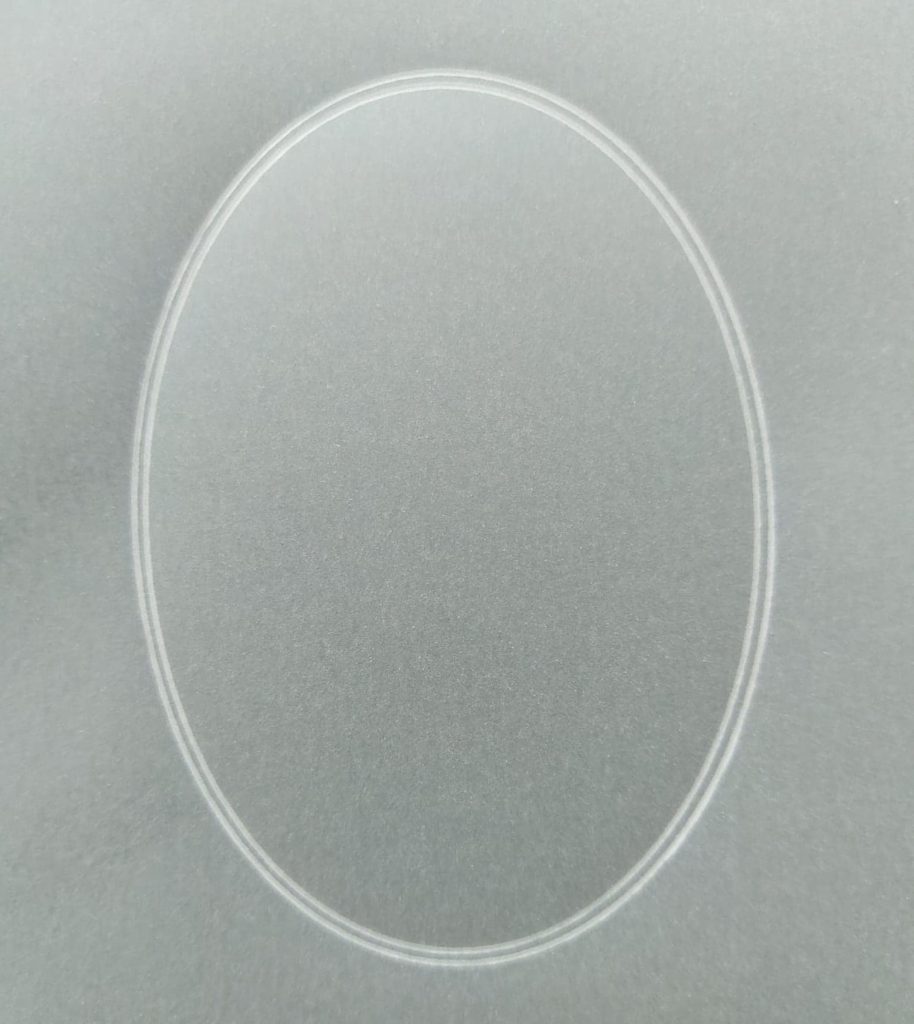
Step 10. To make a 3D oval centrepiece (in which to add your own miniature artwork) use a separate piece of plain parchment. Put the parchment over the Nested Ovals Picot Cut Groovi plate and emboss the 4th double oval from the centre.
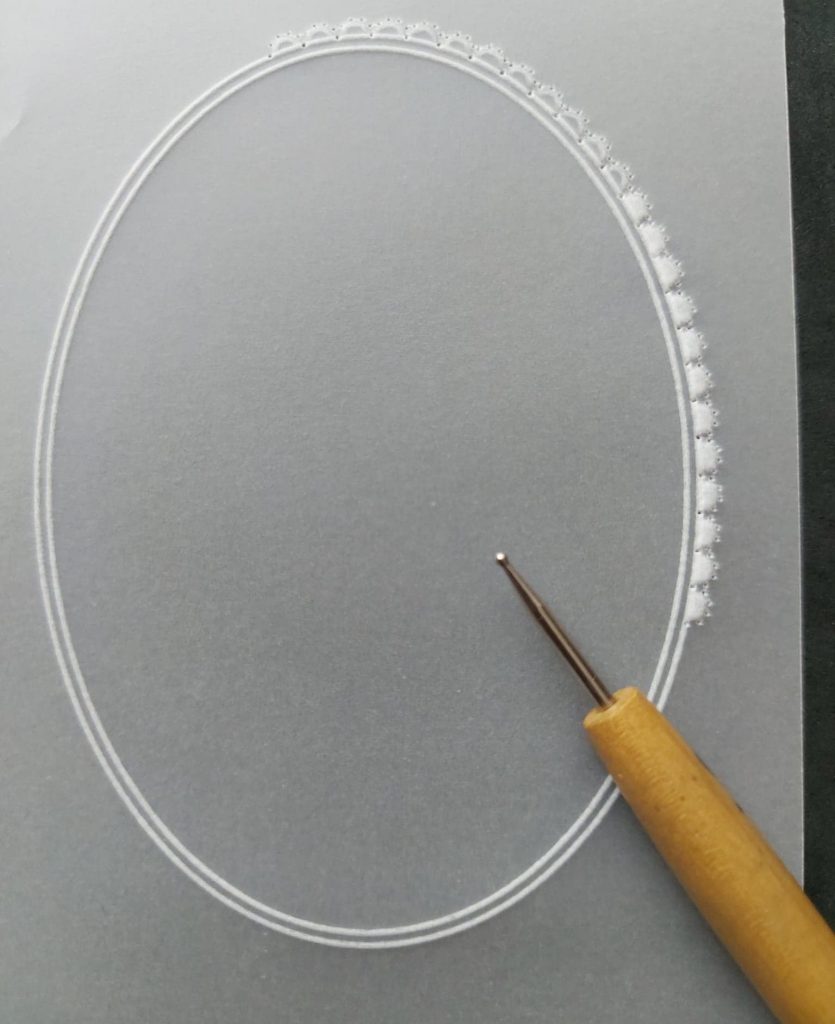
Step 11. Remove your parchment from the plate. Place it face up on a thin A4 Picot Cut Mat and use the Semi Circle Mini tool to shallow-perforate through the outer embossed line of the oval.

TOP TIP: If you try to perforate through your parchment over a thick mat when using a multi-needle tool, you may find that your parchment starts to buckle or even tear, hence doing a shallow perforation first on a thin mat.
Step 11. With your parchment face down over your embossing mat, use the Groovi Number 2 tool to emboss inside the semi-circle shapes.
TOP TIP: At this stage, it doesn’t matter if you squash any of the perforations when embossing as you will be re-perforating them at the next step.
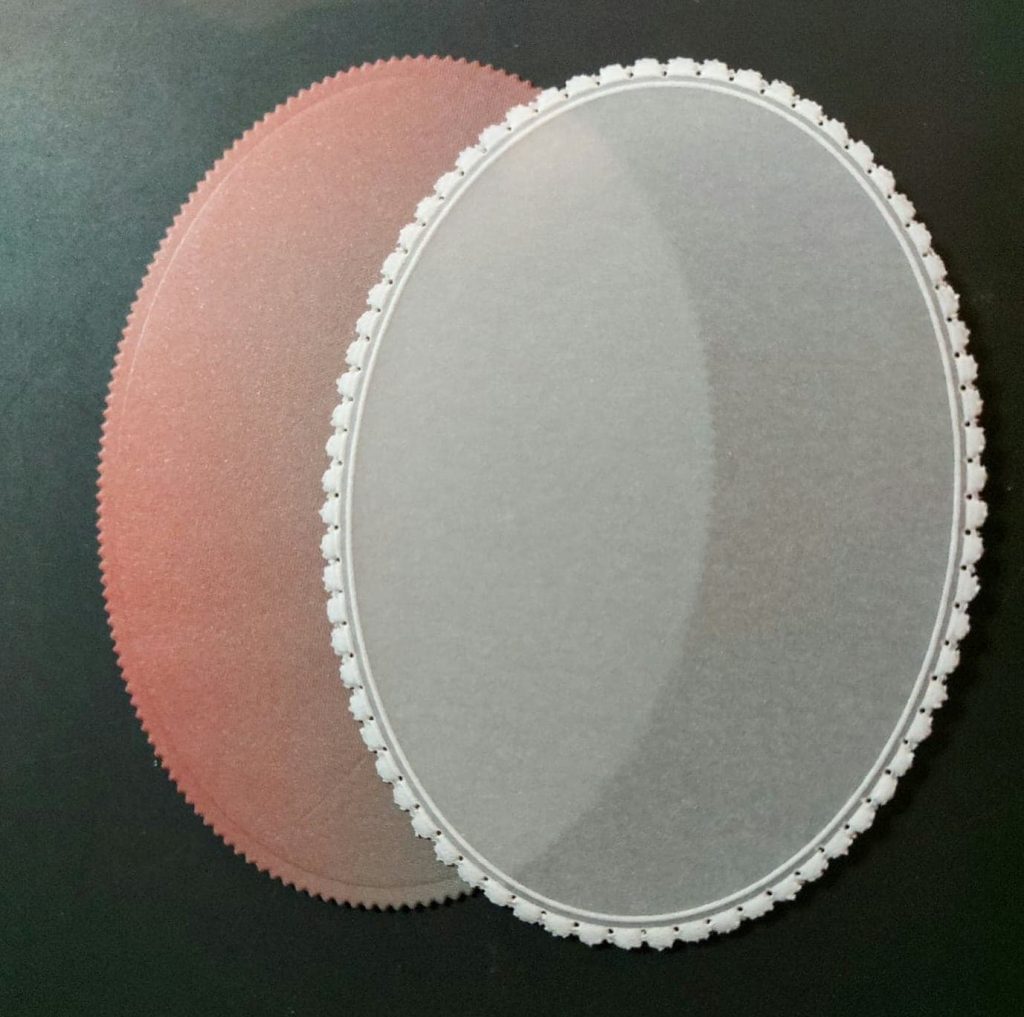
Step 12. Place your parchment face up on the Thick Black Superfoam Mat. Use your 1-Needle Bold tool to carefully re-perforate the holes to make them bigger and rounder for snipping. Then use your chosen scissors (or snips) to picot cut between the perforations.
Step 13. To make a backing for the above centrepiece; use your die cutting machine, the Nested Ovals Picot Cut Die, and a piece of your chosen Designer Paper to cut out the 4th die oval shape near the centre. I used Rainbow River.
Step 14. Before attaching the parchment oval to the backing paper, now is the time to add your own miniature design to the front of the parchment. Maybe you already have something special in mind, or something left from another project!
Step 15. When it comes to attaching your parchment oval to the cut-out backing oval, apply tiny dabs of PergaGlue on a cocktail stick along the underside cut edges of the parchment.
Step 16. To layer up your card, cut a piece of Designer Paper to the size you require, or put it through your die-cutting machine using the Nested Rectangles Die Set as I have done. Attach your parchment to the front of it using your choice of Pergamano Brads in each of the 8 circles at the base of the corner flowers as seen on the finished card. Finish by mounting it onto a white folded card cut to size. Attach your finished layered oval to the centre using foam pads on the reverse. And you’re all set!
WHOA! That is a glorious card. Stunning. Thank you, Maggie, for sharing your tips and tricks with us. I’d be tempted to pop a nice photo in there or some lovely miniature artwork piece. The world is your oyster!
Everything that Maggie has used can be found over on the Clarity website HERE
As always, if you’d like to give this project a go… please email the results to me! We love to see your work. Grace@claritystamp.com
Don’t forget that you have until midnight tonight to take advantage of our Half-Price Highlight product of the week

What’s happening at Clarity Towers this week:
Tuesday, May 24th: Groovi Tuesday with Paul – Live at 10am on Facebook & YouTube
Friday, May 27th: Crafting with Clarity with Paul at 9am & 1pm the new Create and Craft
Mum and Dave land tomorrow afternoon, so I’m excited about their visit! A week in New York. And the weather just got lovely too. Brilliant! I better tidy the apartment up.
Enjoy whatever you’re up to & travel gently.
Lotsa love, Grace & Maggie xoxo
Clarity – The Home of Art, Craft and Well-Being.
What a beautiful card and fab tutorial (as always)! Love that I can revisit these tutorials at any point when I have time to make something and see how they come together. Thank you for all your hard work.
Beautiful project and great idea, thank you Maggie ! Enjoy your week with Mum and Dave, Grace ! X
What a great project. At first look many of us would say no way can I do that- I know I did but with it all broken down into small sections the process of building the design is so much more achievable. Thanks Maggie for today’s challenge- not feeling 100% at the moment but will add it to my to do list.
Have a great week Grace xx
Beautiful frame….can see me utilising this over and over again. Thanks for the excellent guide Maggie 👍🏻
Thanks Maggie and Grace. Beautiful and inspirational.
Stay safe.🍒
That is a stunner! Definitely one to try, so thank you Maggie. Have a wonderful week Grace! X
A fabulous card, thank you Maggie, so inspirational.
Absolutely beautiful Maggie, you make it look so easy, what a talented lady. Thank you for giving us your time and expertise.
wonderfully explained and how beautiful !!
xx