Clarity Matters Blog Tutorial: How To Make A Butterfly Sampler
Hello hello! Grace here.
I hope this finds you well, safe and enjoying your Sunday morning.
We are joined this weekend by the incredibly talented Maggie Byford, from the Clarity Design Team. Now, we all love butterflies, so Maggie has kindly put together a step-by-step blog tutorial for us to show how to make a butterfly sampler. Useful!
I’ll waste no more time and hand you over to our fabulous teacher…

How To Make A Butterfly Sampler
For this tutorial, I’d like to introduce you to my Butterfly Sampler. It’s very easy to make and put together. It’s also handy when used as a reference point for when you want to make a butterfly card and can’t decide on which butterfly you’d like to use. It’s so simple to choose when there is a Sampler or two to hand that allows you to see at a glance what each butterfly has the potential to look like when made up into a 3D decoupage-style element. The butterflies on the Samplers are there temporarily so can be easily removed, used and replaced as necessary, and because you use the Sampler yourself for reference purposes it can be left out on display in your crafting area
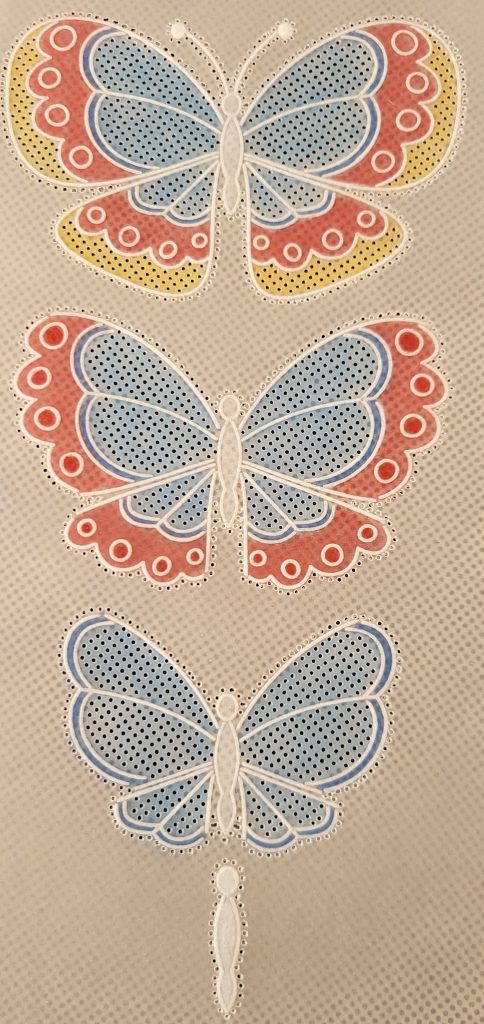
Here are two Butterfly Samplers I made using Tina’s Butterfly Fun A5 plate.
INGREDIENTS
Nested Squares Picot Cut A4 Sq Plate (GRO-PA-41035-15)
Tina’s Butterfly Fun A5 Sq Plate (GRO-AN-40856-03)
Toulouse – French Cities Diagonal Lace Duet A4 Sq Piercing Grid (GRO-GG-41640-24) (optional)
Alphabet A5 Sq Plate Mate (GRO-MA-40002-07)
Straight Basic Bold A5 Sq Piercing Grid (GRO-GG-40202-12) (optional)
Groovi A4 Clear Parchment Paper A4 (GRO-AC-40024-A4)
1-Needle Bold Perforating Tool (PER-TO-70028-XX)
2-Needle Bold Perforating Tool (PER-TO-70279-XX)
Pergamano Excellent – Embossing Mat (PER-AC-70075-XX)
Groovi Embossing Tool 1 & 2 (GRO-AC-40026-XX)
Groovi Embossing Tool 3 & 4 (GRO-AC-40027-XX)
Black Dual-Purpose Groovi Mat A4 (GRO-AC-40194-A4)
A5 Black Super Foam (GRO-AC-41765-XX)
Groovi Sticker Tabs x 16 (GRO-AC-40437-XX)
Groovi Guard (GRO-AC-40345-XX)
Ringlock Scissors (PER-TO-70041-XX)
Dorso Oil (PER-CO-70066-XX)
Blending Nibs Pen with 3 Nibs (PER-AC-70300-XX)
Perga Glue (PER-AC-70133-XX)
Oil Mix Mat (PER-AC-70304-XX) (optional)
Pastel Mix Pergamano Brads (PER-AC-70270-XX)
Card Blanks Pre-scored x 20 8×8” White (ACC-CA-30620-88)
Waimea Falls Companion Paper 8×8” (ACC-CA-31343-88)
Polychromos pencils:
Blue Butterfly: 152 Middle Phthalo Blue, 143 Cobalt Blue, 101 White, 223 Deep Red
and 109 Dark Chrome Yellow.
Green Butterfly: 133 Magenta, 163 Emerald Green, 105 Light Cadmium Yellow, 136 Purple Violet and 101 White.
METHOD
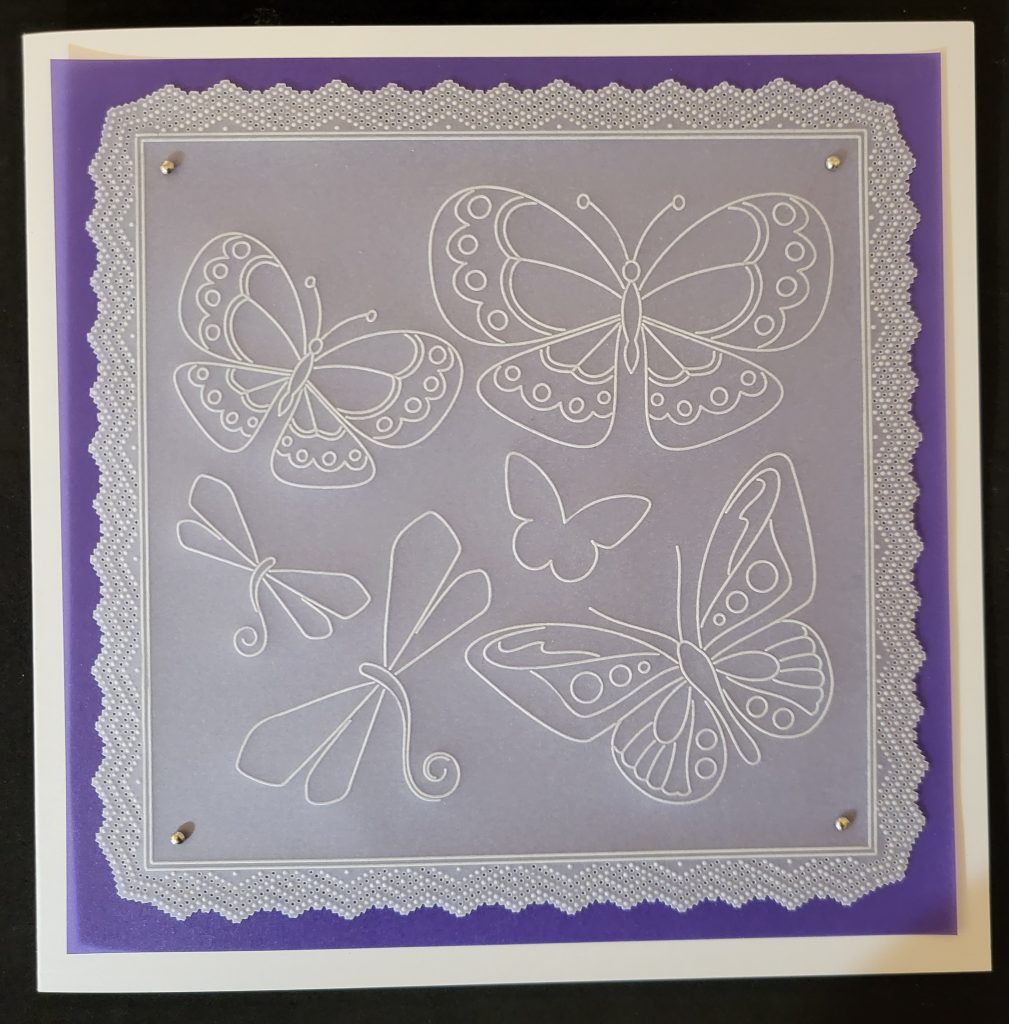
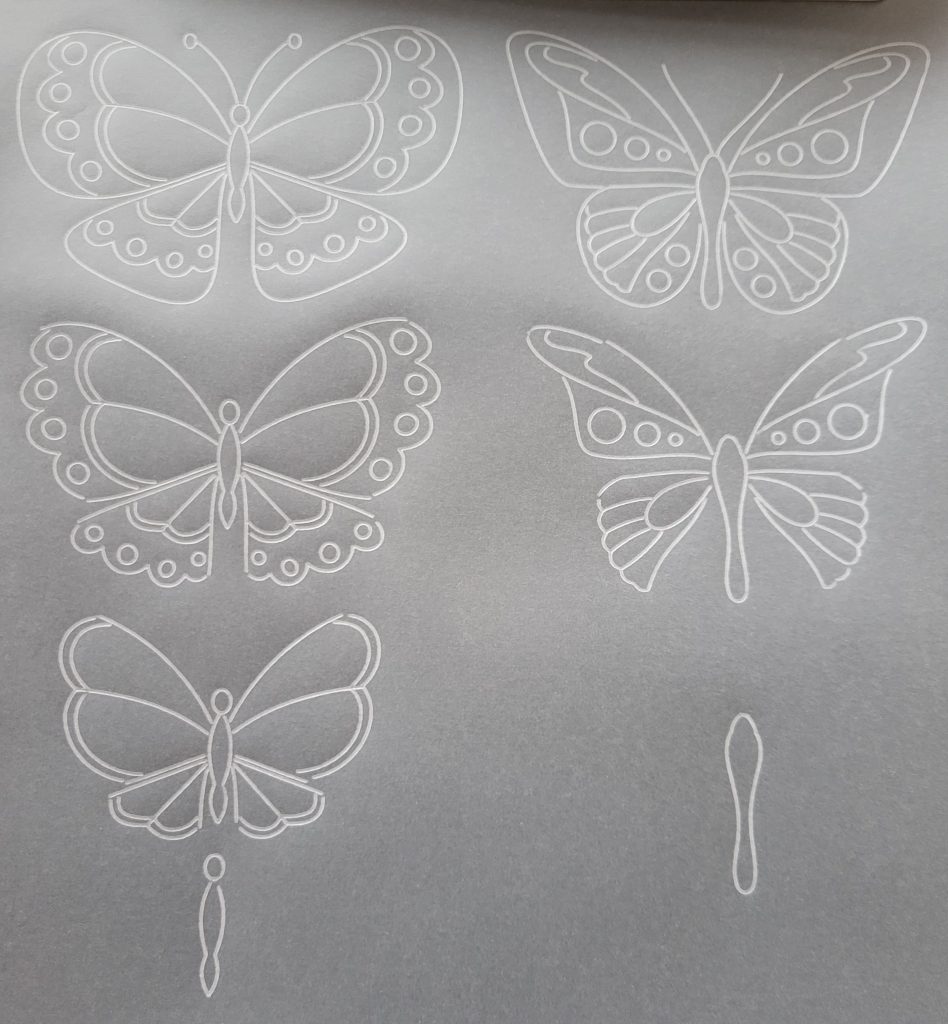
Step 1. Using plain parchment and the Groovi 1 tool, emboss the largest square on the Nested Squares Plate. Next, centralise your embossed square over Tina’s Butterfly Plate and emboss all the butterflies as shown.
Step 2. Create a fancy frame around the square using any of the gridwork plates you like to use. I modified Josie’s Toulouse Lace Duet plate to fit around all four sides of the square and improvised the corners.
Step 3. Use a brad at each corner to attach your parchment to coloured background paper (I used the Waimea Falls Companion Paper Pad).
Next, mount it onto the front of folded white Clarity card (8×8”). This now becomes a template to which you’ll add your 3D butterflies.
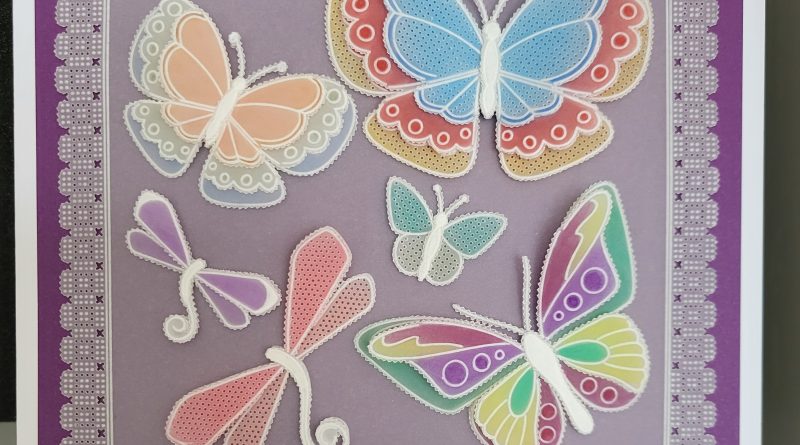
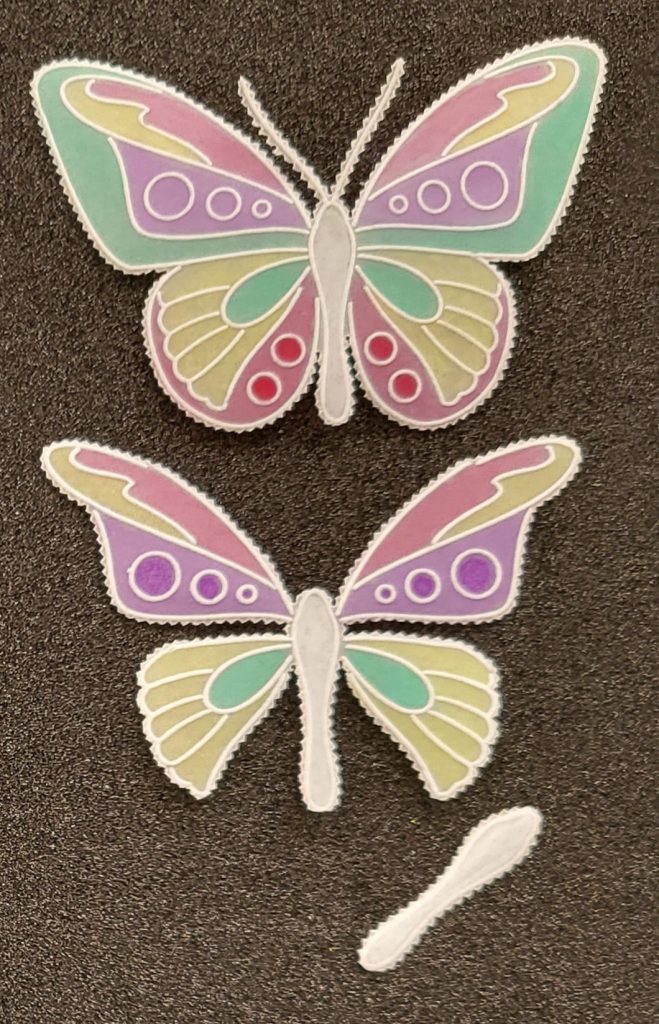
You now need to work on each butterfly in turn in order to transform them into 3D (decoupage-style), so that they can be added to the template. To get you started I’ll show you how I made two coloured and layered butterflies.
Step 4. Using a separate piece of parchment paper and Tina’s Butterfly Plate, use the Groovi 1 tool to emboss those parts of the two different butterflies you can see in the picture.
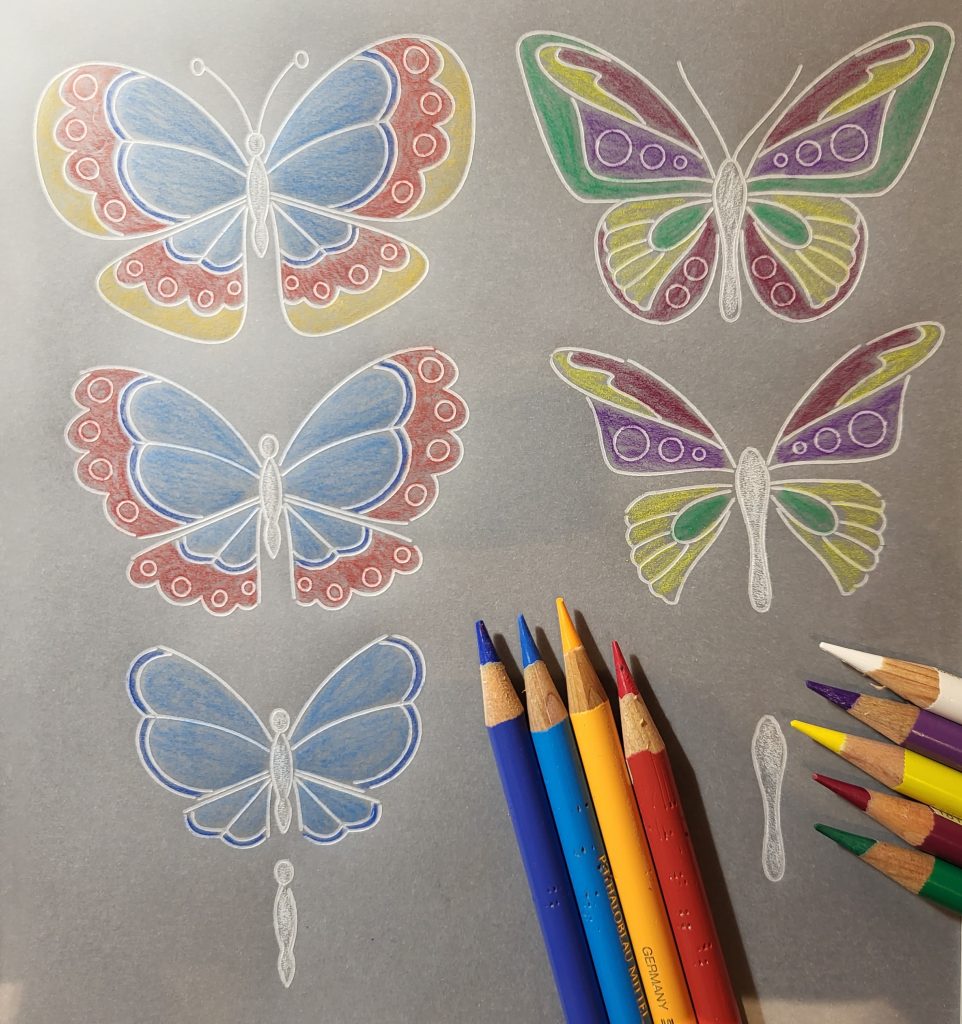
Step 5. Use Polychromos pencils to add colour on the back as follows:
Blue Butterfly: 152 Middle Phthalo Blue, 143 Cobalt Blue, 101 White, 223 Deep Red and 109 Dark Chrome Yellow.
Green Butterfly: 133 Magenta, 163 Emerald Green, 105 Light Cadmium Yellow, 136 Purple Violet and 101 White.
Step 6. Blend each colour individually with a blending nib and Dorso Oil.
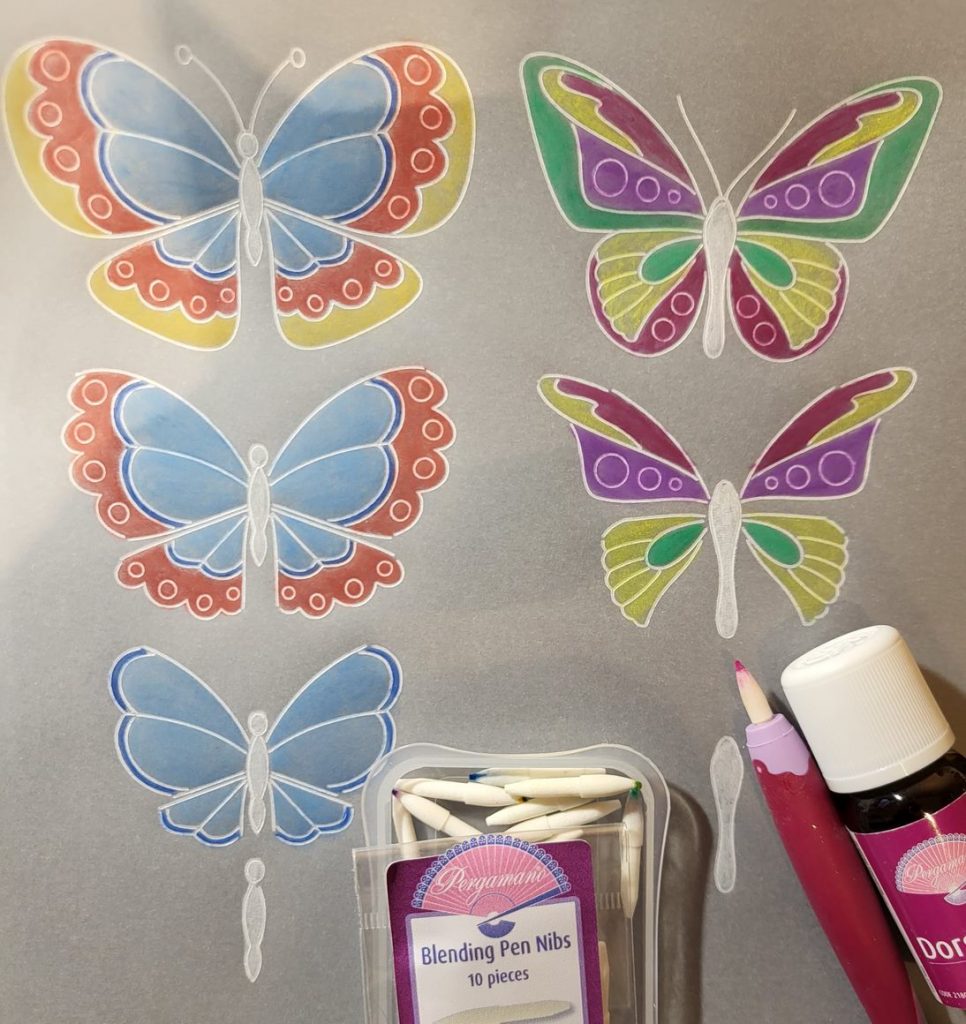
Step 7. On the back use the Groovi number 3 tool to emboss behind the two stand-alone bodies. On the front of the second Green Butterfly use 136 Purple Violet to colour in the circles on the wings, then switch to 223 Deep Red to colour in the circles on the wings of the second Blue Butterfly.
Use a 2-Needle tool over a thick Superfoam mat to perforate around all the elements of both butterflies.
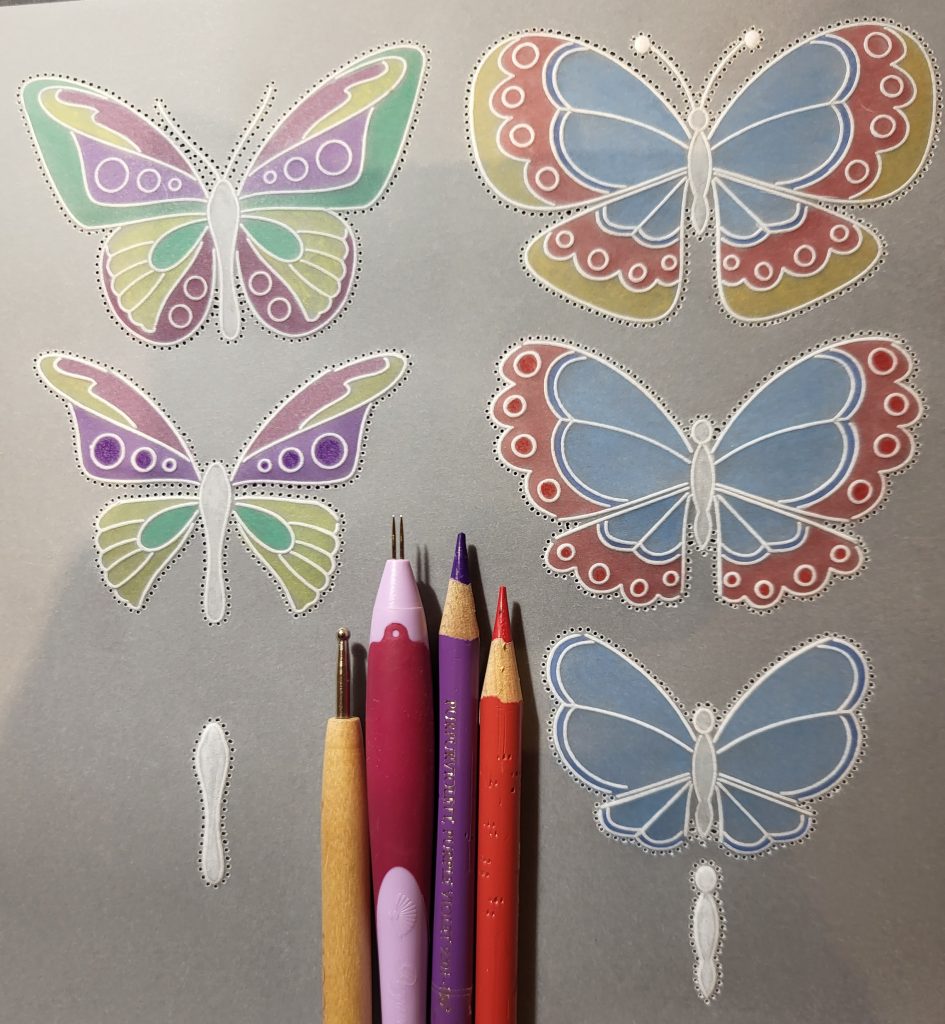
Step 8. At this point, if you wish to add some gridwork holes inside the yellow and blue wing parts of the Blue Butterfly then do so now over a thick Superfoam mat as follows…
On the front of your parchment use a 1-Needle Bold tool over a Pergamano or Groovi Straight Basic Bold Piercing Grid (placed diagonally in front of you), to perforate every hole within the areas shown. Be very careful not to perforate over any of the embossed line-art.
Step 9. Use parchment scissors or snips to picot-cut between all of the 2-Needle Perforations, so that you end up with these individual elements.

Step 10. These elements now need to be attached to each other via the body so that the wings stay free.
Here is a VIDEO of how I glued one 3D element to the other via the body. You’ll need some PergaGlue and a cocktail stick, and you’ll be applying very tiny dabs of glue from an Oil Mix Mat to the underside cut edges of the body as shown.
Step 11. To use the Sampler to help you identify a butterfly for a card you are making, simply make up a card and see how/where one of your detachable butterflies would work best on it.
Once you’ve decided, put the original back on the Sampler then make yourself a fresh one (either the same or different) which can then be placed into position onto your card using narrow foam pads hidden underneath its white body.
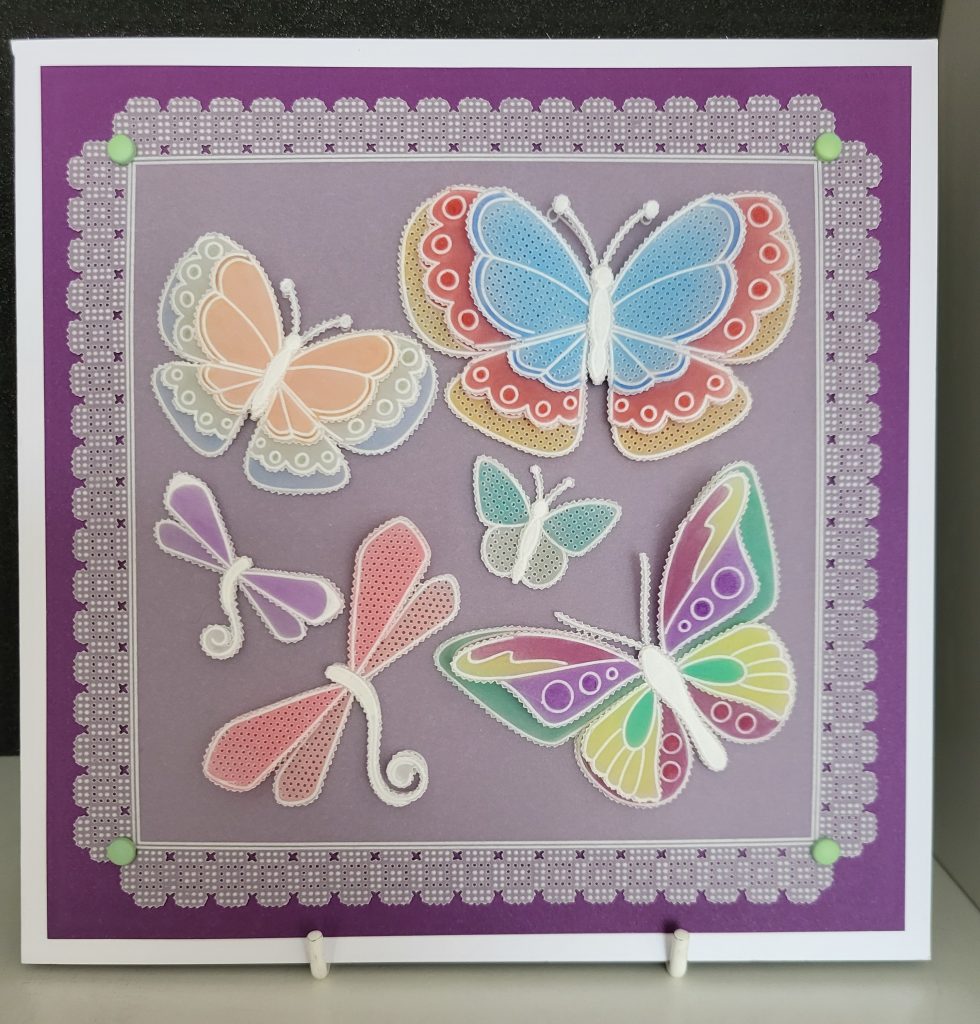
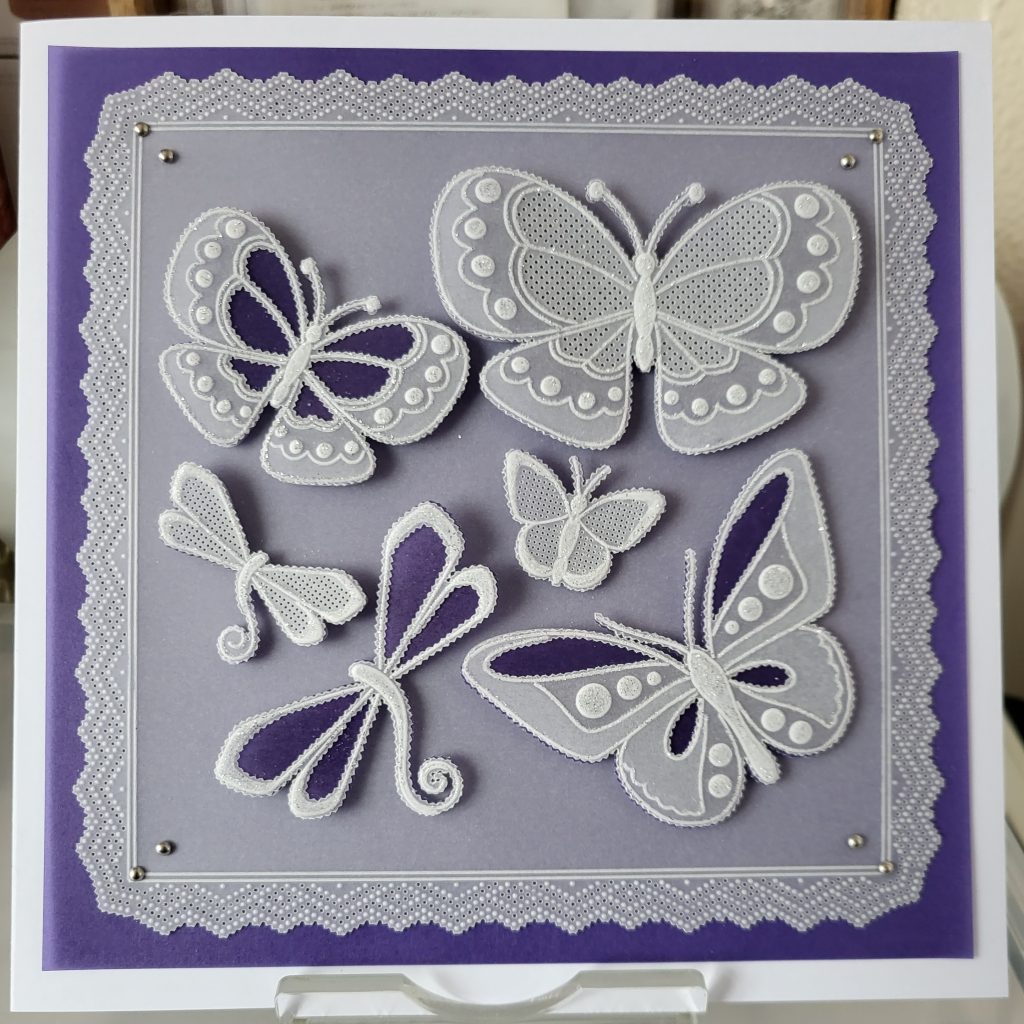
Here are two 5×5” cards that I made in such a way. I also attached some adhesive pearls to the top of the head and along the body for a bit of added decoration.
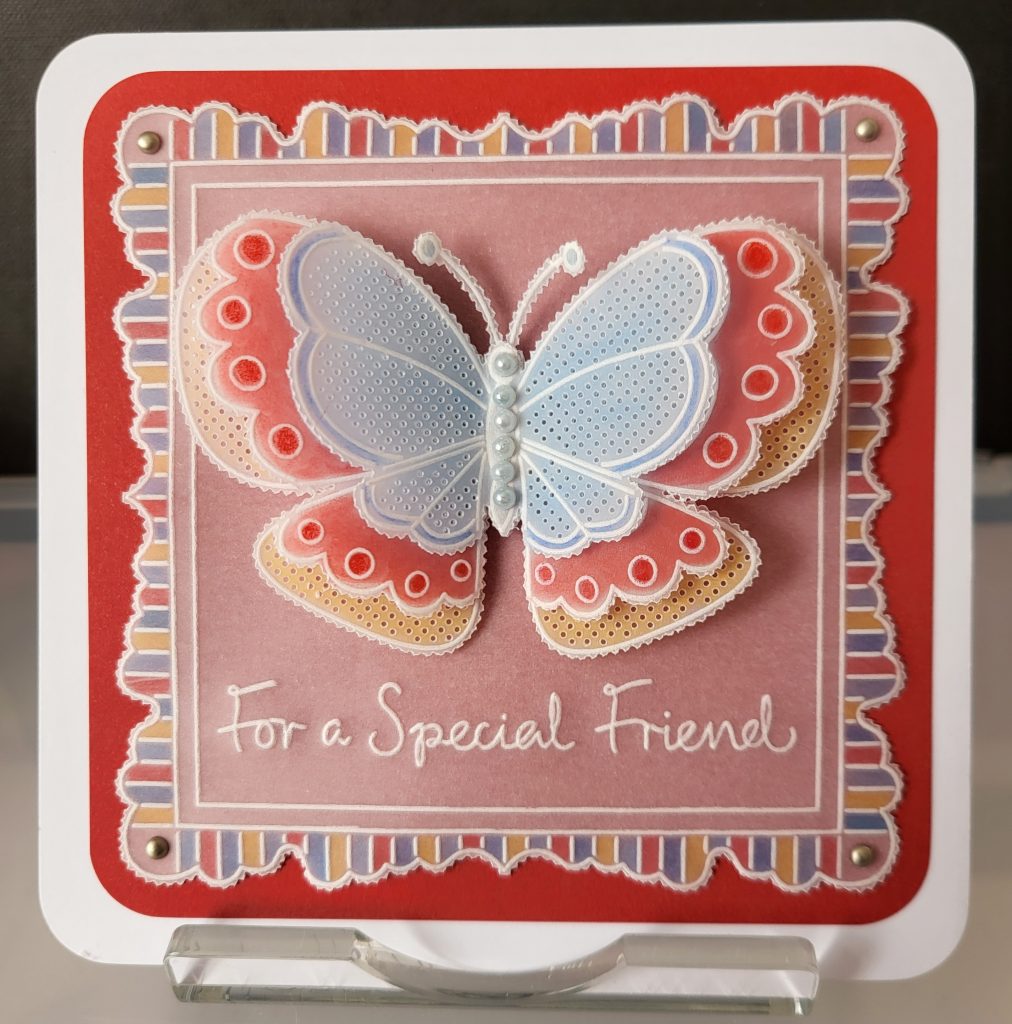
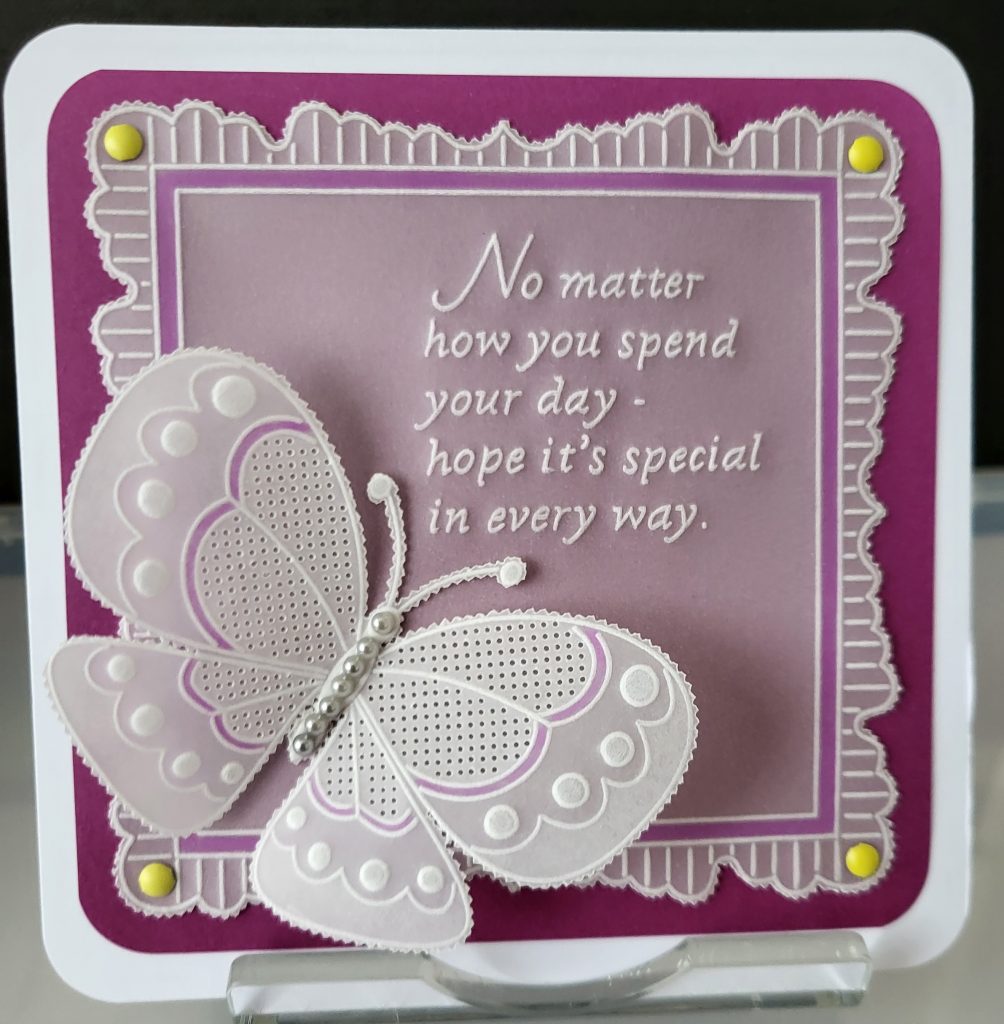
Top Tip: Do remember that if sending this type of 3D card in the post you will need to take it in its envelope to the post office and have it weighed/measured in case you need to pay extra postage because of its depth.
Other than that, you’re all set!
Those cards are GORGEOUS! Thank you so much, Maggie, for sharing your tips and tricks with us. I know this will be a popular tutorial.
Everything that Maggie has used can be found HERE over on the Clarity website.
Lots to look forward to! Here is our schedule for the week ahead:
Monday 22nd May:
In the SHAC with Barbara – 10am Live on Facebook and YouTube
Tuesday 23rd May:
Groovi Tuesday with Paul – 10am Live on Facebook and YouTube
Thursday 25th May:
In the SHAC with Clarity with Barbara on Create & Craft – 3pm & 7pm
Friday 19th May:
Crafting with Clarity with Barbara on Create & Craft – 9am & 1pm
Travel gently, friends.
Lotsa love, Grace & Maggie xoxo
Clarity – The Home of Art, Craft, and Well-Being.
They are gorgeous! Thank you, Maggie. Can I just take this opportunity to thank you for the dove heart tutorial you did earlier in the year. As with this one the instructions are very clear.One of these lovely butterflies would look great in the middle of the dove heart square from that tutorial as well!
Beautiful tutorial, thank you Maggie & Grace x
Maggie they are absolutely wonderful. I am definetely going to make a butterfly board. In colour and whitework. Thank you for sharing.
Thank you for this brilliant blog, but can you tell me how do you attach them to the sampler card so that they can be detached. I have read the instructions many times and can’t find that detail…or have I missed it!
Thanks
Tinapb
Hi Tina,
Thanks for your comment. The Butterflies are temporarily attached to the Sampler, using narrow foam pads hidden underneath the white body. These pads are quite easily detachable with care. Step 11 mentions this method of attaching a Butterfly to a card. Sorry for the misunderstanding. Hope this helps. Maggie & Grace xx
How lovely. What a great idea as who doesn’t love a butterfly. Thank you Maggie. X
Thank you Maggie for another top tutorial.
Those butterflies are fantastic and a great way to practice small pieces of parchment craft.
Hope all is well Grace. Xxxx
Great tutorial. I attach my butterfly samples to acetate so I can overlay them on a card without having to handle them too much by removing and replacing thus avoiding damage.
Thank you, your work is always inspiring.
Perfect tutorial for number 100.
Thankyou.
A great step by step Maggie & a great way to try out all the designs before you actually need them. That way you can iron out any tricky bits or things you don’t like before you put them on a card.
Thanks Grace & Maggie for another Groovi Sunday project.
Off out into the garden to paint more fence before it gets too hot then I shall have an afternoon of crafting – well that’s the plan !!
Have a good week everyone – don’t envy you having to pack everything up for the move Grace but hope it goes well xx
Thank you for this fabulous tutorial. Silly I know but I’d never thought of doing something like that before so that I could try before committing to a design.
Fantastic tutorial Maggie 😀😀😀