Clarity Matters Blog Tutorial: How To Paint with Pens & Pencils
Hello hello! Grace here.
I hope this finds you safe, well and enjoying your Sunday. The day of rest!
We are joined by the fantastically talented Frances Knott! She has kindly prepared a step-by-step blog tutorial for us. Many of you have seen Frances’ incredible artwork shared on Clarity Worldwide, Groovi Worldwide, Create and Craft and any other platform we’re able to showcase them on!
Here is an opportunity to recreate her amazing artwork, by breaking down her techniques into simple steps. I’ll waste no more time and hand you over to our brilliant teacher…
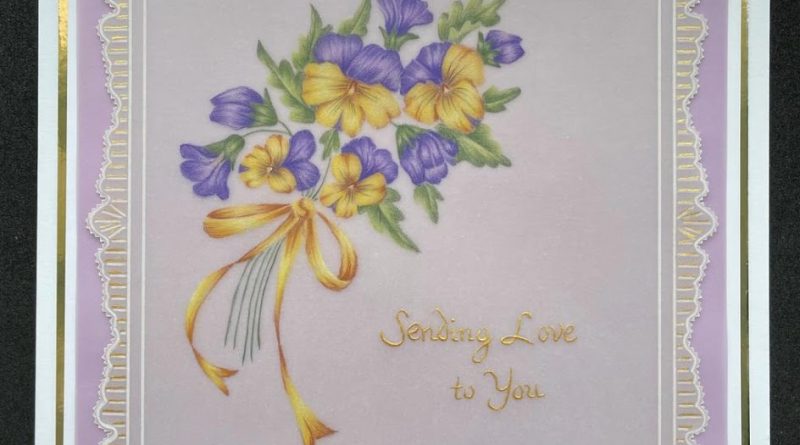
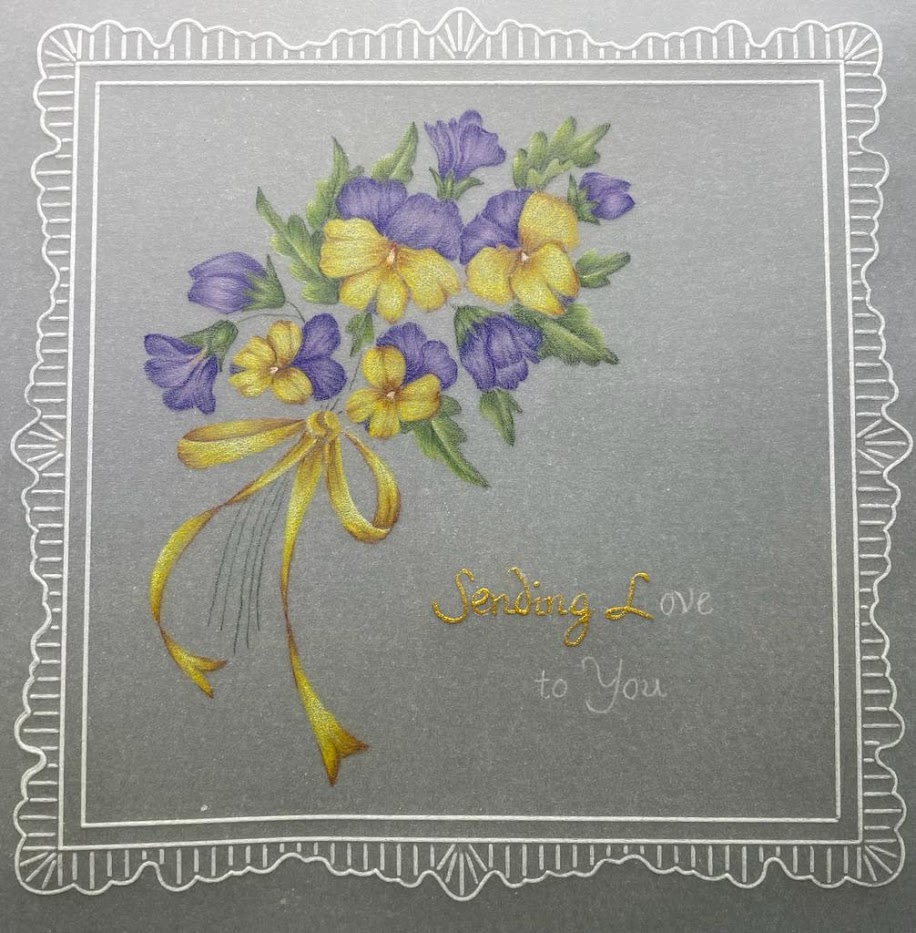
Pansy Spray, by Frances Knott
Ingredients
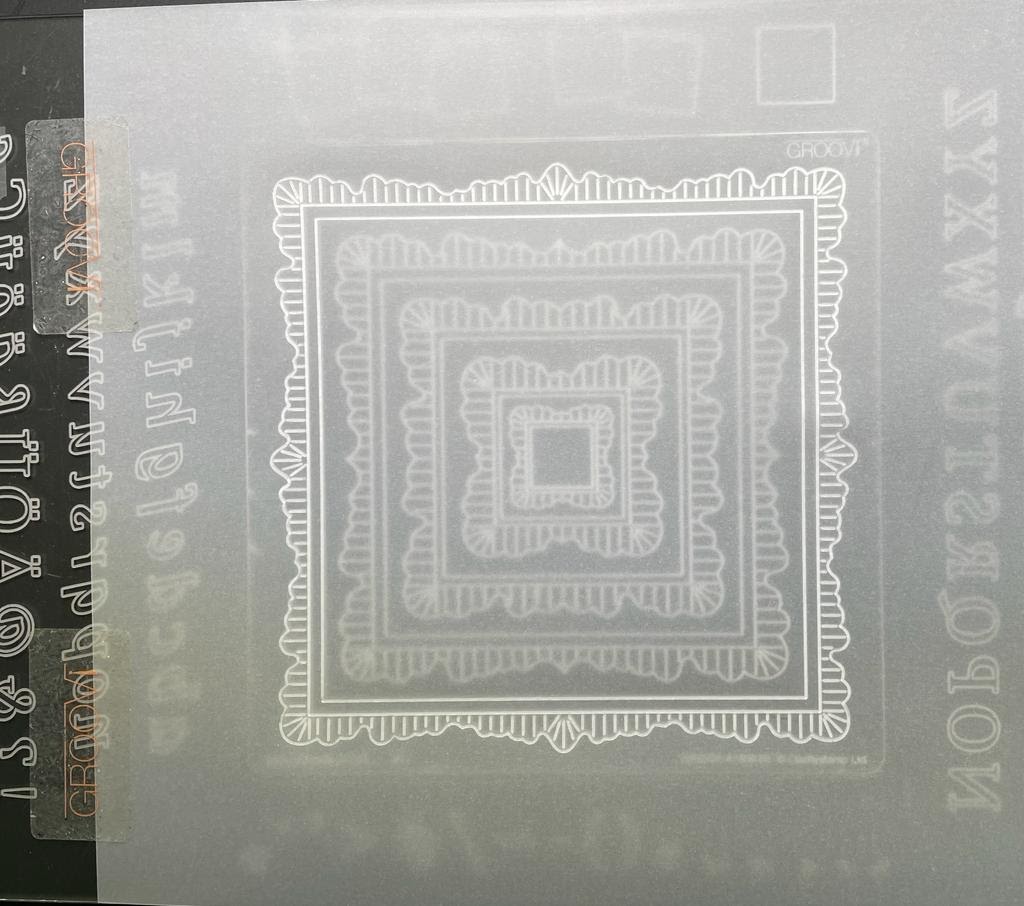
Linda’s Nested Square Doily Frame (GRO-PA-41409-03)
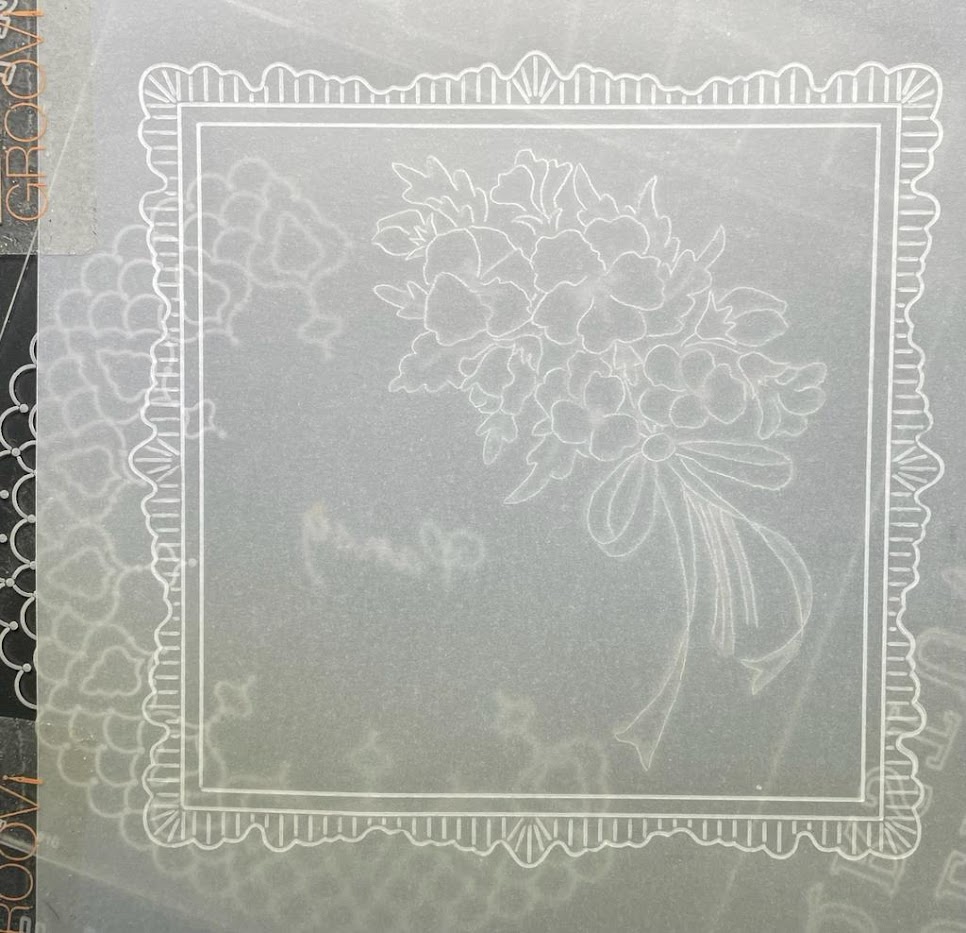
Linda’s Pansy & Lace Plate (GRO-FL-41228-03)
A5 Square Plate Mate (GRO-CO-41706-08)
Faber Castell Polychromos Pencils (ACC-PE-30797-XX)
(Perga Liner Equivalents B5, A6, B3, B9, B8, B1, B6, B15)
White Pencil (ACC-PE-31073-XX)
Blending Nib (PER-AC-70299-XX)
Dorso Oil (PER-CO-70066-XX)
Mix Mat (PER-AC-70304-XX)
Pergamano Colouring Essentials Kit (PER-AC-70431-XX)
1-Needle Tool (PER-TO-70028-XX)
2-Needle Tool (PER-TO-70037-XX)
Parchment Scissors
Optional Watercolour Pencils in Dark Green, Dark Purple & Burnt Sienna (Pergamano Colour Exclusive equivalents: 10, 3, 17)
Pergamano No 2 Round Paintbrush (PER-BR-70044-XX)
Mix
Embossing Mat (GRO-AC-41036-A3)
Method
Step 1. Attach your parchment paper to the A5 Plate Mate and the Nested Doily Plate. Trace out the largest frame.
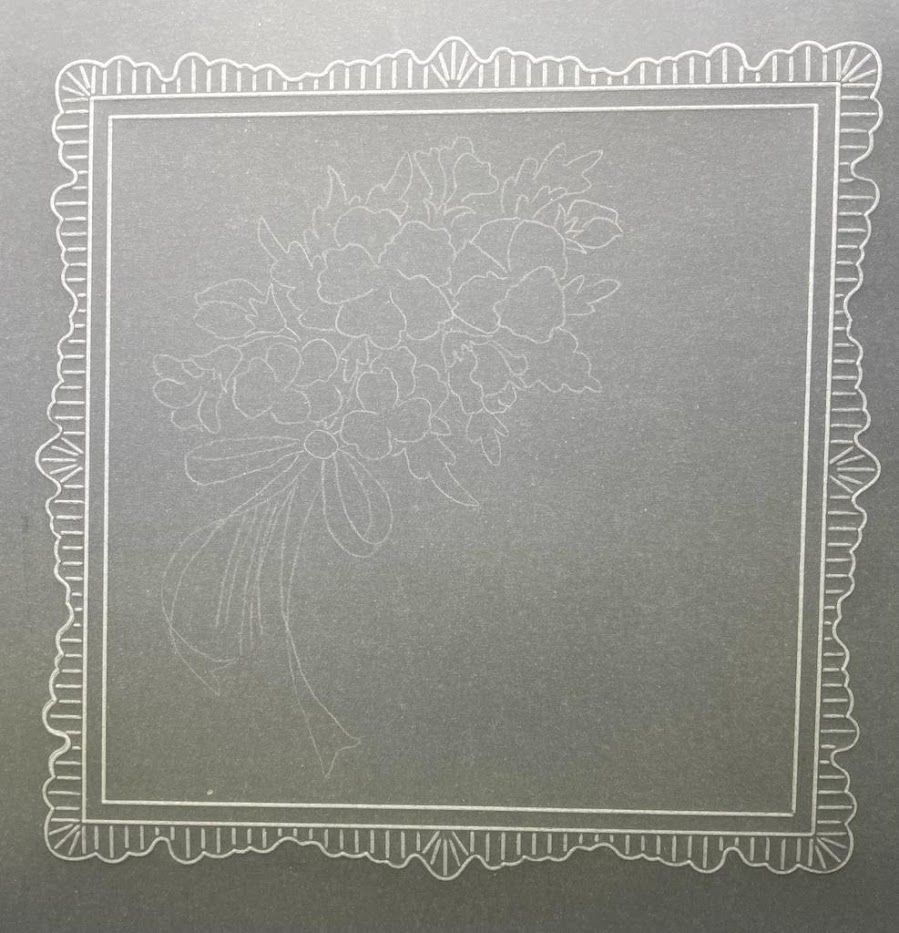
Step 2. Position the frame over the flower spray on the Pansy Plate and (when you are happy with the layout) attach the parchment with Groovi tabs. There are a couple of options at this point… The design can be embossed extremely lightly with the No 1 or 2 Groovi Tool, or as I have done here, traced with a white pencil.
Step 3. The reason for using the pencil on the back of your work (instead of the usual on the front) is that after completing your colouring on the front you will be able to erase the white lines on the back without spoiling your hard work.
TOP TIP: Don’t press too hard with your pencil or you will end up embossing the design!
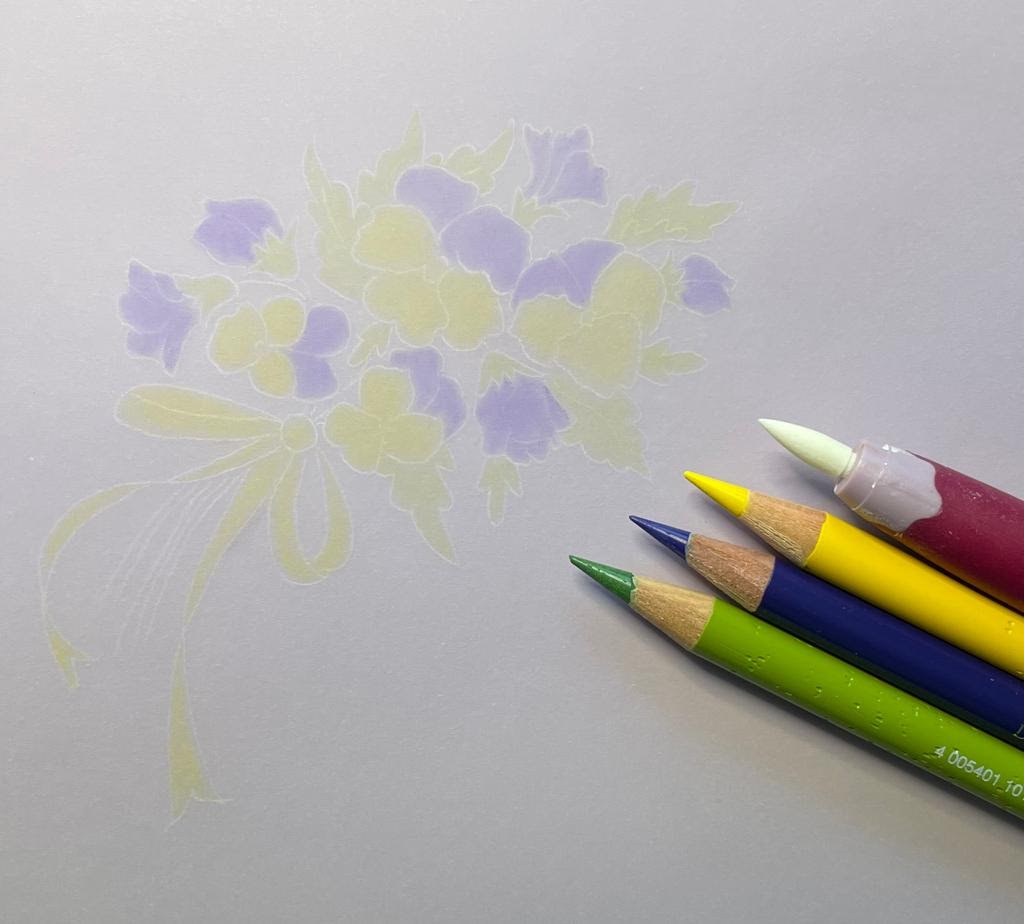
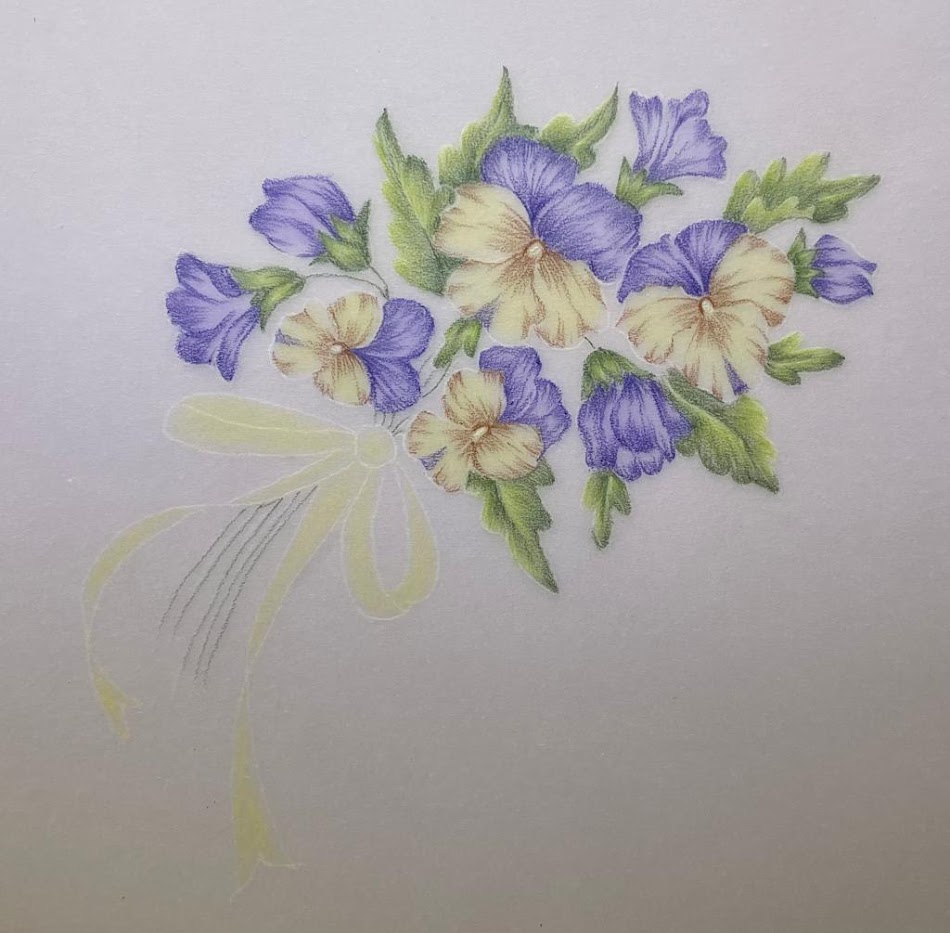
Step 4. Now for colouring! This will all be done on the front of the parchment. I know some people worry about colouring on the front as it is not as ‘forgiving’ as working on the back, but when there are no beautiful white embossed lines to worry about avoiding, then it does become less daunting. All your pencil white lines are still visible to help with where to colour, but they are safely out of the way at the back of your design.
Begin with a very light colour wash, using colours 141, 107 and 138 as smoothly as you can manage. You can see how the white lines still show through from the back.
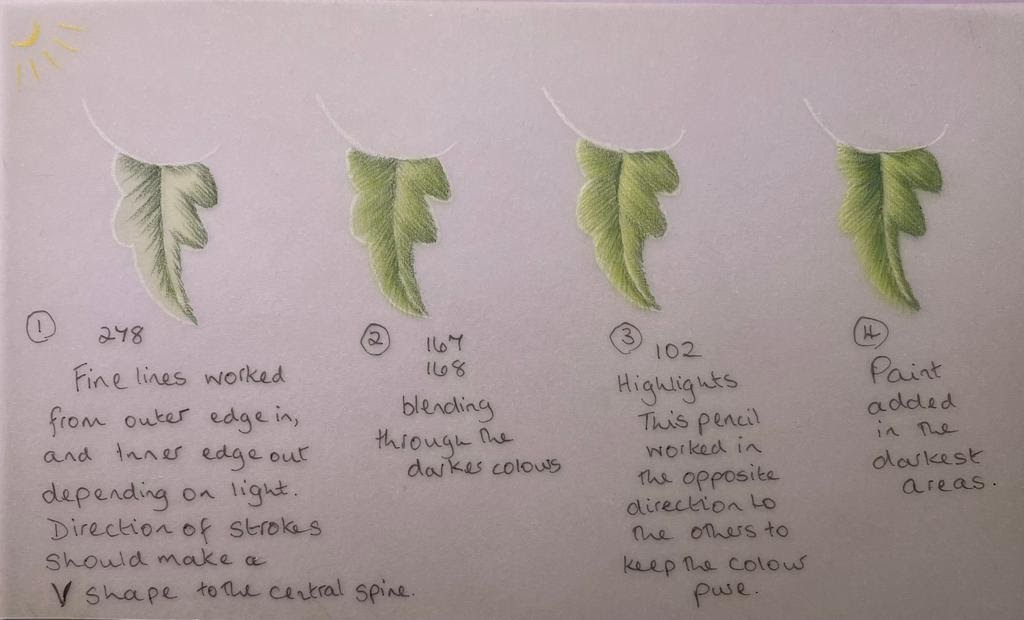
Step 5. Now for the leaves! We’ll look at one of the leaves to show the layout of the pencil work.
Working dark to light, take the darkest green (278) and work using fine lines (rather than all over colour) from the outer edge towards the centre vein. Then, from the centre vein to the outer edge on the opposite side of the leaf. If the pencil strokes were to meet in the middle they would make a V shape.
Using the other greens (167 & 168), in exactly the same way, blend through the colours. There are 3 greens in my sample but you might find that for the tiny leaves, it’s only possible to use 2. The fine lines and direction are always the same until you add the highlight (102). With this pencil, you want to start at the opposite edge and blend into the green rather than through it. All the leaves are worked in a similar way.
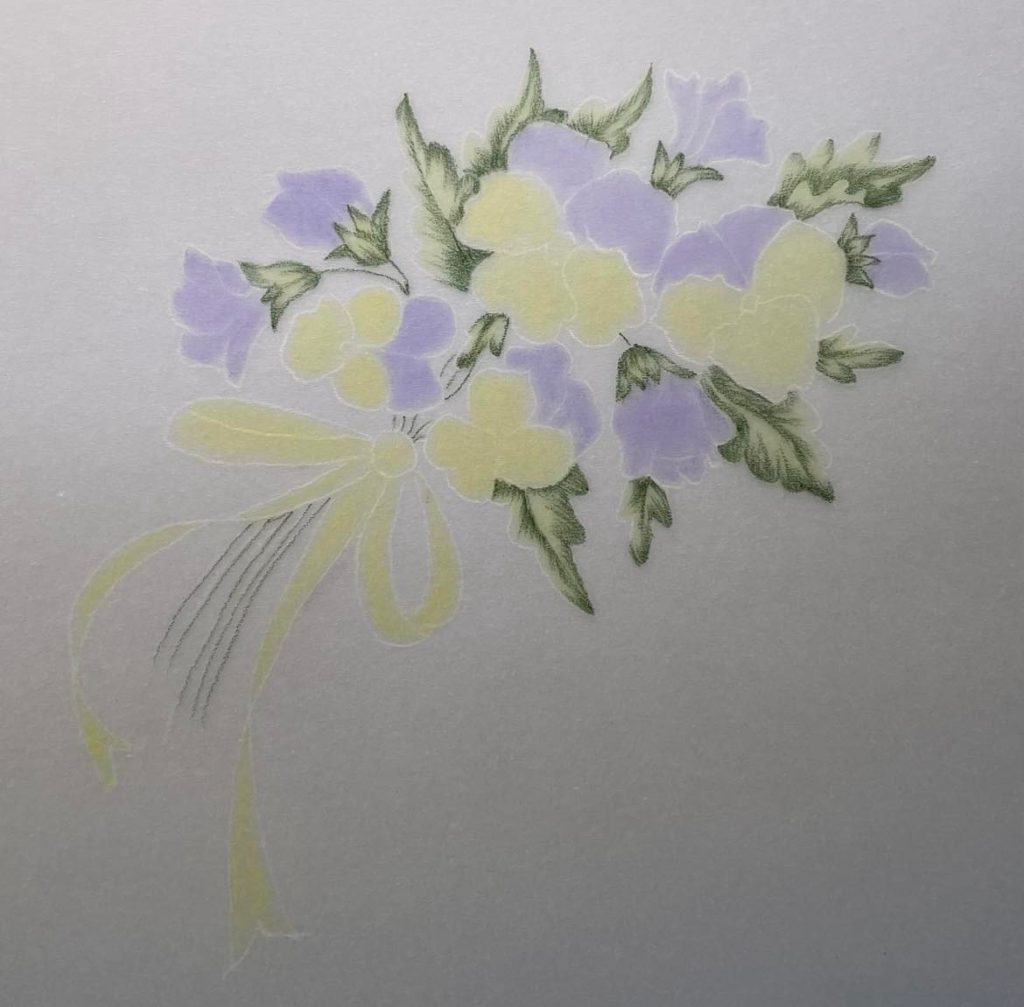
Step 6. The pansies are also coloured from dark to light and blended with overlapping fine lines.
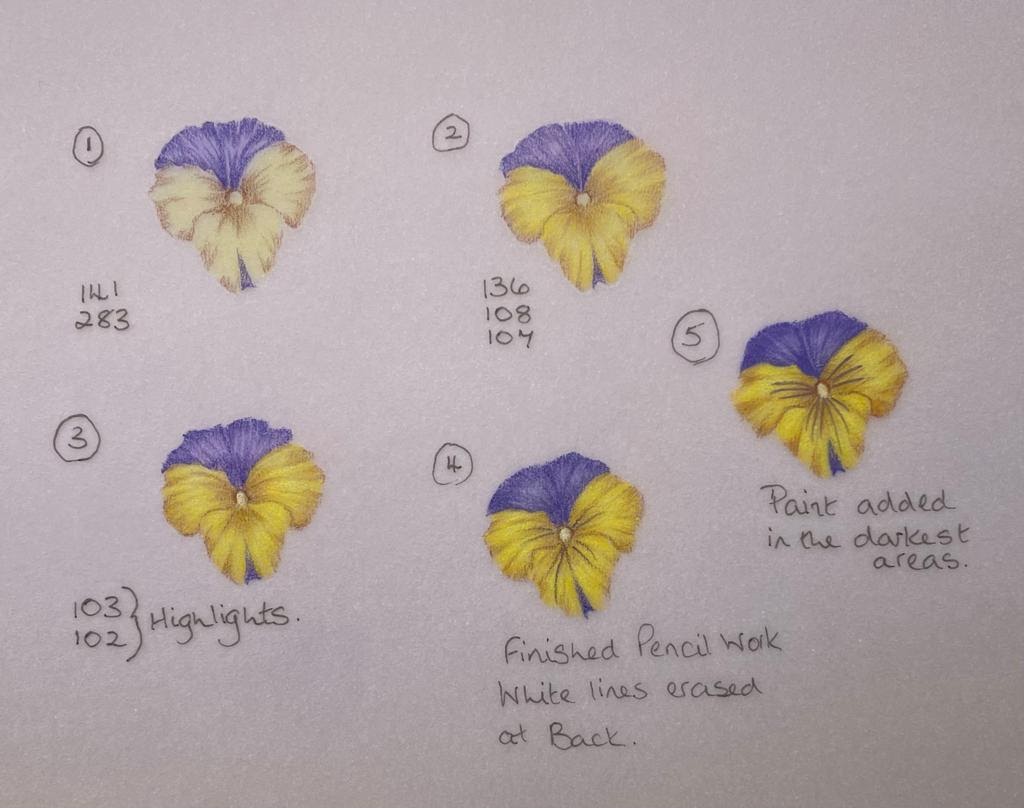
Step 7. I used the highlight pencils 103 in the purple petals and 102 in the yellow petals in the centre of each.
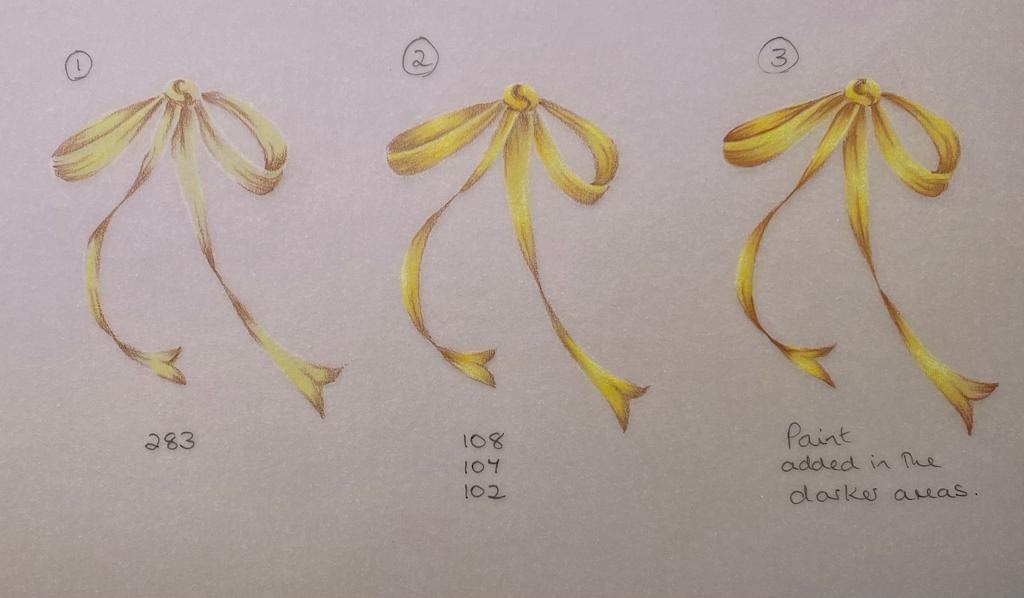
Step 8. Again begin with the dark colour (283). The ribbon is coloured to try to observe which bits are overlapping and therefore casting shadows. Burnt Sienna (283) is excellent for showing this on yellow flowers/ribbons.
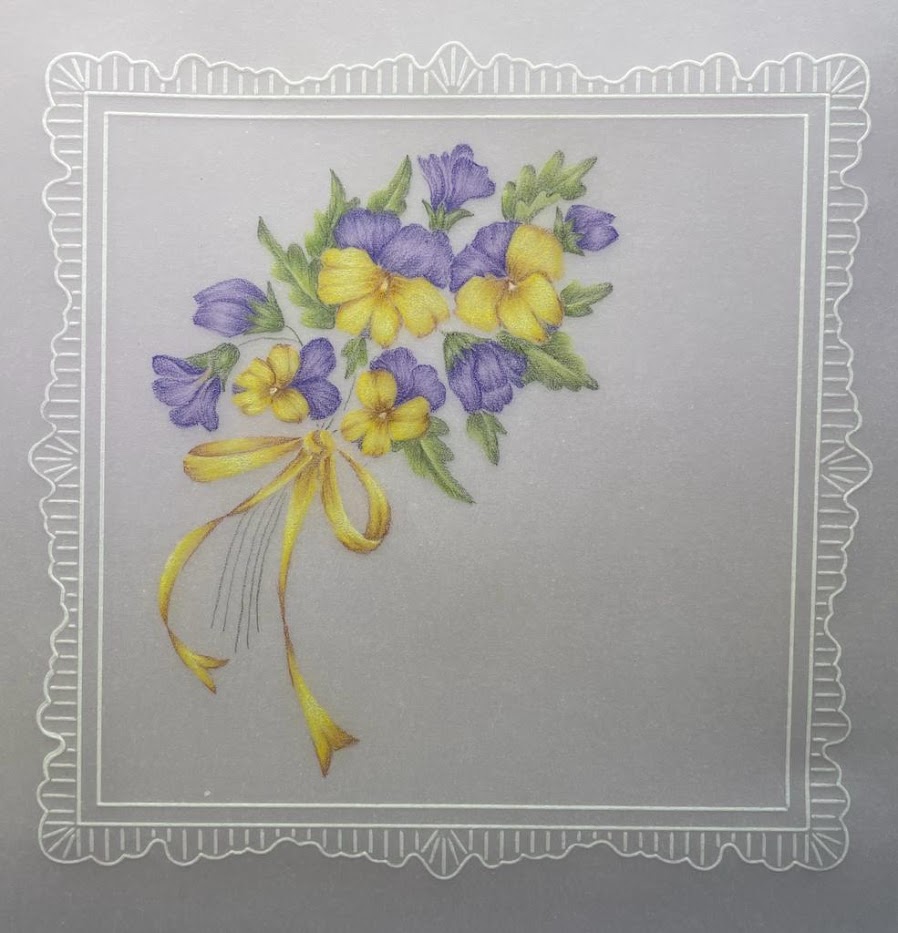
Step 9. At this stage, the pencil colourwork is done and the white lines should be erased on the back of the parchment.
Step 10. Time to add your sentiment. I chose words from one of Linda’s It’s a Wrap Plates.
Emboss the required words on a scrap of parchment and move this around on the front of your design until you’re happy with the placement. Stick it down with a Groovi tab.
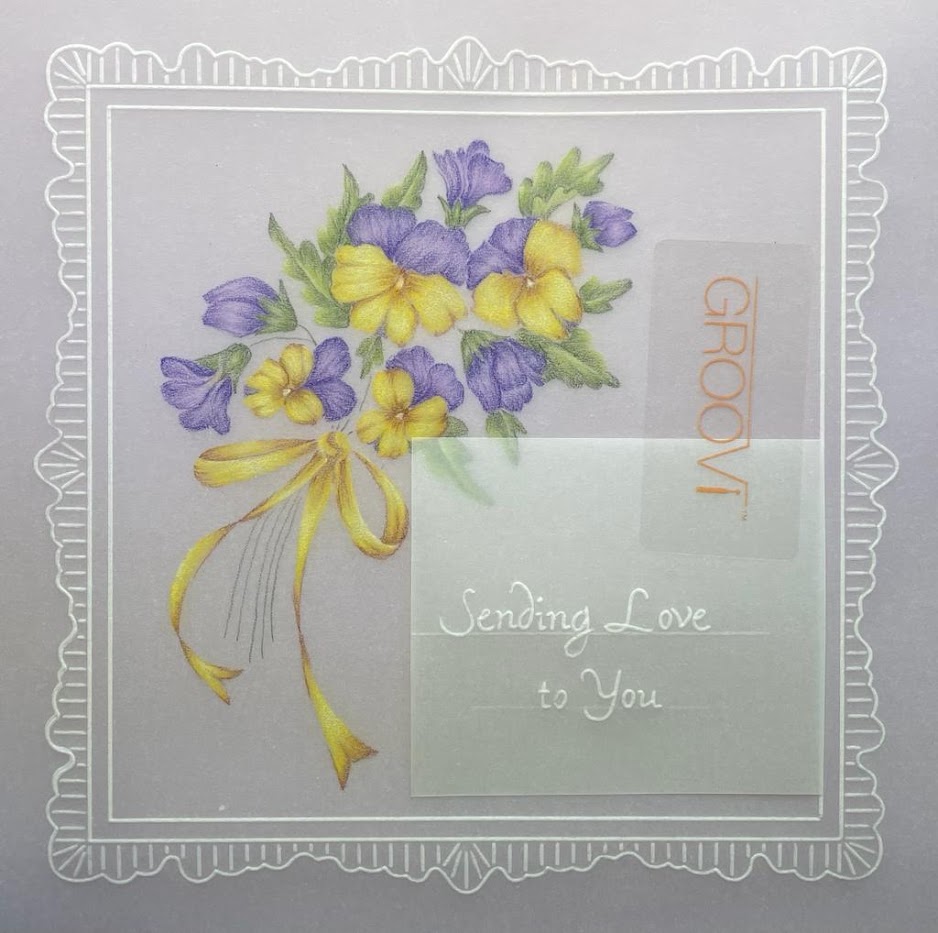
Step 11. Turn the parchment with the attached piece over, and again using the white pencil trace through on the back of your work.

Step 12. Turn to the front again, remove the scrap and now go over the words in gold ink. I use a mapping pen and gold ink – you could use a gel pen, but be sure to let it dry completely before turning the paper over again and erasing the white pencil.
Step 13. Now for some finishing touches.
If you want to take your colourwork a little further, you can add some extra colour in the darkest areas using watercolour and a paintbrush.
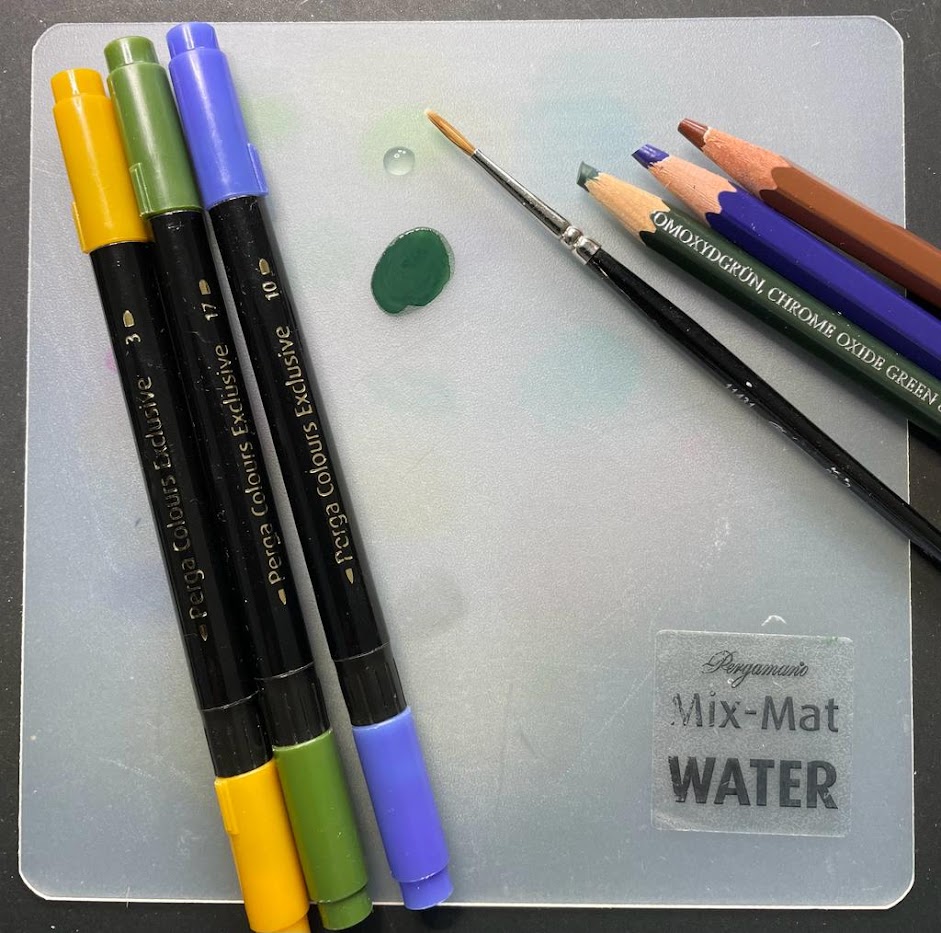
I use watercolour pencils with a tiny drop of water to mix into the paint, but PCE’s work just as well. Make sure your paintbrush is barely damp (dip it in water then take off most of the excess water on a damp sponge). Put the tip in the paint, then gently roll the tip on its side to make a fine point. Practise drawing fine lines on a piece of scrap paper before trying it on your masterpiece! It’s easier to create fine lines by flicking the brush away from you rather than pulling it towards you.
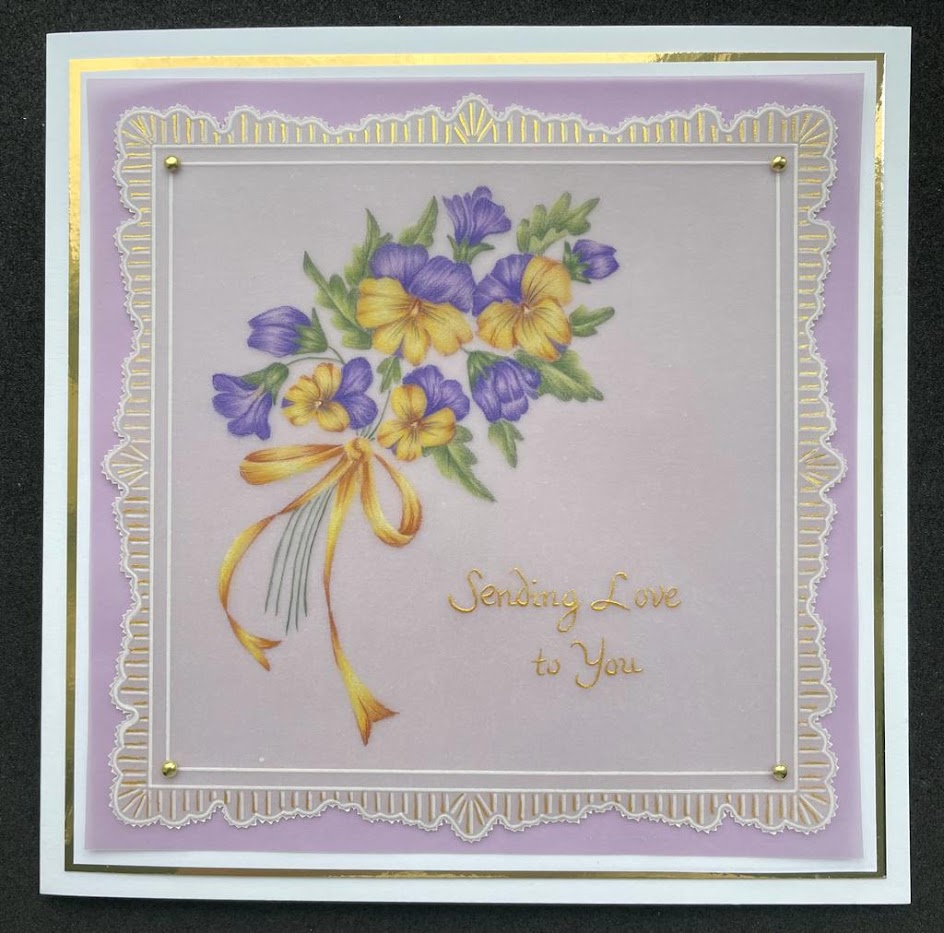
Step 14. The final stage! Use the 2-needle tool to perforate around the frame, then cut out with parchment scissors and mount on to the backing of your choice. Sit back, admire your handiwork and give yourself a big pat on the back!! You’re all done!
That is absolutely GORGEOUS. Thank you, Frances!
I just love Frances Knott’s work. It’s always incredible. I could stare at it for hours!
Everything that Frances has used can be found over on the Clarity website HERE
Lots to look forward to! Here is our schedule for the week ahead:
Monday 15th May:
In the SHAC with Barbara – 10am Live on Facebook and YouTube
Tuesday 16th May:
Groovi Tuesday with Paul – 10am Live on Facebook and YouTube
Thursday 18th May:
Groovi One Day Special with Barbara & Paul on Create & Craft – 6pm & 9pm
Friday 19th May:
Groovi One Day Special with Barbara & Paul on Create & Craft – 10am & 2pm
Saturday 20th May:
Get Groovi with Tina on Create & Craft – 1pm & 5pm
Right, I’m off! Enjoy the rest of your weekend.
Travel gently, friends.
Lotsa love, Grace & Frances xoxo
Clarity – The Home of Art, Craft, and Well-Being.
Brilliant tutorial, thank you xx
A lot of us I’m sure wanted to know how Frances did her colouring as it’s beautiful work. Thank you
Beautiful, thank you for sharing your expertise Frances with us x
Thank you Frances for such a completely informative and beautiful project. I hope I can do your project justice xx
THANK YOU SO MUCH, Frances 💗 this is such a brilliant tutorial!
Full of tips and tricks. I really do admire your work. Xx
This is just stunning, love Frances’s work always but to have it explained like this is great please thank her from me Grace and enjoy the rest of your weekends ladies xx
Great tutorial! Beautiful pansies – thank you,Frances.
Good morning Grace & Frances, what a beautiful and detailed project, love all the instruction for the painting, thank you ! The sun is out at last so in the garden for me, either pottering or reading and sitting with Mikey cat in case this his last summer – he’s out there on his cushion already enjoying the weather ! X
Absolutely brilliant! To have this technique broken down by Frances is wonderful. Her work is instantly recognisable and to be able to try and emulate that, just amazing! Thank you Frances. X
What a stunning piece. Thank you Frances for sharing the step by step.
Wow thank you Frances for a brilliant step by step tutorial showing how you achieve the beautiful artwork that you do. I will definitely give it a go but first I must check what is happening in the garden as OH is getting the secateurs out for some chopping back of some plants so we can reach the fence to paint it. Note to self prune back plants each year !!
Looks like a busy week on the Clarity front so lots to watch & get hints & tips from.
Have a great week everyone x
Absolutely gorgeous! Hoping to have a goat this.
Thank you.x
Thank you so much to Frances and Grace for this, like many I’ve been admiring Frances’s work on Facebook but without any idea how this was done.Just need to go and practice now. Best Sunday yet x
Thank you so much Frances and Grace. Really interesting techniques for when we do not always want the hard white lines. Beautiful.x
Thank you for this beautiful step by step will have to start having a practice. X
What an absolutely glorious tutorial – thank you so much Francis for sharing your beautiful work
Love Seta Xx
Thank you for this brilliant tutorial, your work/ art is fabulous and I am grateful for your knowledge,hints and tips .