Clarity Matters Blog Tutorial: How To Create an Ombre Background
Hello hello! Grace here.
I hope this finds you well and enjoying your Sunday!
We are joined by the fantastically talented Tina Morris. She has put together a brilliant step-by-step project, to show us how to create an ombre background.

Step by Step – Ombre Ombre
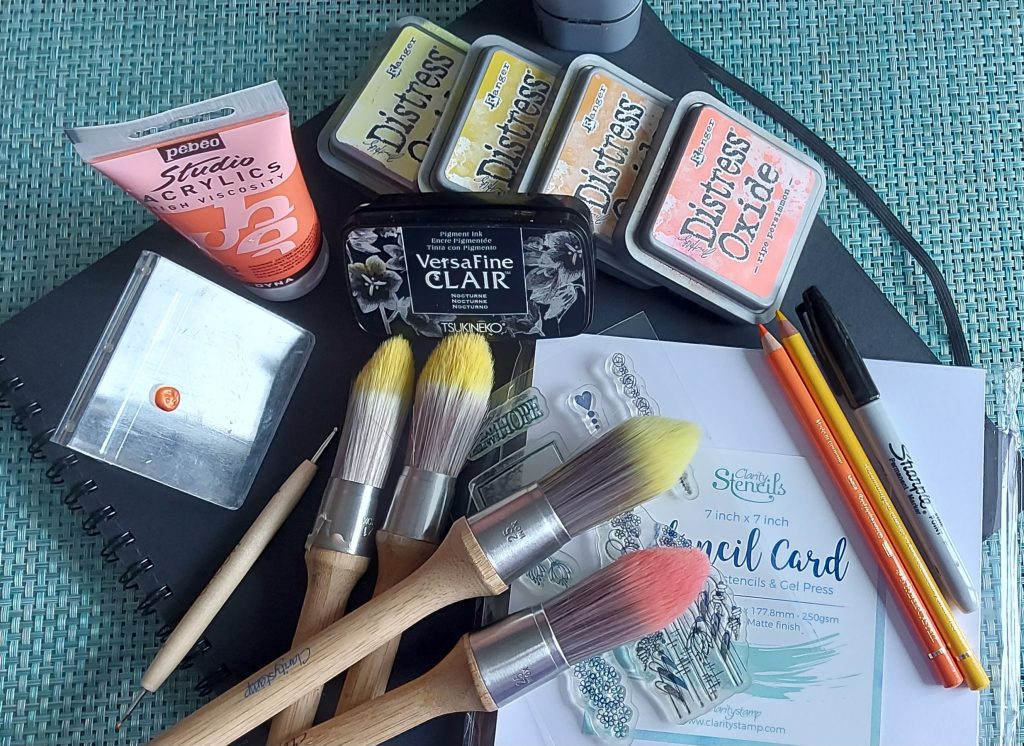
Ingredients
Card Blanks 7″ x 7″ Black x20 (ACC-CA-30623-77)
Stencil Card 7″ x 7″ (50 Sheets) (ACC-CA-30095-77)
Clarity Stencil Brushes (Set of 4) (ACC-BR-30006-XX)
Distress Oxide Ink Pad – Squeezed Lemonade (INK-DO-50429-XX)
Distress Oxide Ink Pad – Fossilized Amber (INK-DO-50409-XX)
Distress Oxide Ink Pad – Wild Honey (INK-DO-50437-XX)
Distress Oxide Ink Pad – Ripe Persimmon (INK-DO-50423-XX)
Archival Ink Pad – Jet Black (INK-AR-50030-XX)
KISS By Clarity – Tina’s Dream, Believe, Hope Flowers A6 Stamp Set (STA-FL-11472-A6)
Pack of 5 Vertical Long Mounts (ACC-MO-30564-XX)
Pebeo Acrylic Paint 59ml – Pearl Gold (ACC-PA-31303-XX)
Roll-A-Tape Super Strong Permanent Glue Tape Runner (ACC-MS-31065-XX)
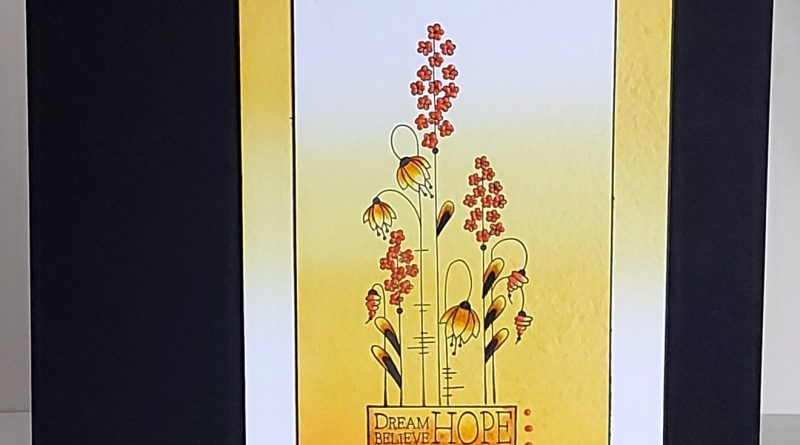
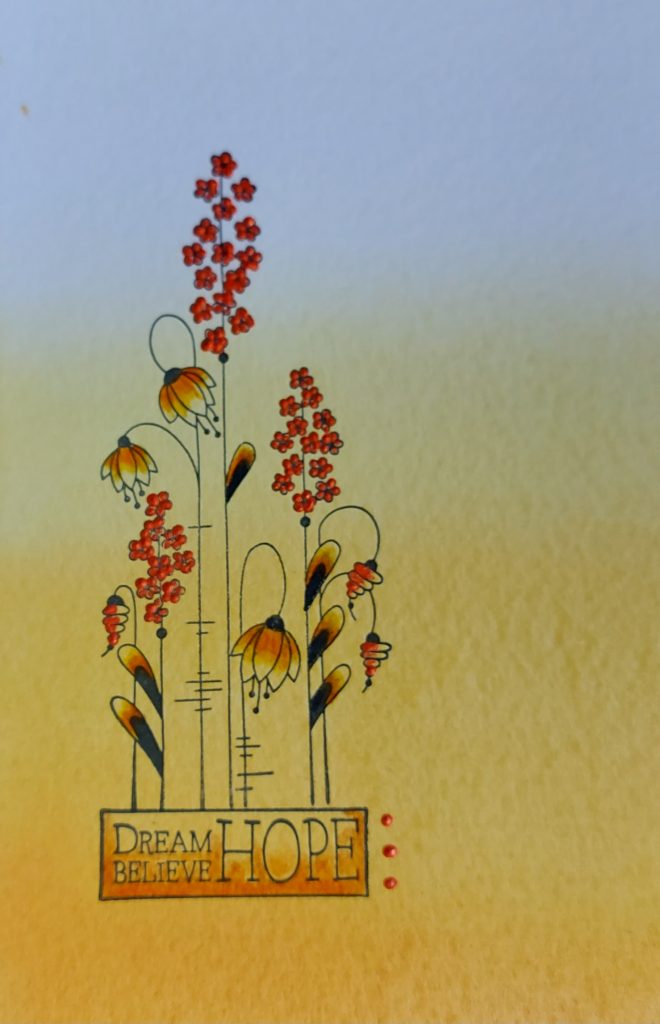
This is where we are headed…

Firstly, gather all of your ingredients. Don’t worry if you don’t have the same colours, just as long as you have 4 ink pads in the same colour family.
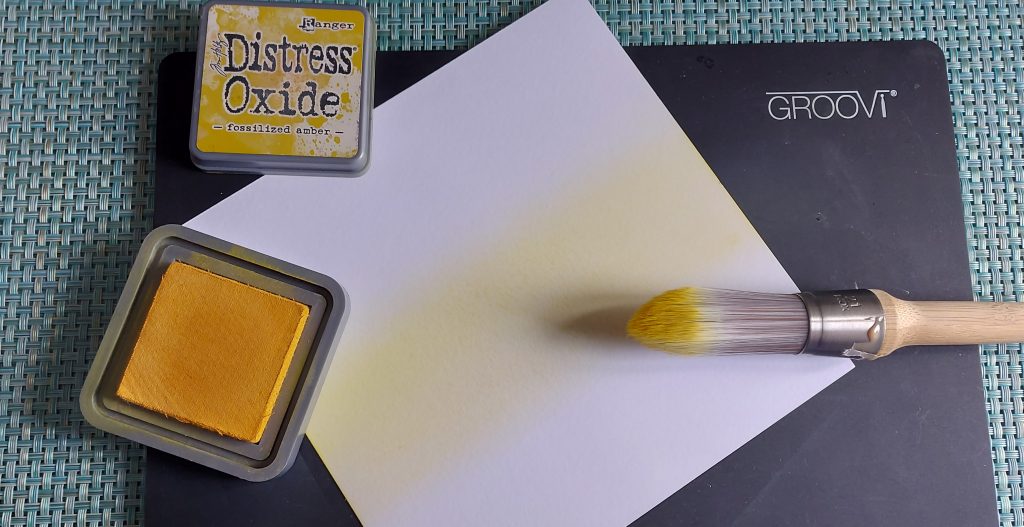
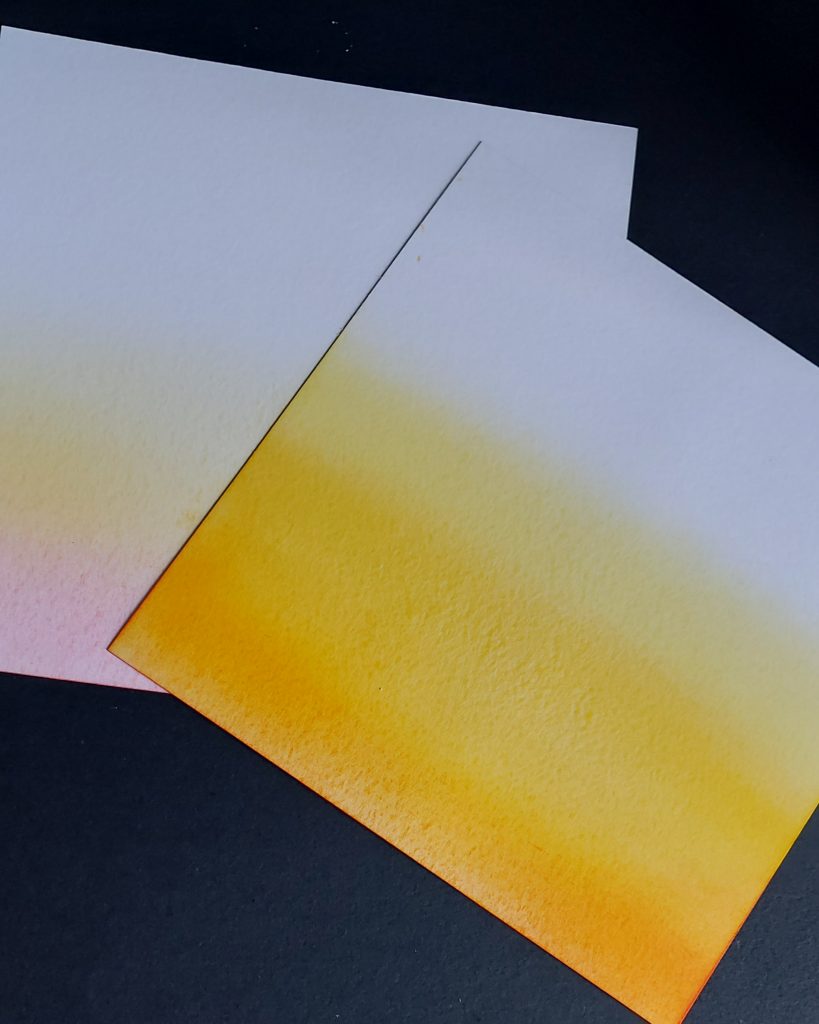
Step 1. Using the lightest of your colours and starting from about ¾ of the way down your 7×7 stencil card, load your brush with colour and sweep backwards and forwards until you get the density of colour you desire. Be aware if using yellow you don’t want to contaminate it with other colours. (keep your yellow brush, yellow)

Step 2. Using the next shade up from your first colour. Repeat step one from the bottom of your first blend of colour laid down on your 7×7 stencil card. (you can blend the two colours by slightly overlapping into the first colour)
Step 3. Again using the 3rd shade up from your first colour, repeat step 2 moving down to the bottom of the page as you go.
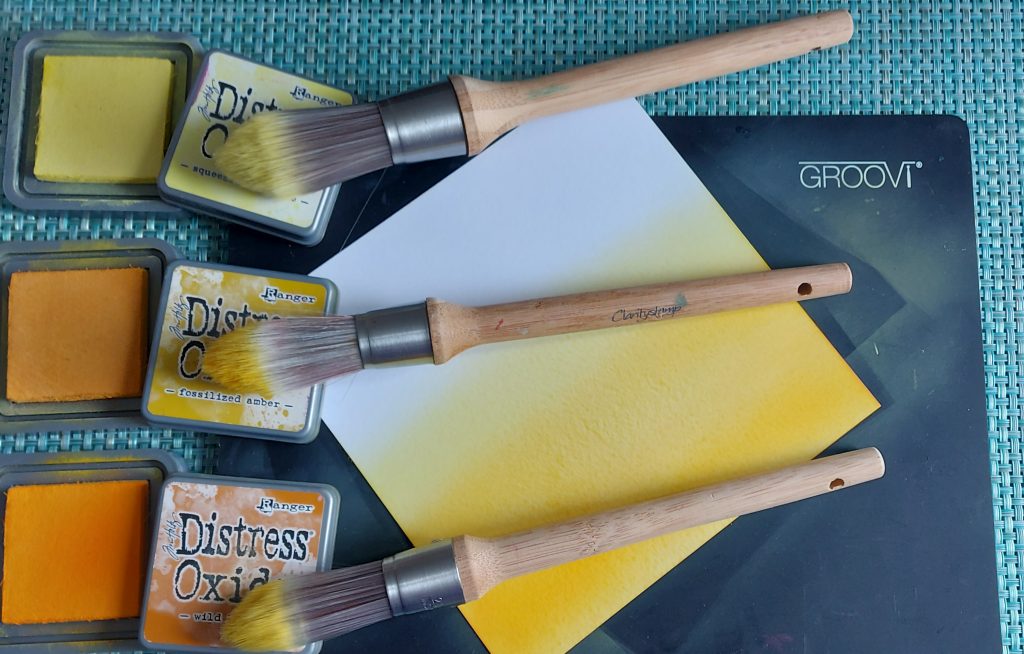
Step 4. For the final colour keep blending till you get the intensity you require, blending off the page.
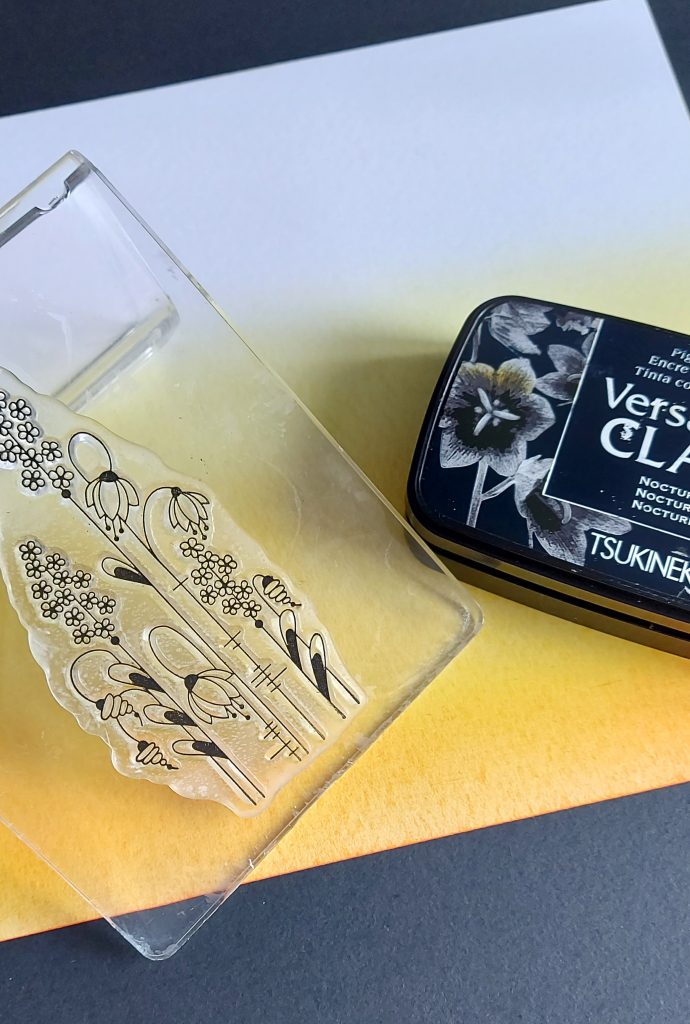
Step 5. Mount your chosen kiss stamp on to the mount and ink up with your chosen black ink.
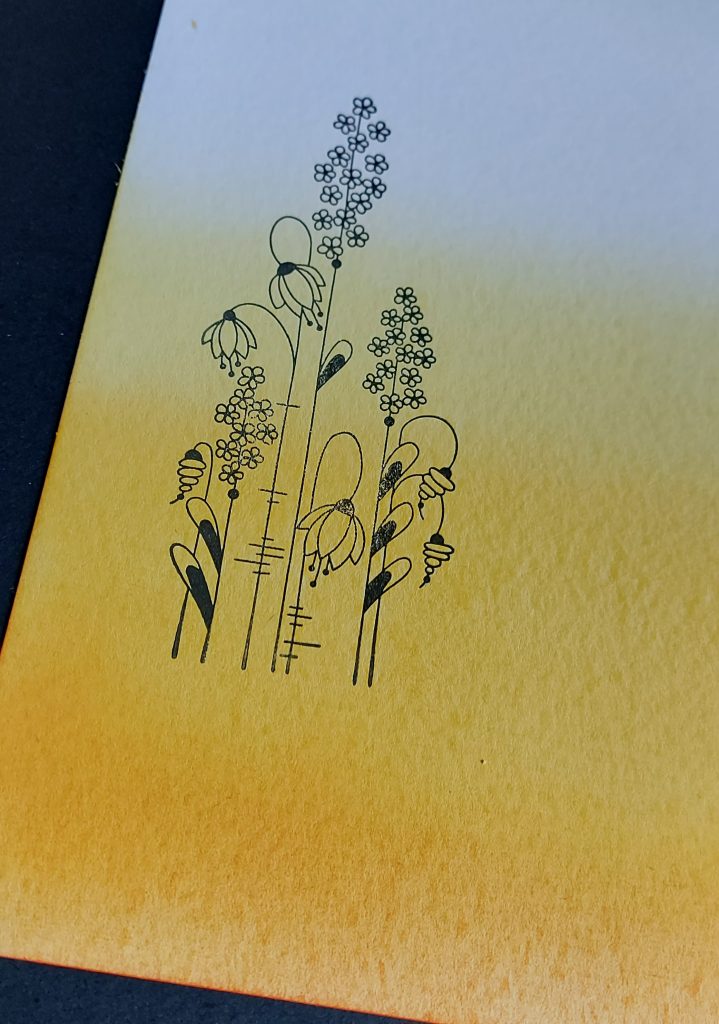
Step 6. Stamp your stamp about a 3rd of the way up from the bottom of your blended colour. So the tips of the flowers stamp into the white area. Make sure there is enough room below the flower’s feet to add the sentiment block and also ensure you are about ¾ of an inch from the left hand side of the card.
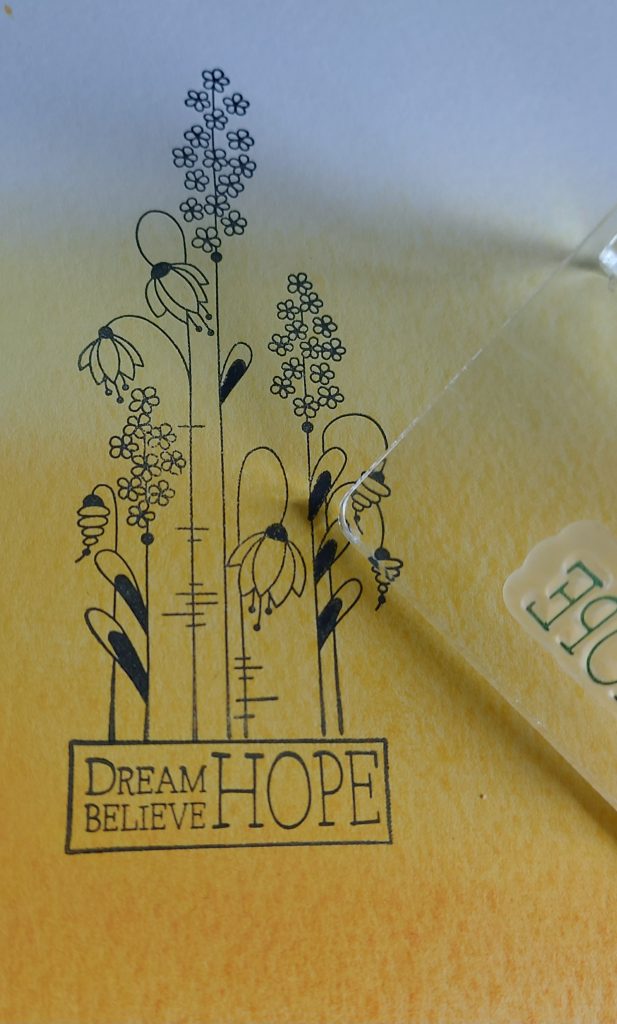
Step 6. Stamp the box and words so they are touching the feet of the flowers.
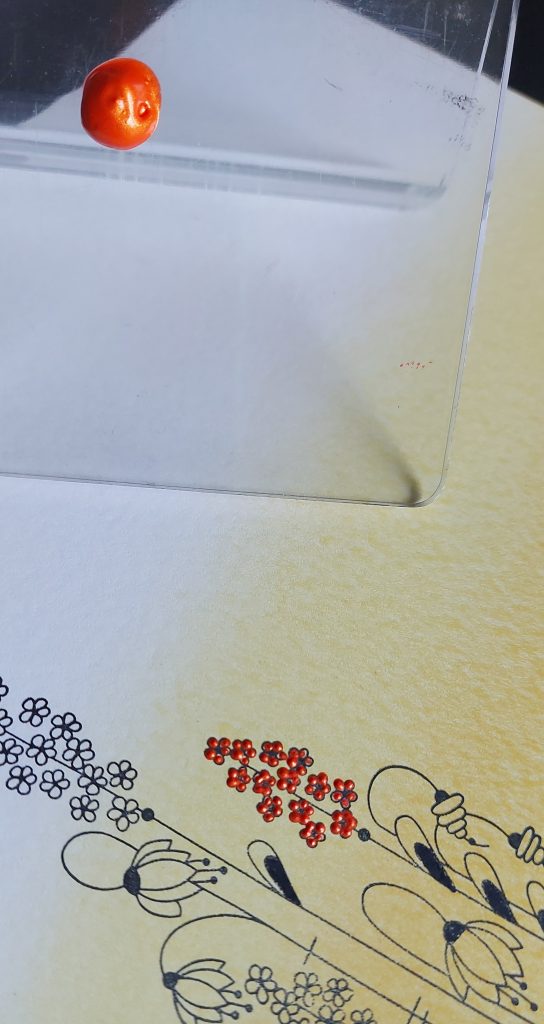
Step 7. Using your chosen acrylic paint, place a small pea sized amount on your acrylic mount, or in a paint pallet, or glazed kitchen tile. Using the no2 Groovi tool, dip the end in the paint and using this tool, dot the paint into the tiny flower petals. Repeat as required. Acrylic holds its density. You will find the paint looks like little raised pearls. You could always use the Pebeo Pearl White Acrylic Paint and make your own colour by mixing it with your Perga Liner Pencils or Perga Colour Pens scribbled on a Mix Mat and mix them together
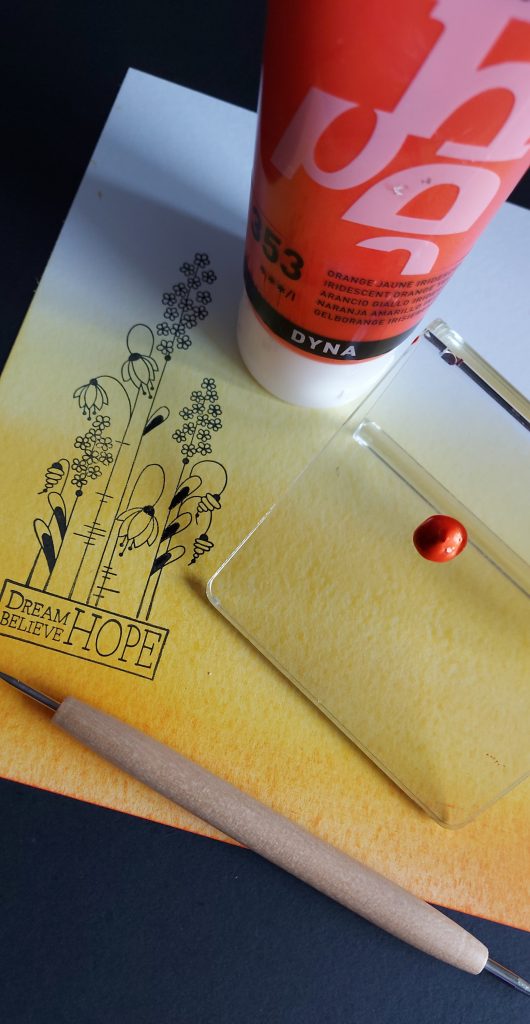
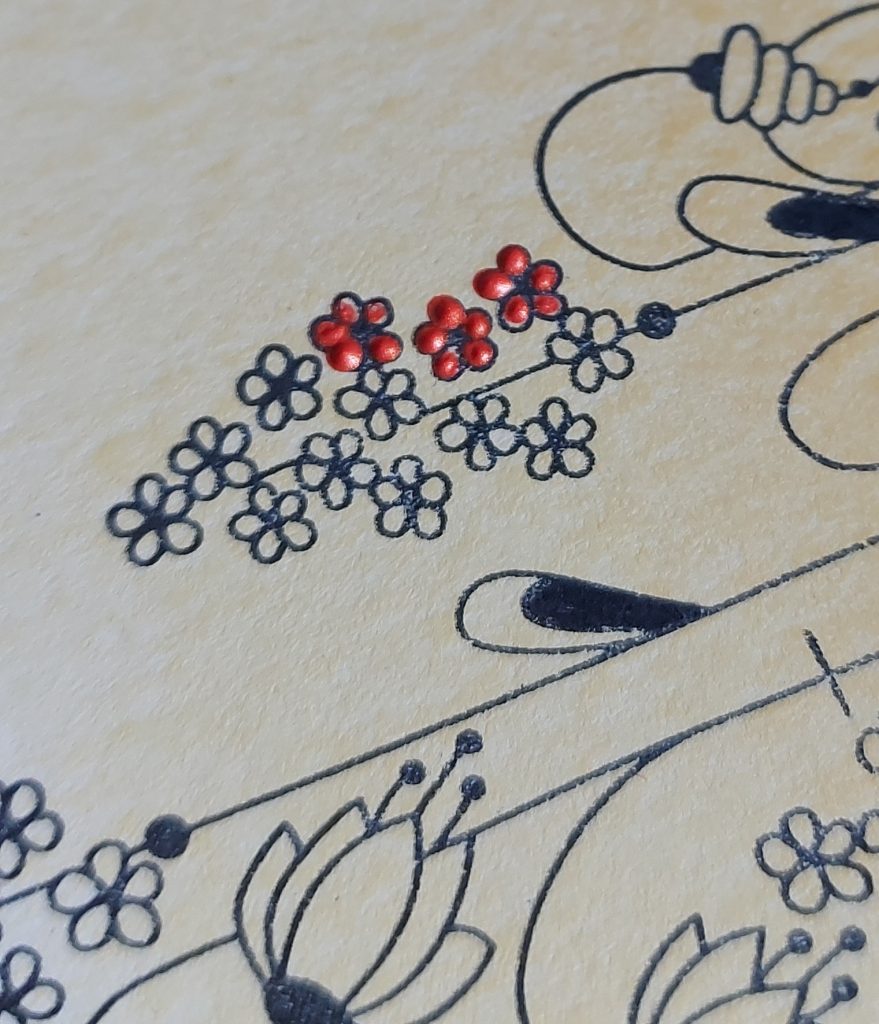
Step 8. Complete this task until all the flower petals have been coloured, this paint takes a while to dry so off to make a cuppa and grab a snack while contemplating which way round I want to ombre my flowers.
Step 9. Colouring in with polychromo pencils, I used 108 dark cadmium yellow, I filled in half the petals leaving some white showing. Pergaliners B pencils will also work well.
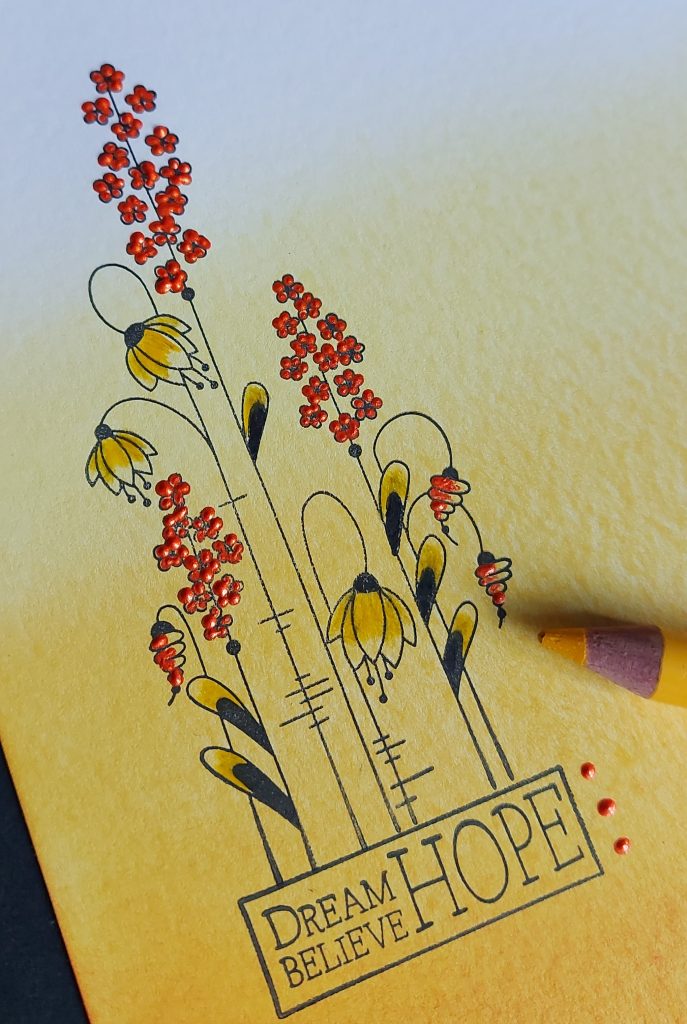
Step 10. Colouring in with the 115 dark cadmium orange polychromo, I coloured about ¾ of the way up with the yellow in step 9, this gives the flowers an ombre effect too! Also add colour to the word tile too! Ombre if you like. It’s your art work after all.

Step 11. Taking your 7×7 stencil card with your coloured art, cut the card at 3 inches making sure you have approximately the same border to one side of your stamped image as the other. The light on my cutter helped ensure I had eyeballed it in the right place.
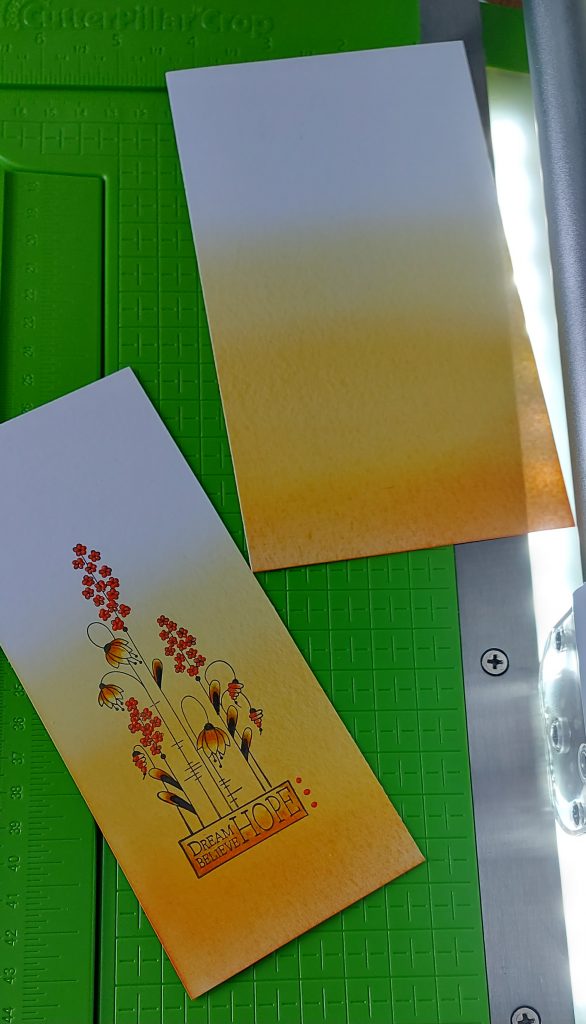
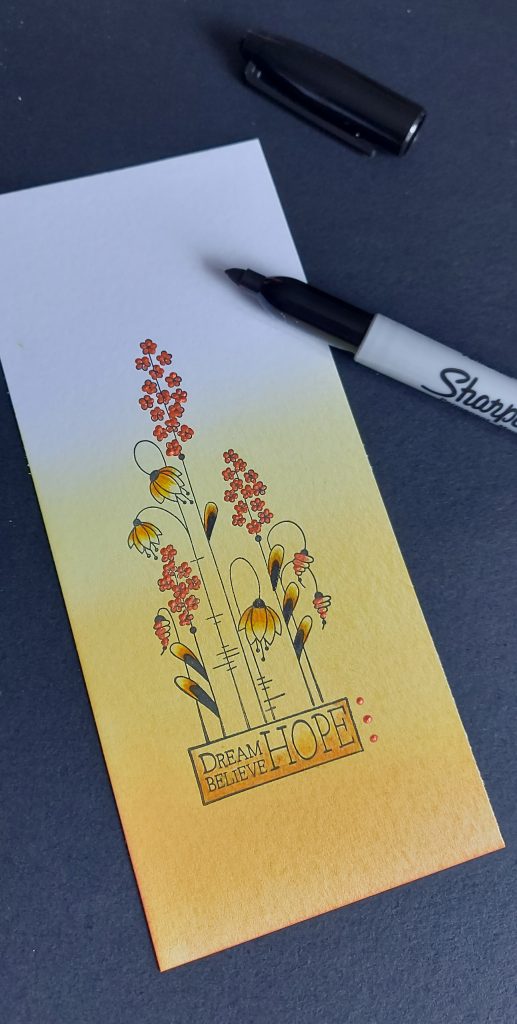
Step 12. With both the stamped piece and the remaining colour blended piece use your black sharpie to edge both items of card.
Step 13. Turn the larger piece upside down so the blend of colour is coming from the top, adhere the stamped smaller piece up the correct way using the clarity Roll-a-tape glue.
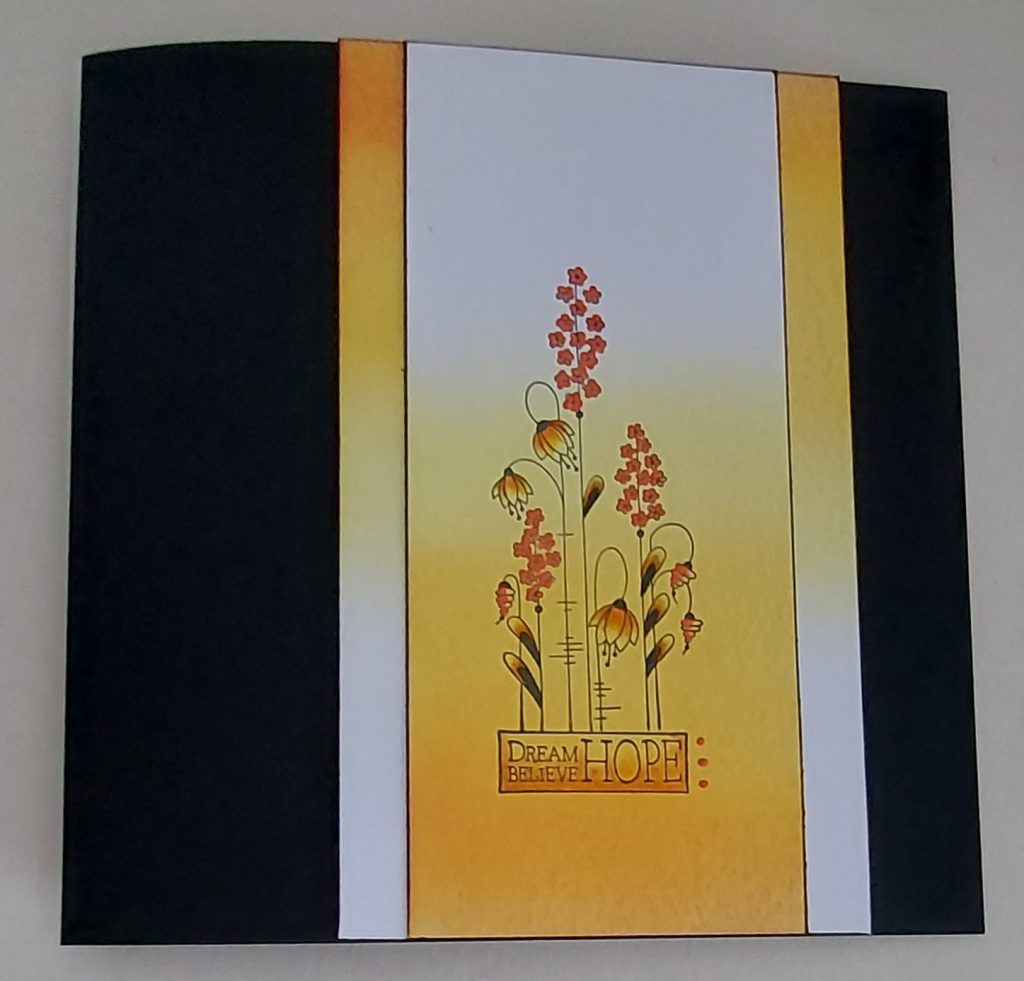
Step 14. Finally, to decide where to add your piece to your 7×7 black card base use white if you prefer, I decided to go with the rule of 3 and put it about 2 inches from the left-hand side of my card, so the remaining 1 inch of black card was to the right of my stamped piece.

There you have it, ombre ombre. (You can always use the excess ink from your brushes to do a lighter version with a different stamp at the same time).
I hope you enjoyed this little step-by-step. I’d love to see your version and colour choices. You could hashtag it with #Ombre when you post it to Clarity Worldwide.
Have a fabulous relaxing Sunday. Lots of crafty hugs as always Tina.x
Wow! I just love Tina’s work… don’t you? This is no exception. Thank you, Tina, for sharing your tip and tricks with us!
Everything that Tina has used can be found over on the Clarity website HERE
Looking at the week ahead:
Monday 27th Mar:
SHAC Shack with Barbara – 10am Live on Facebook and YouTube
Tuesday 28th Mar:
Groovi Tuesday with Paul – 10am Live on Facebook and YouTube
Sunday 2nd April:
Clarity Classics with Barbara on Create & Craft – 3pm to 5pm
Travel gently, friends.
Lotsa love, Grace & Tina xoxo
Clarity – The Home of Art, Craft, and Well-Being.
Love this. I didn’t realise the red flowers were done with paint so will have to give this a go. Thank you for sharing xx
Thank you Tina. This has given me lots of ideas.
Love the addition of the dib dab acrylic paint to the flowers which adds dimension to the artwork. Liking these inky projects to get me to use my stash rather than just look at it !! Thanks Tina x
Hope your arty session went well yesterday Grace – perhaps I will try sip & ink with todays project !!
Beautiful card thank you for explaining your method in such detail
Thank you Tina, I haven’t got these stamps but will have a look to see what I have got as a substitute.
I love pebeo dyna paints and have loads of them!
Thank you Tina, great step by step. xx
Beautiful project Christina. For once I have all the gear. Bought the stamps in the sale but not had chance to use them yet and bought some acrylic paints this week for another project I would like to try. First time using acrylics. Letting them dry now. Will post later in the week when I’ve finished. Thank you.x
Love this.
I have had these stamps for ages, you kno,w what it`s like, buy them think about them and then file them. So i saw what you had done, soooo easy to follow that I did three of them all in your colour combo, then I did a 6inch then a 5 inch and stopped their, so thank you very much and I shall be looking out for some more. ps. I have heard of you many times when Barbara is on the T.V