Clarity Matters Blog Tutorial: How To Create A Delicate Frame
Hello hello! Grace here.
I hope this finds you well.
We are joined today by the talented Maggie Byford. She has kindly prepared a step-by-step project for us to follow. Thanks Maggie!
I’ll pass you over to our teacher…

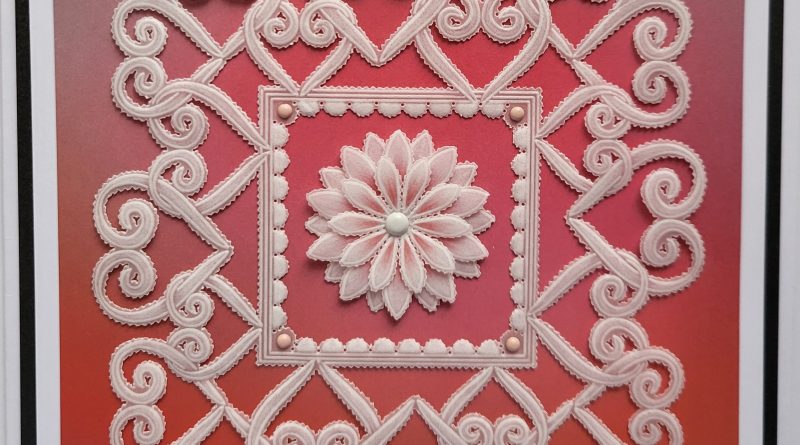
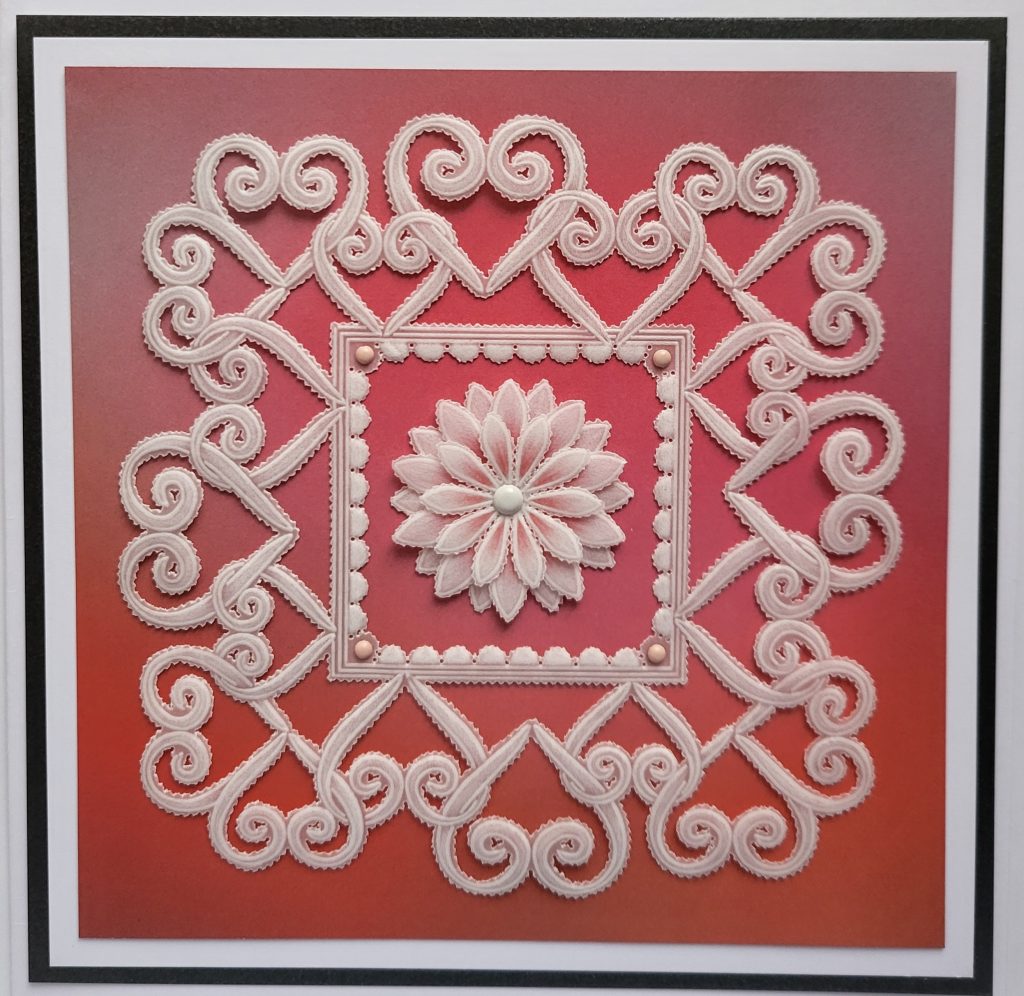
In this tutorial I’d like to show you how to create a beautiful cutwork frame using a single one-row design on Tina’s Doodle Dovehearts Plate. I first made a version of this card in 2018 as a sample for the launch show of the Doodle Plates – and I have to say I enjoyed making it very much and I hope you do too. There is quite a lot of embossing, perforating and snipping to be done as can be seen on my finished card.
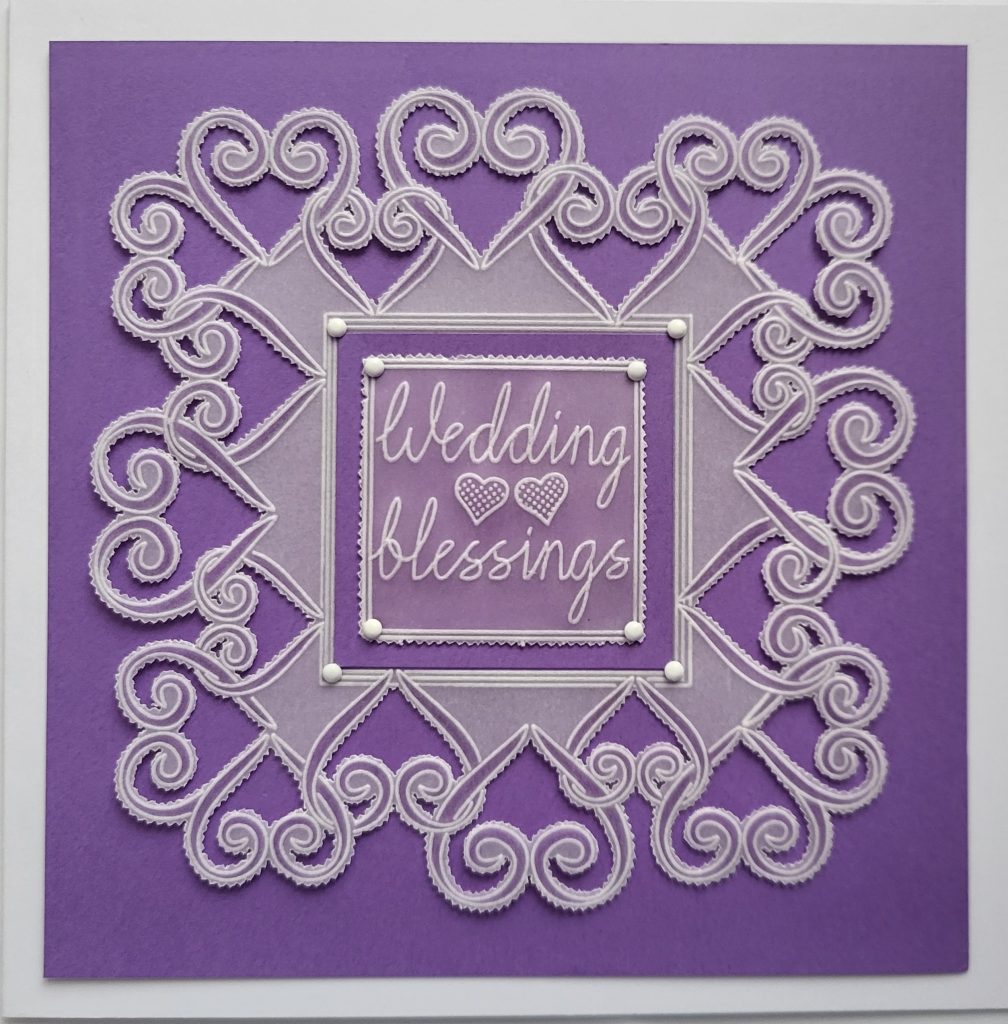
But if you don’t want to tackle all of this you can adapt it to your own taste or take a look at the purple card idea I’ve provided at the end of the Instructions.
INGREDIENTS
Alphabet A5 Sq Plate Mate (GRO-MA-40002-07)
Nested Scallops Squares A5 Sq Groovi Plate (GRO-PA-40557-03)
Tina’s Doodle Dovehearts A5 Sq Plate (GRO-LO-40859-03)
Nested Squares A5 Sq Plate (GRO-PA-40037-03)
Tina’s 3D Flowers & Butterflies A4 Sq Plate (GRO-FL-40553-15)
Groovi A4 Clear Parchment (GRO-AC-40024-A4)
Groovi Sticker Tabs x 16 (GRO-AC-40437-XX)
A5 Black Super Foam (GRO-AC-41765-XX)
A4 Picot Foam (GRO-AC-40625-XX)
Pergamano Excellent – Embossing Mat (PER-AC-70075-XX)
Groovi Embossing Tool 1 & 2 (GRO-AC-40026-XX)
Groovi Embossing Tool 3 & 4 (GRO-AC-40027-XX)
Pergamano 3mm Ball Tool – Large (PER-TO-70005-XX)
Pergamano Semi-Circle Perforating Tool (PER-TO-70017-XX)
Pergamano 1-Needle Bold Perforating Tool (PER-TO-70028-XX)
Pergamano 2-Needle Bold Perforating Tool (PER-TO-70279-XX)
Groovi Guard (GRO-AC-40345-XX)
Ringlock Scissors (PER-TO-70041-XX)
Pergamano White Brads (PER-AC-70269-XX)
Iris & Wisteria x 10 Groovi Duo Parchment Paper A4 (GRO-AC-40766-A4)
Dorso Oil (PER-CO-70066-XX) (optional)
Pergamano Blending Pen (10500) with 3 Nibs (PER-AC-70300-XX) (optional)
Wedding Line Sentiments Border Plate (GRO-WO-40096-09) (optional)
Designer Paper 8×8” Indian Summer (ACC-CA-30524-88)
Claritystamp White Card Blank x 20 (pre-scored) (ACC-CA-30619-77)
Pencil, Ruler and Soft Eraser
Dry tumble Dryer Sheet
METHOD
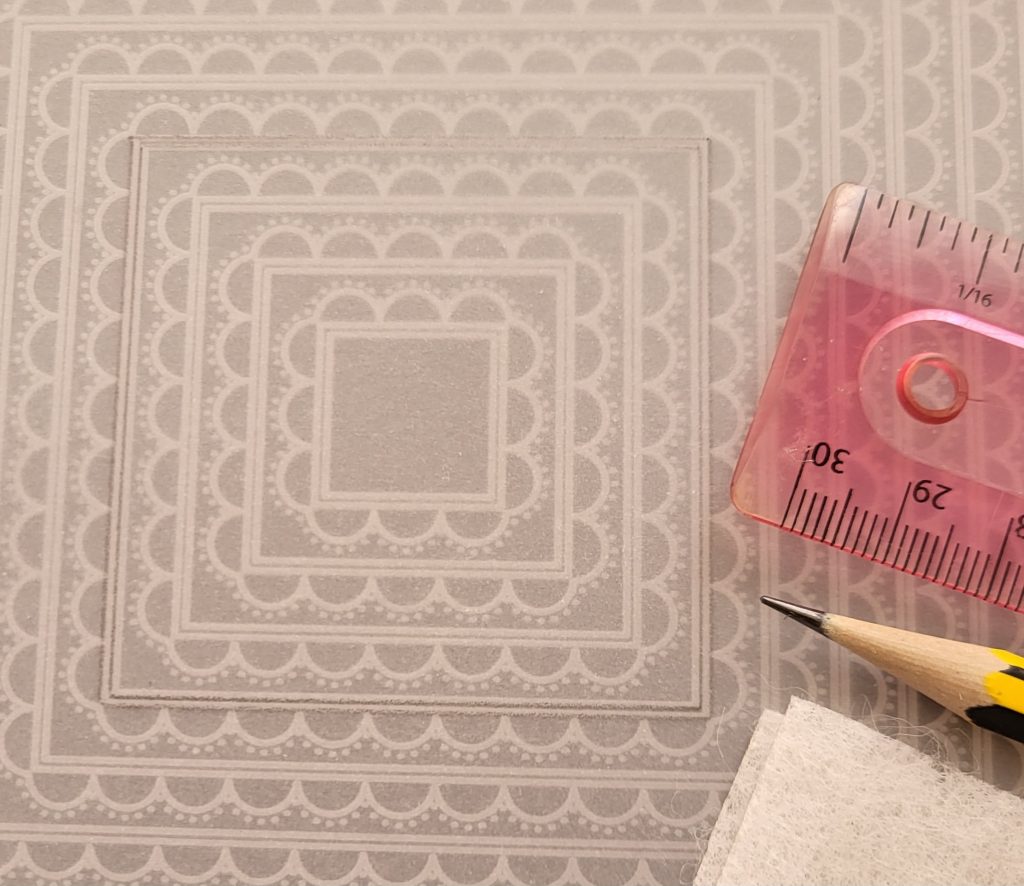
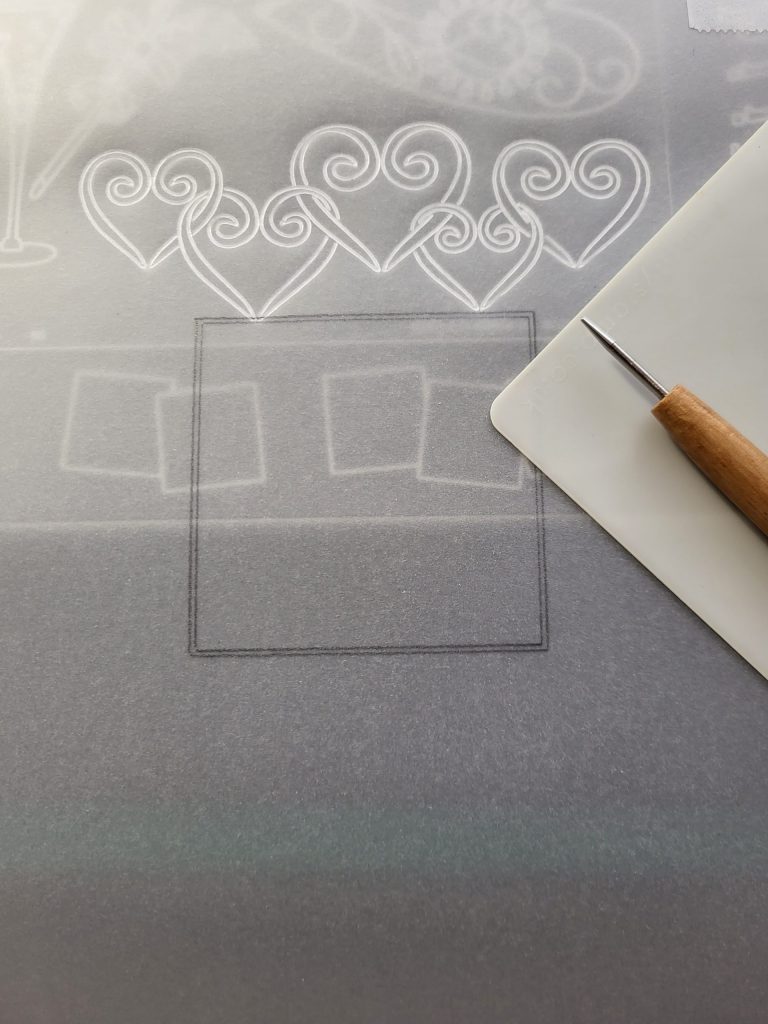
Step 1. Insert the Nested Scallops Squares plate into the A5 Plate Mate,. Attach your parchment to the plate with Groovi Tabs and wipe a dry tumble dryer sheet across the surface to make embossing easier. Use a ruler and sharp pencil to trace around the 6th double outline counting down from the top of the plate so it looks this.
Note: You’ll see I’ve traced around both outlines.
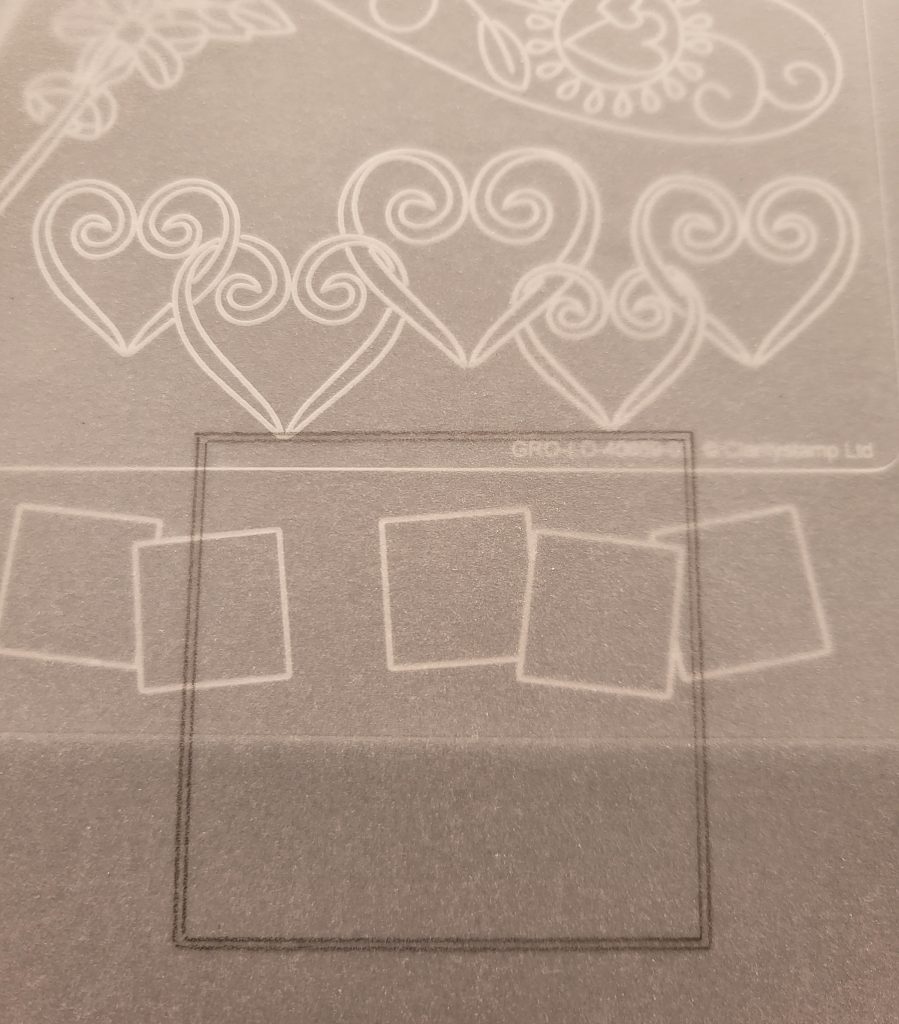
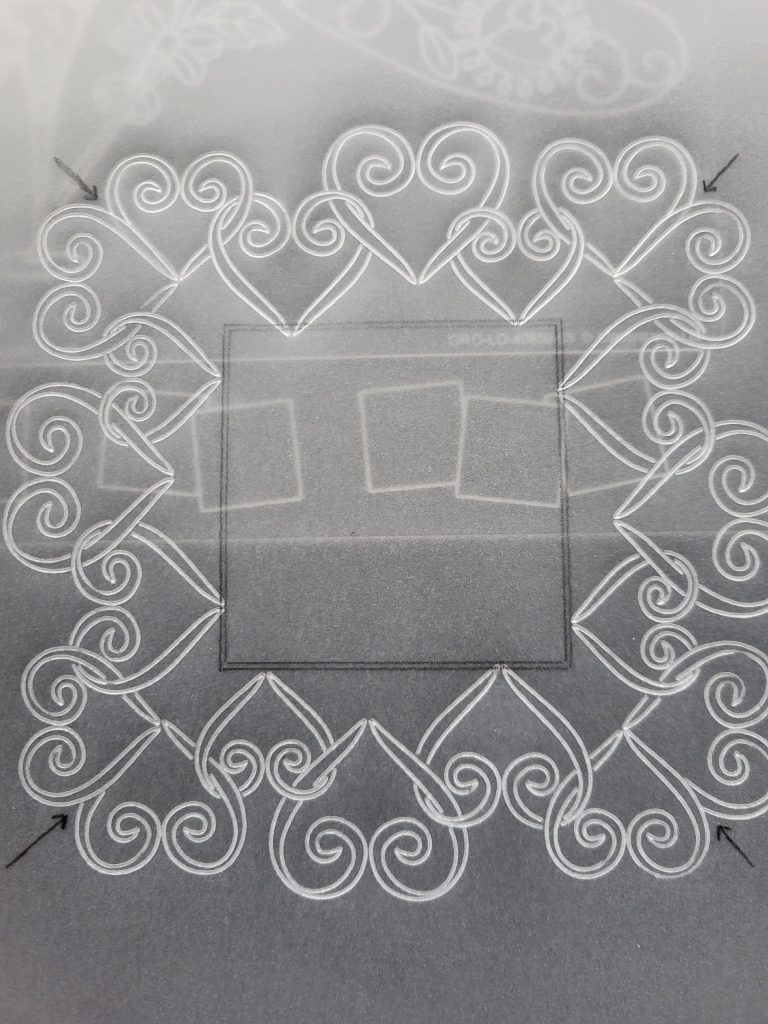
Step 2. Insert Tina’s Doodle plate into the Plate Mate. Very carefully position the top traced outline on your parchment under the two lower hearts, so that the base of the small heart on the right is resting on the top traced line, and the base of the larger heart on the left is resting on the bottom traced line, then re-attach. The positioning of your parchment over the plate is key and should look like this.
Step 3. For the first part of the frame, use Groovi #1 tool to emboss all 4 hearts as you see them on the picture.
TOP TIP: I used a Groovi Guard to keep my parchment flat whilst I was embossing the outlines.
Step 4. For the second part, give your parchment a quarter turn to the right and re-position your top traced outline under the two lower hearts as you did in Step 2 – but before re-attaching take a look at the right-hand side of the picture (indicated by the arrow), to see that I have over-lapped the left arm of the heart on the plate, over the right arm of the embossed heart underneath.

Step 5. Once in position and attached, emboss all 4 hearts as you see them on the picture – but don’t emboss over, or emboss through, the previous embossing near the arrow.
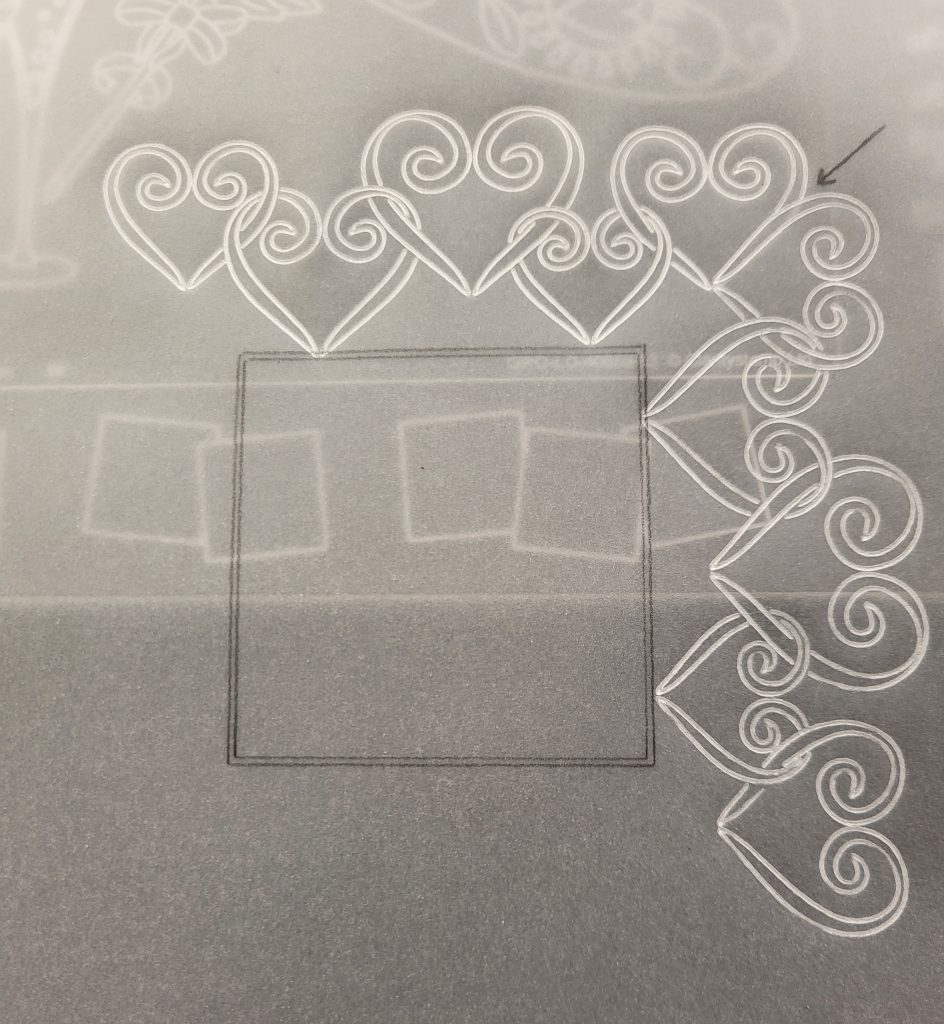
Step 6. For the third part, repeat Steps 4 and 5 above so it looks like this.

Step 7. Before re-attaching for the fourth and final part, take a look at the right and left-hand sides of the picture (indicated by the arrows), to see that each of the end hearts on the plate have been over-lapped with embossing.
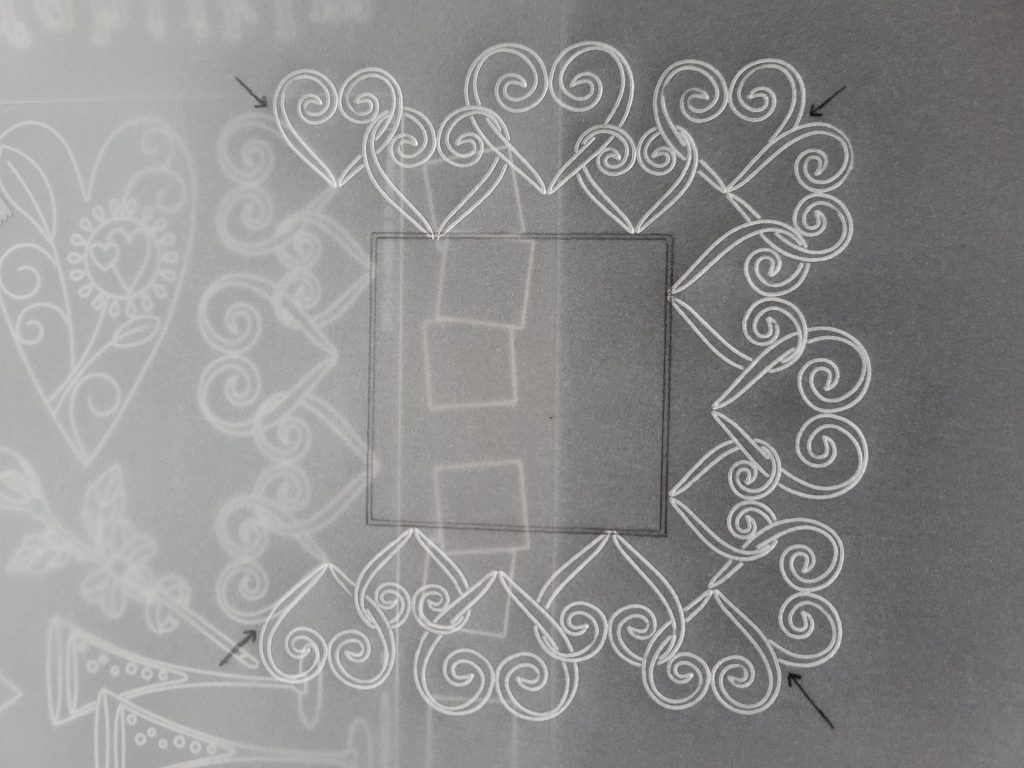
Step 8. When your parchment is in position and attached, emboss the remaining heart. Be careful not to emboss over, or emboss through, the previous embossing.
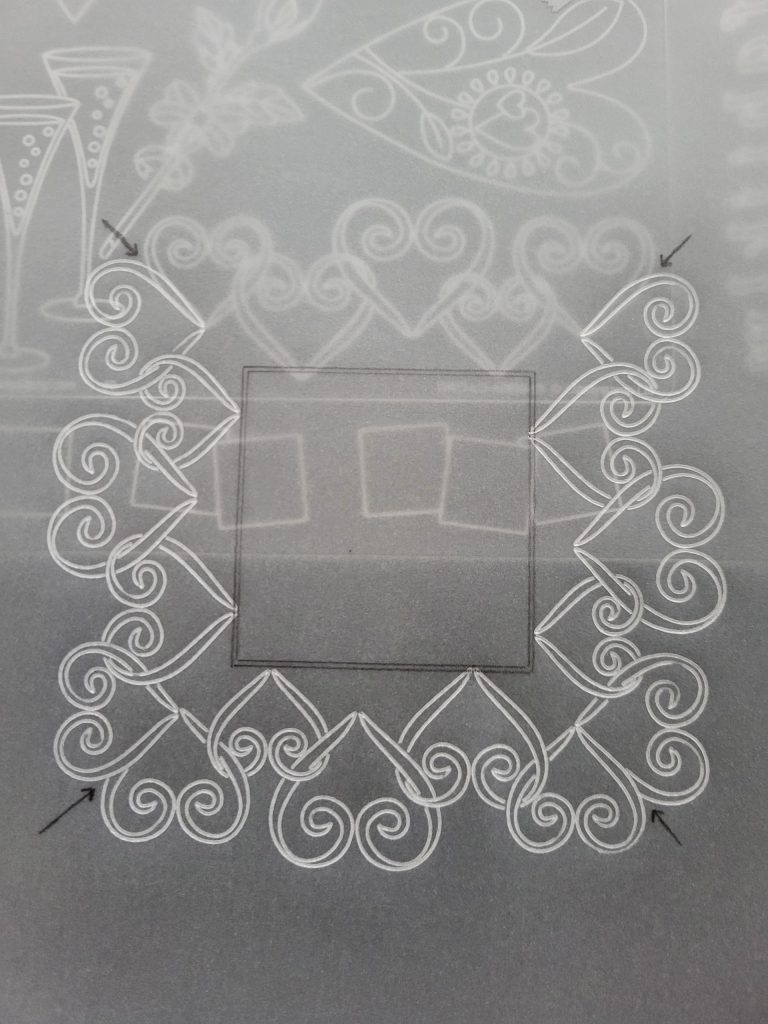
Step 9. Re-insert the Nested Scallops Squares plate into the Plate Mate. Carefully re-align the traced pencil outlines on your parchment over the 6th double outline, counting down from the top of the plate. Once you are happy with the alignment, re-attach and emboss over the pencil lines with the Groovi #1 tool, but take care not to emboss through any parts of the embossed hearts. Use a soft eraser to carefully rub out the pencil lines.
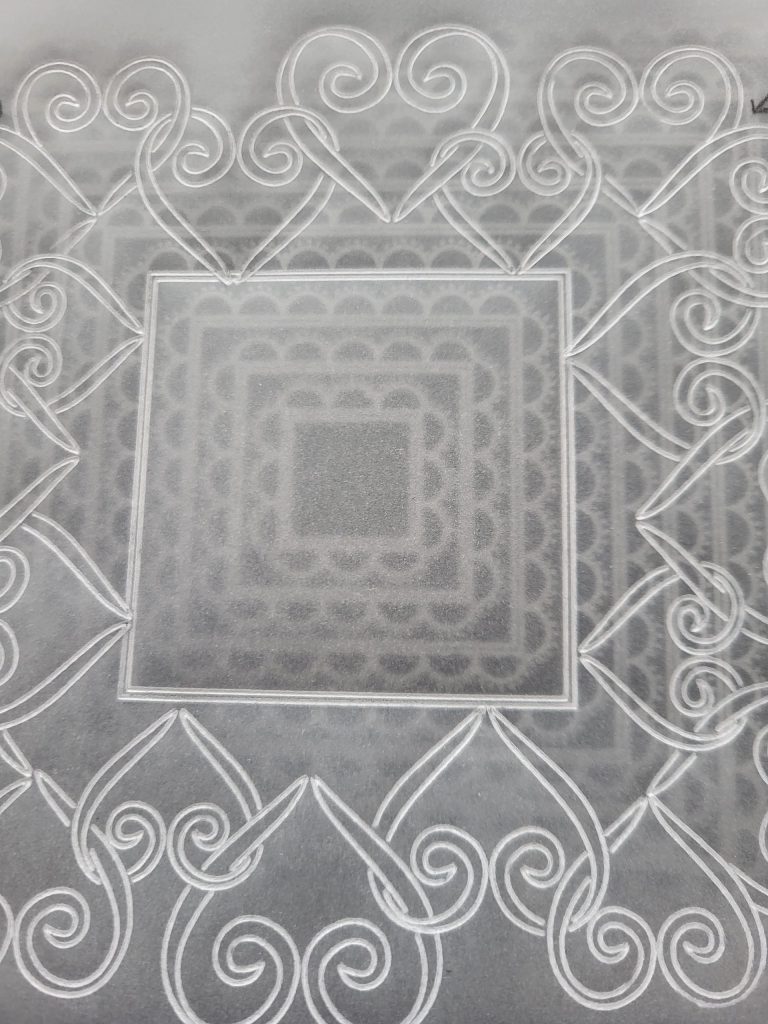
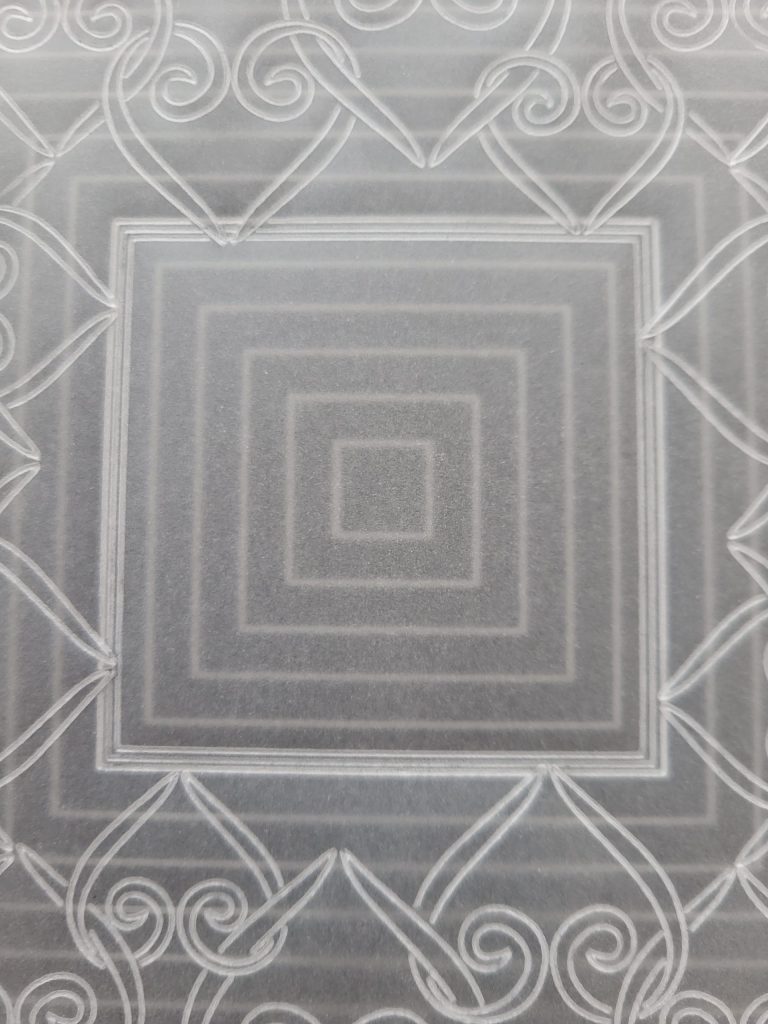
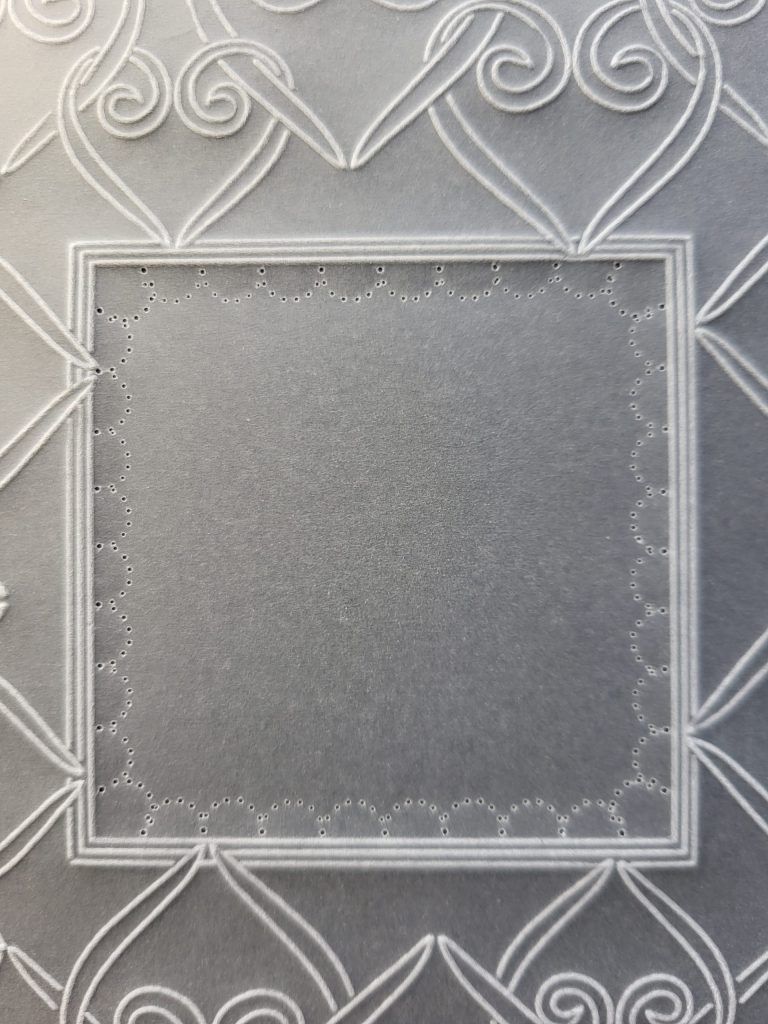
Step 10. Insert the Nested Squares plate into the Plate Mate. Carefully centralise the embossed double outline on your parchment within the 8th outline counting down from the top of the plate. Once you are happy with the placement, re-attach and emboss all around the 8th outline as shown – once again being very careful not to emboss through any parts of the embossed hearts.
Step 11. Place your parchment – front facing upwards – onto a thin A4 Picot Foam mat and use your Semi Circle tool to perforate a semi-circle shape in one of the inner corners of the aperture as shown in the close-up.
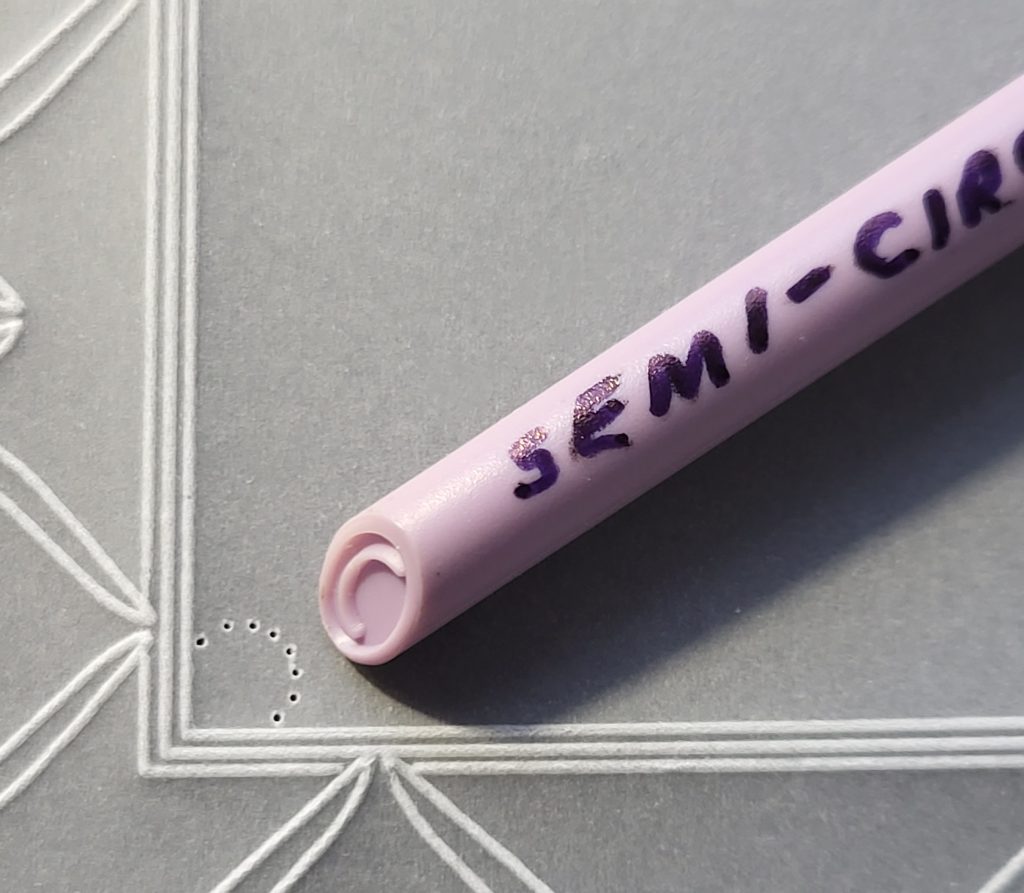
Note: This technique using a thin mat is called a “shallow-perforation”. If you try to use a multi-needle tool with 4 Fine needles or above over a thick mat you will find the parchment will “pucker” and may cause the parchment to tear.
Step 12. Repeat the shallow-perforating of the Semi Circle tool in each of the 3 remaining corners of the aperture, then work around the rest of the aperture.
Step 13. Place your parchment, front facing downwards, onto an embossing mat and use the Groovi #3 tool to emboss along the inside curves of all your semi-circle shapes (but not within the 4 corners as these will be left unembossed and used for inserting a brad into later on).
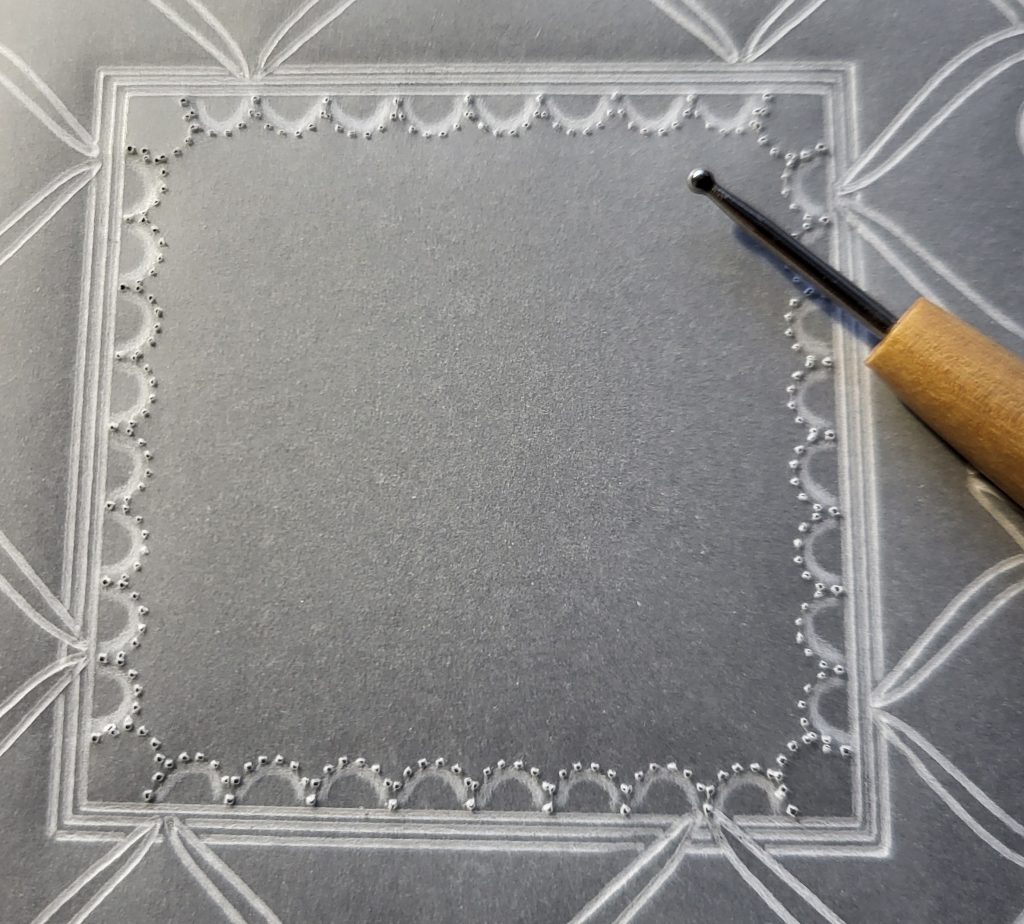
Step 14. Still working on the back, use the Groovi #4 tool to “solid-emboss” inside the semi-circle shapes (this means to fill in the whole of the shape with embossing), but omit the 4 corners as mentioned above. Emboss as near to the perforations as you can, then leave your parchment to rest for a short while before changing down to the Groovi #3 tool to emboss a second, or maybe even a third time, until you achieve the whiteness you are looking for.
TOP TIP: When solid-embossing inside multi-needle shapes there is no need to worry about squashing the perforations as these holes will be re-perforated with a 1-Needle Bold tool at the next step.
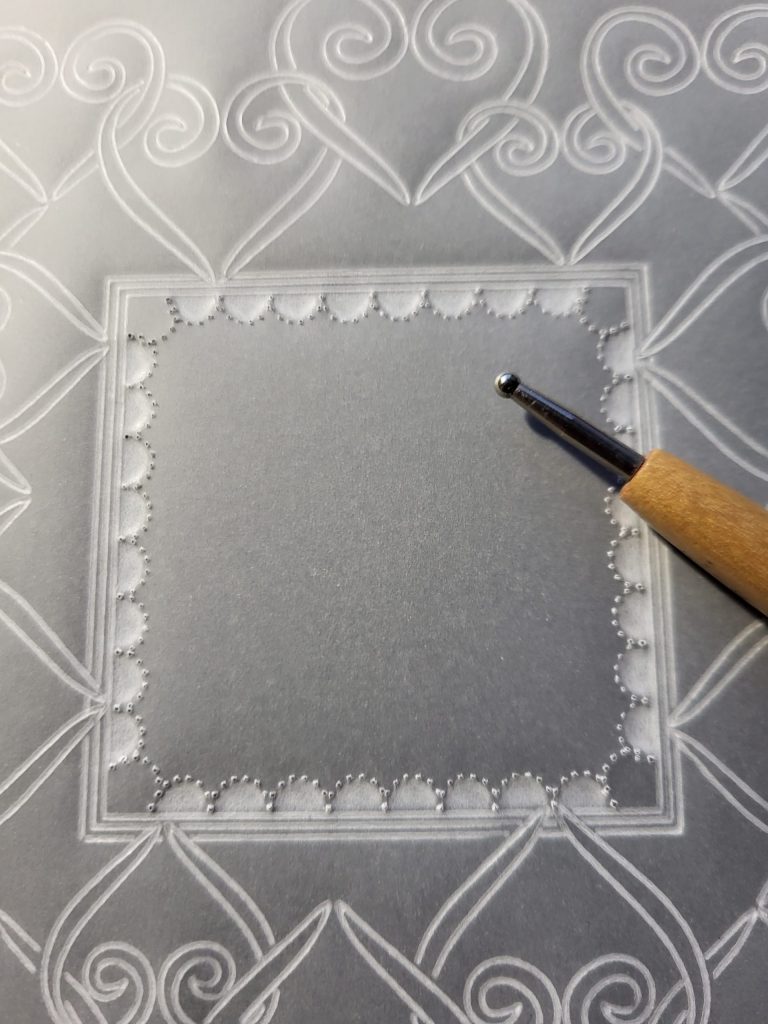
Step 15. With your parchment face up on a thick Superfoam mat, use your 1-Needle Bold tool to carefully re-perforate all the semi-circle perforations as seen on the close-up sample.
TOP TIP: Use one of the apertures on your Groovi Guard to keep the parchment flat whilst re-perforating.
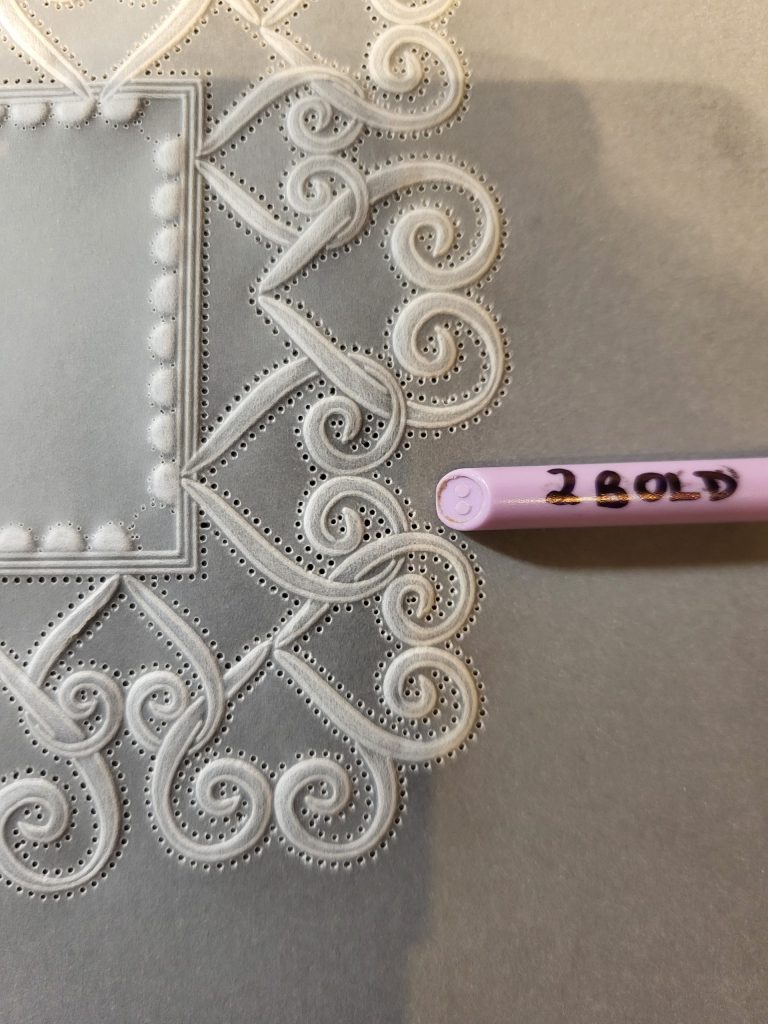
Step 16. To emboss inside the heart shapes use Pergamano 3. I suggest you do a “first” embossing, then leave your parchment to rest for a while before coming back to it for a second embossing, or maybe a third one depending on how white you’d like it to be – take care though not to over-emboss by pressing too hard as this will cause the parchment to buckle or tear. I suggest you use Pergamano 3 for each layer and aim to emboss as close to the outlines as you can.
In the short video below I show you how I did my “first” embossing using Pergamano 3. You’ll see I’m using a soft stroking motion with not too much pressure, sometimes slightly lifting the embossing tool towards the end of each stroke to create some feathering (or shadow).
TOP TIP: In general, for a “first” embossing always start with a larger embossing tool than is needed then move onto a smaller one, but try not to press too hard as whiteness comes with layers of smooth embossing and letting the parchment rest in between each layer, rather than heavy embossing to start with.
Step 17. Place your parchment, front facing upwards, onto a thick black Superfoam mat and use a 2-Needle Bold tool to perforate all around the hearts as shown in the picture.
Step 18. Use your Parchment Scissors or Snips to first of all snip between all the semi-circle perforations inside the aperture, then between the 2-Needle perforations in and around the hearts.
Note: At this point you may choose not to cut out the aperture, in which case you could use it to add a design of your own choice or even add a separate topper at a later date. See Step 21.

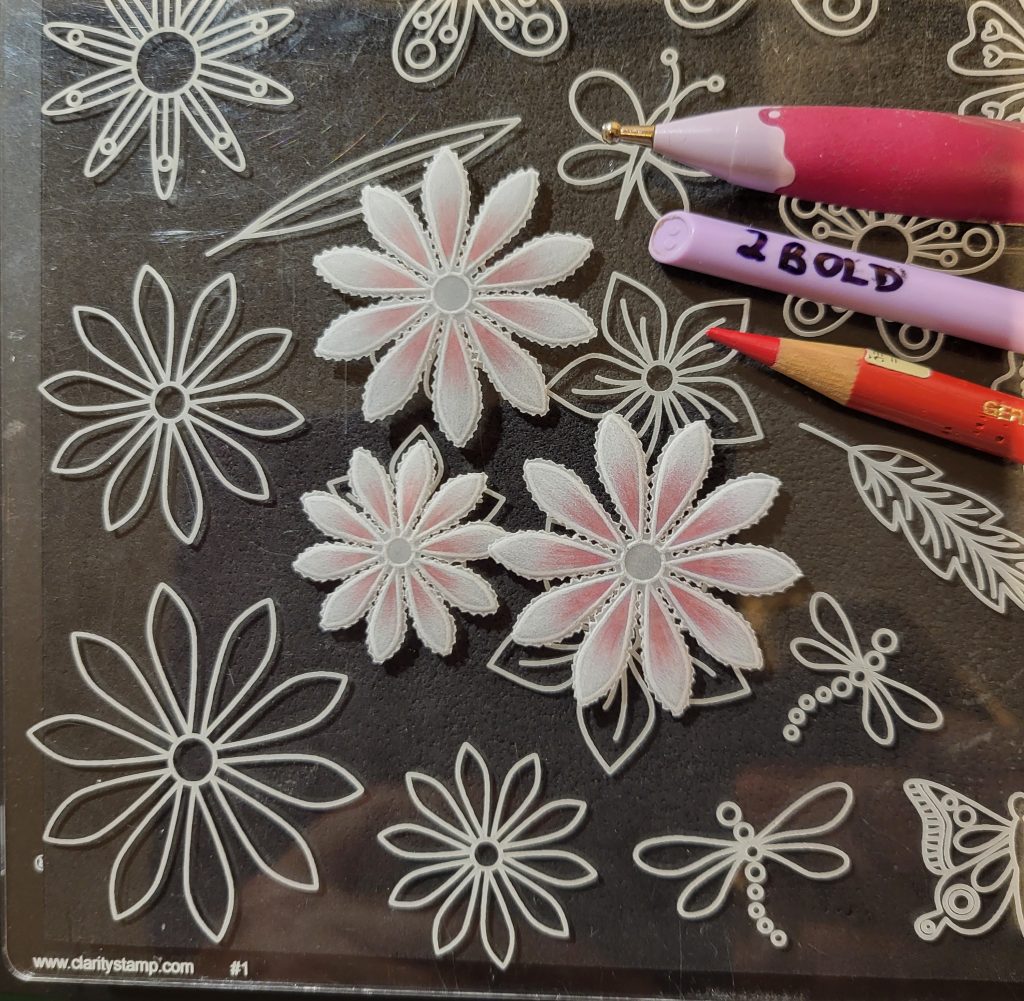
Step 19. The 3D flower I chose was from Tina’s 3D Flowers plate. I used 2 medium daisy flowers and 1 small one, embossed and coloured them on the back, snipped around them with a 2-Needle Bold then cut them out with parchment scissors. I then built them up into 3 separate layers with the smallest on top, and secured them together with a brad in the centre.
Step 20. Finishing
Attach your Entwined Hearts Frame onto Designer Paper cut to size, then secure with a brad in each of the four unembossed semi-circle corners of the aperture, as mentioned in Step 14.
Mount onto white card, then black card, then onto the front of pre-folded white card. Finally, add your 3D flower centre piece (if using). This is what it will look like. You’re all finished!
NOTE: Instead of embossing inside the hearts at Step 16, or snipping out the aperture at Step 18, why not take a look at this purple card below as an alternative idea.
WOW! What an incredibly beautiful step-by-step project. Thank you, Maggie, for sharing your tips and tricks with us. We really appreciate it! The level of detail is amazing.
Everything that Maggie has used in this particular project can be found on the Clarity website HERE.
And don’t forget that our lovely Paul Church is on Create & Craft at 4pm & 8pm today.
So, looking at the week ahead…
Sunday 22nd Jan:
Get Groovi with Paul on Create & Craft at 4pm & 8pm
Tuesday 24th Jan:
Groovi Tuesday with Paul – 10am Live on Facebook and YouTube
Friday 27th Jan:
Crafting with Clarity with Paul on Create & Craft – 9am & 1pm and Craft Extra at 11am
That’s all for now. Enjoy your week!
Lotsa love, Grace & Maggie xoxo
Clarity – The Home of Art, Craft, and Well-Being.
That is beautiful, Maggie! Thank you!
These cards are stunning Maggie. I enjoyed reading through each step. I haven’t quite reached this level but someday with a bit more practice I will be ready to try and achieve this gorgeousness.
Maggie, that is beautiful. I will try to do justice to this design x
What a lovely project with lovely clear instructions and tips. Thank you Maggie xx
Absolutely stunning and just my kind of card Maggi, love it xx
Oooh gosh! I love this! Maggi Beautiful….💗💗💗
Wow lovely project Maggie
This is stunning. Thank you for the clear step by step.
Beautiful project Maggie. I have a same sex marriage coming up which this would be perfect for.
What a beautiful card that looks so complicated but with the clear step by step instructions is so achievable. The 2nd card is also a great alternative. Thanks Maggie for sharing these with us today.
Beautiful projects. Thank you
A brilliant project Maggie. Thank you for sharing it and your expertise with us all.
Xxxx
Wow! Excellent instructions that break down the making of this beautiful card into simple, manageable steps – thank you!
Thank you for a beautiful project.