Clarity Matters Blog Tutorial: How To Use The Picot V Tools
Hello hello! Grace here.
I hope this finds you well on your Sunday morning. It’s time to get creative!
We are joined by our friend and talented design team member, Glynis Whitehead. Her lovable husband, Pete, is quite poorly at the moment, so please send good energy and love his and Glynis’s way.
Glynis has kindly prepared a lovely step-by-step project for us. I’ll pass you over to the pro!

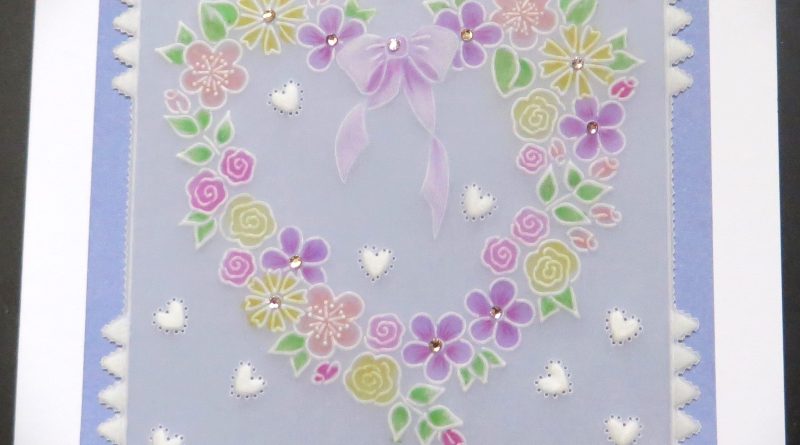
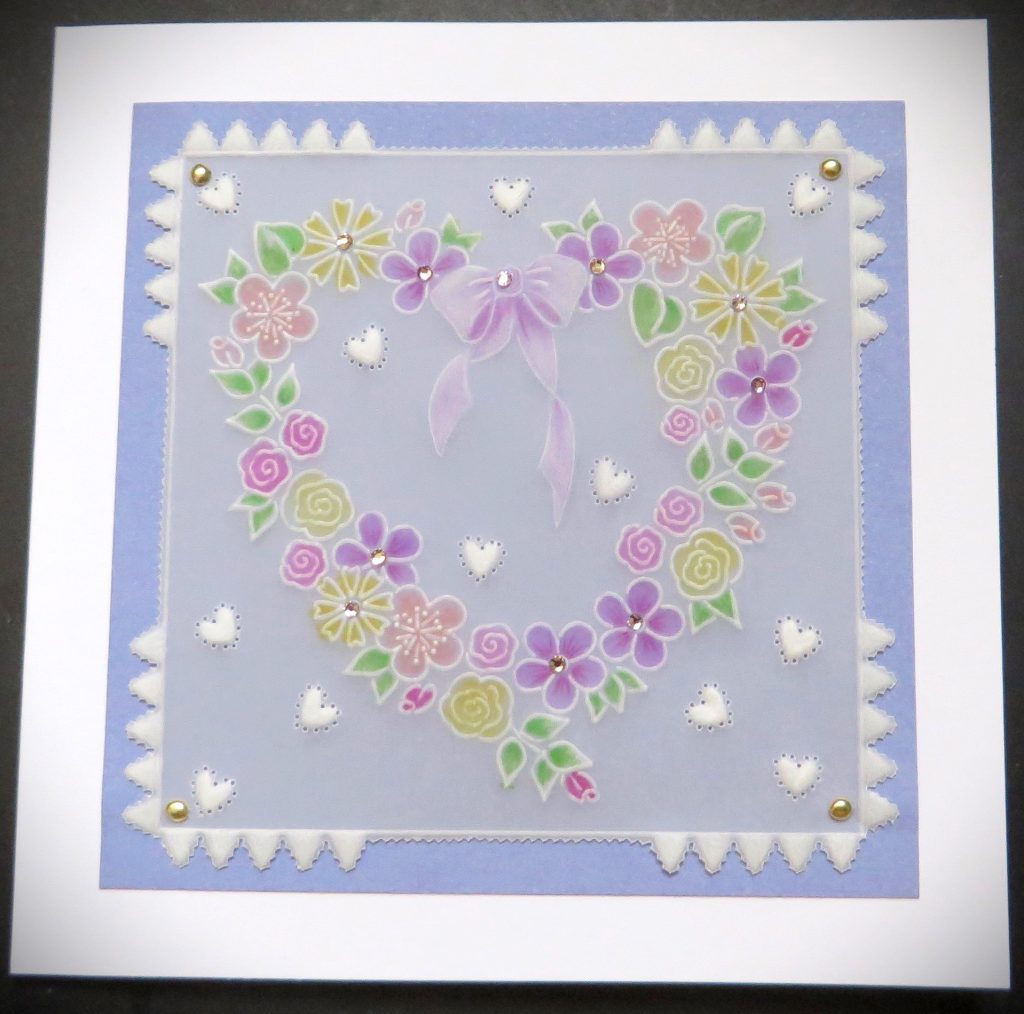
A Posy From the Heart
This project uses a New Design Club plate. If you are not in the club, some of the older back issues are available on the Clarity Crafts Website. Those that are in the club and have this plate might enjoy another cheeky little project to work on!
Ingredients
New Design Groovi Club Back Issue #57 “A Posy From the Heart” (GRO-FL-41532-01)
Nested Squares A5 Sq Groovi Plate (GRO-PA-40037-03)
*If you are in the New Design Groovi Club (or if you already own the original or the deluxe Groovi Plate Starter Kit + Butterfly Wreath A5 Sq Plate) you will have a Plate Mate that fits your baby plates. If not, you will need the item listed next*
Numbers, Ovals and Tags A6 Sq Groovi Plate Inset (GRO-WO-40133-11)
Pergamano Embossing Tool – 4.5 mm (PER-TO-70015-XX)
Pergamano Embossing Tool – 3mm (PER-TO-70005-XX)
Pergamano Pecot ‘V’ Tool (Medium) (PER-TO-70282-XX)
Pergamano Single Needle Perforating tool (PER-TO-70035-XX)
Pergamano Heart Perforating Tool (PER-TO-70022-XX)
A4 Picot Foam mat (GRO-AC-40625-XX)
Perga Colours Exclusive pens (PER-CO-70060-XX)
Small Watercolour Brush Pen (ACC-PE-30874-XX)
Pergamano Mix Mat (PER-AC-70304-XX)
Perga-Crystals – Crystal Blossom (PER-CR-70401-XX)
Perga Glue (PER-AC-70133-XX)
Gold Perga Brads (PER-AC-70274-XX)
Method
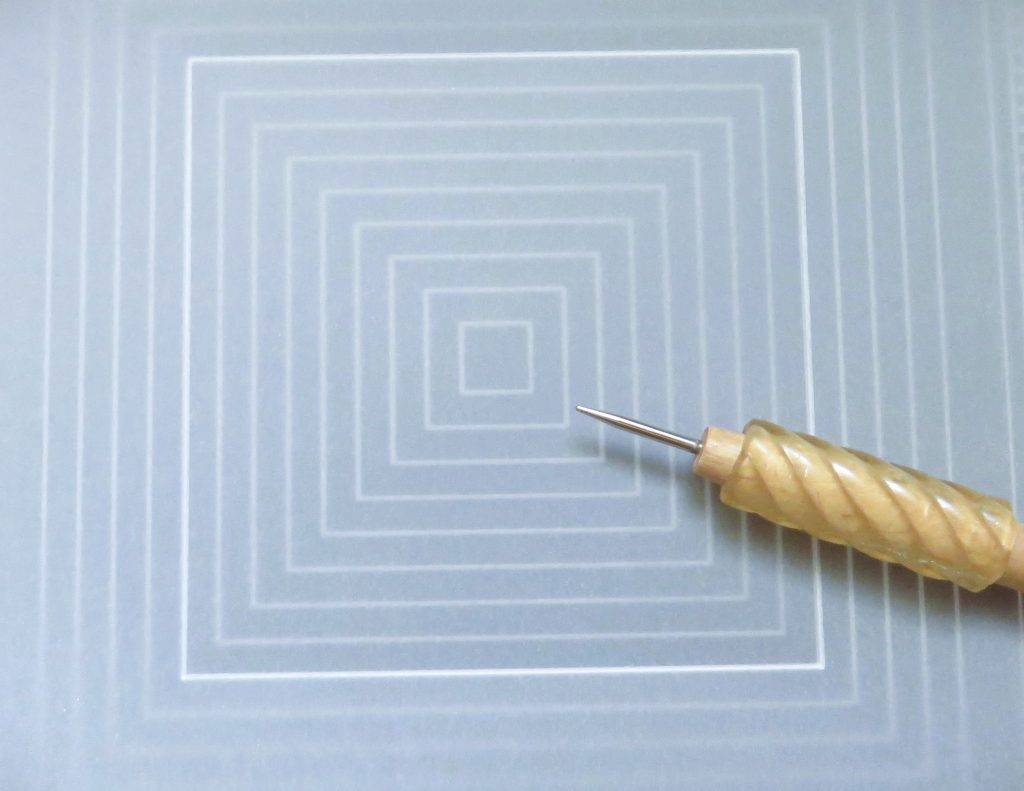
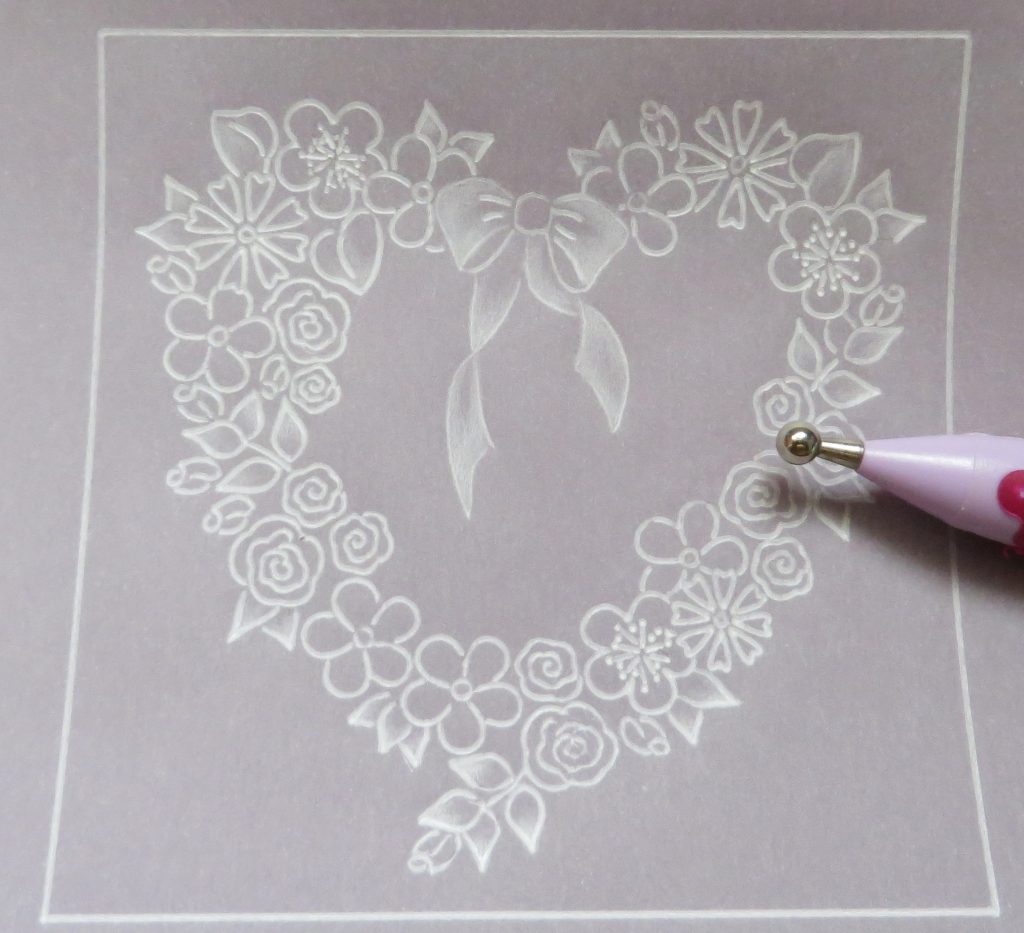
Step 1. Secure a piece of plain parchment over the nested squares and emboss the 5th line in from the edge.
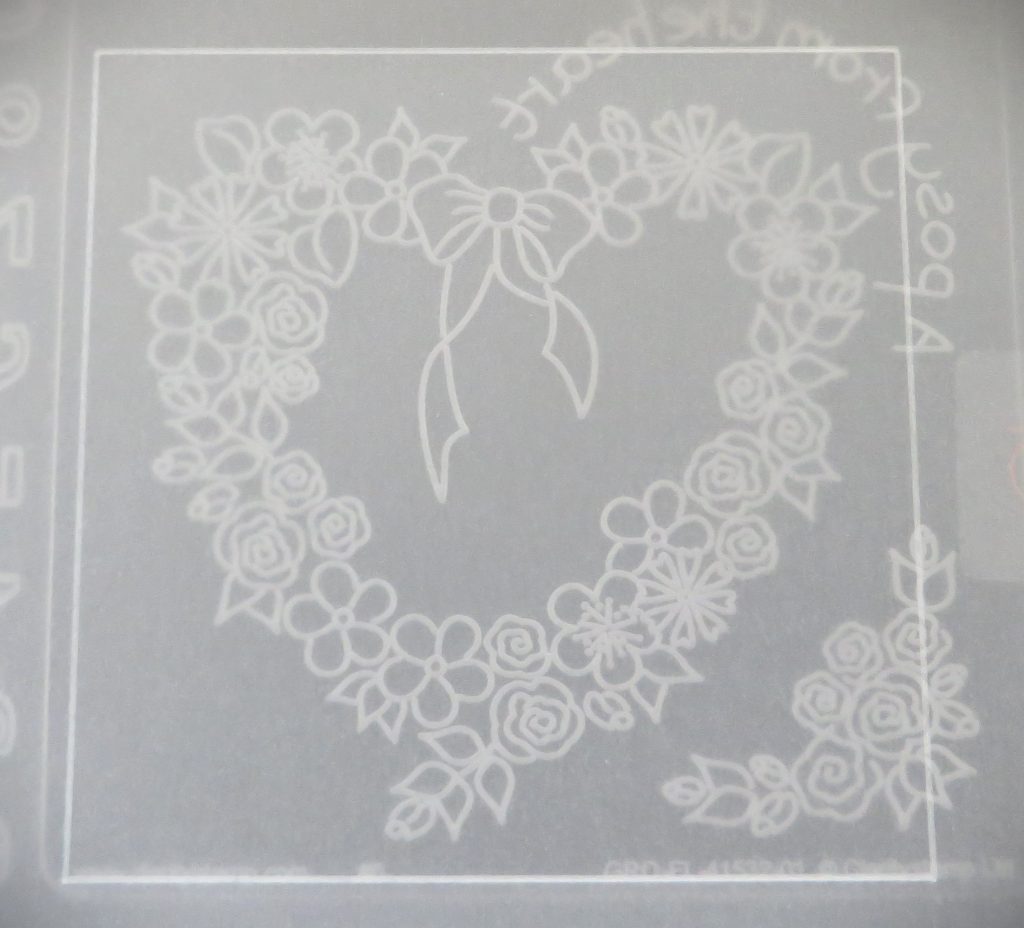
Step 2. Swap out the nested squares for the inset plate and pop the Posy Heart plate into the centre. Secure all the plates with a Groovi tab to prevent them from moving about. Centralize the heart within the embossed square.
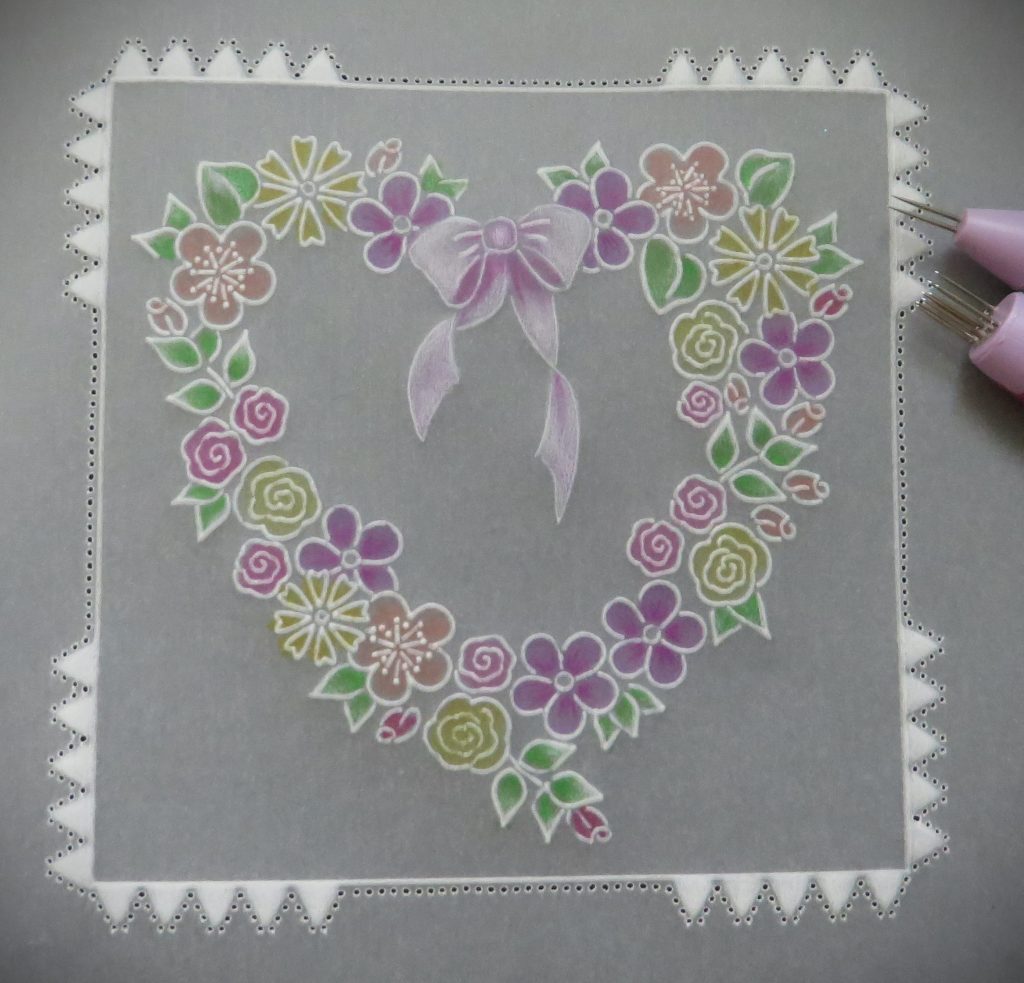
Step 3. Emboss the flowers and leaves with the number 1 tool from the Starter Kit, but use the number 2 tool to emboss the bow.
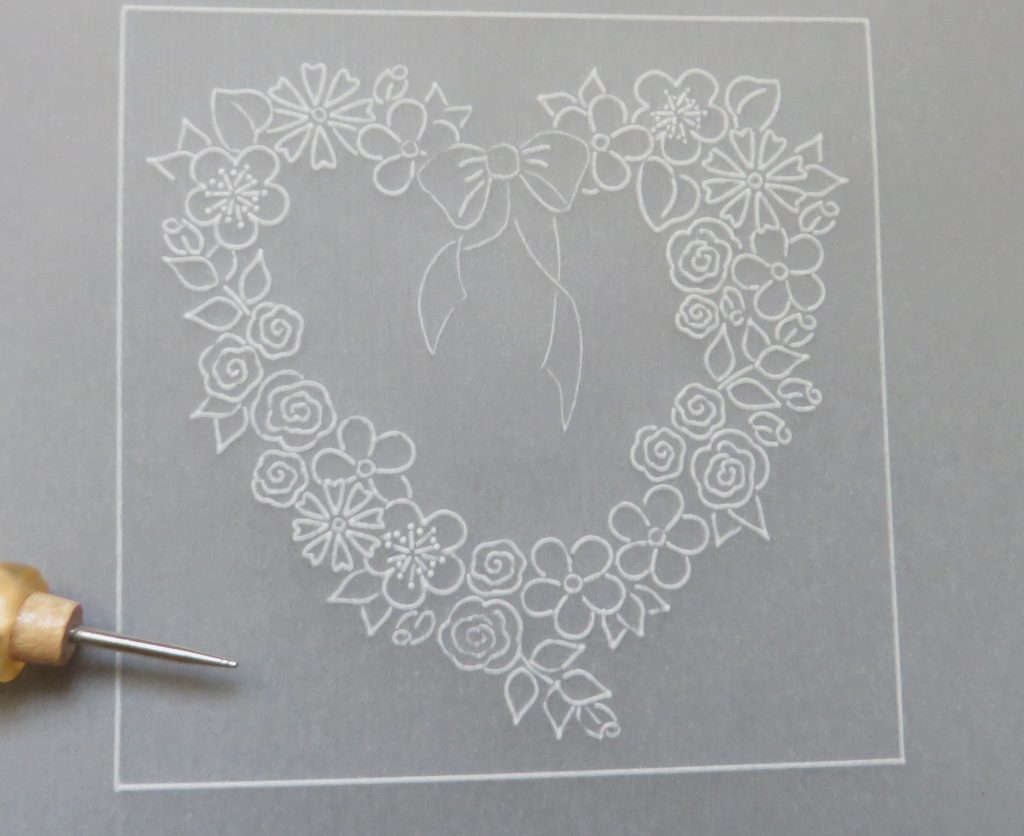
Step 4. Use the 4.5mm ball tool to emboss the bow and add some highlight to the tips of the leaves.
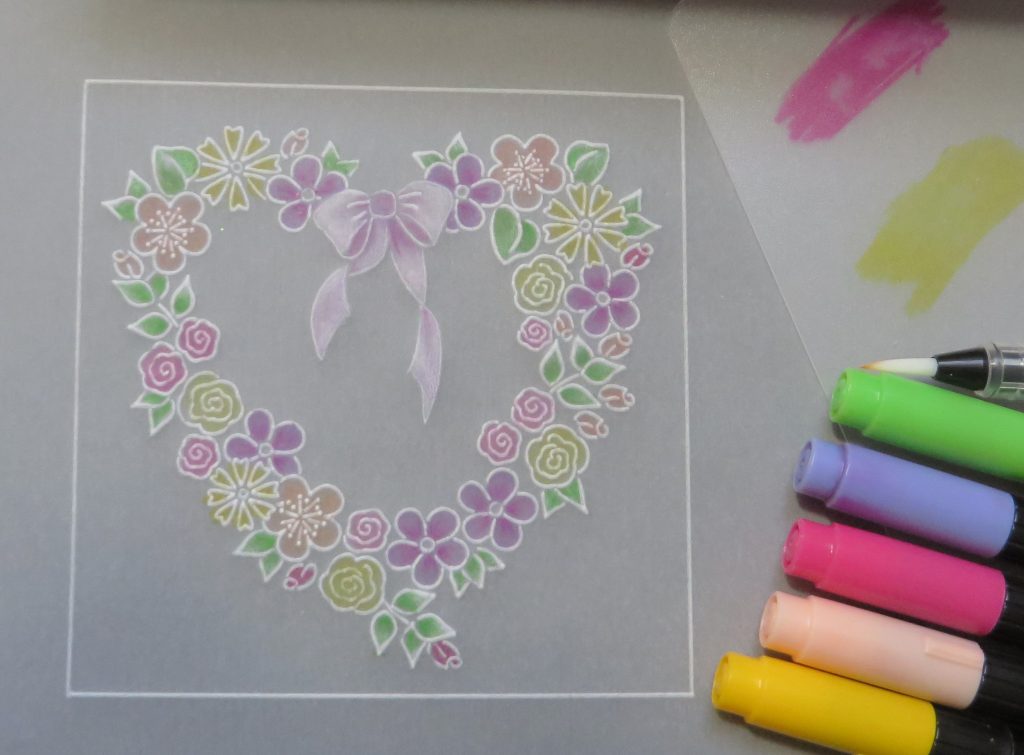
Step 5. It is time now to colour in the flowers. I have used Perga Colours Exclusive Pens for this. I used numbers 1, 4, 6, 9 and 16. I also used a mix-mat to scribble out some of the colours. Where you would like more subtle colours, use the dry pen (keep one, especially for this job). Pick up some colour on the tip of the brush and paint it into the bow and larger flowers. Let the paint dry and then add another layer where you want the colour a tad darker, at the base of the petals etc.
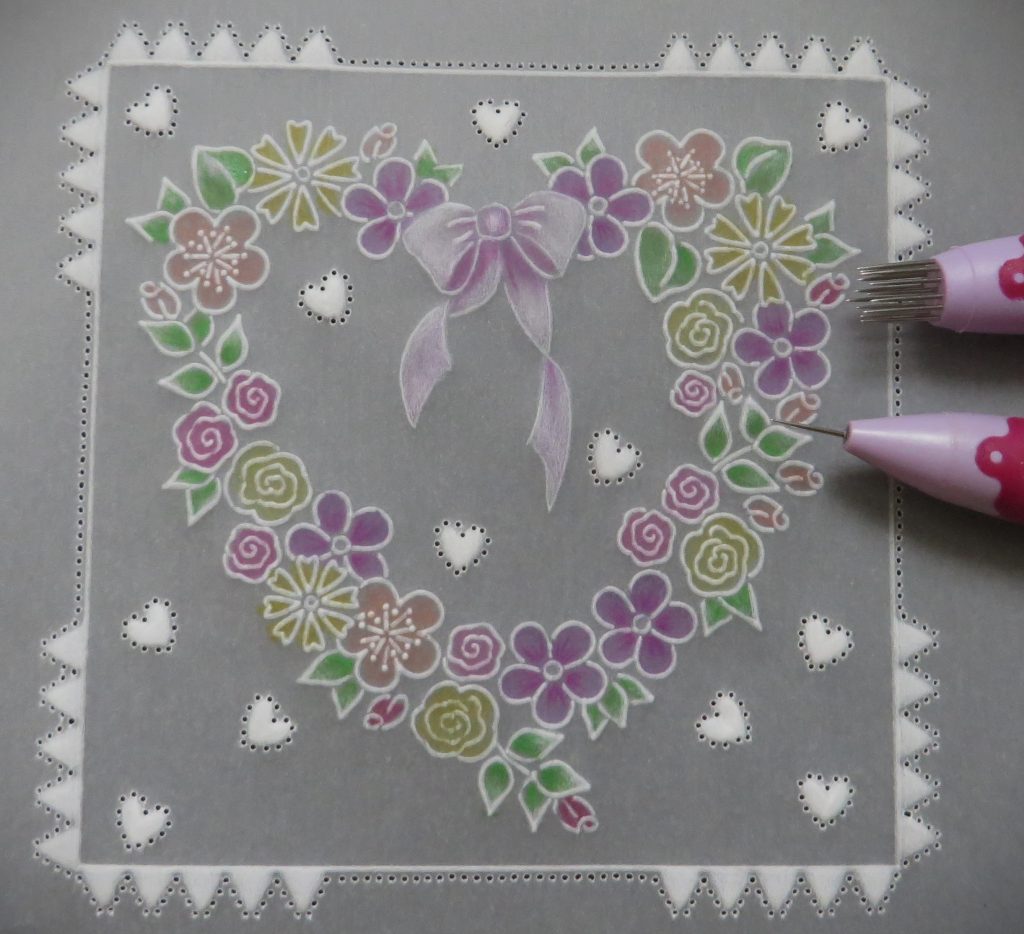
Step 6. Working on the front, lay the work onto the picot foam mat and shallow perforate, using the picot ‘v’ medium perforating tool. Put 5 ‘v’s at each corner.
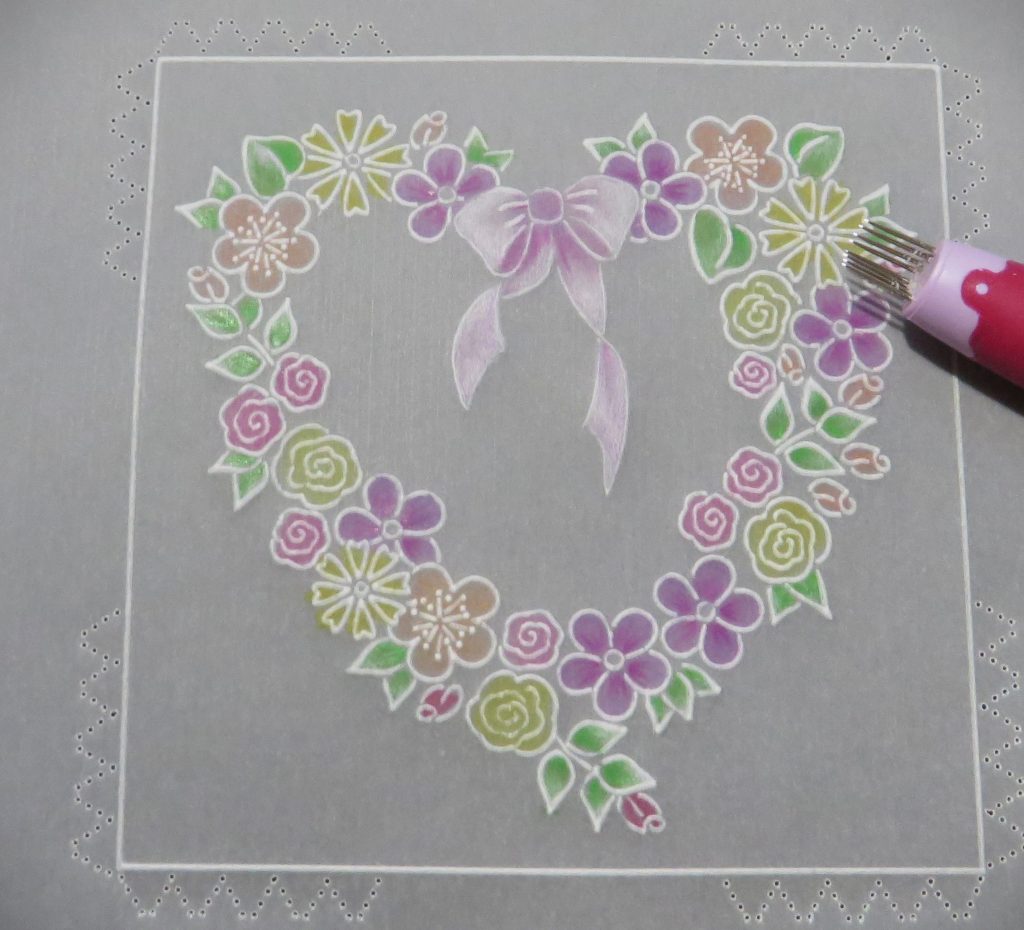
Step 7. Using the 3mm ball tool, emboss the picots, gently working right up to the shallow perforations.
TOP TIP: Before you start working, mark the start point and direction with a pencilled arrow.
You don’t need to get the embossing white at the beginning, as you need to rest the parchment before adding more layers of embossing. This picture has the first layer of embossing.
Step 8. Go around the piece 4 times, embossing within the picot ‘v’s and resting the parchment in between layers. Next, deeply perforate the ‘v’s and use a two-needle tool down the sides between them, ready for snipping the work out.
TOP TIP: If you have problems relocating the needles to reperforate, use a fine single-needle tool to do this.
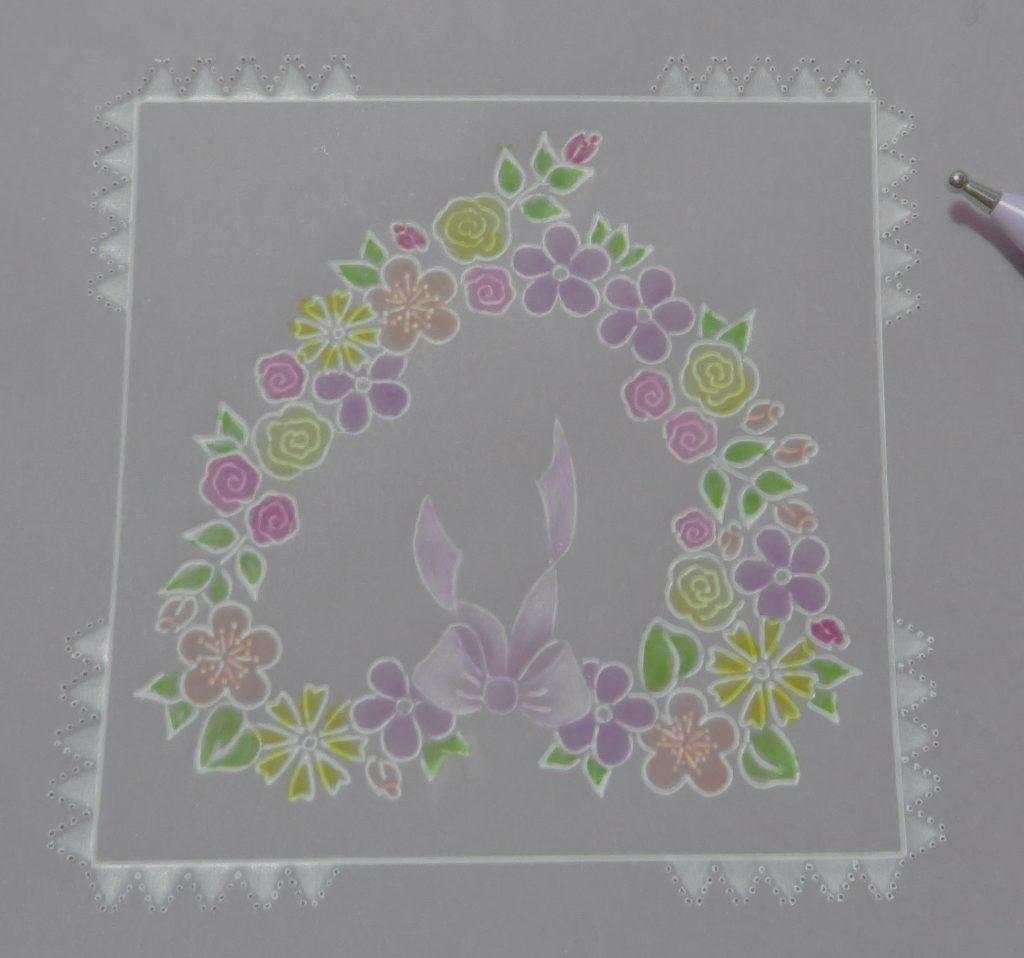
Step 9. After I had done stage 8, I decided that the piece needed a little something extra. It needed a bit of multi-needle tool work dotted around and so I plumped for the Heart perforating tool. I like to work in odd numbers – for some reason it always looks better.
Shallow perforate first. Then, with the 3mm ball tool, emboss in layers in the same way as you did with the picot edge. Deeply perforate using a fine single-needle tool.
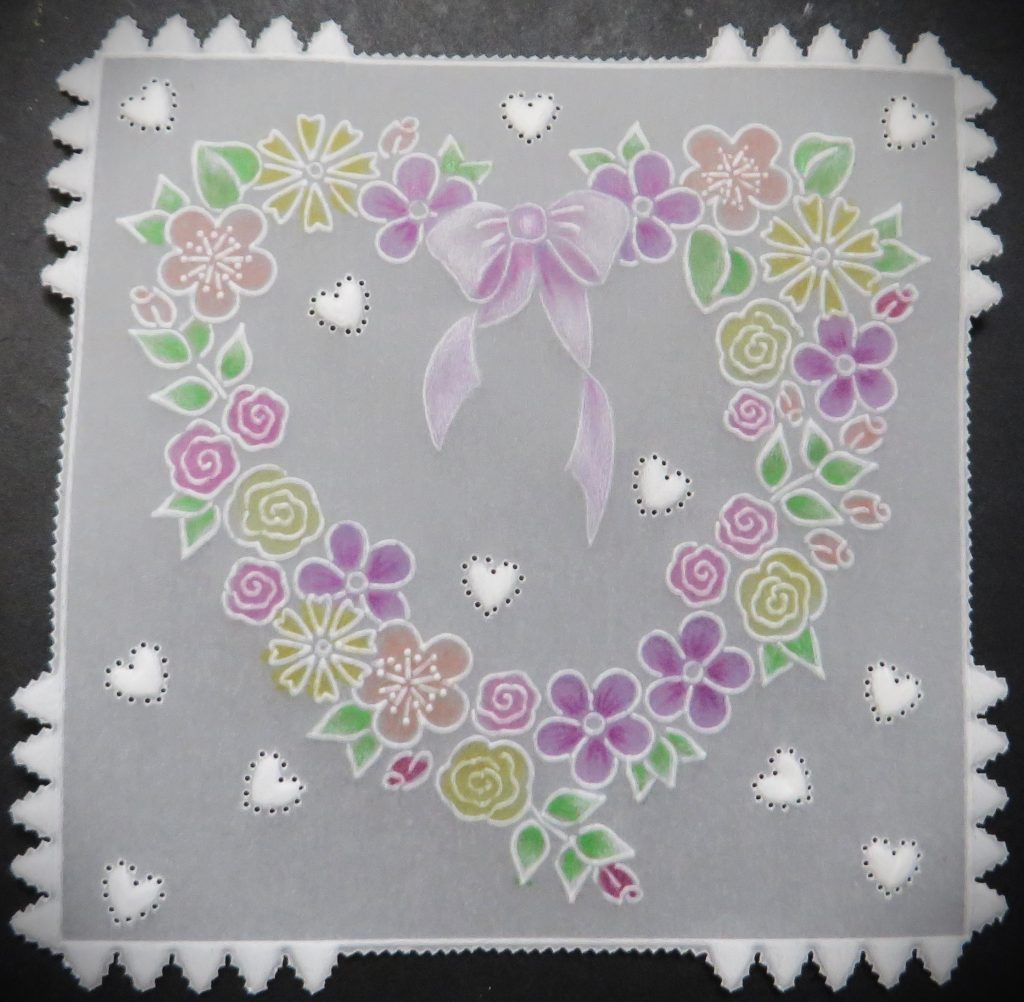
Step 10. carefully snip out the work.
Step 11. Cut a piece of Toscana Companion paper 10.5 x 10.5cm and fix the parchment piece to it with gold Perga Brads. Attach with some double-sided tape to a 5 x 5-inch card blank.
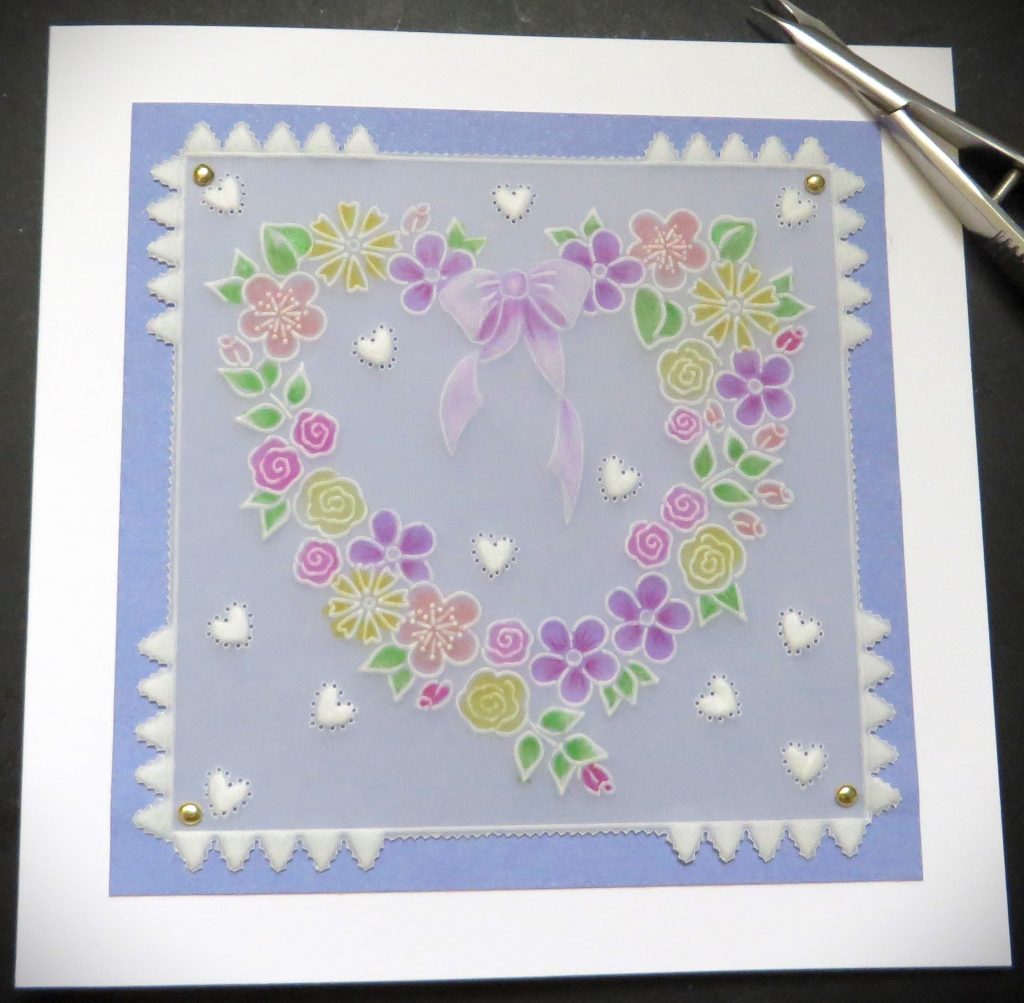
Step 12. I left the centres of the flowers empty because I wanted to add some Perga Crystals to them. Use Perga Glue; squeeze a dot of it onto a scrap of plastic or an off-cut of parchment, pick up little bits with a cocktail stick, then pick up the gems and apply them. Let the glue dry thoroughly before handling the card anymore.
And your card is finished!
BEAUTIFUL! What a pretty project. I love it. Thank you, Glynis, for sharing your tips and tricks with us.
Everything that lovely Glynis has used can be found on the Clarity website HERE.
Side note: Did you know that we do the Picot V Tool in 3 different sizes? Small, Medium and Large – You can explore more on those, HERE.
Now, looking at the week ahead:
Sunday 8th Jan:
Clarity Classics with Paul on Create & Craft – 3pm-5pm
Tuesday 10th Jan:
Groovi Tuesday with Paul – 10am Live on Facebook and YouTube
Thursday 12th Jan:
The Pergamano Show with Tina Cox on Create & Craft at 11am & 3pm
Unfortunately, the SHAC Shack will be cancelled tomorrow. I know, you miss her. But Mum (Barb) will be back soon. And Paul is on Create And Craft this afternoon (3-5pm with some Clarity Classics), as well as a Pergamano show with Tina Cox on Thursday. Plenty to keep you entertained and crafty in the meantime.
Travel gently, friends.
Lotsa love, Grace & Glynis xoxo
Clarity – The Home of Art, Craft, and Well-Being.
What a lovely project Glynis. It is so pretty and perfect for making a set of notelets to give as a gift. It would make a perfect present for Mother’s Day, put into a pretty box.
I hope that everything is ok with Barbara. Paul taking over today and the SHAC cancelled tomorrow is worrying. Sending her love. XX
That’s beautiful Glynis. I have this lovely plate – I’ve used it a lot even just for the little flowers.
Thankyou for your inspiration and tuition as always!
This is one of my favourite designs and I’ll be using it to send golden wedding anniversary wishes to my sister in law. It’s very helpful to have Glynis’ tuition especially on the ribbon and borders. Best wishes for her husband’s health.
Thank you Glynis for another lovely project using one of the club plates. Sorry to hear Pete is not well at the moment & hope he starts feel better soon. Sending love & hugs to you both xx
Looking forward to seeing what Paul has lined up for us this afternoon having seen some of the samples made by the design team on the blog & Facebook. Sorry to hear the SHAC is cancelled tomorrow but I know that wouldn’t have been done without a very good reason so my thoughts are with Barbara & remembering the quotes over the last few days.
I saw a quote the other day but can’t for the life of me find it again on the show I thought I was watching on C&C but it was ”Don’t count the days, make the days count”
Take care everyone xx
Thank you for this project. All good wishes to Glynis and Pete.
Beautiful samples yesterday.
Hope all is well with Barbara, she works so hard. It is good that Paul, Tina and Dawn are able to step in and she has a brilliant team behind her.
Love to all🍒
Hope all is well in the Gray household and that Pete will feel better soon. Thank you Glenys for the lovely project.
Thank you for the beautiful tutorial Glynis; especially when you have a lot on with Pete being poorly. Wishing all who are unwell best wishes for a thorough recovery.
Thanks for this lovely tutorial. I hope Barbara is ok and it’s just recovering from her tooth work that is problem. Positive thoughts to Barb, Glynis and Pete xx
A beautiful project which I can’t wait to try. I think it will make a perfect valentine card for hubby. Thank you Glynis and I hope your husband is soon on the mend xx
Thank you Glynis. I shall definitely give that one a go. Sending big hugs to Pete, hope he feels better soon
Lovely project so thanks Glynis I shall enjoy this one, hope all is well with Barbara. Xx
Another lovely little cheeky design, Glynis thank you. Best wishes, Glynis to you and Pete, hope he gets better soon. And best wishes to Barbara, take care and travel gently.
Lovely heart art Glynis, thank you for your step by step. Best Wishes Glynis and get well wishes to Pete. x
Thank you for this lovely project Glynis – so pretty
And sorry to here your husband is poorly – best wishes
for a speedy recovery
Love Seta X
Thank you for this lovely project Glynis. Sorry to hear about your husband and just hope he feels better soon. This always seems to be a rotten time of year for a lot of people for all sorts of reasons so I’d like to wish you all well xxx