Clarity’s Matters Blog Tutorial: How To Colour Using Line Art
Hello hello! Grace here.
I hope this finds you safe, happy and enjoying your Sunday!
We are joined this weekend by the brilliant Maggie Byford. She has prepared an in-depth step-by-step for us to follow. I’ll pass you on over to our fabulous teacher.

Hi! In this tutorial, I’d like to show you a simple(ish) dry pencil colouring method known as the “Fine Line Technique”. This works really well on parchment paper and uses any oil-based blend-able pencils such as Perga Liner B pencils or Faber Castel Polychromo pencils.
For this technique you use very sharp pencils to draw very fine lines close together working them away from your body in long and short strokes. Each layer of fine lines is worked in a different colour, starting with the lightest shade and finishing with the darkest, to build up the depth of colour.
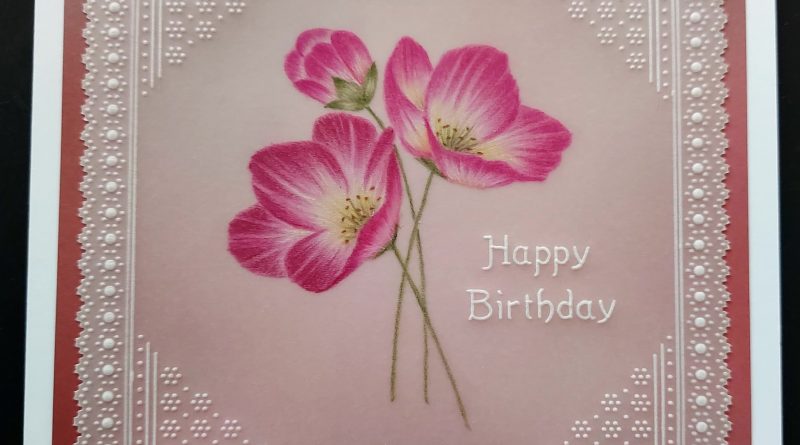
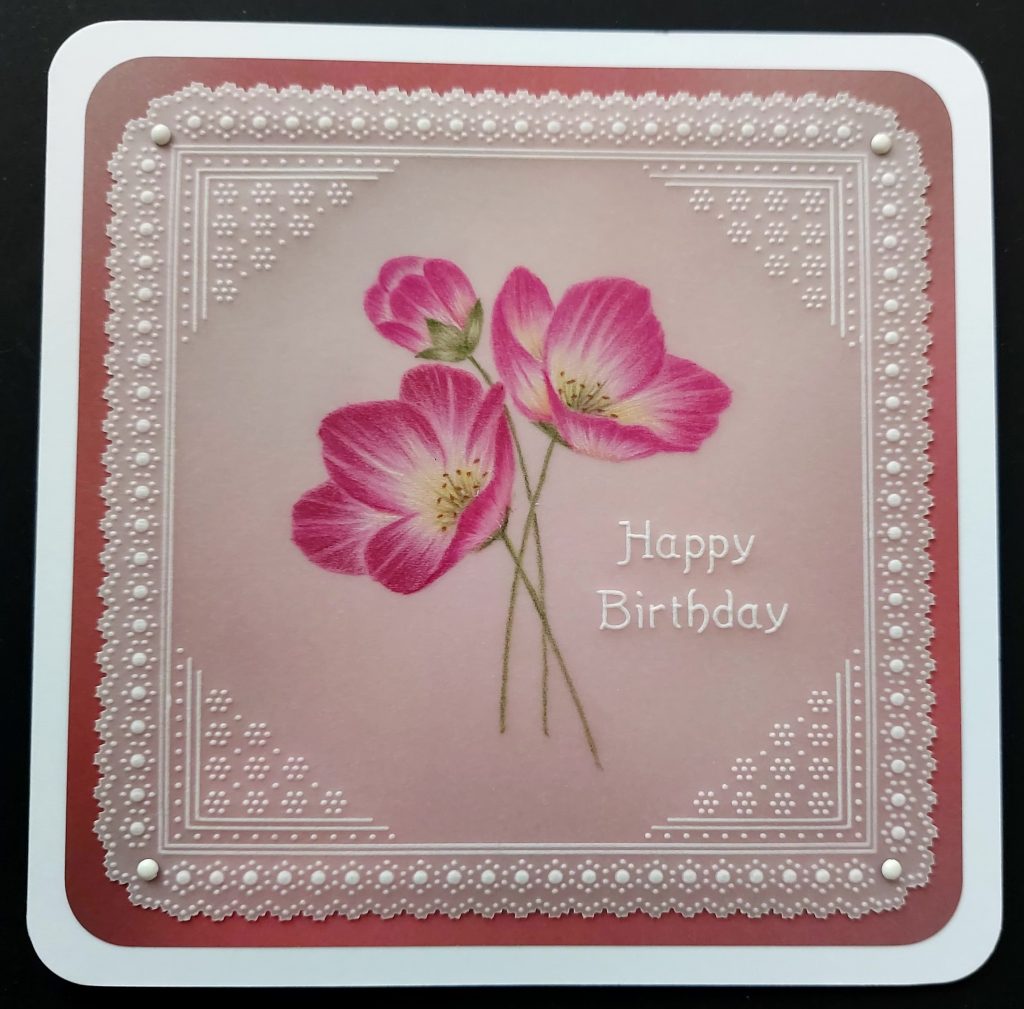
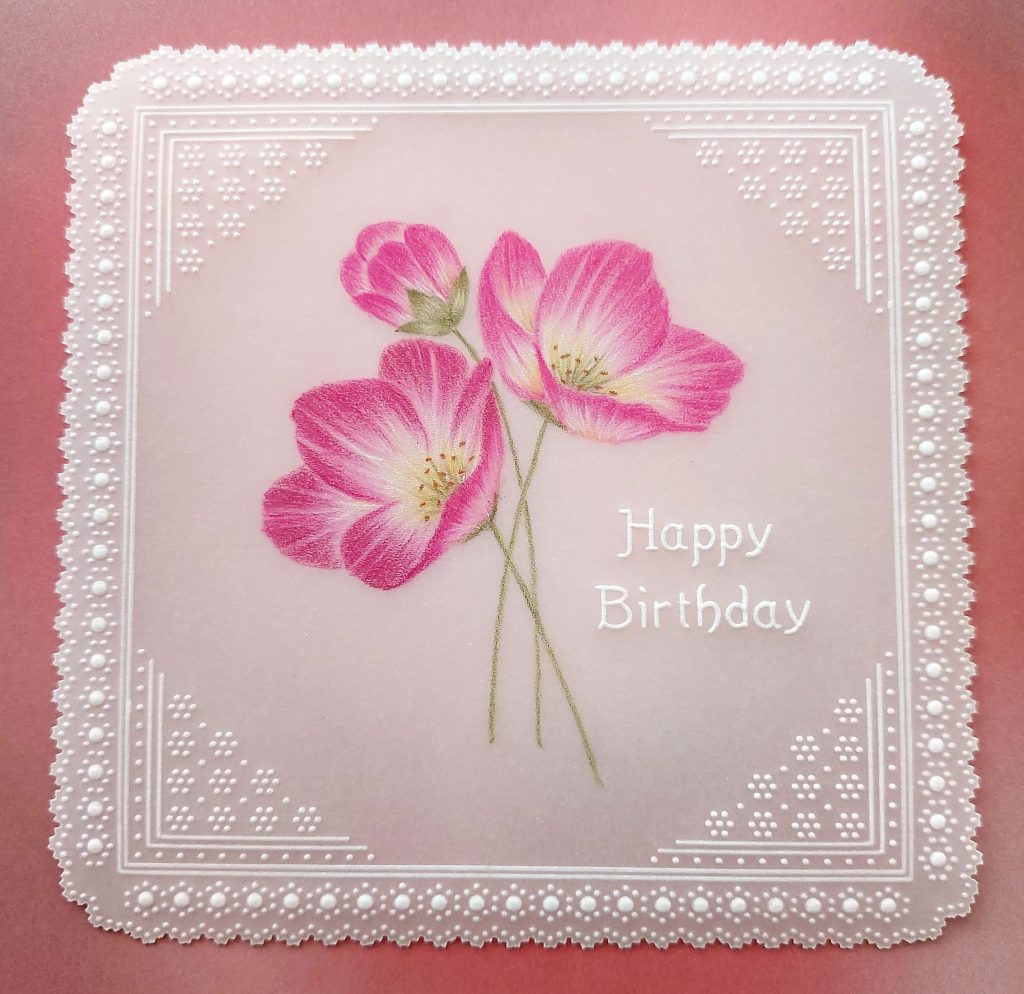
I’ve used Polychromo pencils to colour a Christmas Rose design, which I’ve adapted from Linda’s Frosted Floral Overlay Pack. I’ve also used Josie’s Diagonal Embossed Frames & Corners Plate to create a lovely whitework frame and some lovely grid work corners.
This is what my finished 6×6-inch card looks like…
INGREDIENTS
Frosted Floral Overlay Pack – Christmas Rose (PER-PA-70417-XX)
Alphabet A5 Sq Plate Mate (GRO-MA-40002-07)
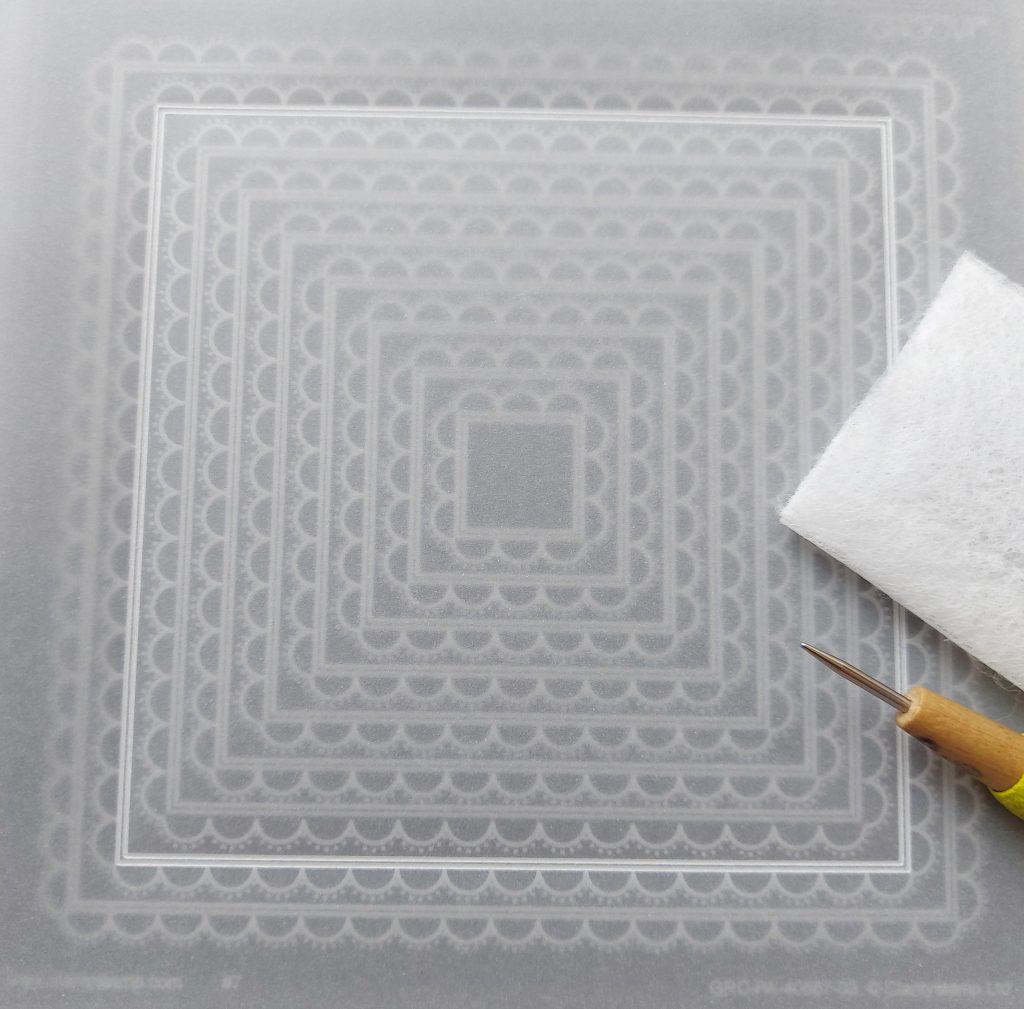
Nested Scallops Squares A5 Sq Groovi Plate (GRO-PA-40557-03)
Josie’s Diagonal Embossed Frames & Corners A4 Sq Groovi Plate (GRO-GG-42058-24)
Diagonal Basic Bold A5 Sq Groovi Piercing Grid (GRO-GG-40201-12)
Groovi Sticker Tabs x 16 (GRO-AC-40437-XX)
A5 Black Super Foam (GRO-AC-41765-XX)
Pergamano Excellent – Embossing Mat (PER-AC-70075-XX)
Groovi Guard (GRO-AC-40345-XX)
Ringlock Scissors (PER-TO-70041-XX)
Groovi Embossing Tool 1 and 2 (GRO-AC-40026-XX)
Pergamano 6mm Ball Tool – Extra Large (PER-TO-70016-XX)
Pergamano White Brads (PER-AC-70269-XX)
Ruler (PER-AC-70278-XX)
Claritystamp White Card Blank 6×6″ (ACC-CA-30618-66)
Spare pieces of plain parchment paper (for practice pieces if required)
Dry Tumble Dryer Sheet
Soft Brush, Soft Eraser & Good Quality Pencil Sharpener
Piece of white paper
Polychromos pencils (ACC-PE-30797-XX):
128 Light Purple Pink
123 Fuchsia
125 Middle Purple Pink
133 Magenta
101 White
105 Light Cadmium Yellow
168 Earth Green Yellowish
174 Chromium Green Opaque
283 Burnt Siena
METHOD
Step 1. To start, we’ll make the embossed frame. Use plain parchment and the A5 Scallops Square Plate to create a square. Do this by embossing the second double-outline, counting down from the top of the plate (omitting the scallops around the edges).
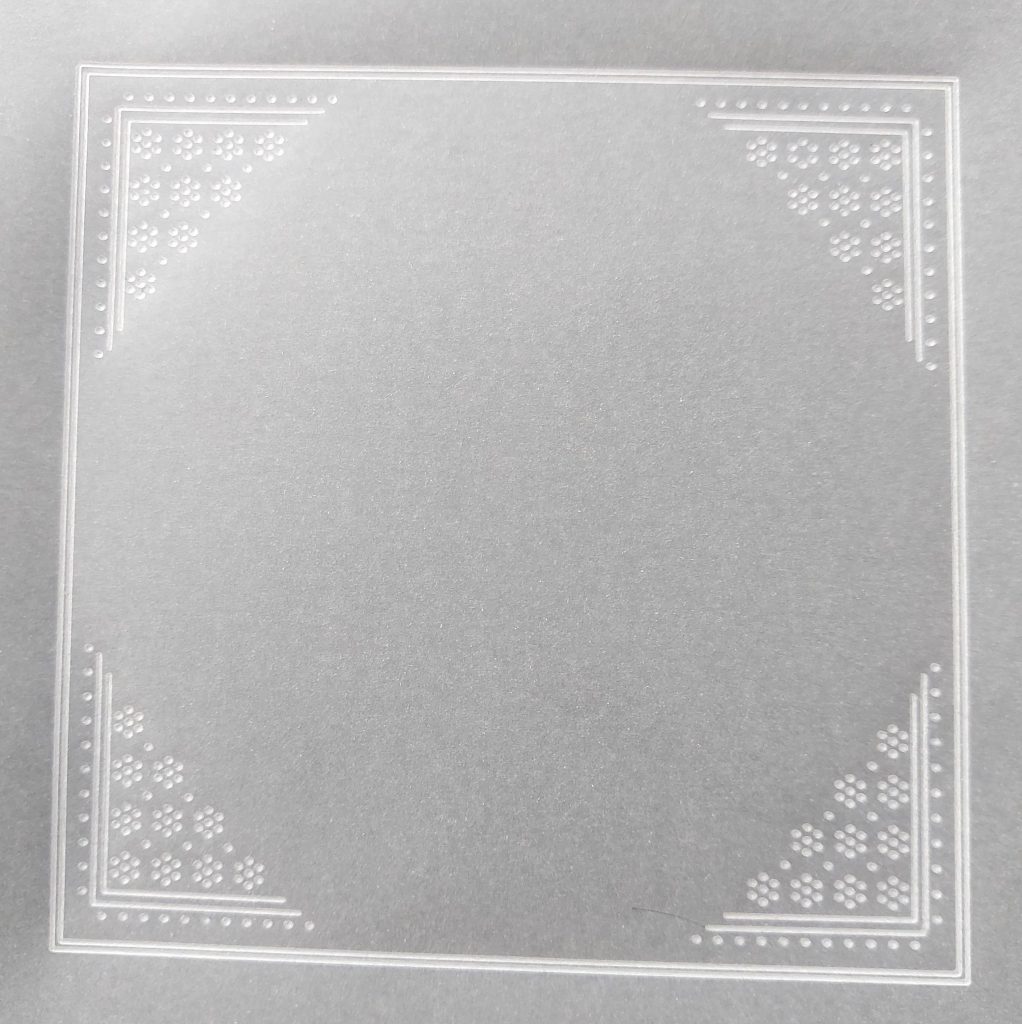
Step 2. Use Josie’s Frames and Corners Plate to emboss a fancy corner design in each of the 4 corners of your embossed square. Mine looks like this.
I’ll continue with the rest of the frame later, and for now I’ll start on the Christmas Rose.
Step 3. From the Frosted Florals Pack, choose the Christmas Rose design that is printed in black on A5 white paper. Carefully align and attach the front of your parchment over those parts of the design that you can see on my picture, then use sharp pencils 128 Light Purple Pink to trace the petals. Use 168 Earth Green Yellowish to trace the leaves and stems.
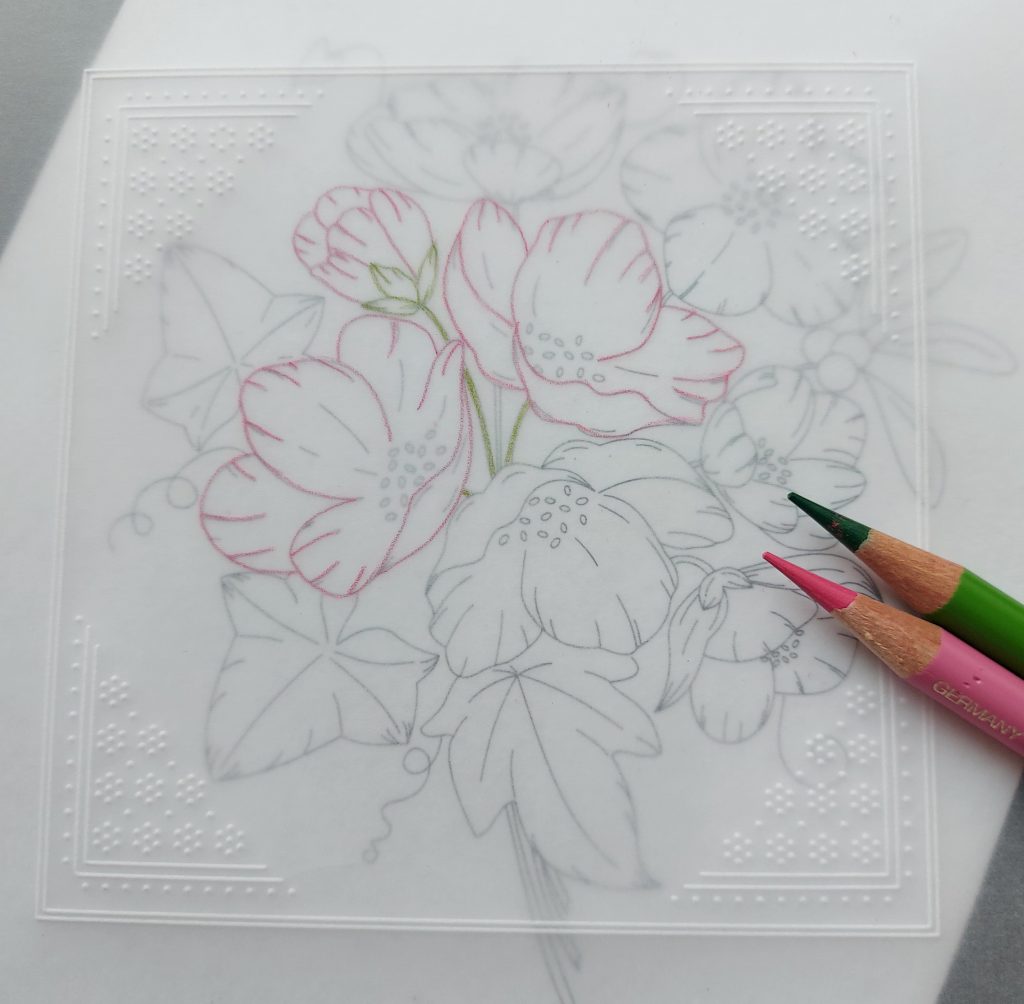
TOP TIP: When colouring with soft pencils, you can use a Groovi Guard to protect your resting hand from smudging the colours whilst you work.
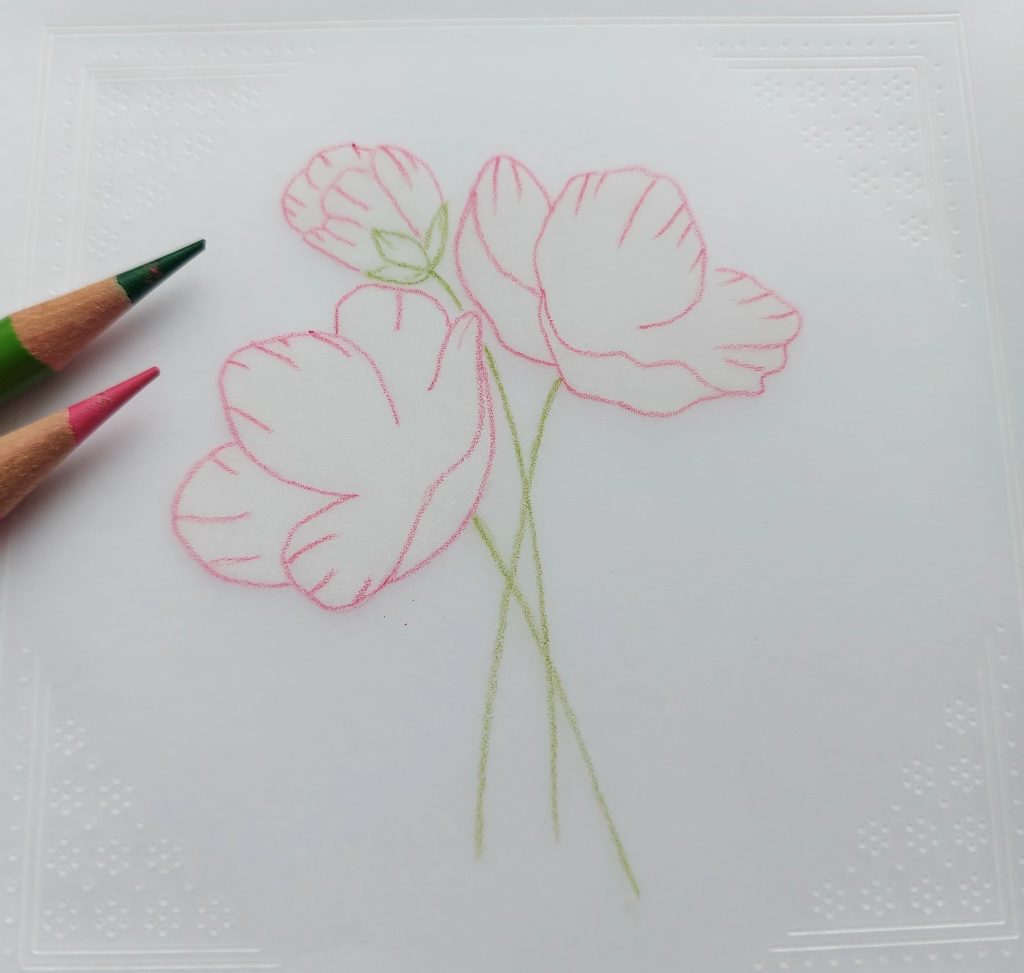
Step 4. Remove your parchment from the pattern and place a piece of white paper underneath so you can clearly see your tracing. Working on the front of your parchment for all the colouring, you now need to extend the 3 stems downwards in freehand using 168 Earth Green Yellowish. It should look like this.
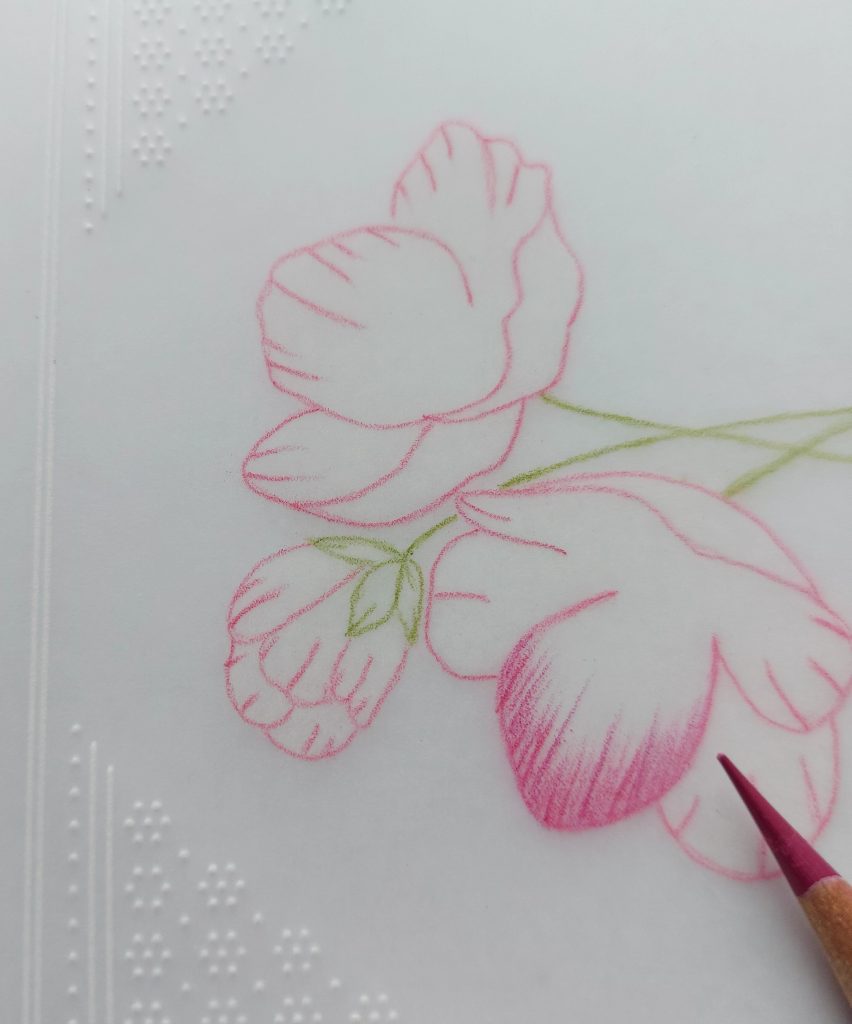
Step 5. Hold 128 Light Purple Pink near the tip of the pencil (to give you more control) and, pushing the pencil away from your body, draw some long and short fine lines close together from the outer edges of the petal. It should look like this.
TOP TIP: Use a soft brush to brush away any pencil residue whilst you are working, as using the side of your hand to remove the residue will cause smudging.
For Steps 6, 7 and 8 continue to work on this one petal using long and short strokes on each layer, so you can see how the Fine Line Technique works.
Step 6. Use 123 Fuchsia to go over the previous fine lines so it looks like this.
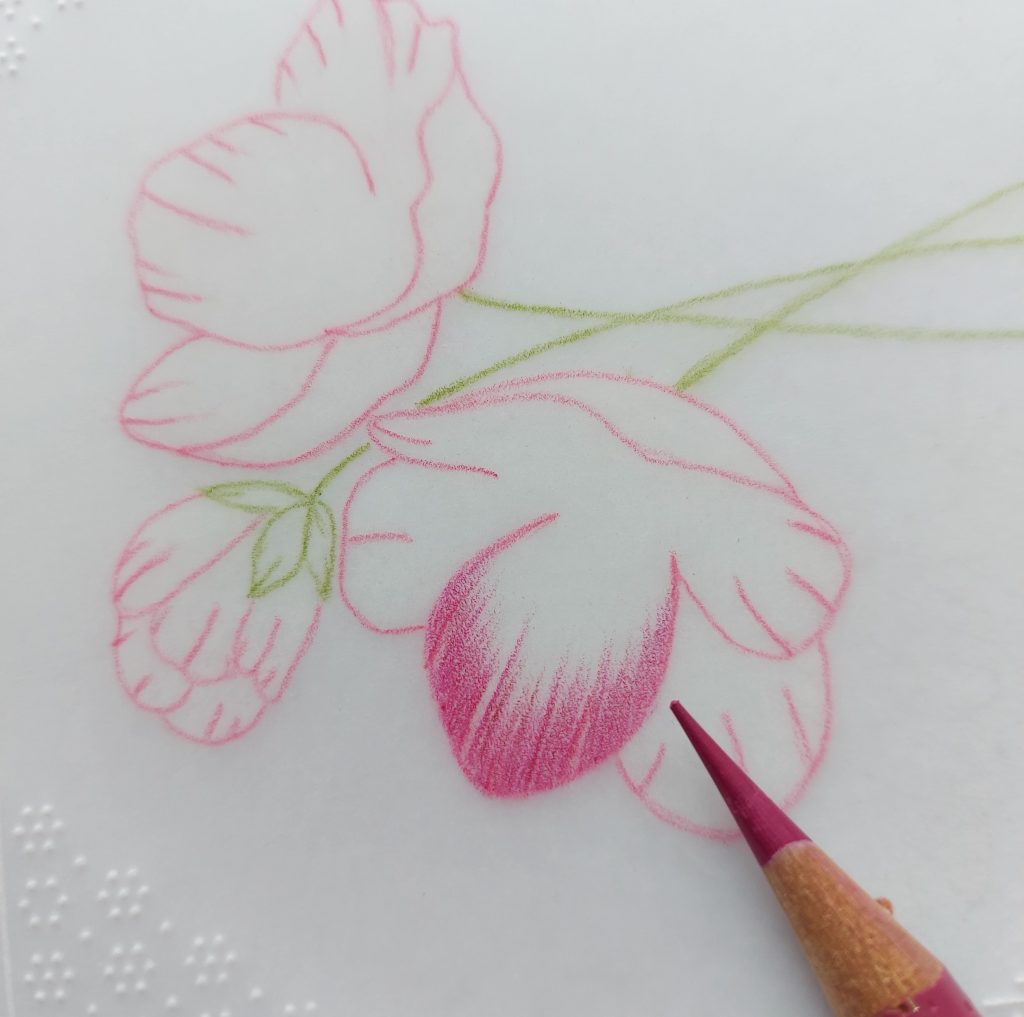
Step 7. Use 125 Middle Purple Pink to add another layer of colouring as shown on the picture. Put a little more pressure on some of the longer lines so they stand out a bit. Also leave one or two white gaps between some of the lines as I have done.
Step 8. Go over the previous layer once again with 125 Middle Purple Pink so it now looks like this.
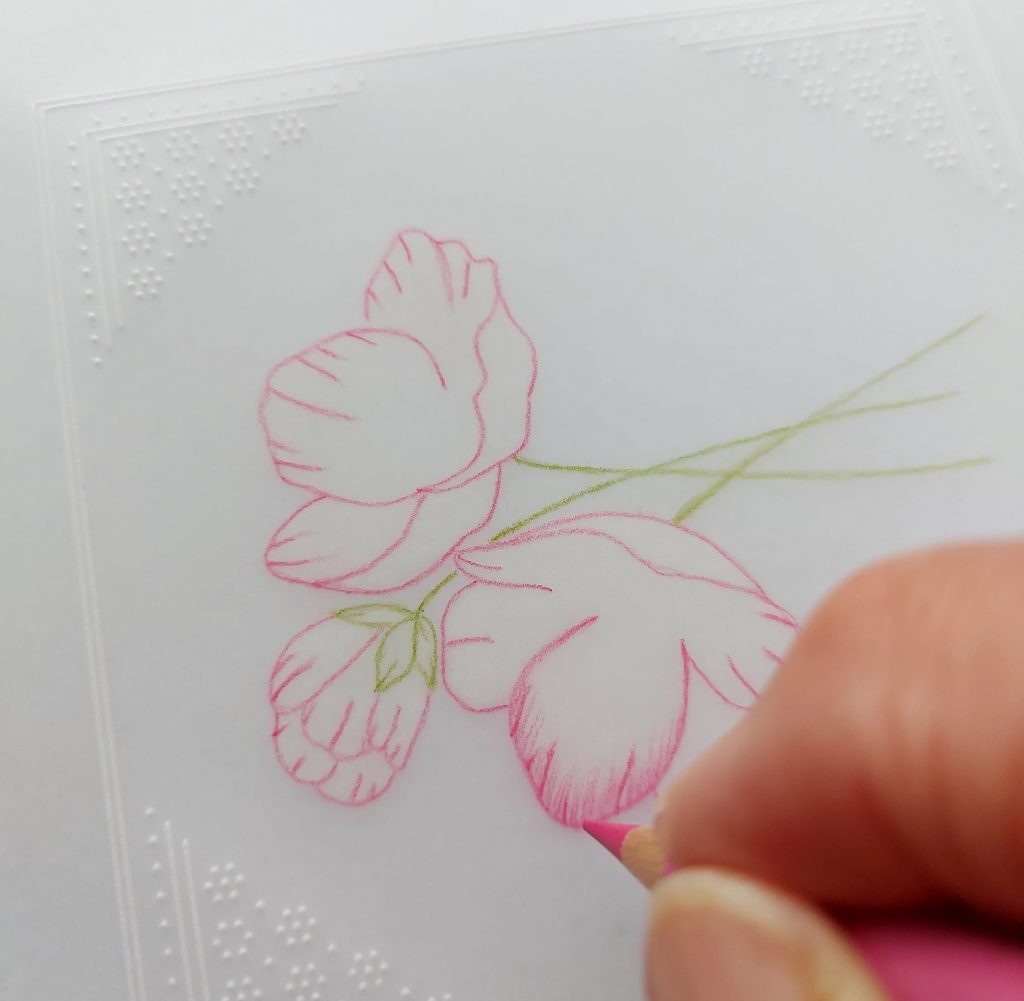
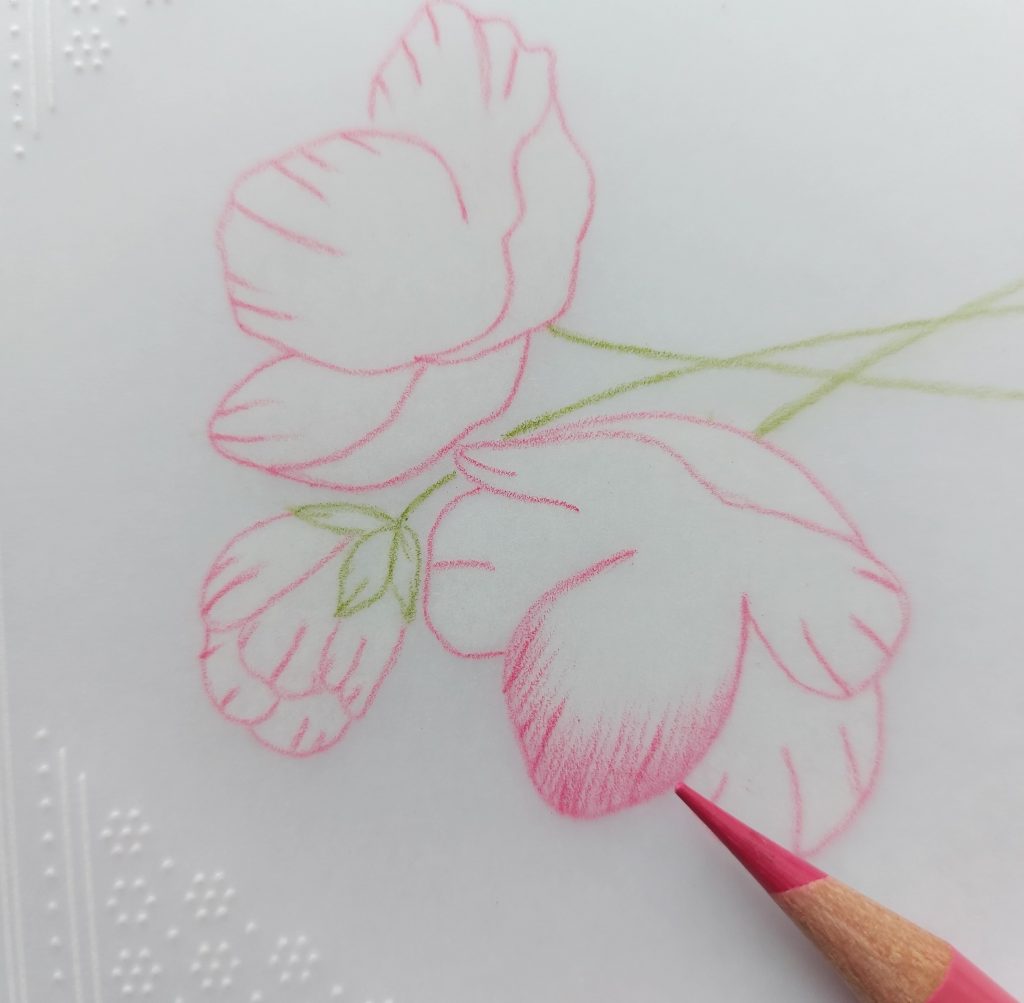
For the next few steps you will be adding layers of fine-line colouring to the other petals, leaves and stems on the design.
Step 9. As shown in the picture, use 128 Light Purple Pink to add a first layer of fine lines to the remaining flowers. Use 168 Earth Green Yellowish to add some fine lines to the two tiny leaves, together with a bit of the same colour at the base of each of the 3 flowers as shown in the picture.
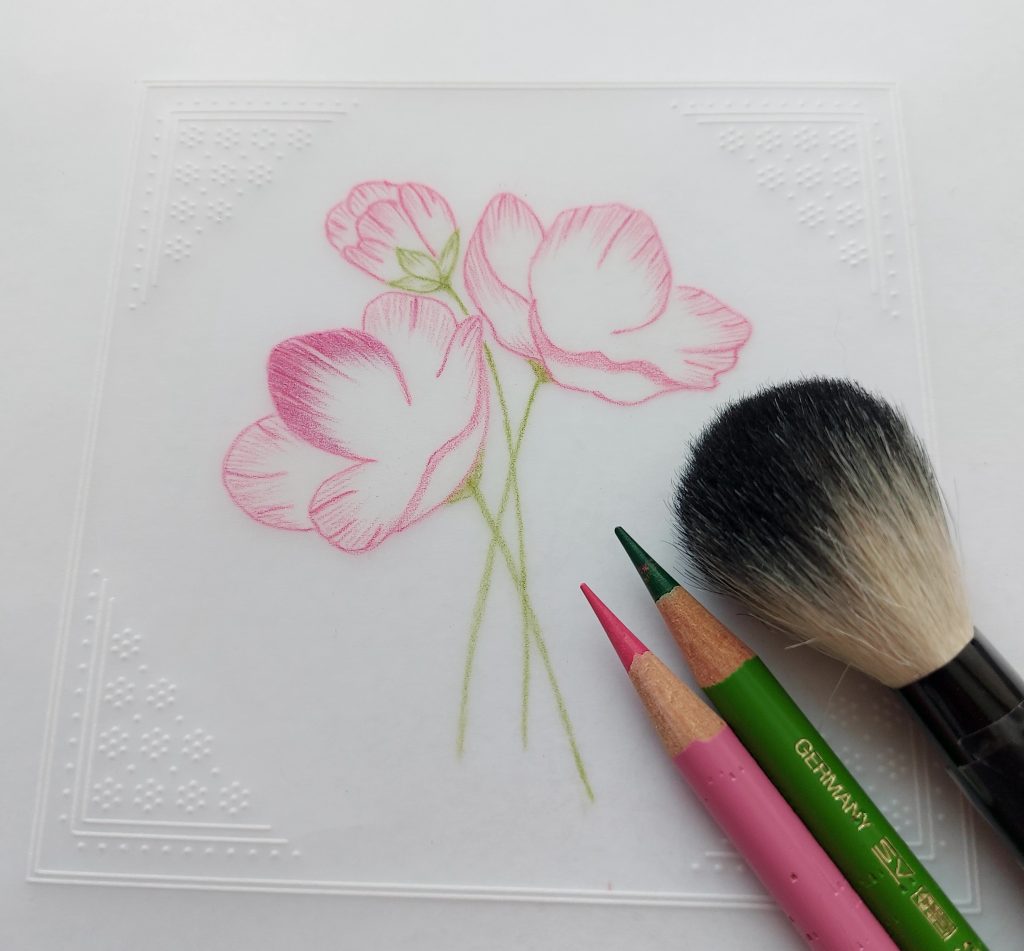
Step 10. Add a layer of 123 Fuchsia fine lines to the petals as shown.
Step 11. Add two layers of 125 Middle Purple Pink fine lines to the petals, and one layer of 174 Chromium Green Opaque to the leaves and stems. It should look like this.
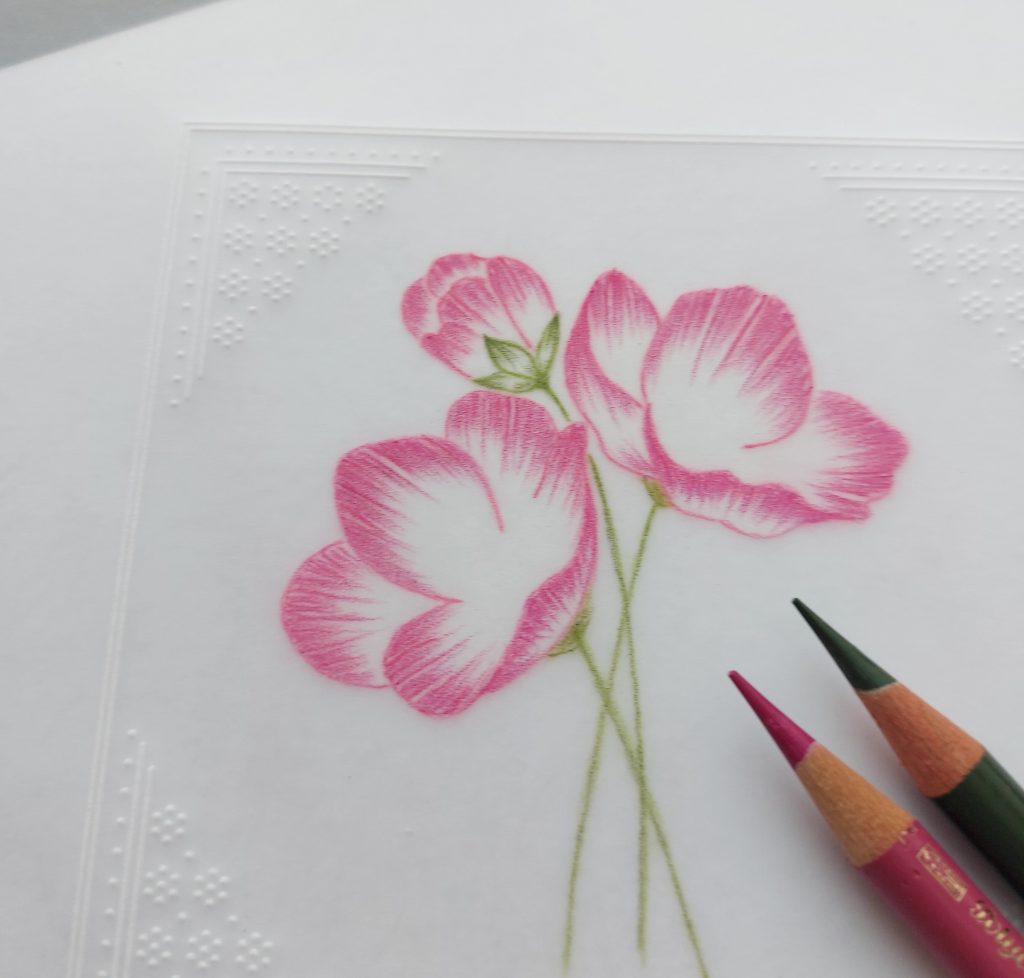
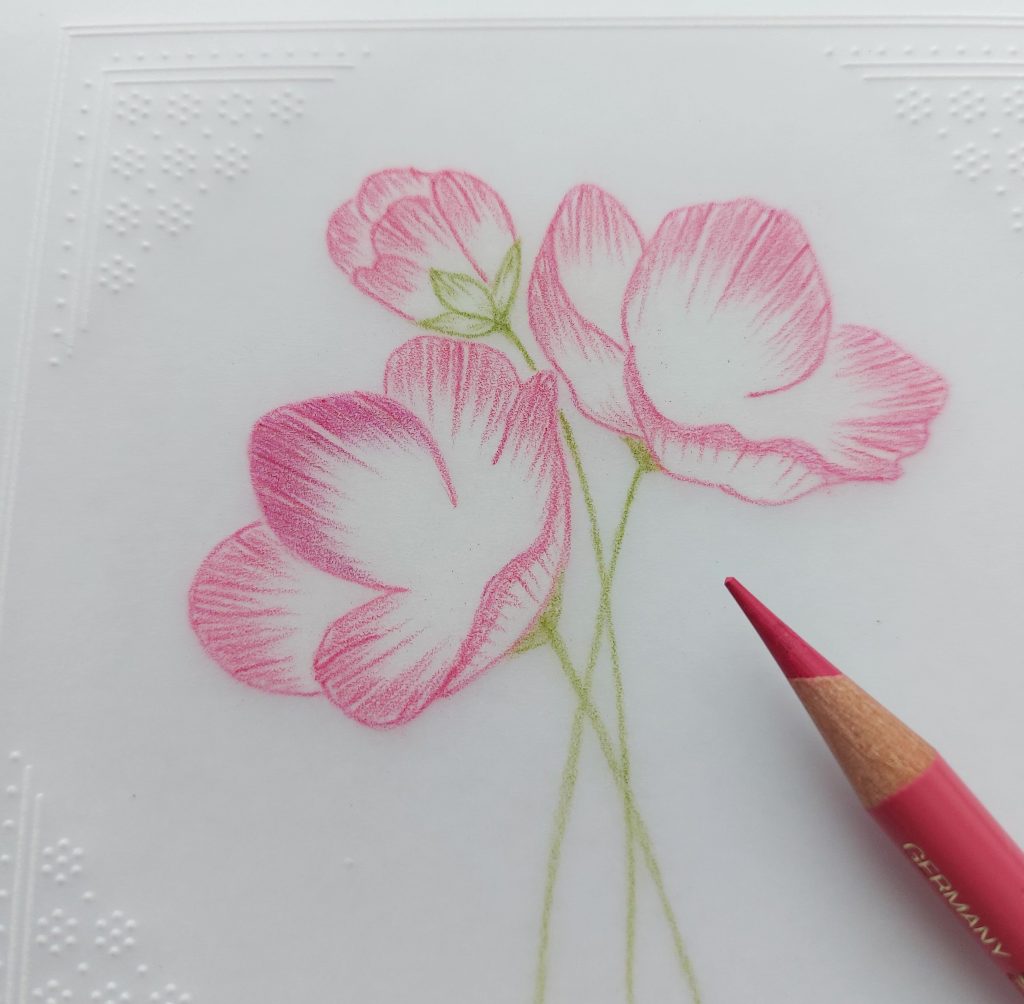
Step 12. Use 133 Magenta to add a final layer of fine lines to all the petals to give some depth of colour. Remember not to go over any white gaps you’ve purposefully left within the fine lines.
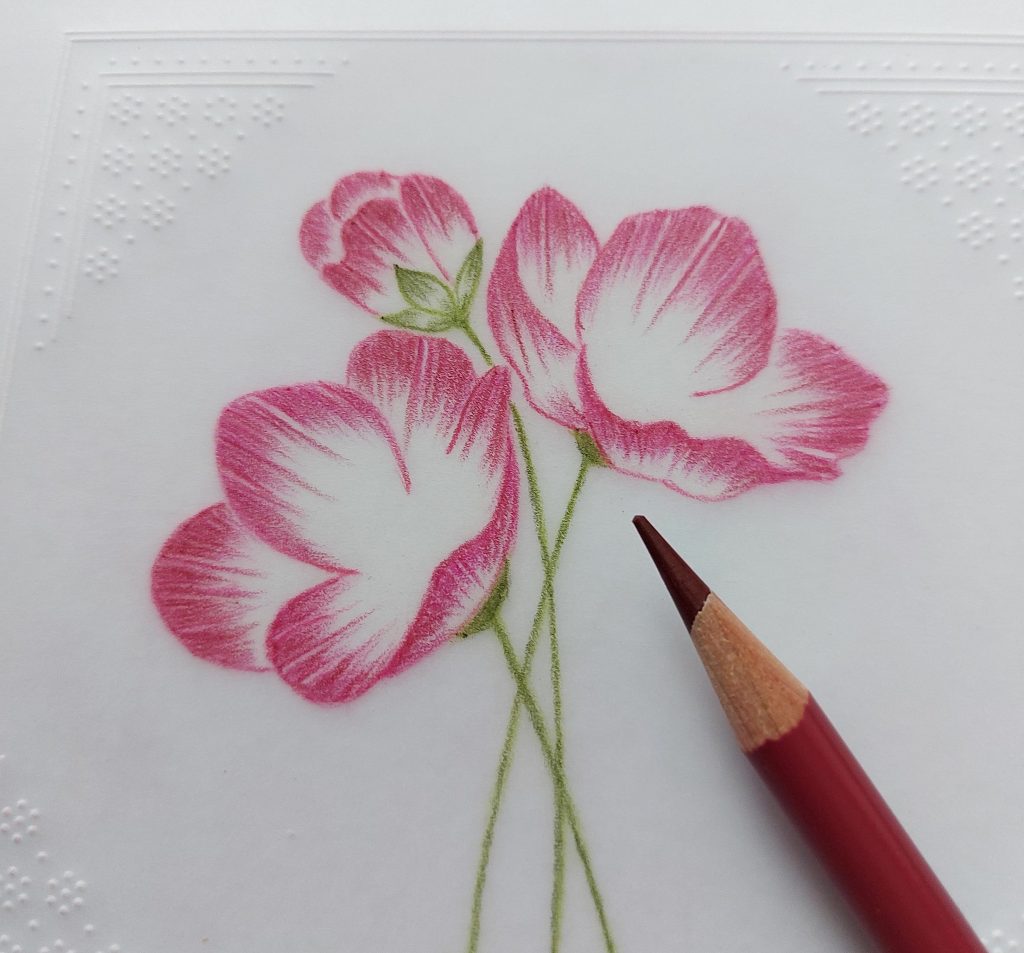
Step 13. Add some fine lines of 105 Light Cadmium Yellow radiating out from the base of the flowers (as shown in the picture), then add a few sparse lines of 174 Chromium Green Opaque over the top. Also, add a bit of the Yellow at the base of the front petals that turn over.
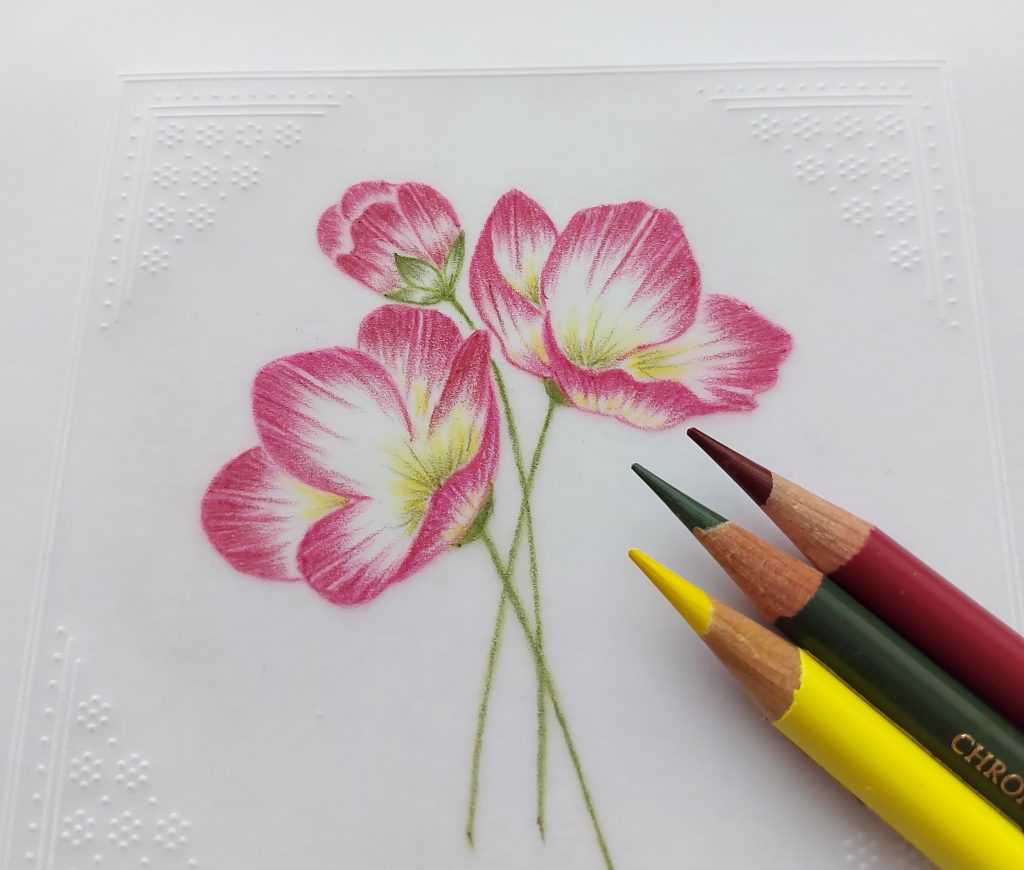
Place the front of your parchment onto a dark piece of card. Use 101 White to add some fine lines to the white areas within the fine lines, within the petals and on the leaves (or alternatively add some embossing on the back of the white areas only, using Pergamano No 6 Extra Large Ball).
Step 14. Position the front of your parchment back onto the pattern and carefully draw then colour-in the stamens using 283 Burnt Siena.
That’s the colouring finished. Now for the rest of the whitework frame.
Step 15. Use Josie’s Frames & Corners Plate to add a fancy row of embossed gridwork on the back of your parchment, to each of the 4 outer sides of your embossed square frame.
To see the design I’ve used on the plate, turn the plate round so that the Groovi logo is at the bottom left and check out the picture to see which design I’ve chosen and how I’ve added it to the top of the embossed square frame. The 2 downward-facing arrows shown on the picture indicate where the pattern should start and finish, and this should be repeated on all 4 sides.
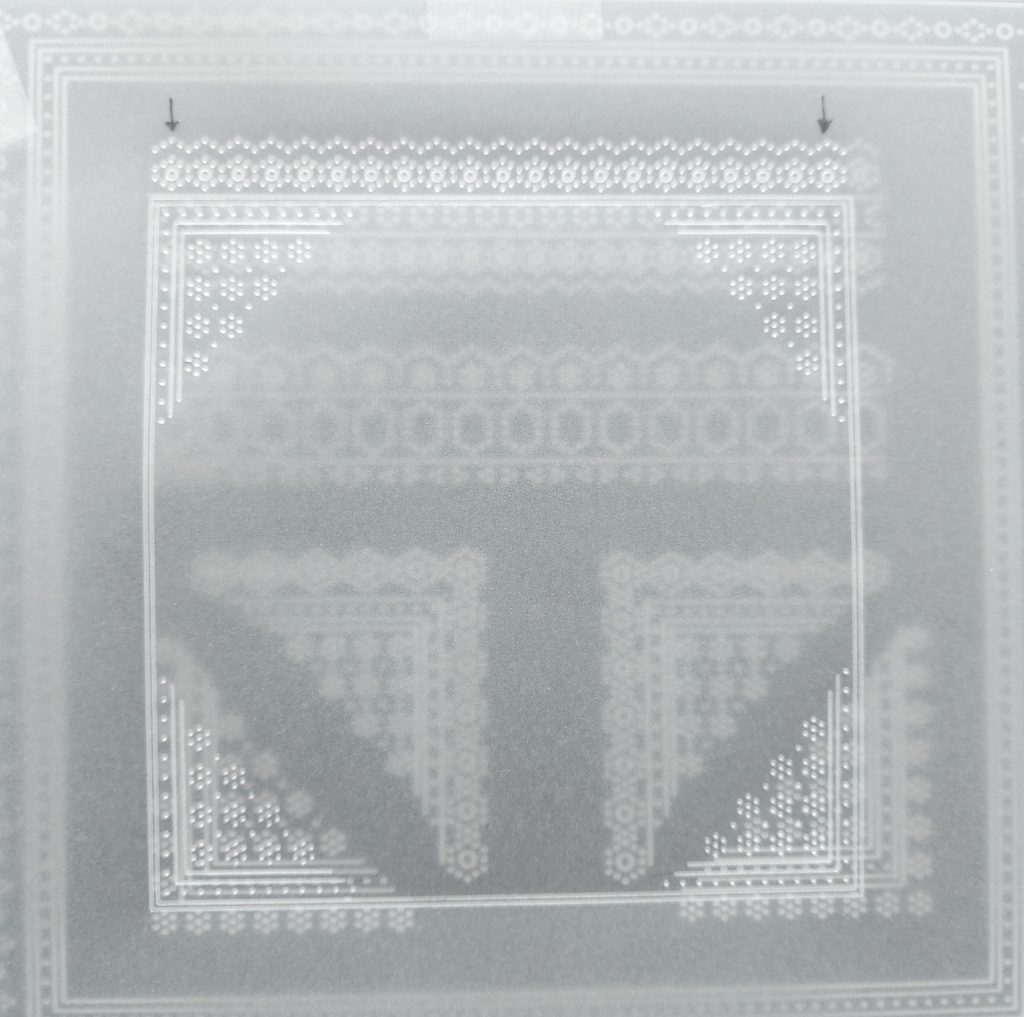
Step 16. To finish the fancy gridwork you’ve just added, use Groovi #2 tool to emboss the middle of the dots from the back. Also add some creative random dots using Josie’s Plate to the corners to join up the rows. Then add a greeting (if wanted) of your own choice.
Working on one row at a time, align the front of your parchment over a Diagonal Basic Groovi Piercing Grid. Place onto a thick perforating mat and use a 1-Needle Bold to perforate around the outside edges of the fancy gridwork. If your embossed dots don’t slot nicely on to the Piercing Grid then see the TOP TIP below.
When you get to the end of the first row… remove your parchment, do a quarter turn, re-align it over another row and repeat the same process. Repeat for the remaining 2 rows. For the corner perforations you need to be a bit creative and put the holes where you think they will fit the best, and when all the perforating is complete use your parchment scissors or snips to picot-cut between the perforations.
TOP TIP: Your embossed dots will only fit one way on the Piercing Grid. If you haven’t noticed it before, take a look at the grid with the Groovi logo at the top right. You will see that the top row of holes forms a straight line. If you turn the grid a quarter turn to the right you will see that although the holes on the top row form a straight line there is a gap between each hole giving a zig-zag shape. In this respect, the grid dots you did on Josie’s Grid will only fit one of these two ways on the Piercing Grid.
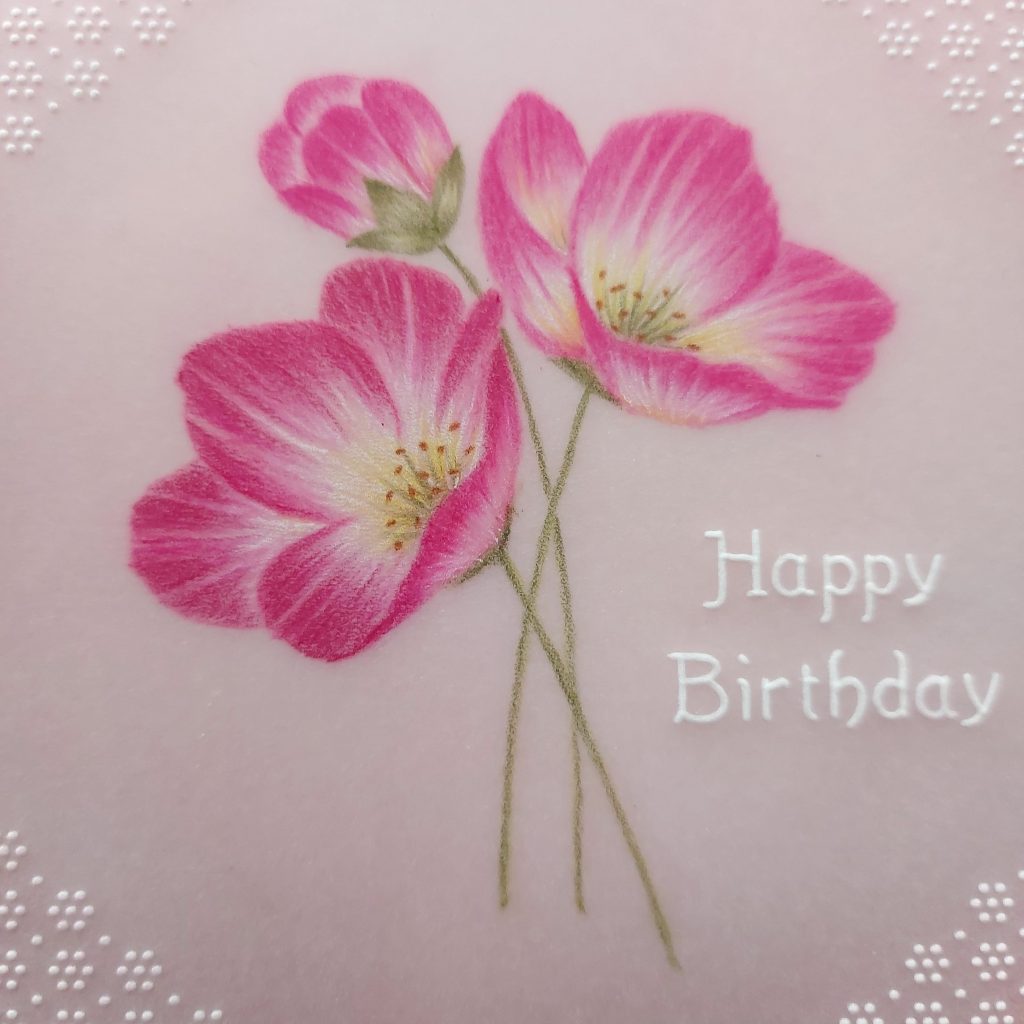
Step 17. All you need do now is attach your finished work onto Designer Paper (I used Shenandoah) using a white brad in each corner. Mount this onto the front of a folded 6×6 inch white card blank. And your card is finished!
What a stunning piece of artwork! Thank you, Maggie, for showing us this colouring technique in such detail too. It’s so helpful for so many of us who don’t know how to achieve this level of effect through colouring. I think many of us have learnt so much through the SHAC Shack too… there are levels to this.
If you fancy giving this blog tutorial a go yourself, please share your artwork with us! It might just go into the Saturday Share Blog 🙂 Grace@claritystamp.com, as always.
Everything that Maggie has used can be found on the Clarity website HERE
Looking at the week ahead:
Monday 31st October – SHAC Shack – 10am Live on Facebook and YouTube
Tuesday 1st November – Groovi Tuesday with Paul – 10am Live on Facebook and YouTube
Thursday 3rd November – SHAC Shack – 10am Live on Facebook and YouTube
Sunday 6th November – Crafting with Clarity on Create and Craft with Barbara 3pm-5pm
Travel gently, friends.
Lotsa love, Grace & Maggie xoxo
Clarity – The Home of Art, Craft, and Well-Being.
ThAnks so much for the tutorial Maggie, I still don’t think my work will ever look like yours but this will help so much,
Fantastic tutorial, Maggie. Thank you so much for sharing it with us. Hx
Thanks Maggie I love colouring I love the Christmas Roses design.
Oooooh wow Thank you si bautiful x
very pretty Maggie. practice is the key to producing a piece as good as yours.
Great tutorial, thank you ! X
Hi Maggie – what a beautiful piece of work & thank you for the tutorial
Love Seta Xx
I am not good at colouring and this tutorial should help a lot. The plate of Christmas roses shows a lot of possibilities for different scenarios, it goes on my wish list which gets longer after every blog. Whole picture looks beautiful. Thankyou. I will definitely try with what I have.
Brilliantly explained project Maggie….such a realistic way to enhance the petals…beautiful 👍🏻
Love the delicate framework too.👏🏻
Wow, Maggie, what a fantastic technique, this appeals to me greatly and I can’t wait to have a go. Thank you.x
Fabulous. Love the finished piece. Will definitely try this technique. X X
Beautiful, thank you Maggie for your tutorial. Must find time to give it a go. xx
Wow – what a lovely project. The next step in colouring that I am sure most of us admire & wonder how it is achieved. Thank you Maggie for great step by step instructions that hopefully will take the scary bit out of colouring on the front of our work.
We have just had a terrific downpour, hosepipe effect of rain blowing up the road but like true British weather the sun is now shining and the sky is blue with not a cloud in sight!!
Having another completion of card day today, surprising how the toppers mount up in various stages of production. I can sit & emboss Groovi plates or colour stamped images in whilst watching the TV at night but some things just have to be done sat at the table or my desk.
Have a good week everyone x
What a brilliant tutorial. I haven’t tried this way of colouring on parchment before but look forward to trying it. Many thanks xxx
Hi Maggie – what a beautiful piece of work & thank you for the tutorial
Love Seta Xx
Merci beaucoup pour ce tutoriel si bien détaillé, je vais appliquer cette méthode.
Hvala lepa za ta projekt. Sama sem neuka v barvanju in mi vaša vadnica veliko pomeni. Še enkrat iskrena hvala za vašo dobroto, ker delite svoje znanje z nami. Pozdrav iz Slovenije!
Hi Maggie
This was a very informative tutorial.
I’ve lost my crafting mojo at the moment, so I am looking to find it. Hopefully, this tutorial will help.
Hugs
Penny
xxxxx