Clarity’s Blog Tutorial: How To Father’s Day!
Hello hello! Grace here.
I hope this finds you well and enjoying your Sunday.
What a success the Clarity Open Days were… WOOP WOOP! We are all laying on the ground today. I can only imagine that many of you are too. We had such an epic day, didn’t we? Photos of the event will be shared on the blogs when we’ve caught our breath 🙂
But the fun continues…
Today we’re joined by the fantastic Jane Telford (who was also of course at the Open Days and will be horizontal today too I hope!) with another helpful project. I’ll hand you over to the pro!
As a lot of people have joined the Groovi family recently, I thought I would do a card using just the plates from the starter kit. I also thought I would do a card that would be suitable for a man as I know many don’t like making men’s cards, or at least find them more difficult. We need some inspiration! It is Father’s Day soon too.
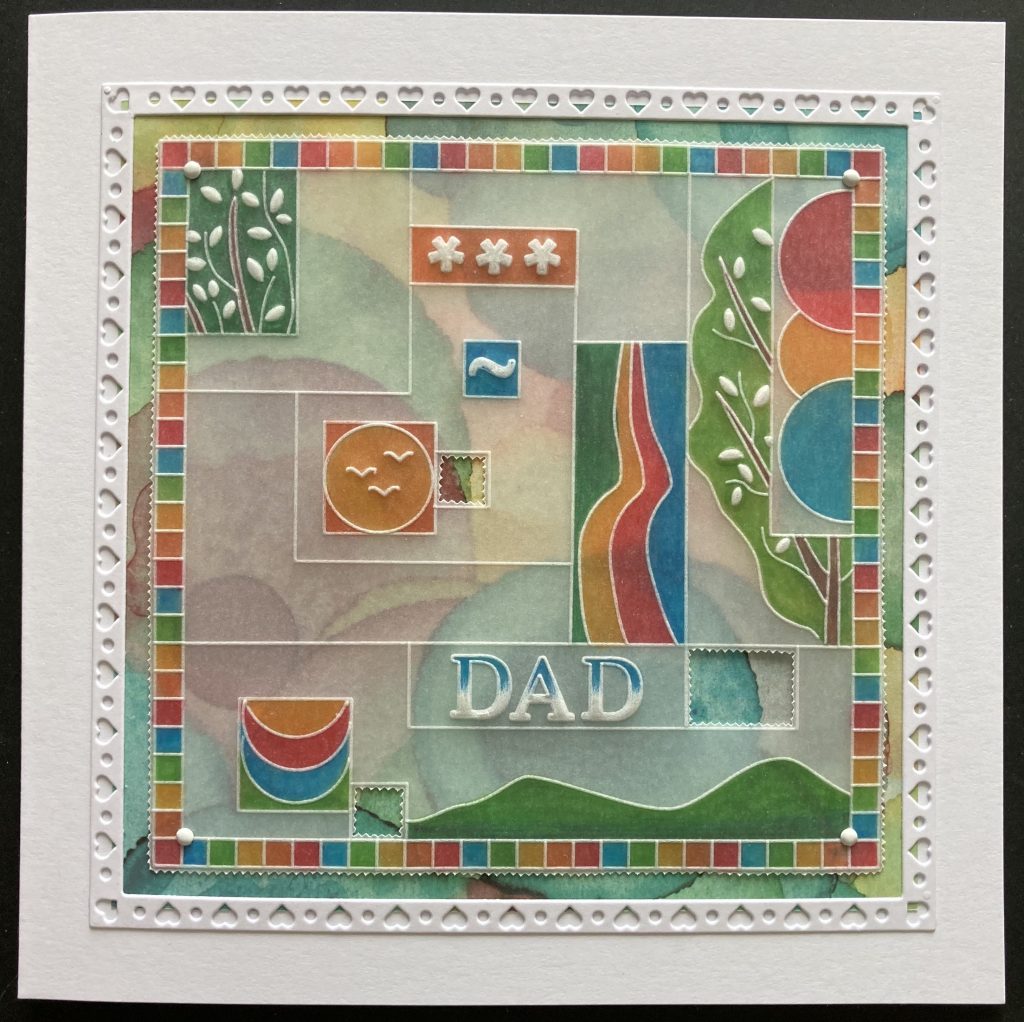
This is where we are headed…
Ingredients
Deluxe Groovi Plate Starter Kit + Butterfly Wreath A5 SQ Plate (GRO-SK-41709-XX)
Plain Parchment (GRO-AC-40024-XX)
Perga Colours Exclusive (PER-CO-70060-XX)
2 Needle Tool (PER-TO-70037-XX)
Ringlock Scissors (PER-TO-70041-XX)
Northern Lights Designer Paper Pack 8″ X 8″ (ACC-CA-30443-88)
4 White Brads (PER-AC-70269-XX)
7 x 7 Card Blank (ACC-CA-30619-77)
Nested Square Doodle Frame-Its Frames Die Set (ACC-DI-31157-66)
Perga Glue (PER-AC-70133-XX)
Method
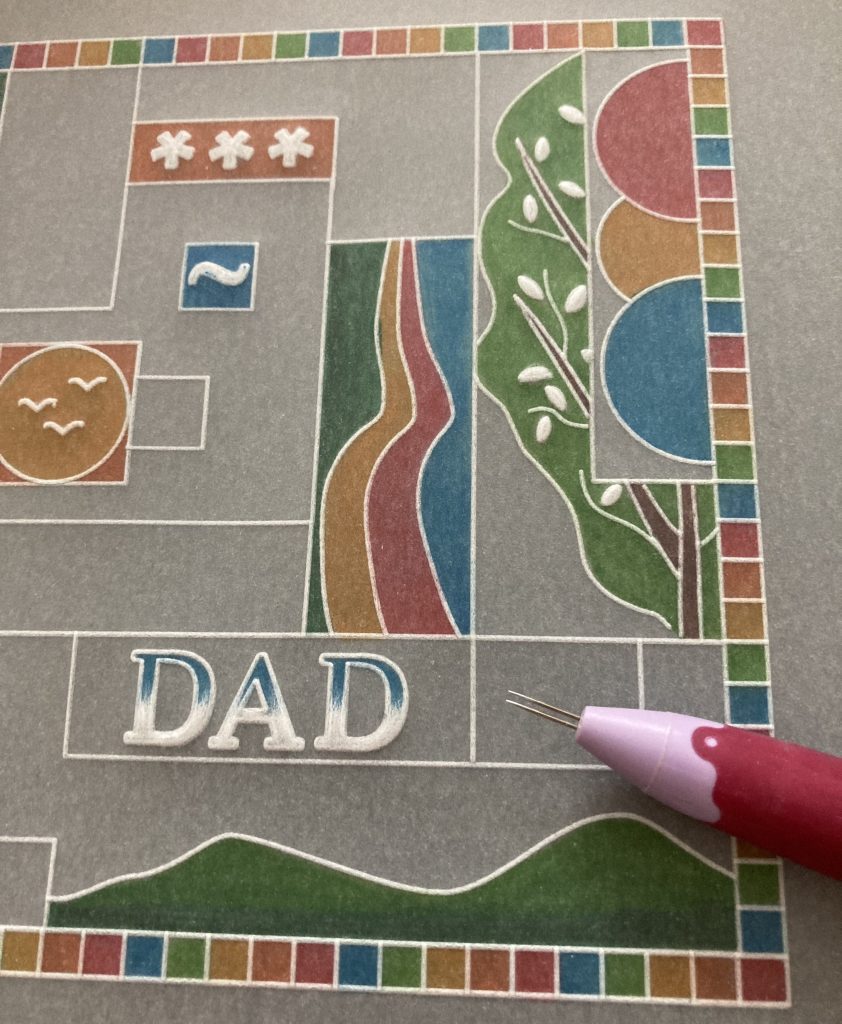
Step 1. Put the nested square plate in the plate mate and attach a piece of the parchment to it. Emboss the two outer squares to make a frame.
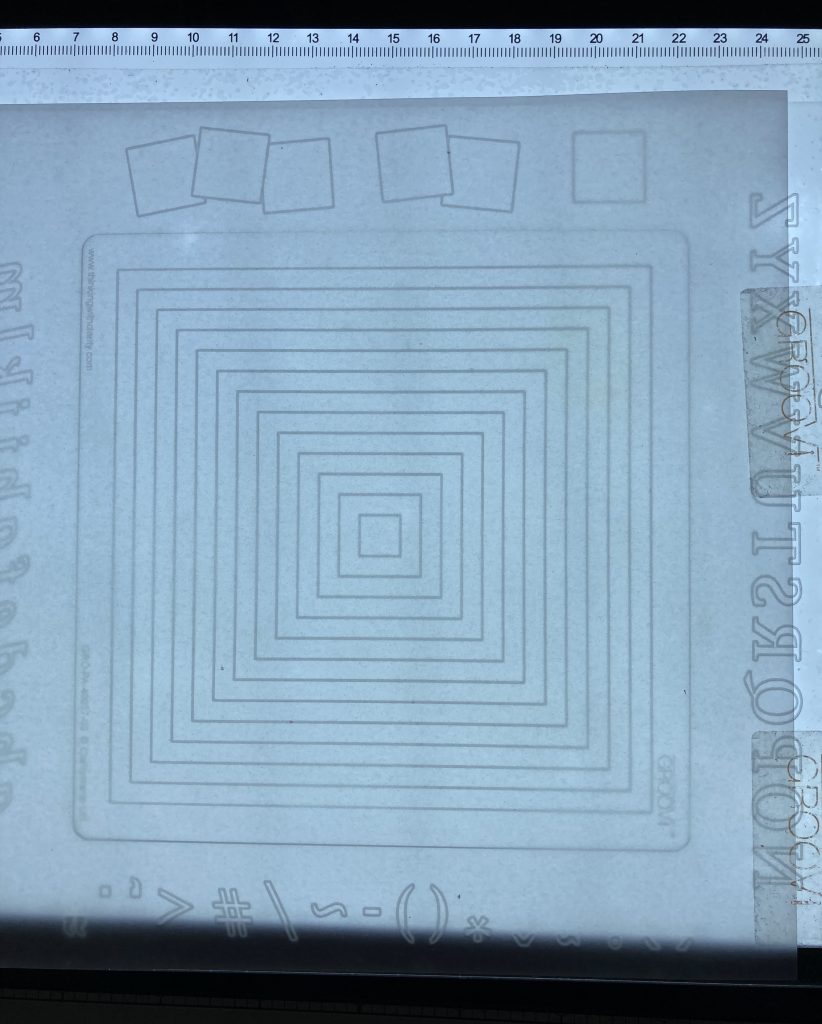
Step 2. Move the parchment and use the lines on the square plate to create a section within the outer square.
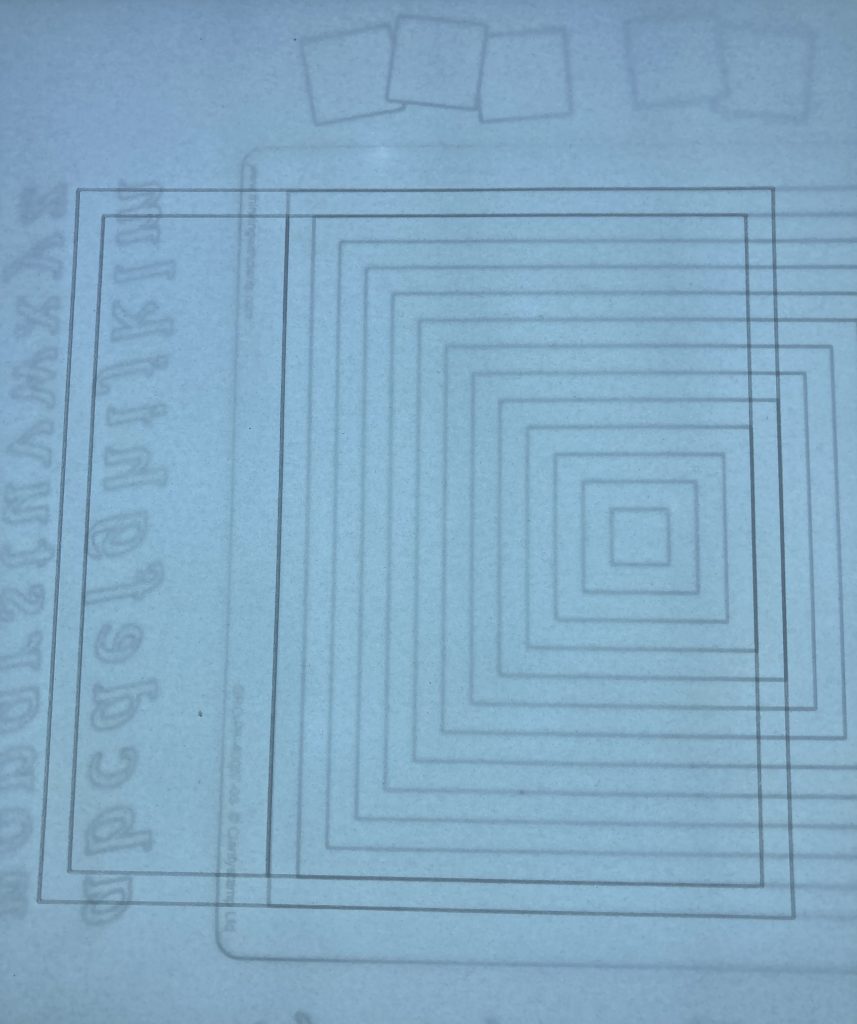
Step 3. Move the parchment again to create another section but without crossing the lines already embossed.
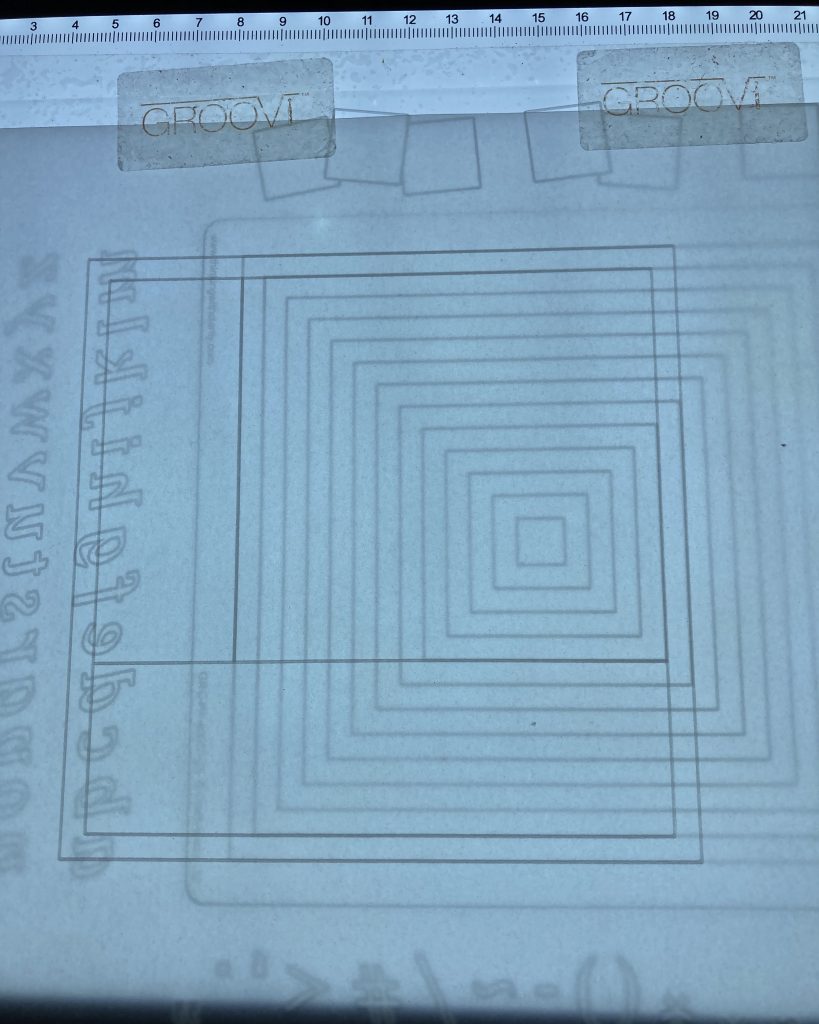
Step 4. Continue to move the parchment to add squares and sections until you have a layout you like. Use the letters on the plate mate to add the name/word you want then surround it with another section.
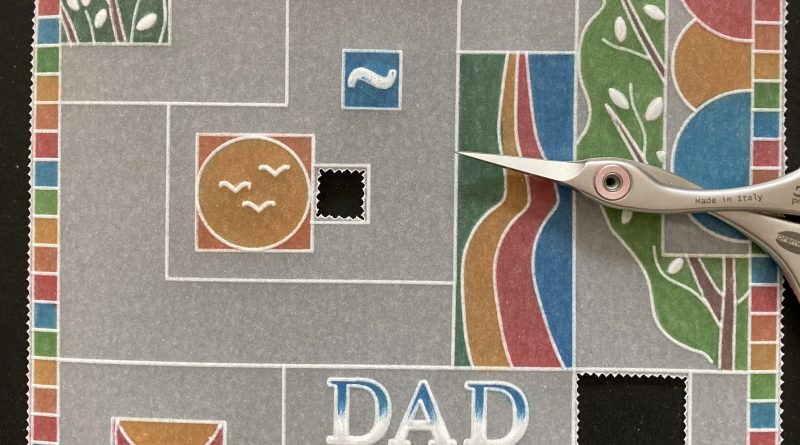
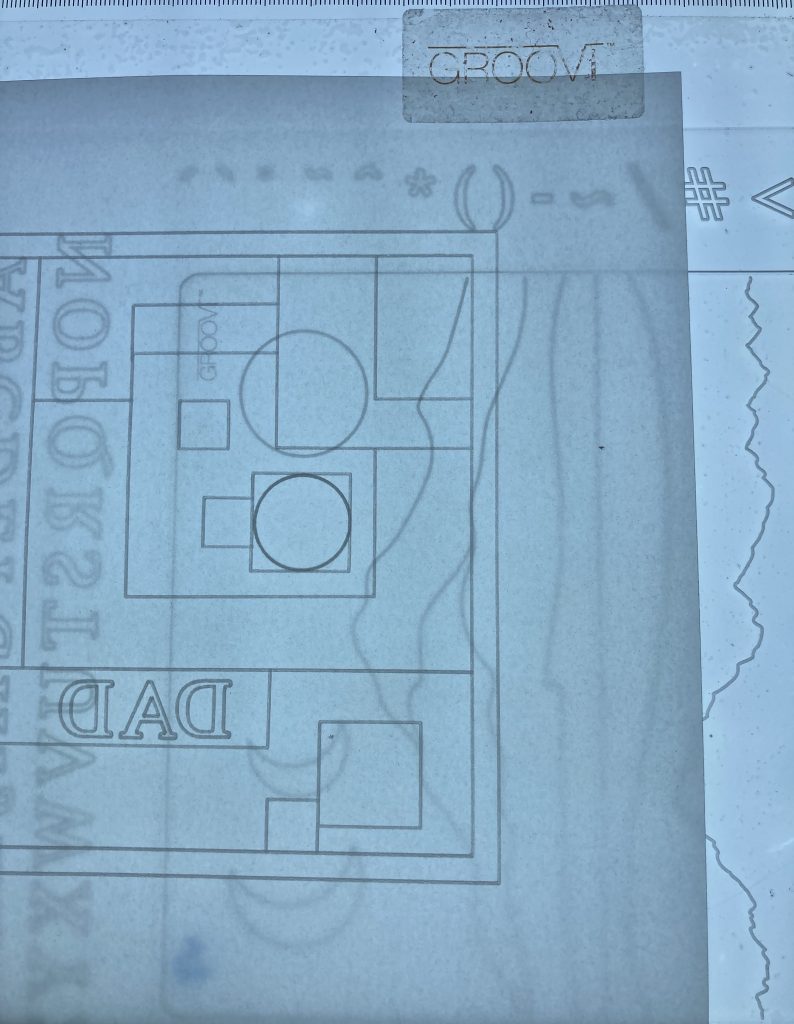
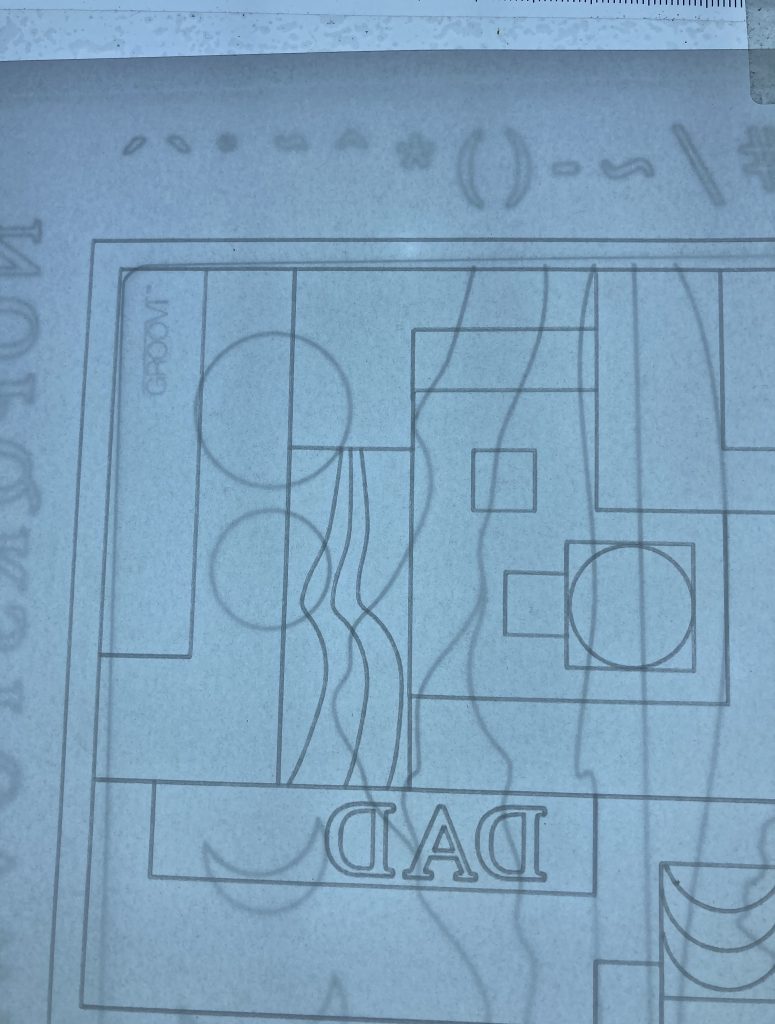
Step 5. Use the mountains plate, the trees plate and elements off the plate mate to add details to some of the sections.
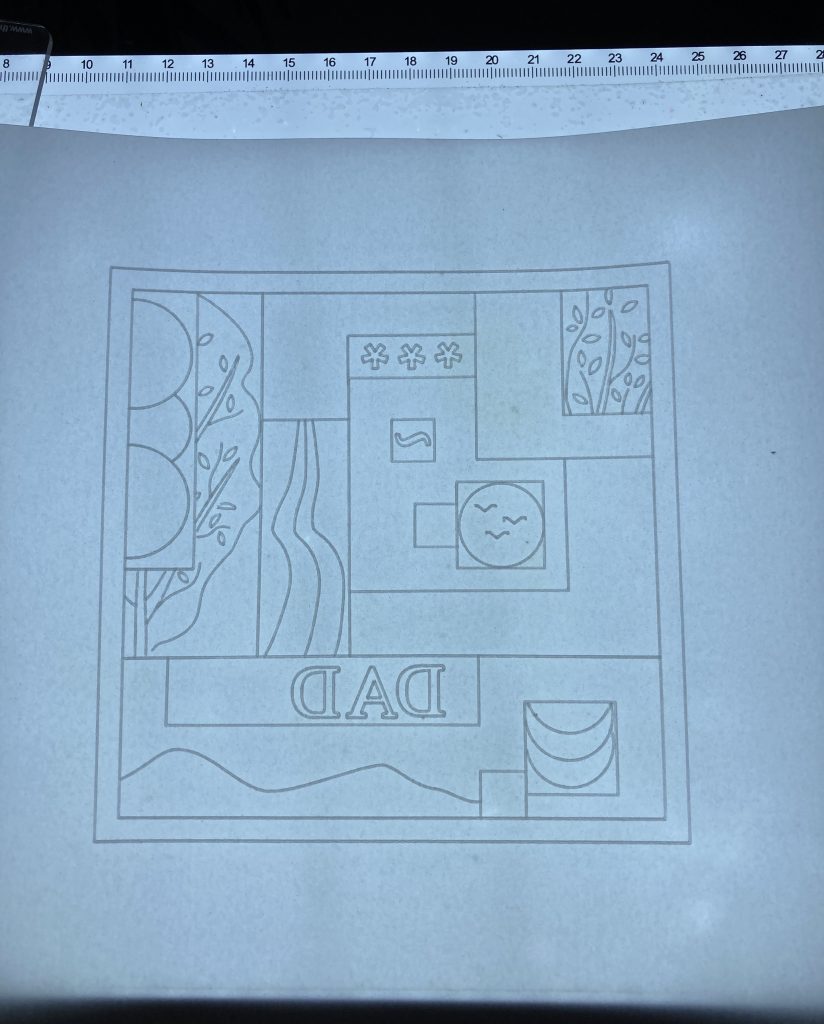
Step 6. Make the small squares within the frame using the lines on the nested squares plate.
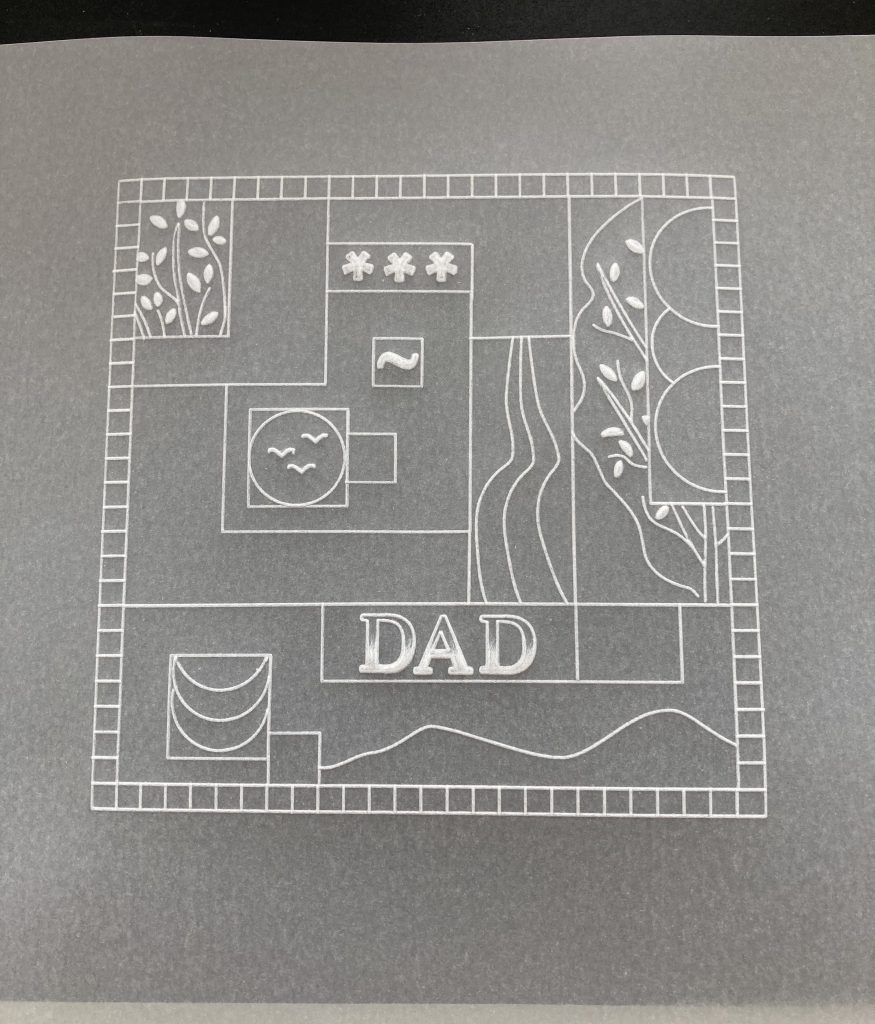
Step 7. Emboss white work within the leaves and small areas, and halfway up the letters. Your design should look something like this.
Step 8. Pick a piece of designer paper. I went bright and bold with paper from the Northern lights Pad. I then chose pen colours that matched.
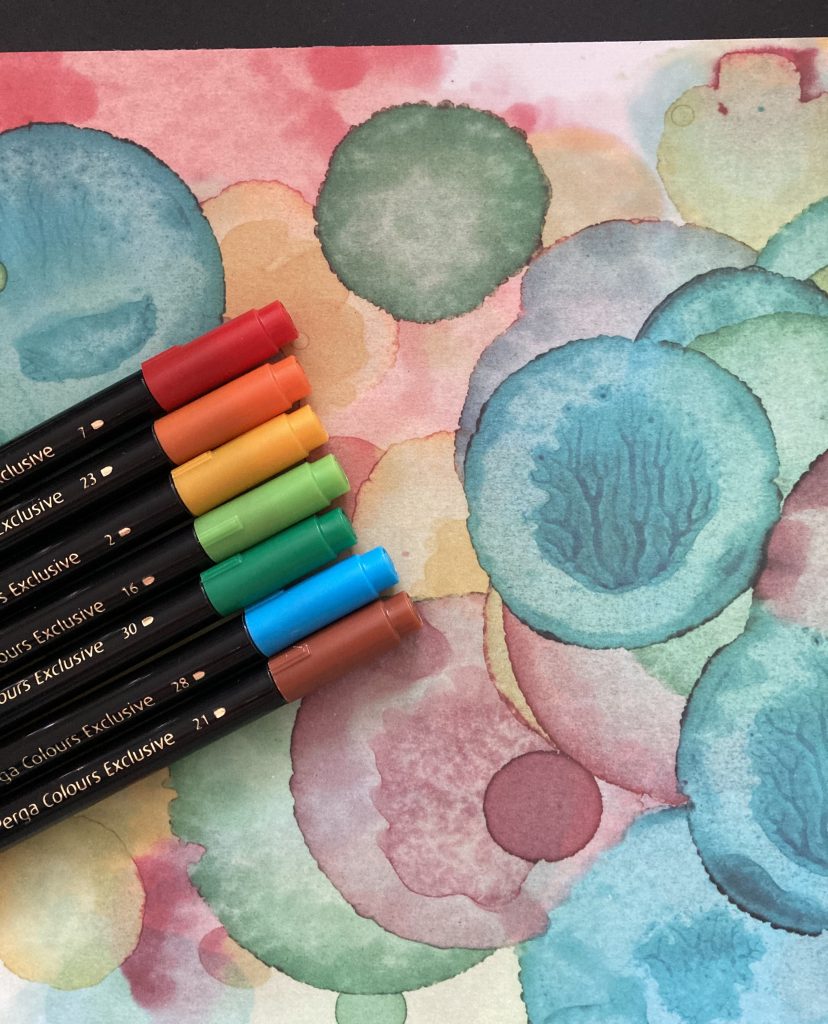
Step 9. Colour the design on the reverse using your chosen colours.

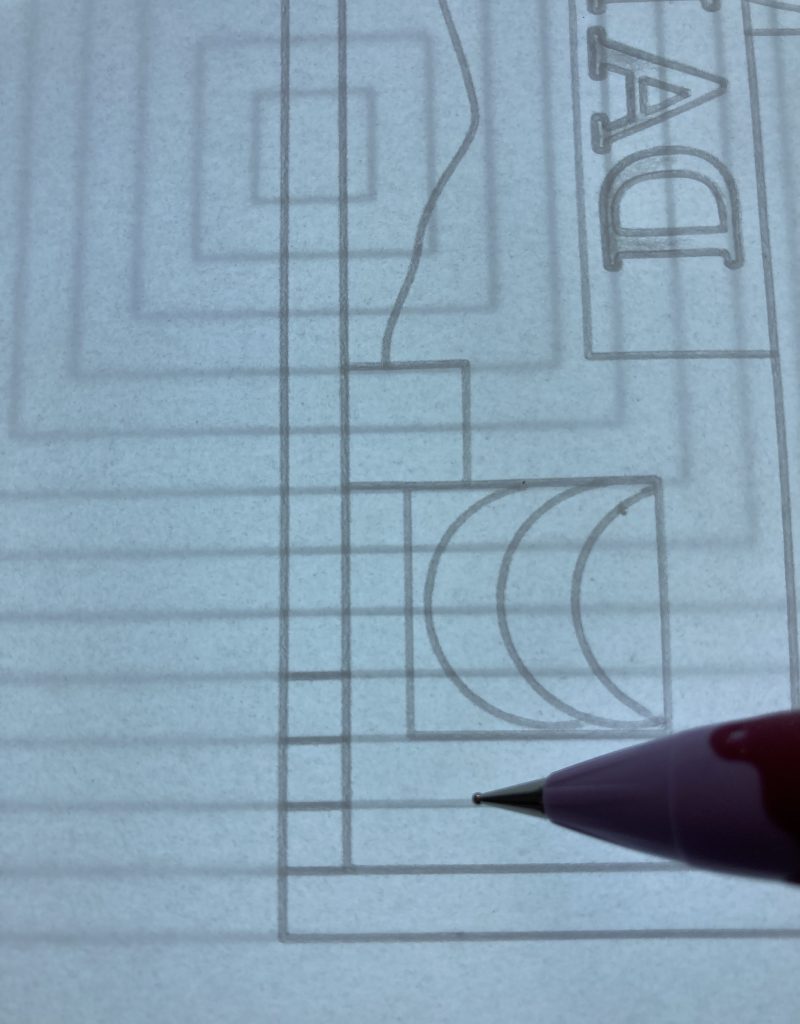
Step 10. Use a two-needle tool to perforate in some of the smaller sections on the design and around the edge.
If you don’t want to picot cut leave this out and simply cut around the frame with straight scissors or a paper trimmer.
Step 11. If you have perforated then use scissors or snips to picot cut out the inner sections and around the outside of the frame.
Step 12. Cut the paper you have chosen to measure 14½cm². Attach the parchment to it using brads and adhere to a 7 x 7 card blank.
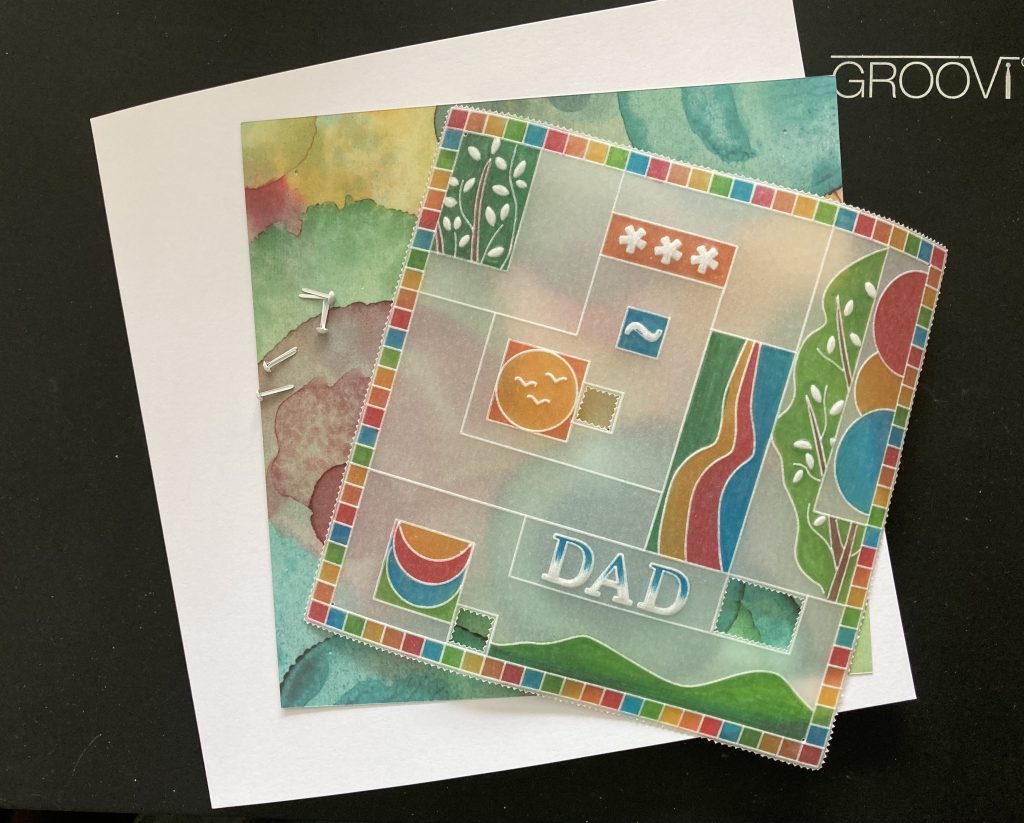
Step 13. Add the largest doodle frame around the edge of the paper using small dots of Perga glue to stick it. And you’re all done!

THANK YOU, JANE! That’s a beautiful card. I absolutely love the colour and the composition. I’m pretty inspired by this myself. What a fantastic idea to create sections to fill… For men’s cards particularly, I think that’s a smart way to go.
In fact, I really like the layout stamps for that very reason! Here, Jane has been clever and created her own layout using the lines from Groovi plates. But we do have a stamp collection for exactly this! They’re wonderful for all cards, but especially men’s cards! Then all you have to do is fill the sections with bits and pieces, and boom, you can see how effectively Jane did it.
Check out the Clarity Layout products HERE.
Everything Jayne has used is over on the Clarity website HERE
What’s happening at Clarity Towers this week:
Monday, June 13th: SHAC Shack with Barb – Live at 10am on Facebook & YouTube
Tuesday, June 14th: Groovi Tuesday with Paul – Live at 10am on Facebook & YouTube
Thursday, June 16th: SHAC Shack with Barb – Live at 10am on Facebook & YouTube
Saturday, June 18th: Get Groovi with Clarity with Tina Cox on 2pm on Craft Extra and 5pm on Create and Craft Live
Right, I’m off to enjoy the rest of the weekend. I hope you’re doing the same. A couple more days and I’m off back to Brooklyn.
Travel gently, friends.
Lotsa love, Grace & Jane xoxo
Clarity – The Home of Art, Craft and Well-Being.
Love the blog Grace
Can you tell us who won the (blueinittowinitchallenge ) would like to congratulate them xx
Great project from Jane which could be used for lots of occasions. It was lovely to actually talk to both of you over the last couple of days face to face. Thanks again to the whole team for all the hard work that went into the planning for the Open days and safe travels to everyone getting back home.
Another great project from Jane. Don’t do much parchment work but always enjoy the blog. I might give this one a try though with the products that I have.
Fabulous project Jane especially for those who have just got the starter kit and no other plates yet. There is nothing worse than finding you need something extra to be able to complete a project when just starting out. Thank you to everyone involved in making the Open Days such a success – no wonder you all need a lie down today. Have a safe journey home Grace xx
Lovely project and the colors – wish I still had my Dad to do it for 😢. I’m sure it would be lovely for something else though. I remember when Groovi first came out, Barbara asked us to do a design just using the original starter kit which I did, we either sent them in or sent a photo, can’t remember which, and Barbara showed them on the tv, that was original C & C days too of course. I was so impressed I got my name mentioned on tv 😹. Who would think I’d still be doing it now and not got fed up with it.
Looks like everyone enjoyed the Open Days, I hope you recover before your journey home and have few more days with your family. Safe trip home x x
Lovely project for anyone. Sounds like you had an absolute ball; would have loved to be there – may be another year. Have a fantastic few days with the family.
Thank you Grace and Jane for lovely project. I look forward to seeing the photos of the open days too. Pleased it went well. I endeavour to be there next year for both days. Have a lovely rest of your stay before you fly back with family and a safe journey home. Lesley xx
A lovely project!
It was good to meet you on Friday, Grace. What a fantastic day! Xx
Loving this design. Thanks for the inspiration Jane. Xx
Hi Grace & Jane
Thank you for this lovely project – surprised and delighted to see after the VERY busy weekend that was had. It was wonderful to see all the Clarity team -from having questions answered first hand by the experts – to meeting other crafters -and to the raffle ticket prizes – the hall was buzzing – a BIG BIG thank you to each and everyone of you for giving up your time and for all the hard work that went into making the weekend – it was a joy
Hope you’ve all managed to have a well deserved rest
Love Seta Xx
It was lovely to meet you both in person at the Open Day, Grace and Jane. This was the designer paper we talked about at the make and take, Jane. Thank you for the inspiration xx
What a fabulous piece of art. Hopefully something I can achieve!