
Clarity’s Blog Tutorial: How To Use A Semi-Circle Mini & Swirl Tool – Part 1
Hello hello! Grace here.
I hope this finds you safe and well!
Following on from Linda and Paul’s session in the Pergamano School on Tuesday, Glynis has created another beautiful and achievable piece of artwork using the Semi-Circle Mini & Swirl Tools.
If you missed this weeks episode, then worry not – you can find the session over on the Clarity website. In fact, you can find all of the previous classroom sessions HERE
Let me hand you over to the lovely Glynis………..

How To Use A Semi-Circle Mini & Swirl Tool
Ingredients
Pergamano Handbook for Multi-Needle Tools Volume 1 by Linda Williams (PER-BO-70291-XX)
Nested Arch Tags Groovi Plate A5 (GRO-PA-41465-04)
Tina’s 3D Flowers and Butterflies A4 Square Plate (GRO-FL-40553-15)
Semi-Cirlce Mini Perforating Tool (PER-TO-70034-XX)
Swirl Perforating Tool (PER-TO-70032-XX)
Single Needle Perforating Tool (PER-TO-70035-XX)
5 in a Circle Perforating tool (PER-TO-70025-XX)
1mm Embossing Ball tool (PER-TO-70011-XX)
1.5mm Embossing Ball tool (PER-TO-70004-XX)
3mm Embossing Ball tool (PER-TO-70005-XX)
Tools from the starter kit.
Faber-Castell Polychromos Pencils (ACC-PE-30797-XX) OR
Perga-Liner Pencils (B) (PER-CO-70063-XX)
Blending nibs (PER-AC-70300-XX)
Dorso Oil (PER-CO-70066-XX)
Perga Glue (PER-AC-70133-XX)
Gems
Method
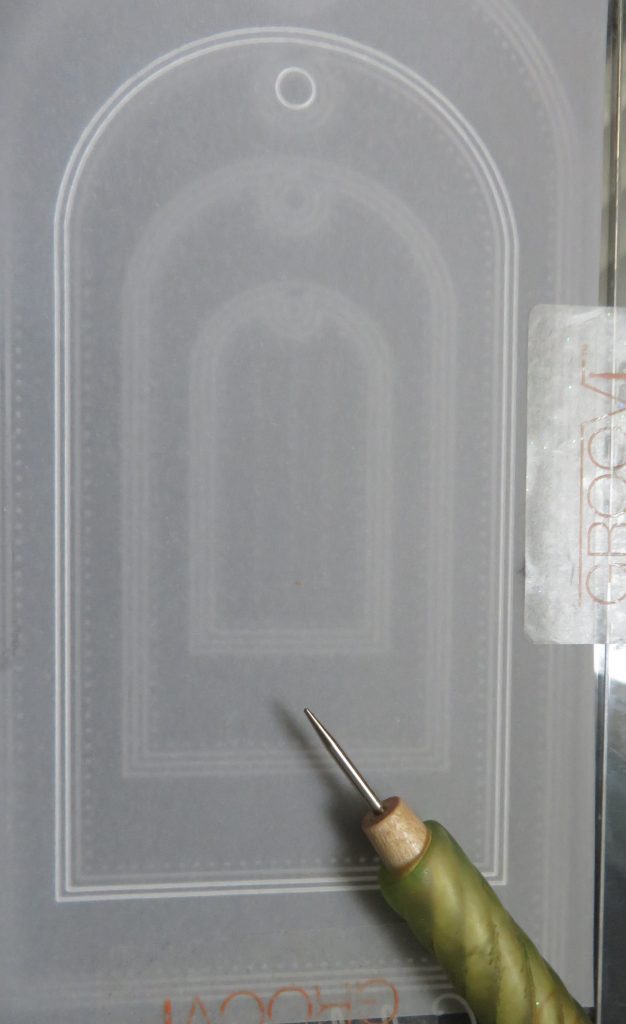
Step 1. Trace out the 2nd largest tag on the arched tags plate.
Step 2. Choose a flower from Tina’s 3D Flowers and Butterflies plate. Make sure the petals are large enough to take a swirl tool perforation into them. Emboss them into the tag along with a few leaves to make a display.
Step 3. Add some colour to the flowers and leaves, blending the colours with some Dorso oil and blending nibs.
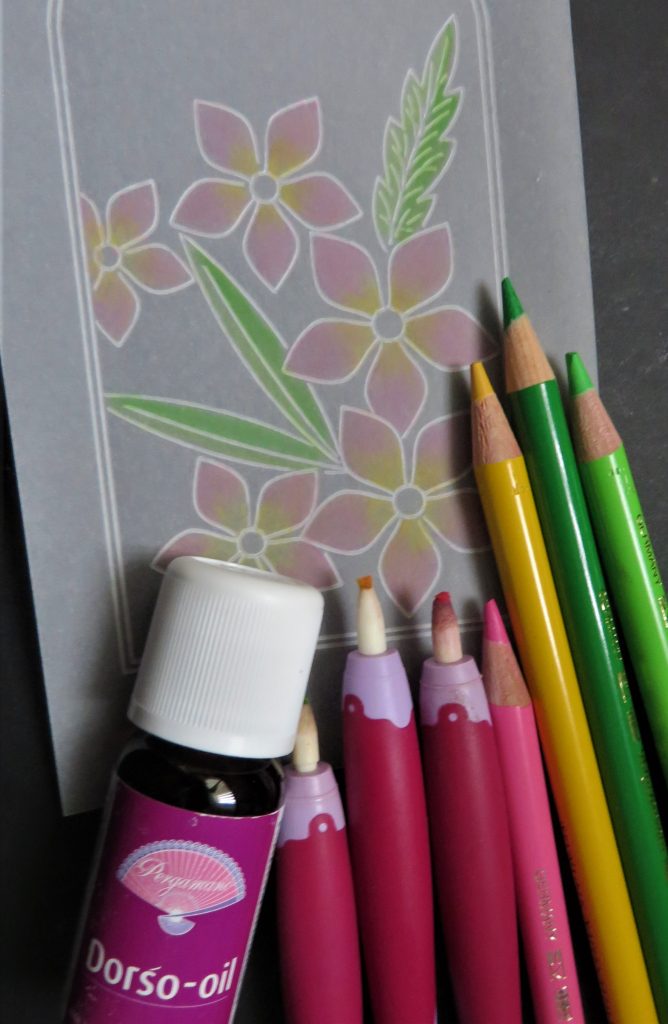
Step 4. Put some colour into the margin with a colour you used for the flowers or leaves.

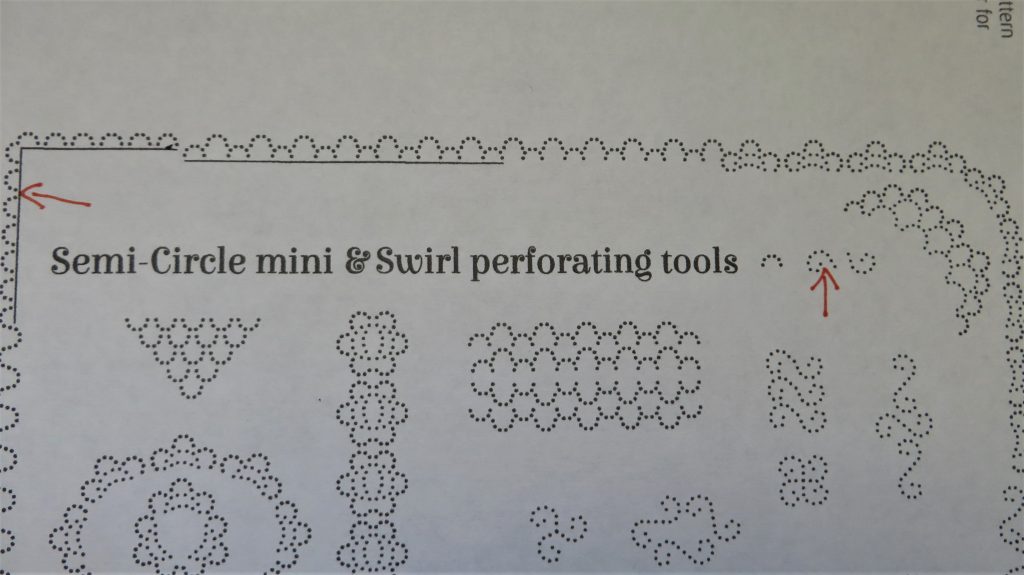
Step 5. The patterns for the Semi-Circle Mini and Swirl tools are in Linda’s handbook on pages 34-37. Photocopy the sampler on page 37. The two patterns used for this project are marked with red arrows.
Step 6. Place the parchment over the pattern and shallow perforate through to the paper, aligning all the dots with the points of the needle.
Line up the parchment so that you perforate a swirl into each petal. Use the paper pattern to help you as it will make it easier. When you have a swirl in all of the petals, go around the edge with the semi-circle mini. Space them out so that they fit.
TOP TIP: Note the dots on the handles of the tool – these will help you with the orientation of the tool.

Step 6. Emboss into each scallop around the edge with 3mm embossing ball tool. It doesn’t have to be white straight away, so just go very lightly. Use the 1mm ball tool to emboss within the swirl perforations – look at the illustrations provided by Linda in the handbook.
Add some 5 in a circle perforations as decoration and emboss a dot in the centre of each. Use the 1.5mm tool to define the edges of the scallops and widen out the thicker end of the embossing within the swirls.
Step 7. Use the single needle tool (fine) to re-perforate all of the holes; the swirls, the scallops and the 5 in a circle designs. Picot cut out the scallops. Remember to turn the work as you go to keep your hand in a comfortable position and the picots neat.
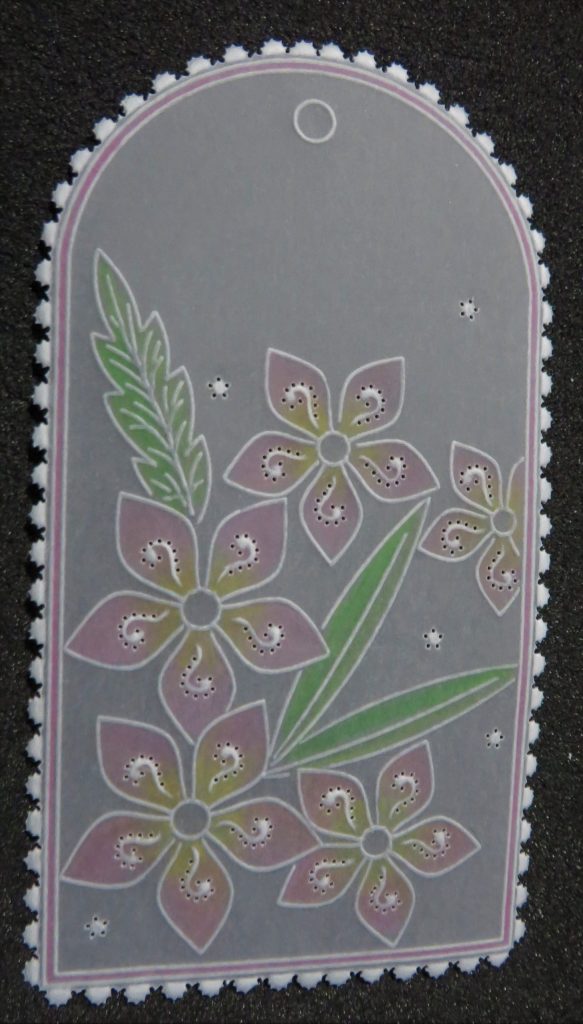
Step 8. Mat and layer the work up and cut carefully around the tag shape. Add some gems to the centres of the flowers using perga glue.
Everything that Glynis has used in her project is in one place over on the Clarity website HERE
Don’t forget to tune in on Tuesday for another session from Linda and Paul. Oh, and if you missed the news earlier this week, Mum will be doing 2 weekly sessions of the SHAC Shack – Monday and Thursday.
We are here to keep you company!
Lotsa love, Grace & Glynis xoxo
Clarity – The Home of Art, Craft and Well-Being.
Love this project (love them all really)
Hope to catch up and have a go soon
Lovely achievable project. Thank you xxx
Another great project from Glynis this week – love the tags for showcasing a new technique.
Have been out today so was surprised to still be the 2nd person to comment.
Thank you Grace & Glynis x