
Clarity’s Blog Tutorial: How To Make A Groovi Christmas Tree
Hello hello! Grace here.
I hope this finds you well?
Thanks for joining us on a Sunday!
A few weeks ago, Paul showcased the Groovi Christmas Tree on The Craft Store.
We’re back with our Clarity blog tutorial, with the fantastic Josie Davidson this week! Lucky us..

I’ll hand you right over to our stellar teacher!
A Clarity Christmas Tree
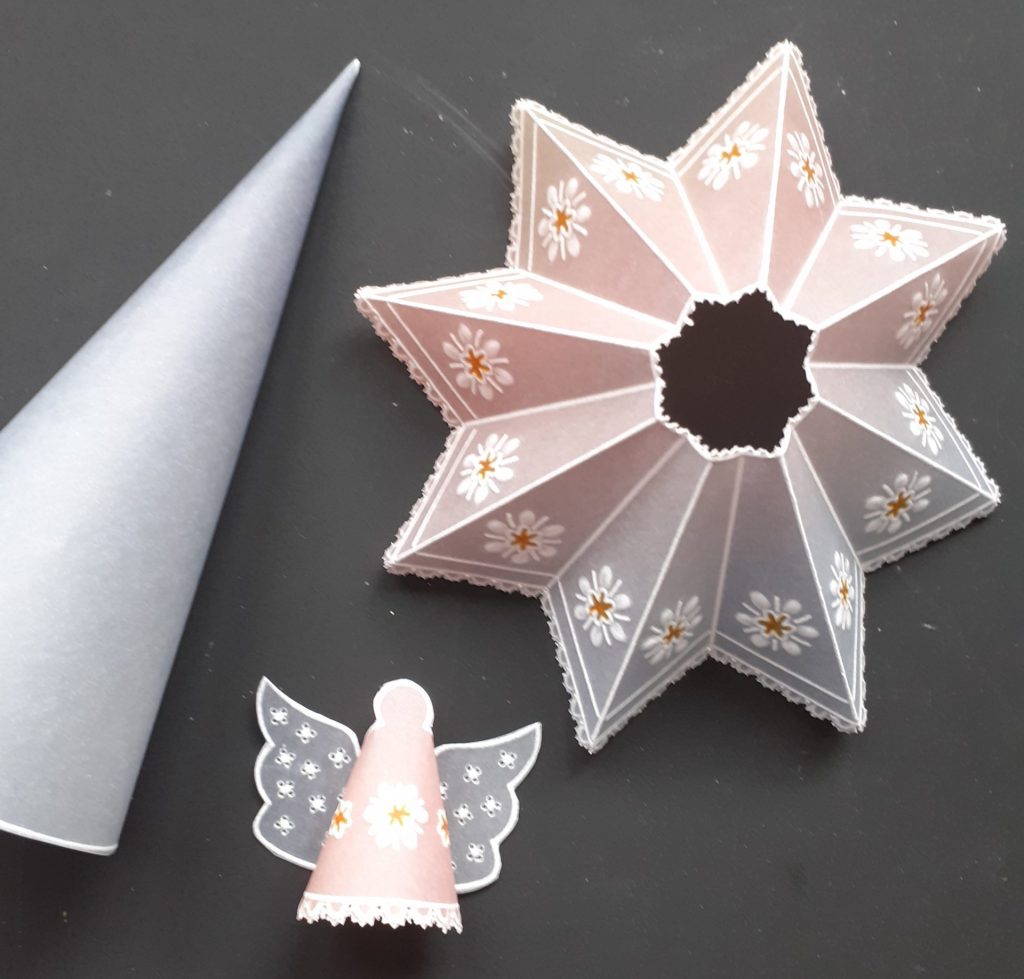
TOP TIP: As we are going to be using the semi circle tool to add decoration to the edges of each of the layers of the tree, you may need to move your parchment around the plate to allow extra space for the perforating. If you do not wish to do any picot cutting, then you can cut out all of the pieces of the tree with scissors, including the centre circles of the each tree section.
You can put a battery tealight under your finished tree, if you wish.
Ingredients
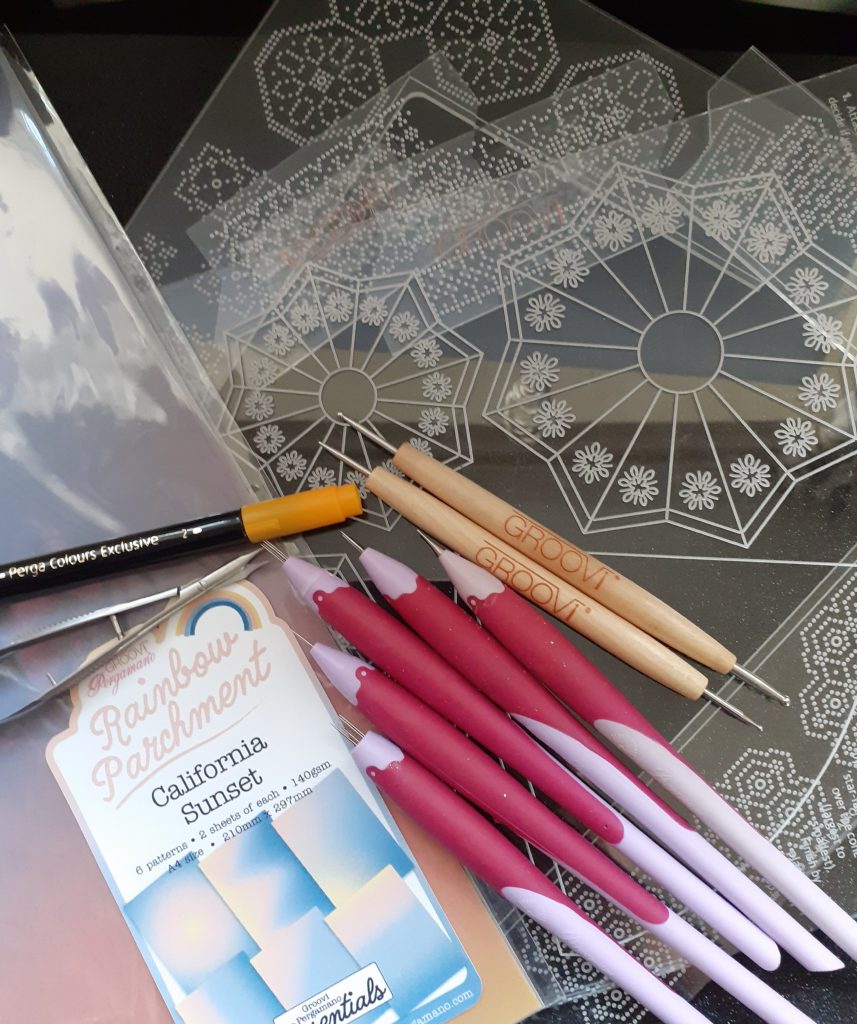
3D Christmas Tree Plate (GRO-TE-41020-16)
Rainbow Parchment (I used California Sunset, but the choice is yours!)
A4 Plate Mate and Extenders (GRO-MA-41768-21)
Groovi 1 & 2 Embossing Tool (GRO-AC-40026-XX)
Groovi 3 & 4 Embossing Tool (GRO-AC-40027-XX)
Pergamano Mini Semi Circle Perforating Tool (PER-TO-70034-XX)
Pergamano Fine 1 Needle Perforating Tool (PER-TO-70035-XX)
Pergamano 4 Needle Fine Perforating Tool (PER-TO-70036-XX)
Pergamano 2 Needle Bold Perforating Tool (PER-TO-70279-XX)
Pergamano 1mm Embossing Tool (PER-TO-70011-XX)
Embossing Mat (GRO-AC-40194-A4) or (PER-AC-70075-XX)
Thick Super Foam Mat (GRO-AC-41765-XX)
Thin Picot Foam Mat (GRO-AC-40625-XX)
Scissors or Pergacutters
No 2 Perga Colours Exclusive (PER-CO-70060-XX)
Sticky Ink/Mapping Pen and Perga Glitter (Optional)
Thin Red Liner Tape (ACC-AD-30375-XX)
Ordinary Scissors (ACC-CT-30223-XX)
Method
Step 1. Emboss all of the design with the Number 1 end of the Number 1 & 2 Groovi Embossing Tool, except for the snowflakes. Emboss the centre star and straight lines of the snowflakes with the Number 1 Embossing Tool and the rest of the pattern with the Number 2 Embossing Tool.
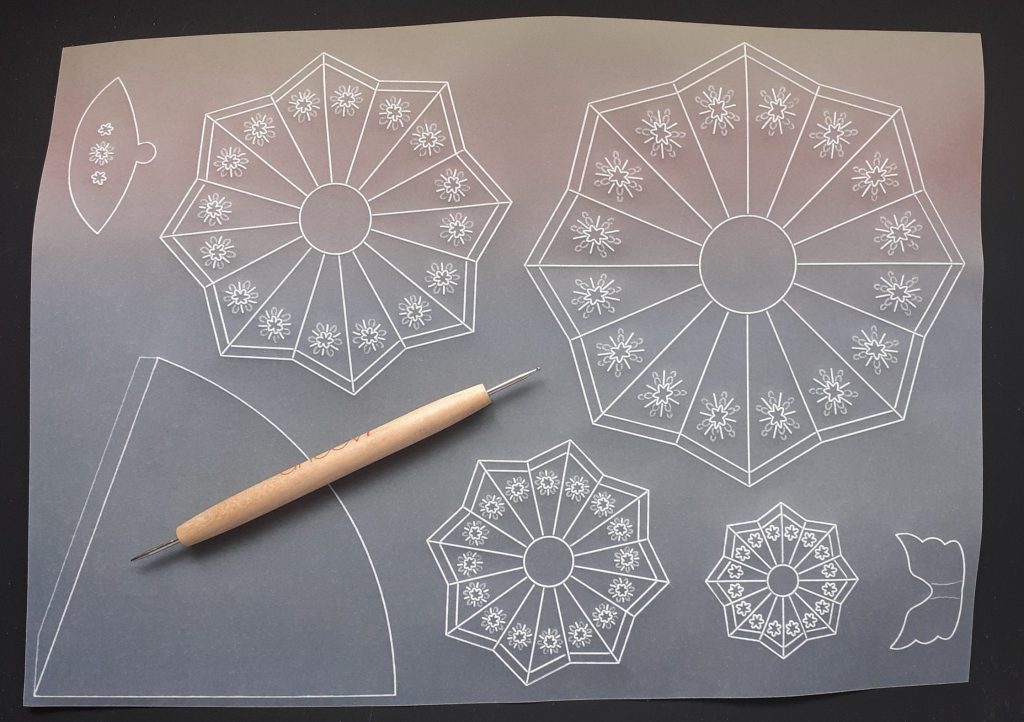
Step 2. Use the Number 3 & 4 Groovi Embossing Tool to emboss the areas of the snowflakes that were traced with the Number 2 Embossing Tool.
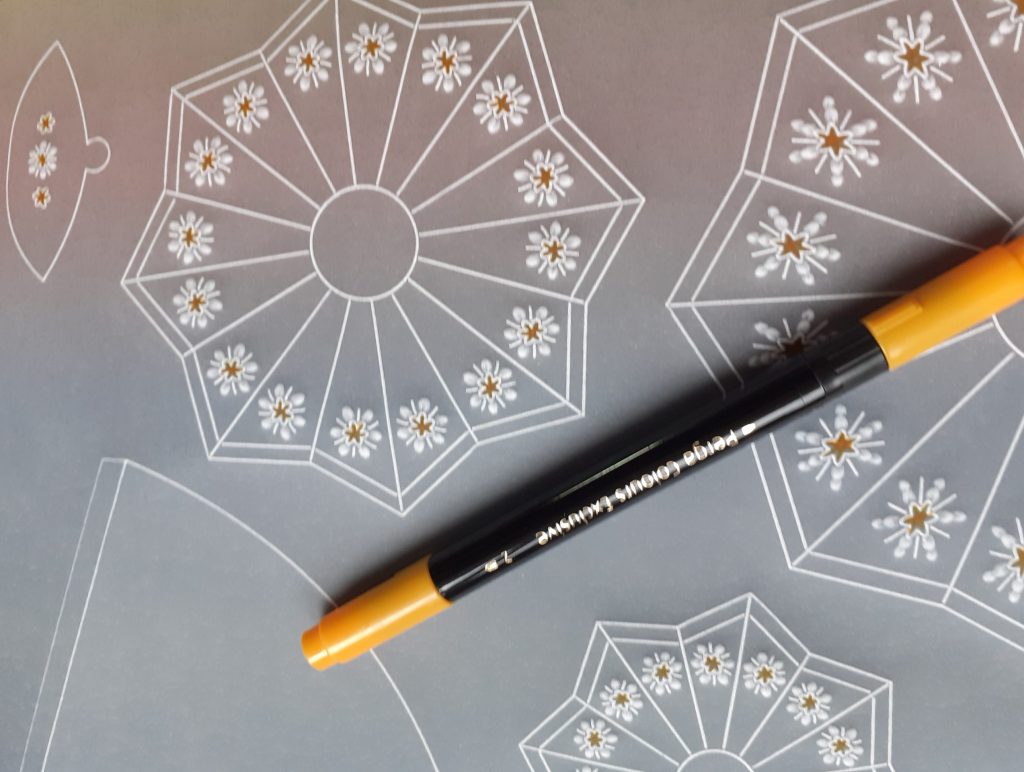
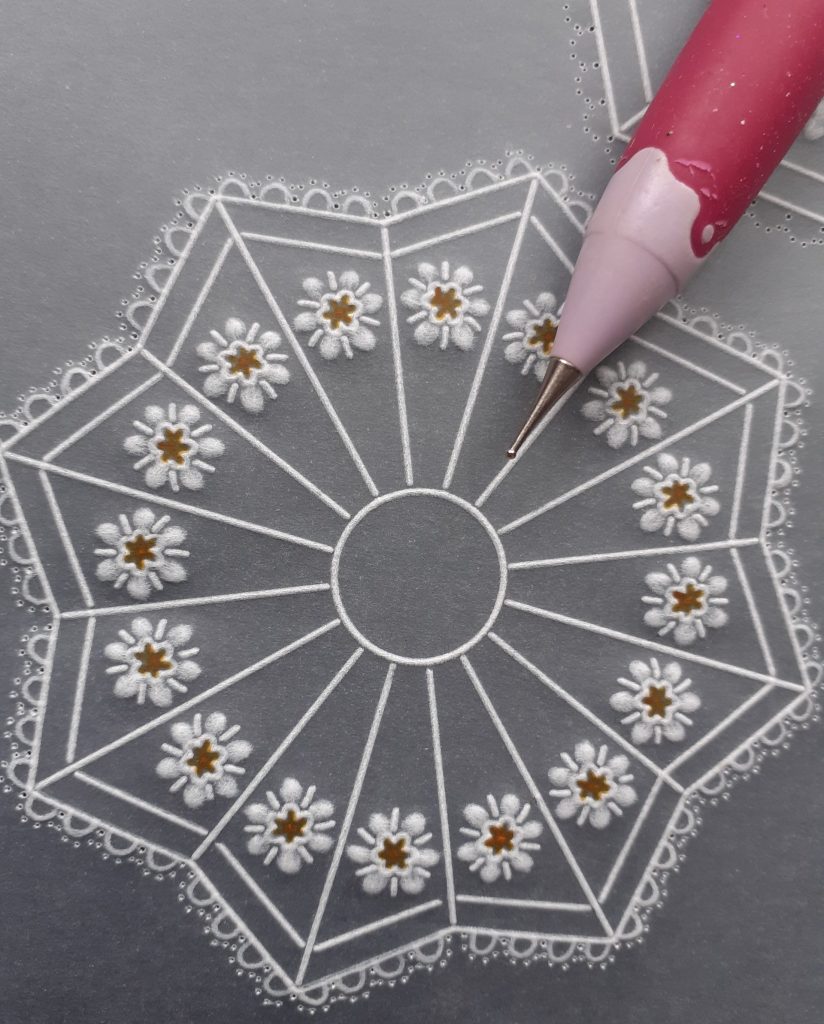
Step 3. On the back of the work, colour the stars in the centres of the snowflakes with the Number 2 Perga Colour Exclusive.
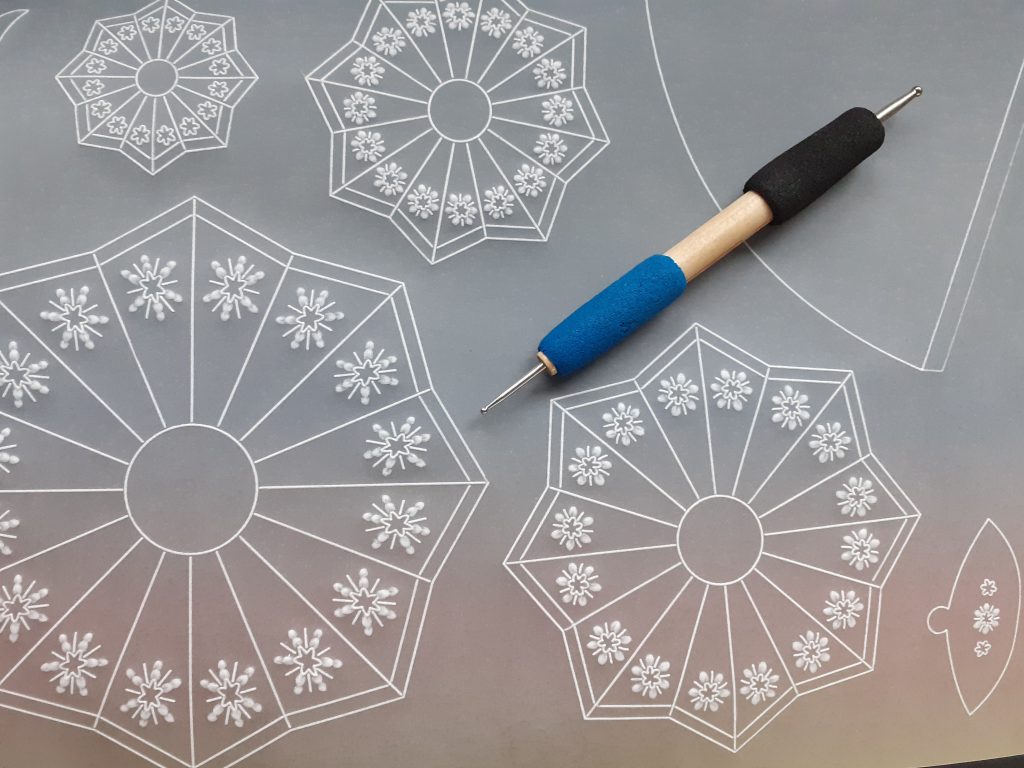
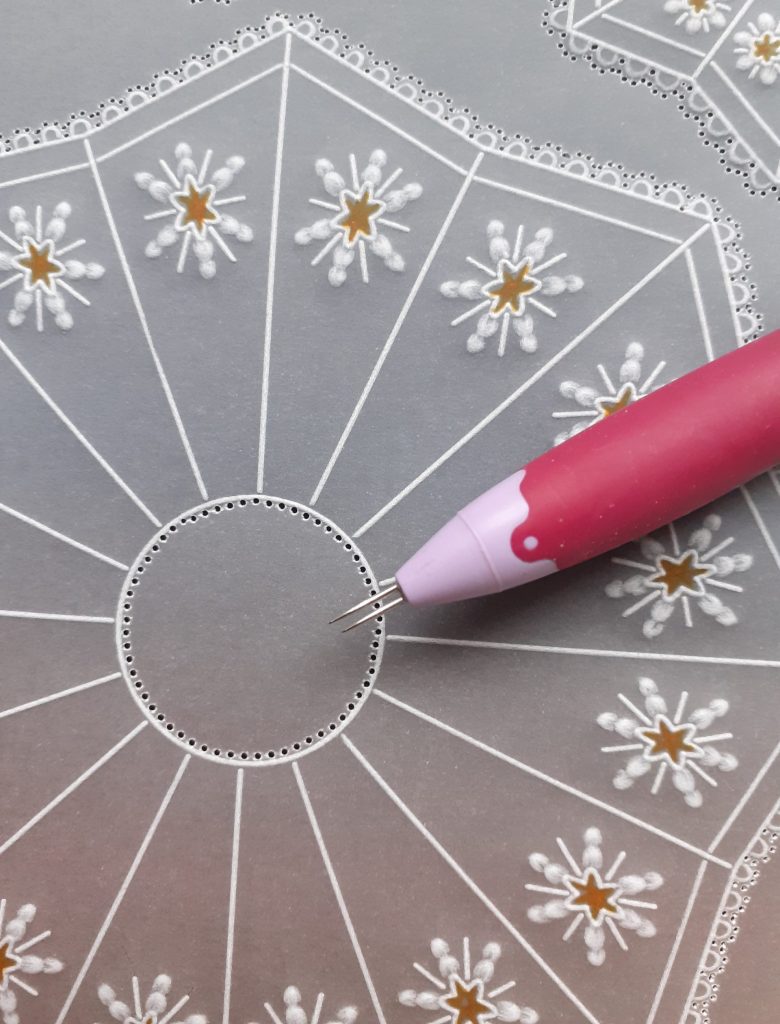
Step 4. Working on a thin Foam Mat and working from the front of the parchment, use the Mini Semi Circle Tool to perforate around each layer of the Christmas tree. Start the perforating from the pointed tip, this will ensure that each point looks the same on each layer.
Step 5. When you reach the ‘v’ at the bottom of each side you may find that there isn’t space to use the Mini Semi Circle Tool but this can be perforated with the 2 Needle Tool. When the layers are folded this will not show. Alternatively there may be enough space to use the Mini Semi Circle Tool between the two sets of perforating you have done from either point.
Step 6. From the back of the work, use the 1mm Pergamano Embossing Tool to emboss a line around the inside of the perforations of each scallop.
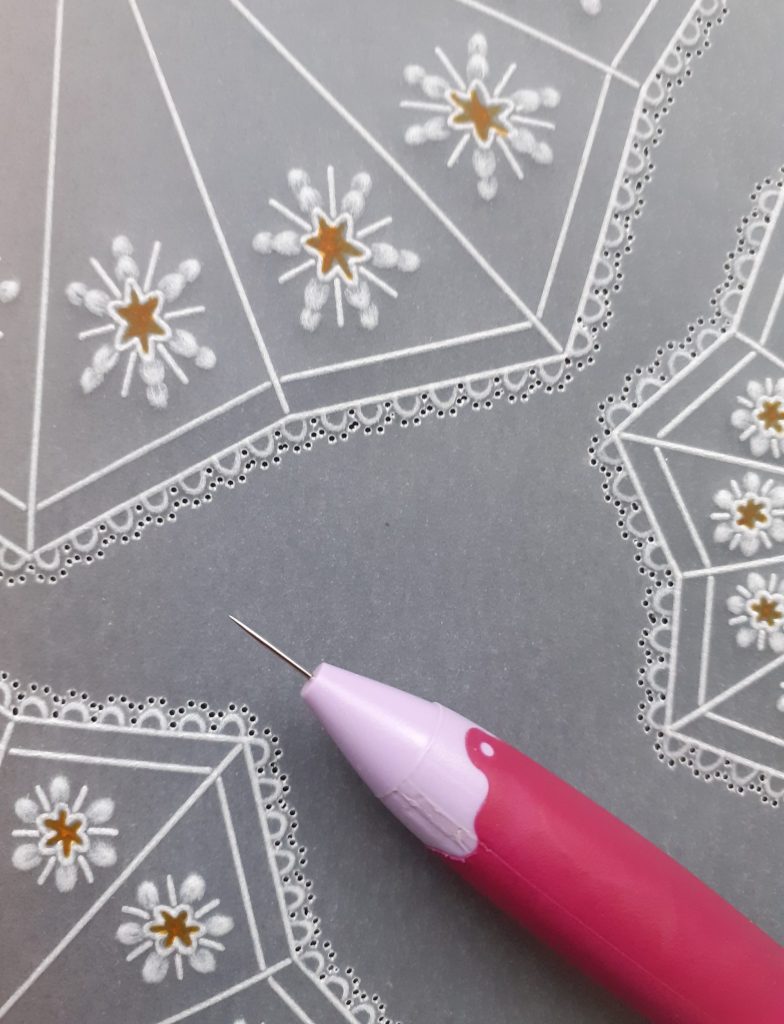
Step 7. On your thick foam mat, re-perforate the Mini Semi Circle perforations with the Fine 1 Needle Tool from the front of the work.
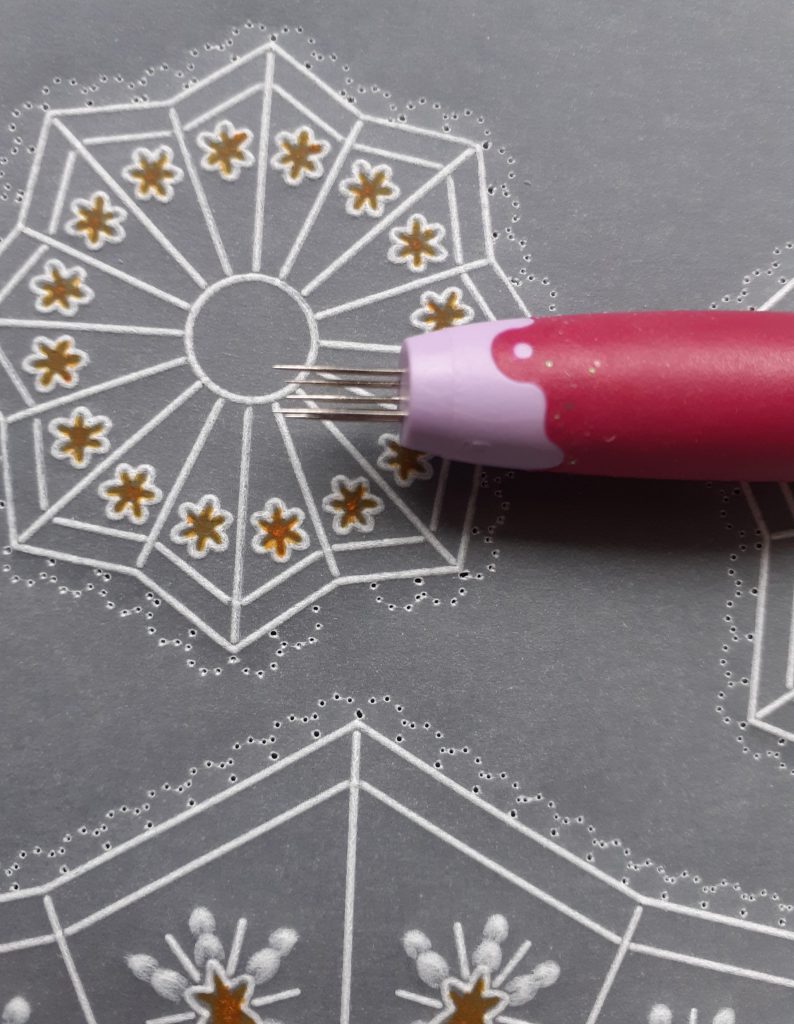
Step 8. Perforate around the centre hole of each layer of the tree with the Pergamano Bold 2 needle tool.
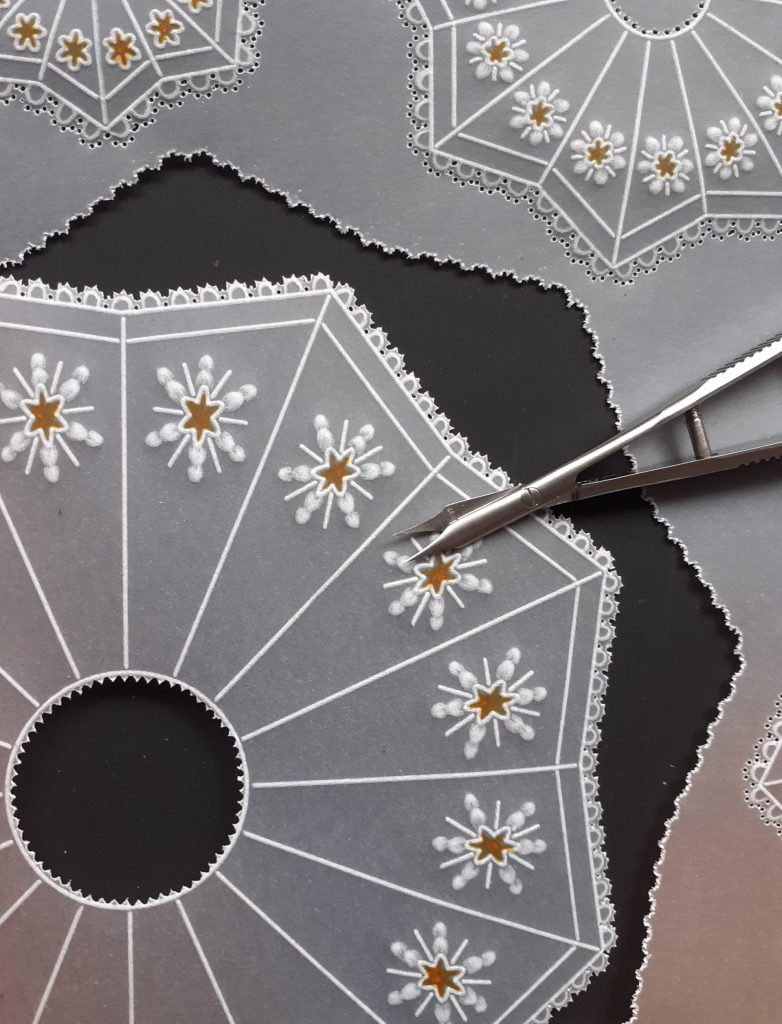
Step 9. Cut out all of the perforating with your scissors or cutters.
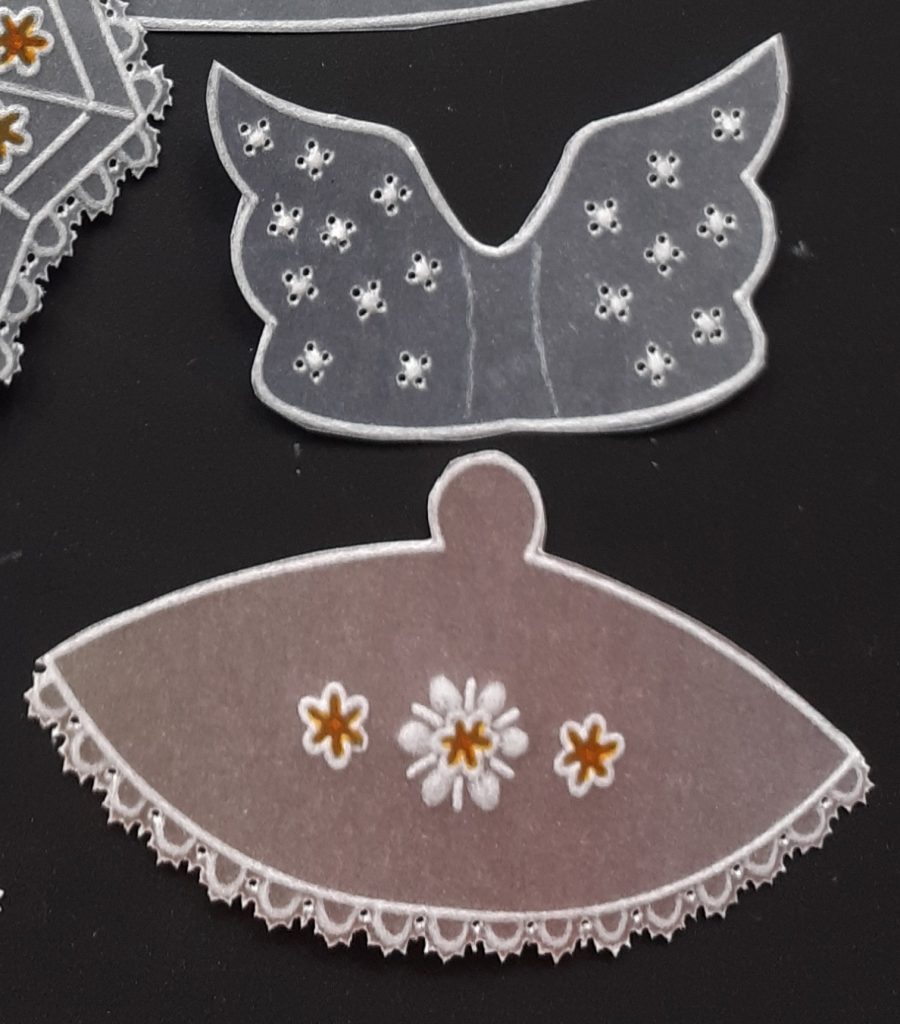
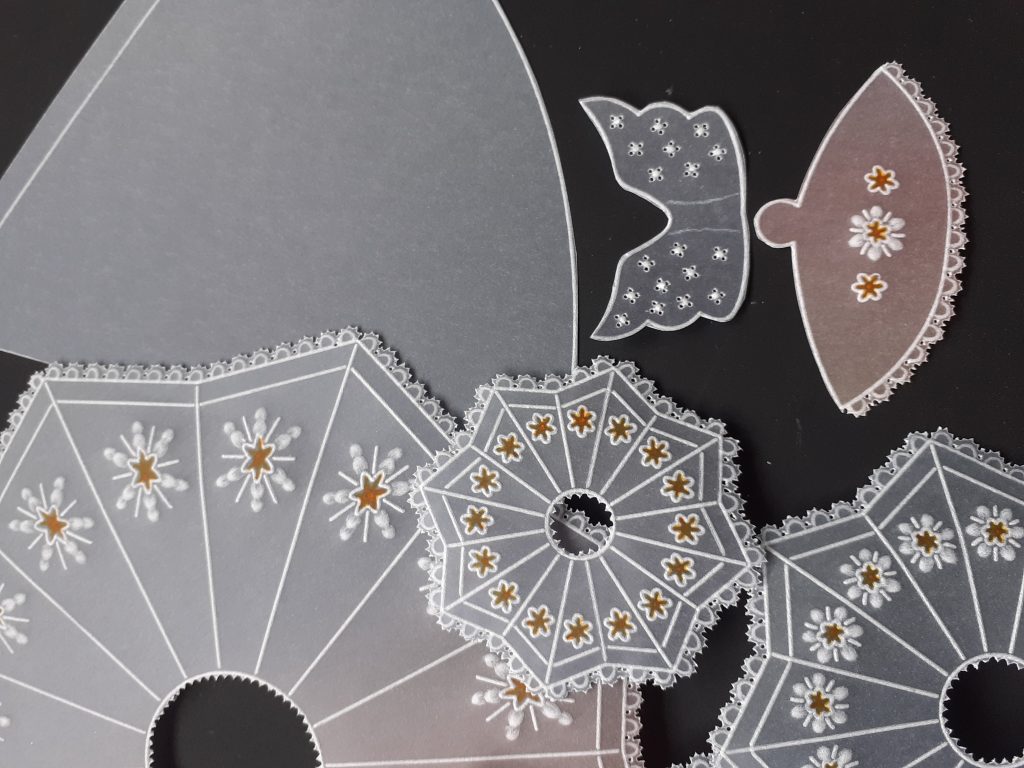
Step 10. To make the angel – emboss the outlines of the angel and wings with Number 1 Groovi tool. Emboss the snowflakes as per the instructions for the ones in the Christmas tree. Use the 4 Needle Tool on your thin Foam Mat to perforate randomly inside the wings. Emboss a dot in the centre of each one with the Number 2 Groovi Tool and re-perforate with the 1 Needle Tool. Perforate with the Mini Semi Circle Tool along the edge of her dress and complete as per the instructions for the sections of the Christmas tree. Cut these perforations with your scissors or cutters. Cut out all of the remaining outlines with normal scissors.
Step 11. Cut around the cone shape with normal scissors. You should now have all of the pieces of your Christmas tree cut out.
Step 12. At this stage you can decorate your tree with Sticky Ink and Perga Glitter if you wish.
Step 13. To fold each layer of the Christmas tree, I begin with the longer lines and these are folded from the front to form a mountain fold. Turn your piece over and fold the shorter lines to form a valley fold. Attach Red Liner Tape to the edge of the cone and curl it around to stick to the other side. Attach Red Liner Tape to the back of the angels dress and curl it around to stick to the other side of her dress. Attach the wings to the back of the dress using the red liner tape.
Step 14. To assemble your tree, place the sections of the Christmas tree on to the cone starting with the largest one first and then the angel will sit on top of your tree. You do not need to stick the sections of the tree together unless you wish to. By not sticking it together it will store in a much smaller space, ready for future years.
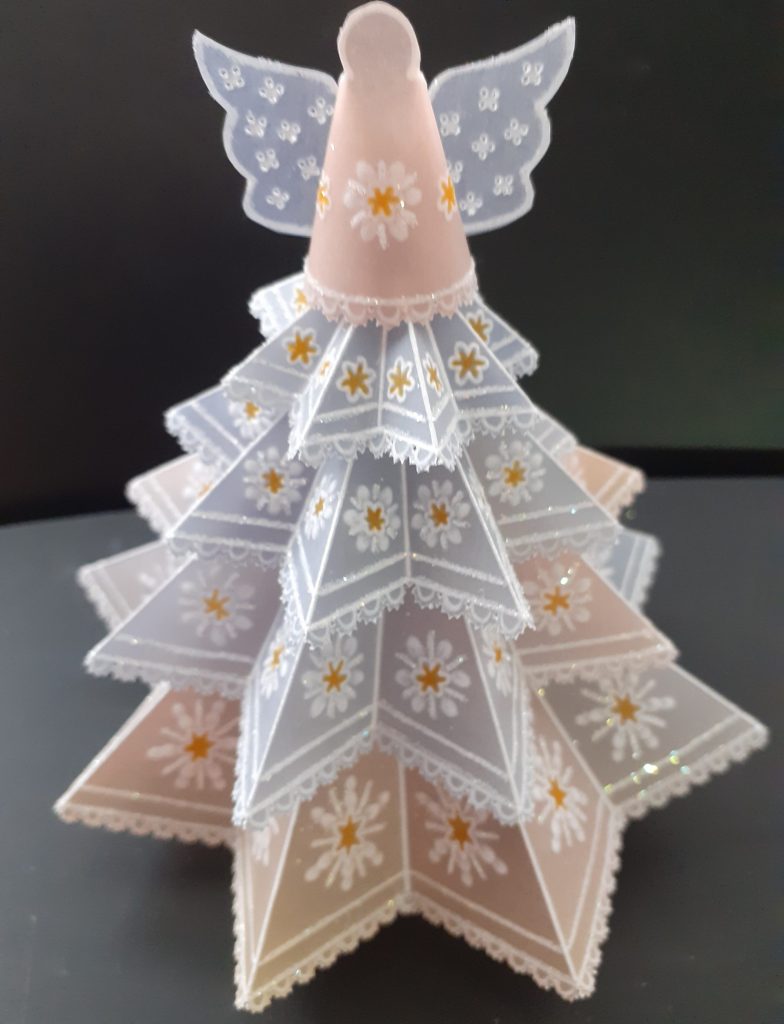
STUNNING! How’s that for a Christmas decoration?! Thank you, Josie, for such a beautiful step by step project! How intricate and detailed it is, but very achievable with the help of Clarity products and Josie’s techniques!
As usual, everything that Josie has used can be found HERE on the Clarity website.
Fancy giving it a go? I’d love to see 🙂 (Grace@claritystamp.com)
Don’t forget to catch Mum on The Craft Store today! The show is 2-4pm. And there’s some absolutely gorgeous products being demonstrated!
You can find more details HERE.
Lotsa love, Grace & Josie xo
Clarity – The Home of Art, Craft and Well-Being.
It looks so much easier than I thought it would be, with Josie’s clear guidance. Maybe another one on the wish List? Thanks Grace and Josie, for sharing. Annette XX
This looks so beautiful. Couldn’t resist giving it a try so plate ordered. Just got to find the time to make it now!!!
Hi Grace, Hi Josie, Wow, Wow, Wow !! Stunning, stunning, stunning !!
Lots of love from Patricia xx
This is a great plate.Made the tree with my 7year old granddaughter this week first time she has tried Groovi she did a grand job we just did the lines and left out the snowflakes etc it looks great and as she said I just have to draw the lines. Off to make her other Nana one for her decorations.
Hi Grace. I love this tree, made several a few years ago, they are in lots of different houses. Need to do a couple more. It is a great plate . Xxxxxxx
Hi Gracie Hi Josie
Josie it was great meeting you at the retreat, I really enjoyed the whole two days, Have made saveraql of the trees, but never with the lace edging it’s fantastic so am going to make a few more. Thank you so much for such fantastic instruction.
Hi Grace & Josie, just catching up with the blog after our birthday celebrations yesterday. I see that it was Dave’s birthday as well yesterday,
Lovely step by step instructions for the Christmas tree from Josie, I like the additional edge to the layers but as yet haven’t got this plate so look forward to seeing what the Groovi Gang come up with.
Have a good week everyone x
Olá muito linda gostava de ter esse molde para fazer uma árvore para mim se fizer o favor e quiser me enviar obrigada
Pingback: Sapin en Pergamano - Les passions d'ART