Clarity Matters Blog Tutorial: How To Use the Pergamano Picot V Small Tool
Hello hello! Grace here.
I hope this finds you well, enjoying your Sunday and feeling crafty.
Earlier this week, in Paul’s Groovi Tuesday class, he began working with tools used in the Pergamano Handbook for Multi Needle Tools – Volume 2. He started by showing us how to use the Picot V Small Perforating Tool. If you weren’t there with us live, you can catch up HERE.
To go hand in hand with that video tutorial, Glynis Whitehead has kindly put together TWO step-by-step projects to show off this particular tool. They’re crafting machines! What a team!
I’ll hand you over to our fabulous teacher…

Picot V Small Perforating Tool, Project 1
Ingredients
Pergamano Handbook for Multi-Needle Tools Vol 2 by Linda Williams (PER-BO-70355-XX)
Nested Arch Tags Groovi Plate A5 (GRO-PA-41465-04)
Jayne’s Gerbera & Butterfly A5 Sq Groovi Plate (GRO-FL-40753-03)
Picot V Small Perforation Tool (PER-TO-70281-XX)
Single Needle Perforating Tool (PER-TO-70035-XX)
1.5mm Embossing Ball Tool (PER-TO-70004-XX)
3mm Embossing Ball Tool (PER-TO-70005-XX)
Groovi 1 & 2 Tool (From Starter Kit) (GRO-AC-40026-XX)
Pergamano Sticky Ink (PER-AC-70134-XX)
Perga-Glitters (PER-AC-70252-XX)
Perga Glue (PER-AC-70133-XX)
Perga Crystals (Starlight Sparkle) (PER-CR-70402-XX)
Method
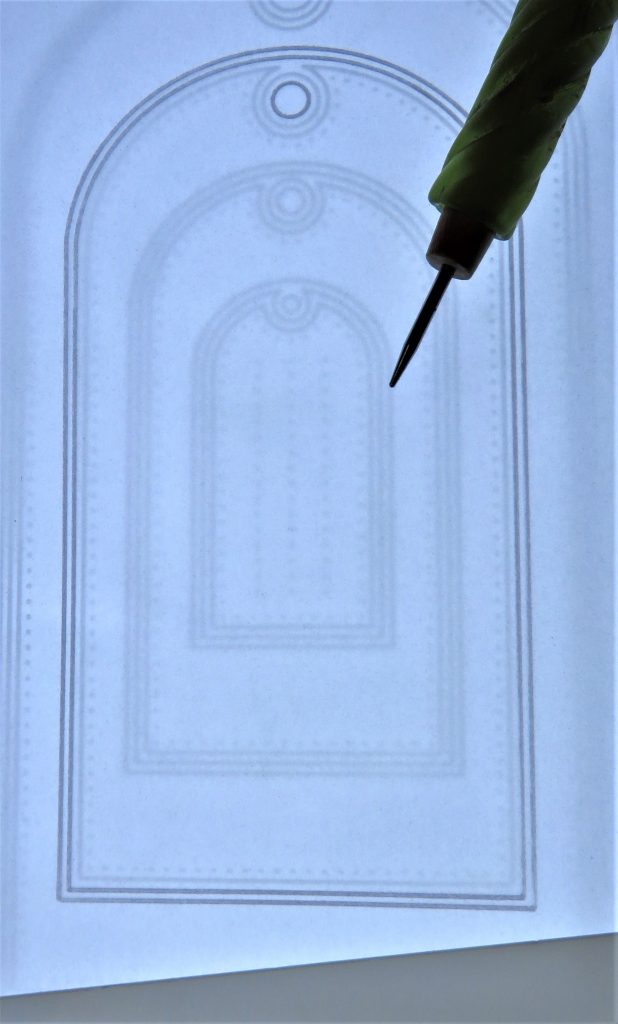
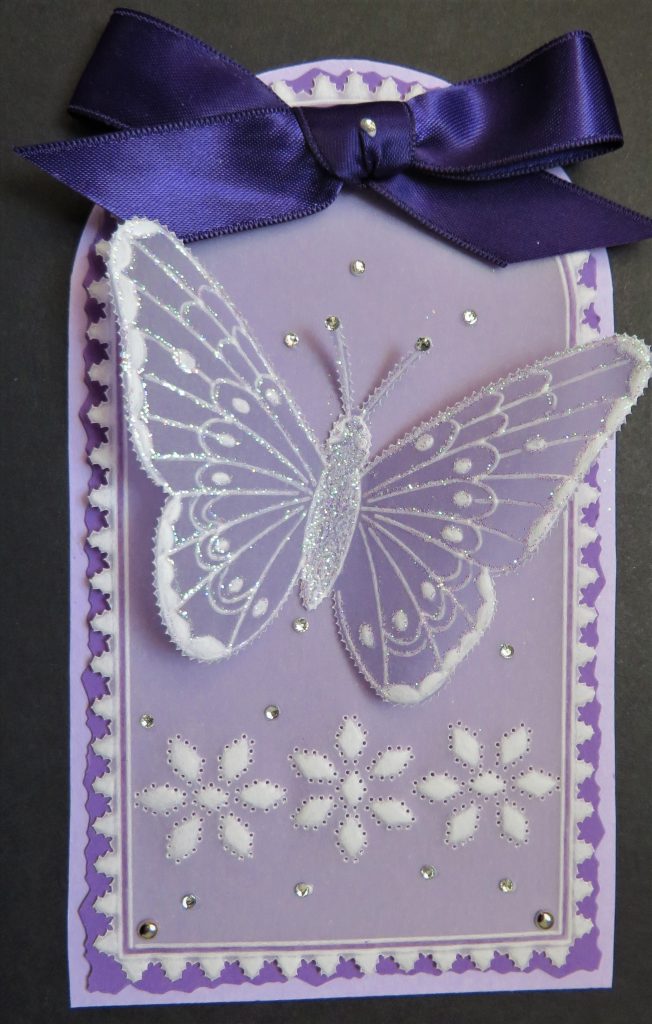
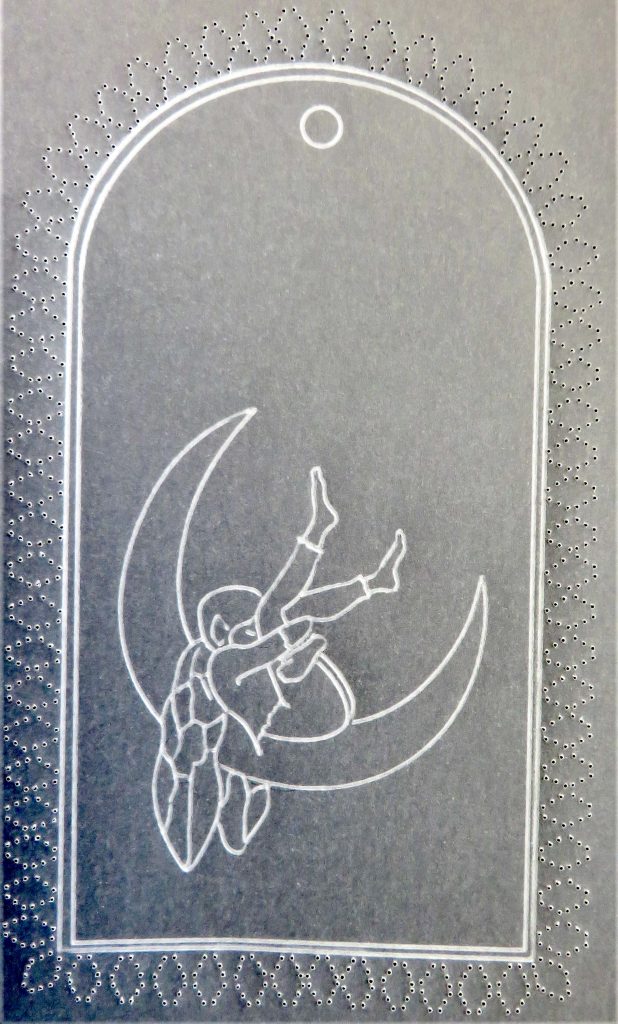
Step 1. Trace the 2nd largest tag from the Nested Arch Tag Groovi plate.
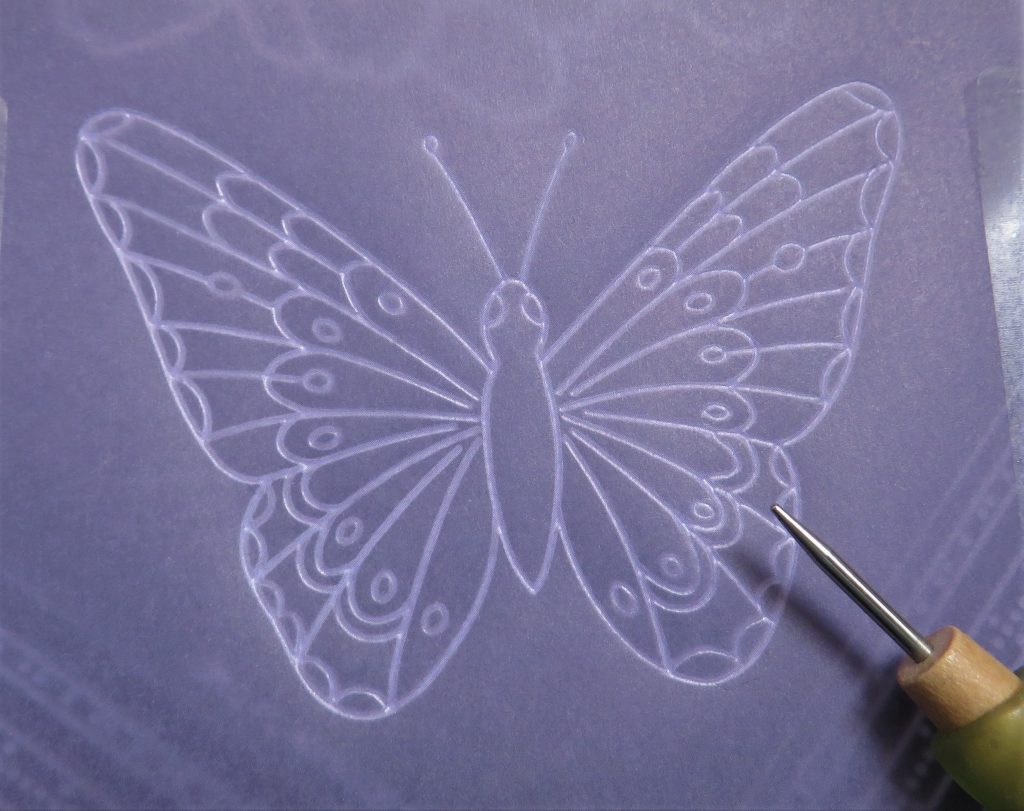
Step 2. Use a scrap of coloured parchment to emboss a butterfly. I used the one from Jayne’s Gerbera and Butterfly Groovi Plate.
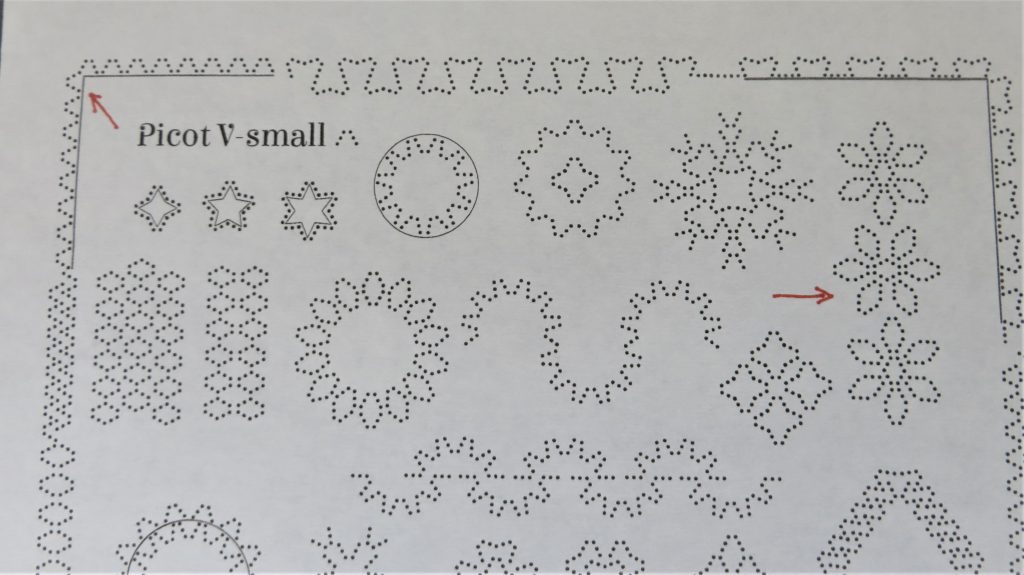
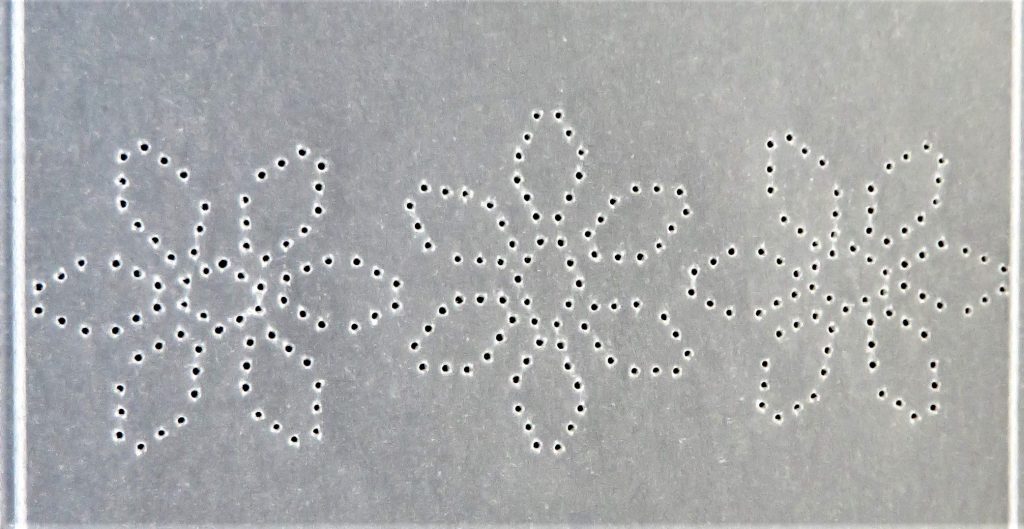
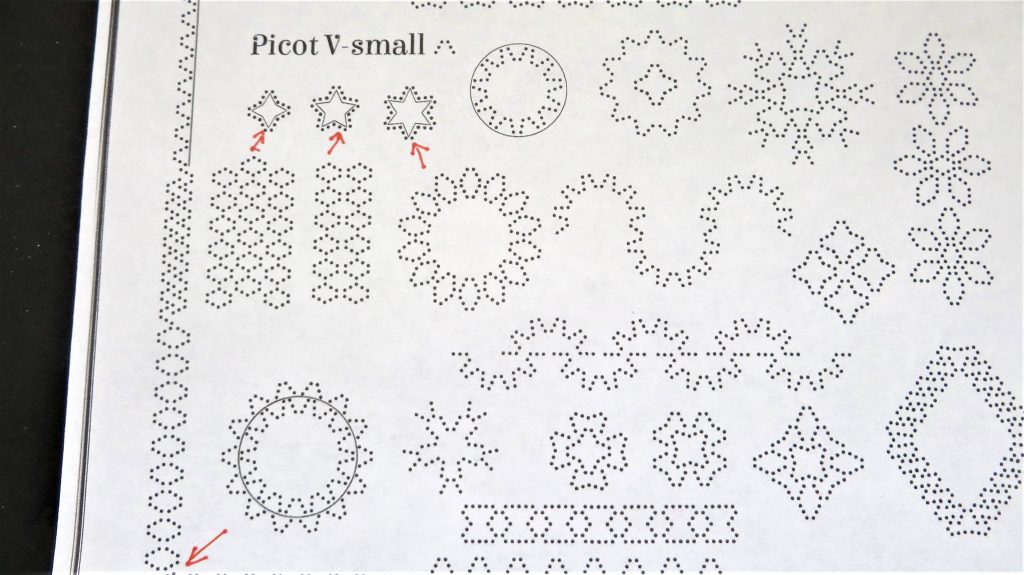
Step 3. The Picot V small tool is illustrated by Linda on pages 14-17 of her Handbook. The sampler you need to photocopy is on page 17. I have marked the patterns we will be using with red arrows.
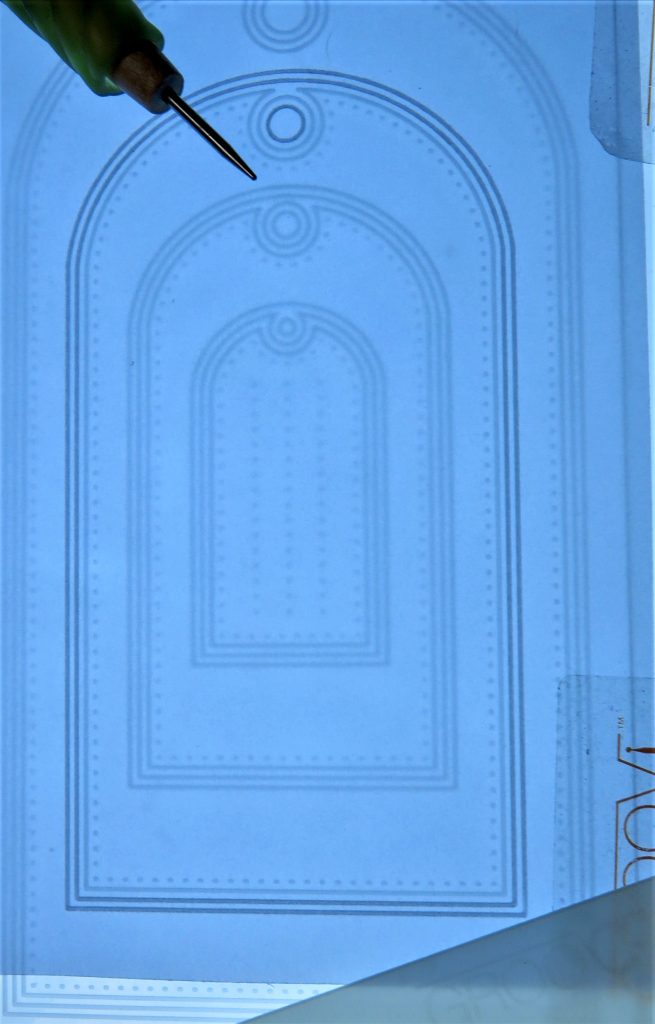
Step 4. Place the pattern on a shallow perforating mat and the parchment tag on top – lining up the ‘flower pattern’ along the bottom of the tag. Always perforate from the front and shallow perforate through all the layers using the Picot V small tool and match each needle to the dots underneath. The three flowers just fit in nicely along the bottom.
TOP TIP: The picot V’s in the centre of the flowers meet in the middle so you need to hook the needle that are set the widest into the holes of the opposite ‘V’.
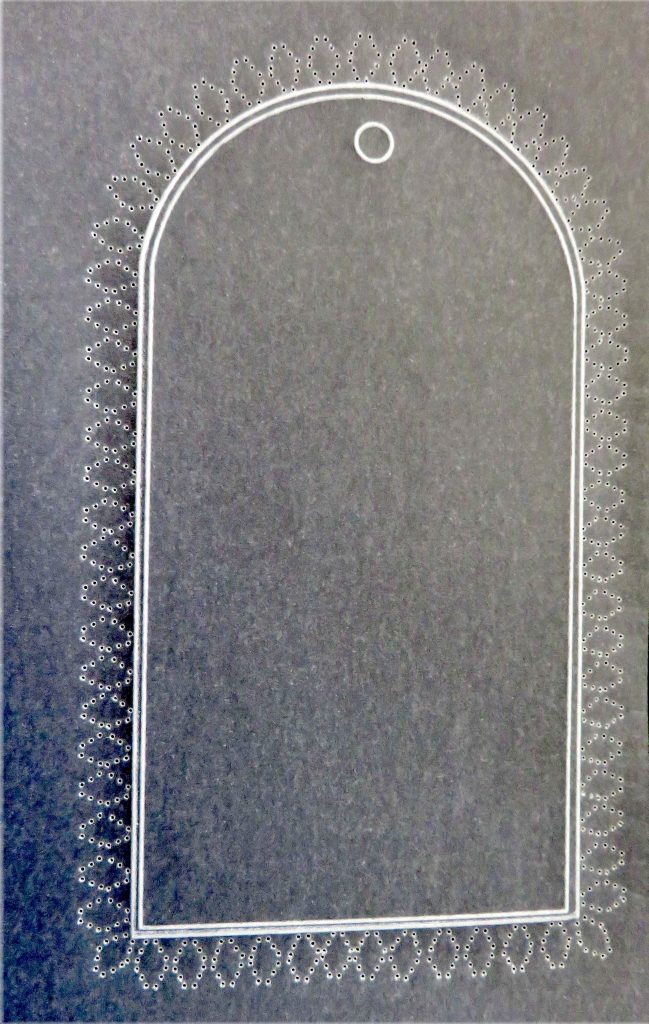
Step 5. Go around the outside of the tag using the other pattern I have marked with a red arrow, again only shallow perforations. When going along the bottom of the tag, start at each corner and alternative perforate until you meet in the middle, this will help you to space out the V’s evenly across the edge. Do the same down each side of the tag – go up one side, stop when you get to the arch, do the other side, and then when you get to the arch again, you can space out the V’s to fit.
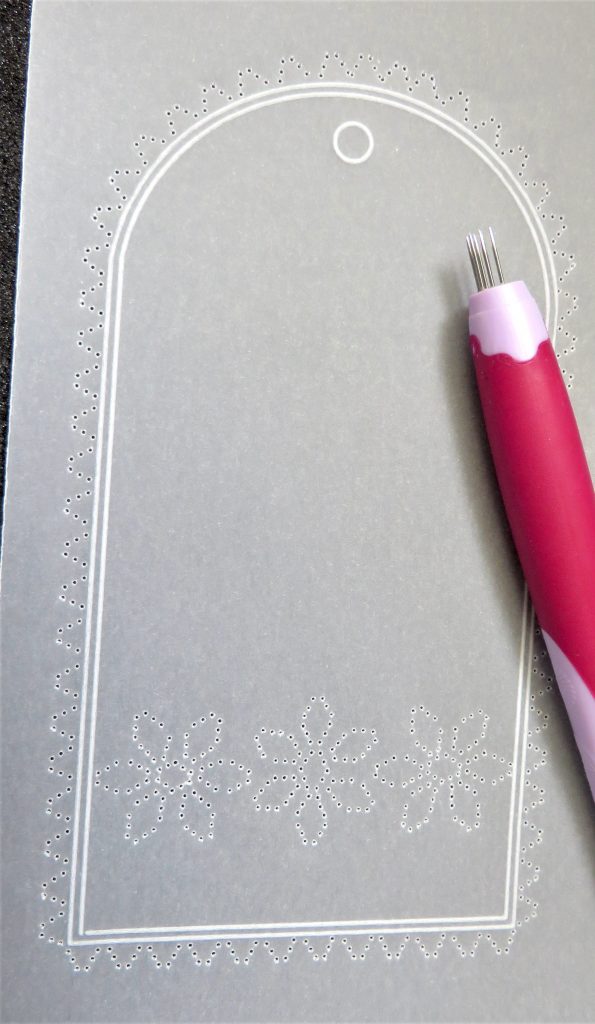
Step 6. Use the 3mm embossing ball tool to emboss between all the perforations. Don’t try to get it white all at once. Go round all the flowers and edges, and by the time you get back to the beginning again, you will then be able to add another layer of embossing. Fill up all the space within the needle perforations.
Step 7. Use the single needle tool to re-perforate all the holes. Then snip out the tag.
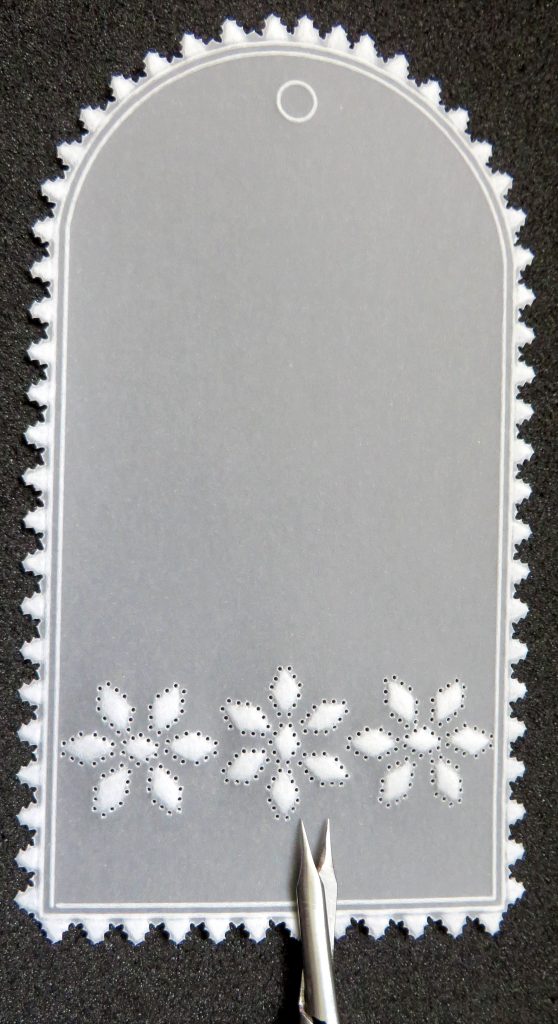
Step 8. Emboss all the elements of the butterfly. Stipple the body, using a single needle tool with a stout piece of card underneath, being careful not to make holes in the parchment. Then, go around the outside with the two-needle tool and snip it out.
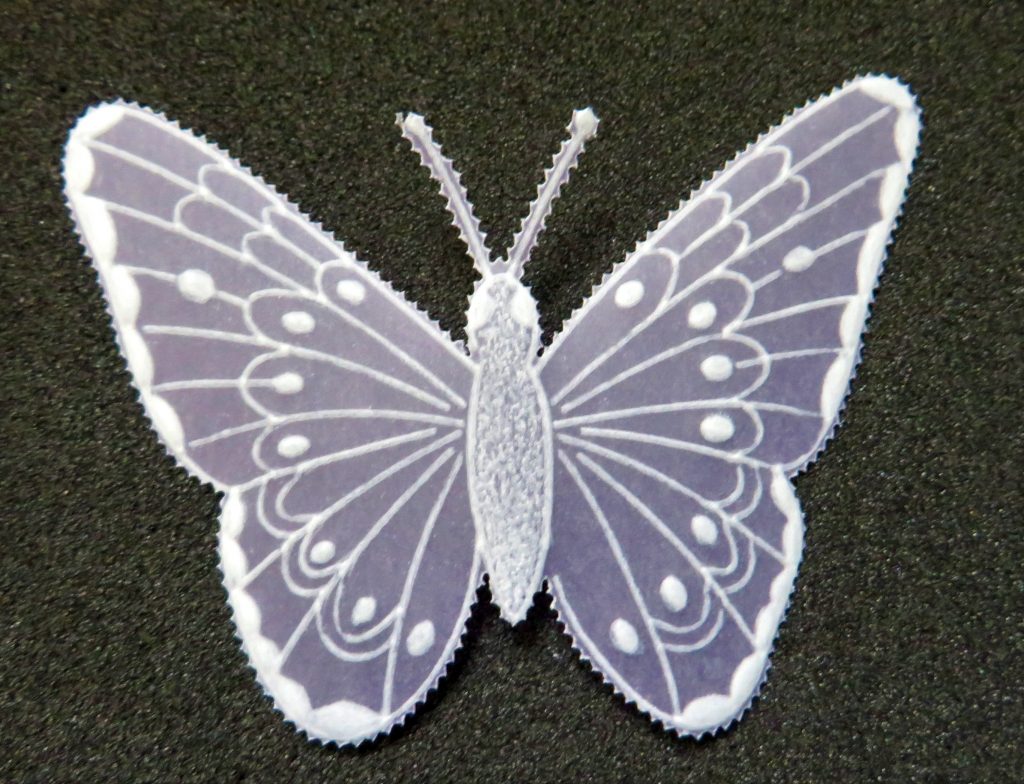
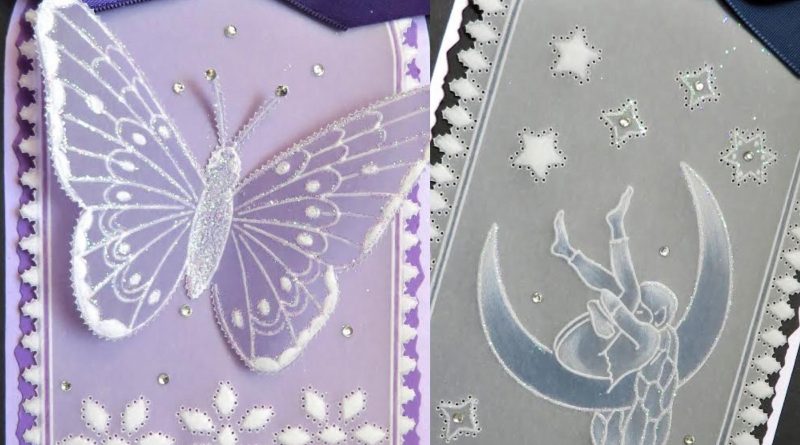
Step 9. Add sticky ink and glitter to the butterfly and a couple of gems to the ends of the antennae. Then, mat and layer the tag onto backing papers of your choice and add a bow. Stick the butterfly on with Perga Glue and decorate the tag with a few gems too. And your first project is complete!
Now, on to project 2! Lucky us…
Picot V Small Perforating Tool, Project 2
Ingredients
Pergamano Handbook for Multi-Needle Tools Vol 2 by Linda Williams (PER-BO-70355-XX)
Nested Arch Tags Groovi Plate A5 (GRO-PA-41465-04)
Moonfairy A5 Sq Groovi Plate (GRO-FY-40465-03)
Picot V Small Perforation Tool (PER-TO-70281-XX)
Single Needle Perforating Tool (PER-TO-70035-XX)
1.5mm Embossing Ball Tool (PER-TO-70004-XX)
3mm Embossing Ball Tool (PER-TO-70005-XX)
Groovi 1 & 2 Tool (From Starter Kit) (GRO-AC-40026-XX)
Faber-Castell Polychromos Pencils (ACC-PE-30797-XX)
OR Perga-Liner Pencil (B) (PER-CO-70063-XX)
Blending Nibs (PER-AC-70300-XX)
Dorso Oil (PER-CO-70066-XX)
Pergamano Sticky Ink (PER-AC-70134-XX)
Perga Glitters (PER-AC-70252-XX)
Perga Glue (PER-AC-70133-XX)
Perga Crystals (Starlight Sparkle) (PER-CR-70402-XX)
Method
Step 1. Trace out the 2nd largest tag from the Nested Arch Tags Groovi plate.
Step 2. The Picot V Small perforating tool is illustrated by Linda in her Handbook on pages 14-17. The sampler you need to photocopy is on page 17. I have marked the perforation combos we are going to use in this project with red arrows.
Step 3. Go around the edge of the tag and perforate the ‘V’ pattern illustrated, making diamond patterns, leaving a gap between each one. Put the two bottom corner ones in first, then space them out, perforating alternately from one corner to the other, meeting up in the middle so that the diamonds are spaced out nicely. Then, go up each side until you get to the arch of the tag, then do the other side and space them out around the arch. Note that Linda has not re-inserted the end needles into the holes made previously.
Step 4. Attach the tag to the Moonfairy Groovi plate and emboss the middle sized fairy, leaving some room at the top for some stars from the paper pattern and also a bow.
Step 5. Place the pattern onto a shallow perforating mat and line up the parchment where you would like your stars. Pierce through the parchment and pattern, matching up all the needles to the dots underneath.

Step 6. Start with a 3mm embossing ball tool and gently emboss between all the perforations. Don’t try to get it too white too quickly. Just soften the parchment first. By the time you get to the end, you can go ahead and add another layer of soft embossing. Then move down to 1.5mm ball tool and define the edges of your embossing. Make sure you go across the shapes rather than going round and round. Use the 1mm ball tool to add embossed lines around the edges of some of the stars too.
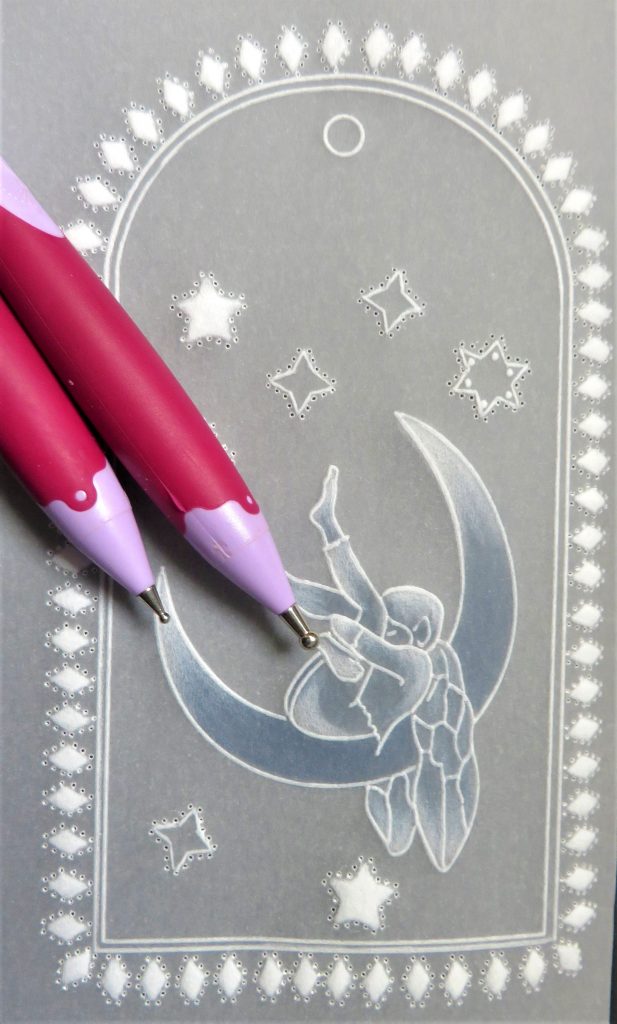
Step 7. Go around with the single needle fine perforating tool and re-perforate all the shallow perforations. Use the 6mm ball tool to emboss each end of the moon, add some highlights to the fairy.

Step 8. Use the 6mm ball tool to emboss each end of the moon, add some highlights to the fairy. Then add some colour. I used indigo Polychromos, blended out with some Dorso oil on a blending nib.

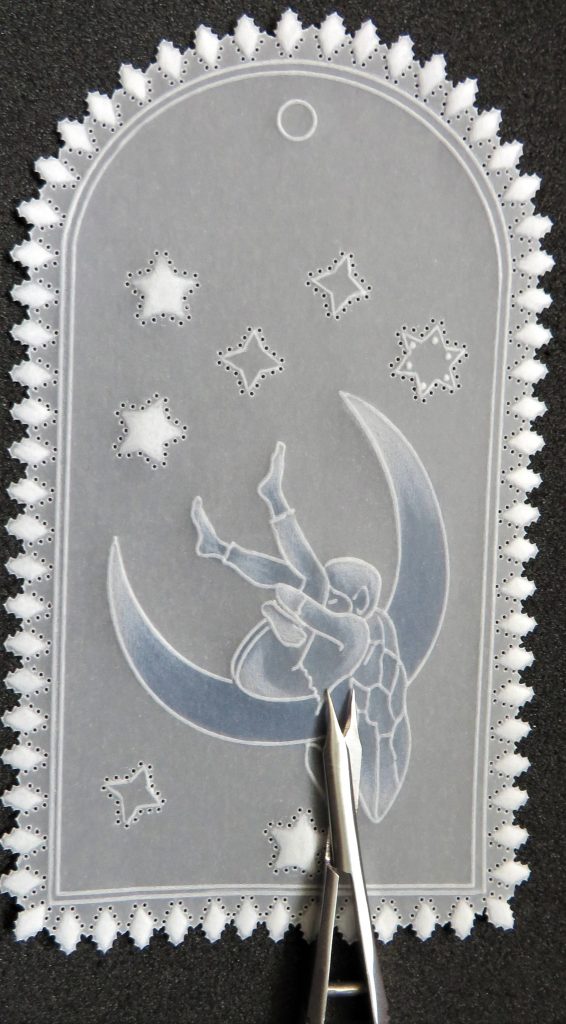
Step 9. Add some colour to the margin of the tag, then snip around the edge. Do all the diagonal perforations before going around and snipping all ones that are on the straight. This way, the parchment is supported until the end.
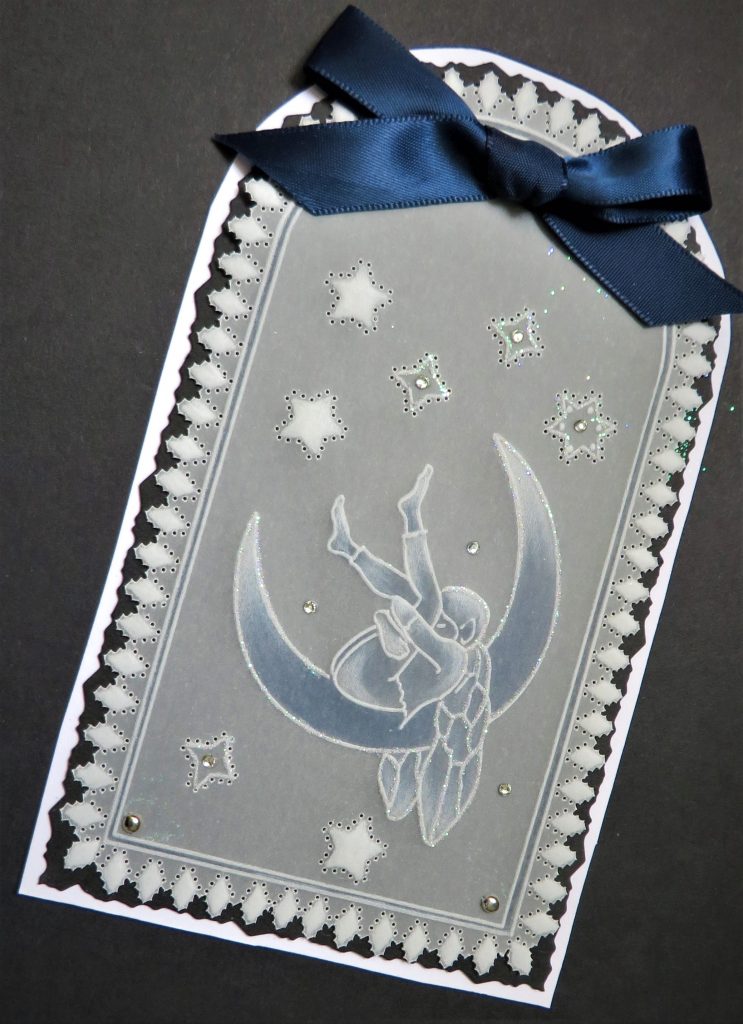
Step 10. Mat and layer the tag onto your choice of backing papers and add a bow. Also add some glitter and gems, highlighting the moon and stars. And now your second project is all finished!
What beautiful projects!
That is unbelievably helpful. Thank you, Glynis, for sharing your tips and tricks with us. And thank you to Paul for holding down the Groovi Tuesday fort. Between the tuition you get from him on Tuesday’s, combined with these Step-by-Step blog projects from Glynis, you should be well on your way to creating some incredible results!
Everything that Glynis has used can be found over on the Clarity website HERE
Looking at the week ahead
Monday 21st August :
In the SHAC with Barbara – 10am Live on Facebook and YouTube
Tuesday 22nd August:
Groovi Tuesday with Paul – 10am Live on Facebook and YouTube
Thursday 24th August:
Groovi New & Exclusive on Create & Craft with Paul – 4pm & 8pm
Friday 25th August:
Groovi New & Exclusive on Create & Craft with Paul – 8am
Travel gently, friends.
Lotsa love, Grace & Glynis xoxo
Clarity – The Home of Art, Craft, and Well-Being.
Morning Grace and Glynis.
Hope you’re enjoying your time in the UK Grace. I’m sure you’re being well looked after.
These are beautiful projects Glynis. Thank you so much for sharing your skills with us.
Love and Hugs. Xxx
Jane.
Beautiful projects Glynis 💙 Thank you.
I hope that you are having a Lovely time with your family, Grace enjoy.
Take care. Xx
Beautiful projects Glynis and they truly do compliment Pauls Groovi Tuesday. Have a great rest of the weekend everyone xx
Good morning
thank you so much for these projects i’m going to have a go.
just treated myself to both of the handbooks vol 1 & 2
im going to go through my needle stash sure i have the v picot tool if not i will place an order.
Good morning Grace & Glynis, what lovely projects to try out the picot V tool running along side the sampler that we did on Tuesday with Paul. I must admit I have had the tool for ages but only use it to go round the edge of work, I haven’t used it to create patterns so this is the kick up the ** I needed !!
Look forward to doing the tags later when I have finished my piece from Friday night.
Have a great week Grace – don’t work too hard & perhaps encourage your mom to sit down & chat/rest for a little while as well !! Perhaps it will be nice enough to sit out in the garden. Whatever you do enjoy it xx
Hi Grace and Glynis. Great little project to get me back in the mood. Thanks so much.
Have fun! X