Clarity Matters Blog Tutorial: Coloured Geometric Shapes
Hello hello! Grace here.
I hope this finds you safe, happy and enjoying your Sunday! Feeling crafty?
Well, good! Because we’re joined today by the insanely talented Maggie Byford, our friend and Clarity Crafts design team member. She has kindly put together a step-by-step project for us. It’s beautiful!
I will hand you over to our teacher for today…

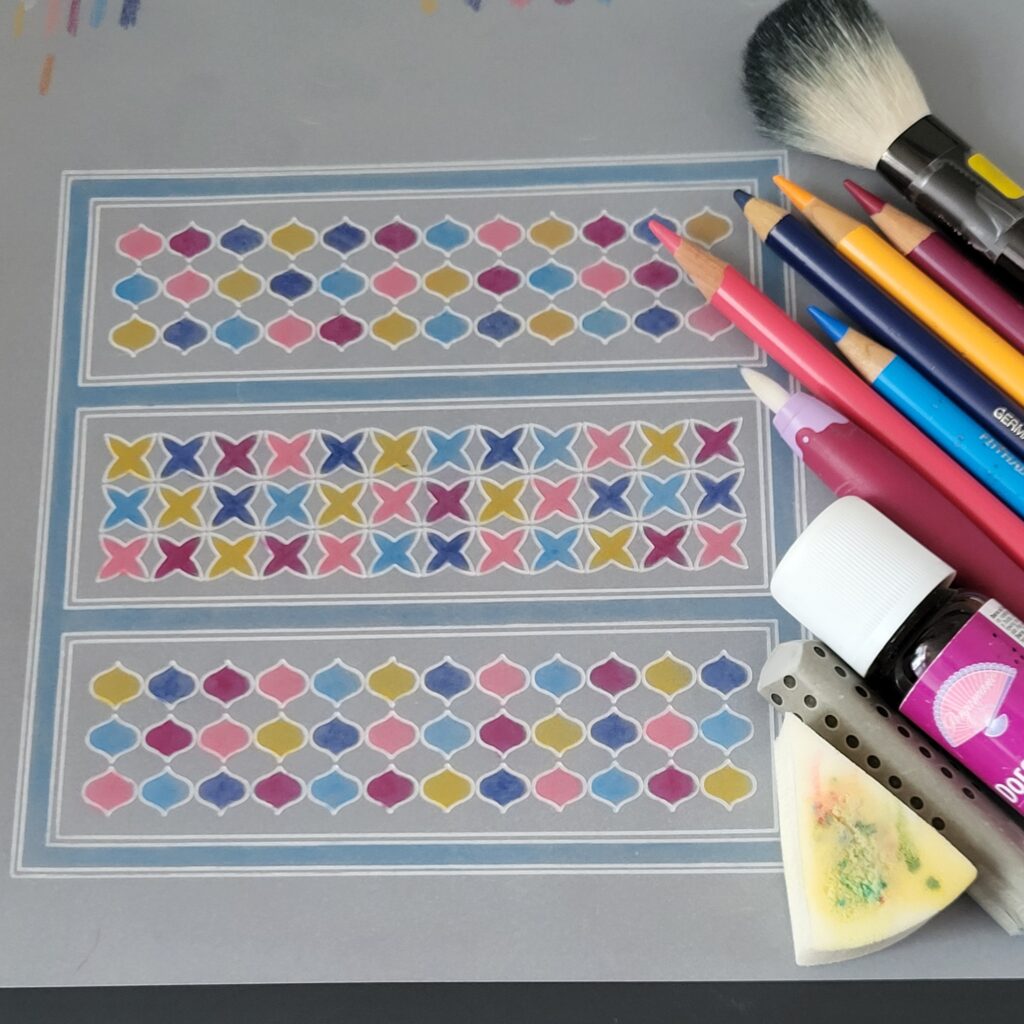
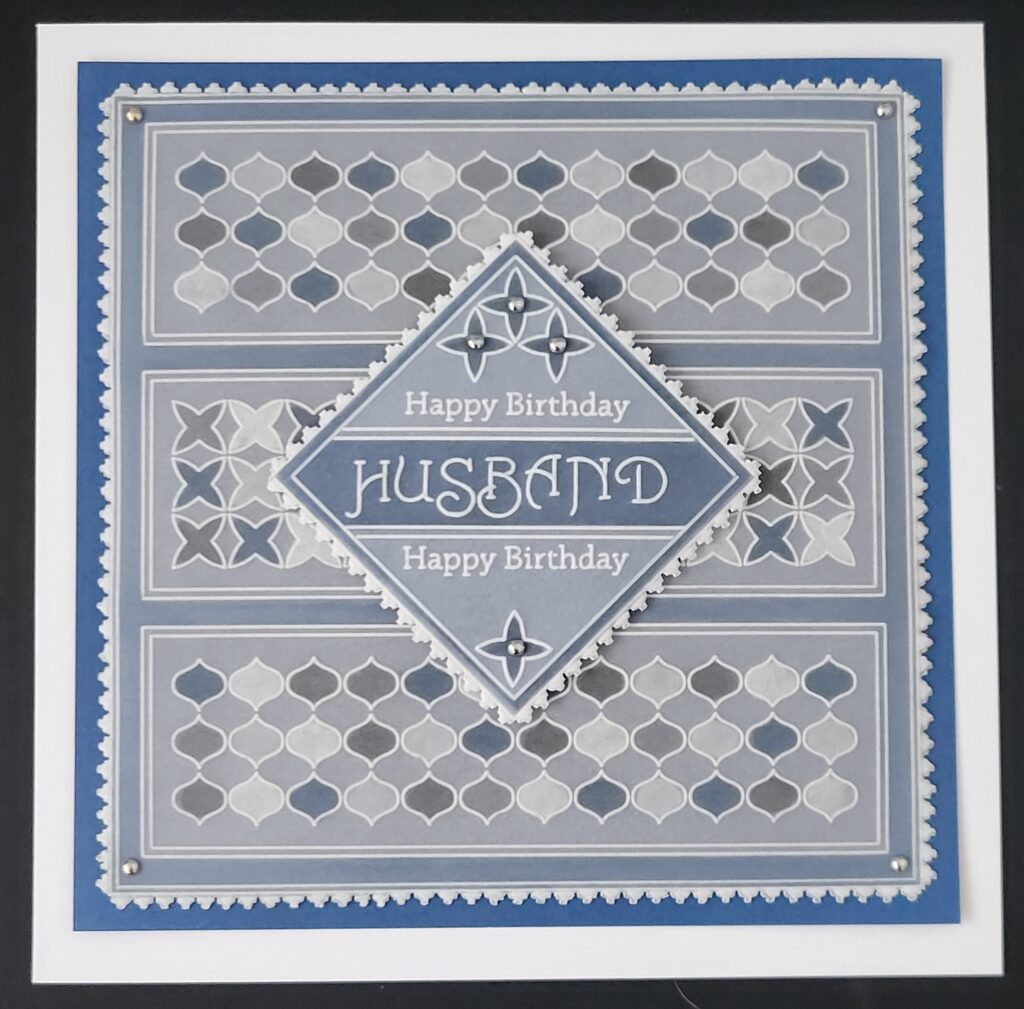
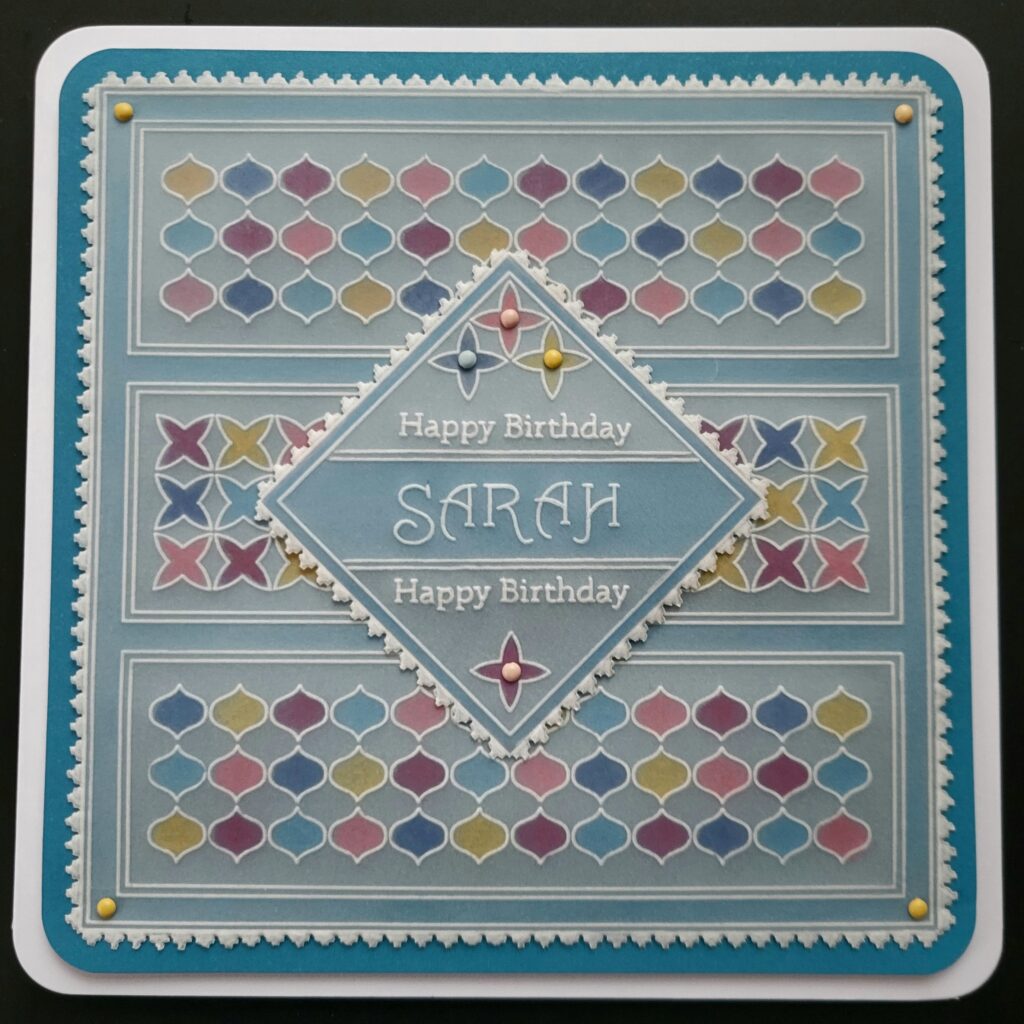
Hi! We will be making a card with coloured geometric shapes. For this tutorial I’ve used Tina’s Geometric Layering Rectangles plate to make not one but two cards, both using the same pattern design but with different colour ways to finish them off. One has a more low-key colour combination of dark indigo, cold greys and white, which I’ve made into a masculine card. Then the other has a more colourful combination of soft pinks, yellows and light blues which I’ve made into a female card. However, you can use them any which way around you wish! For the colouring I used Polychromos pencils blended with Dorso Oil, but any blendable pencils with a suitable blending oil will do.
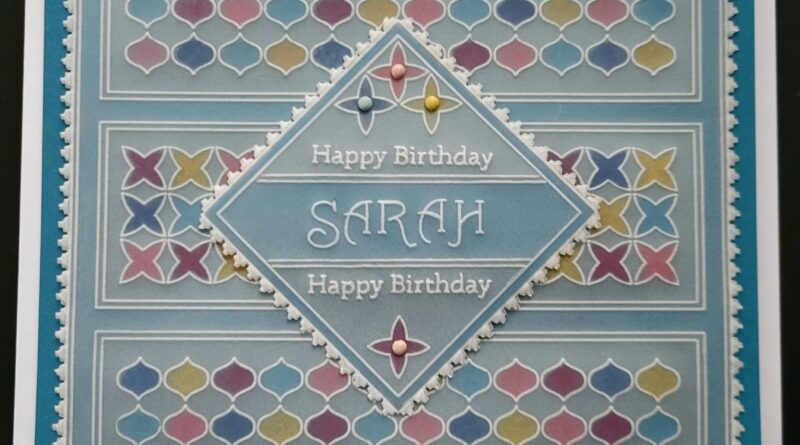
Here are my two cards just to show you what you could be aiming for….
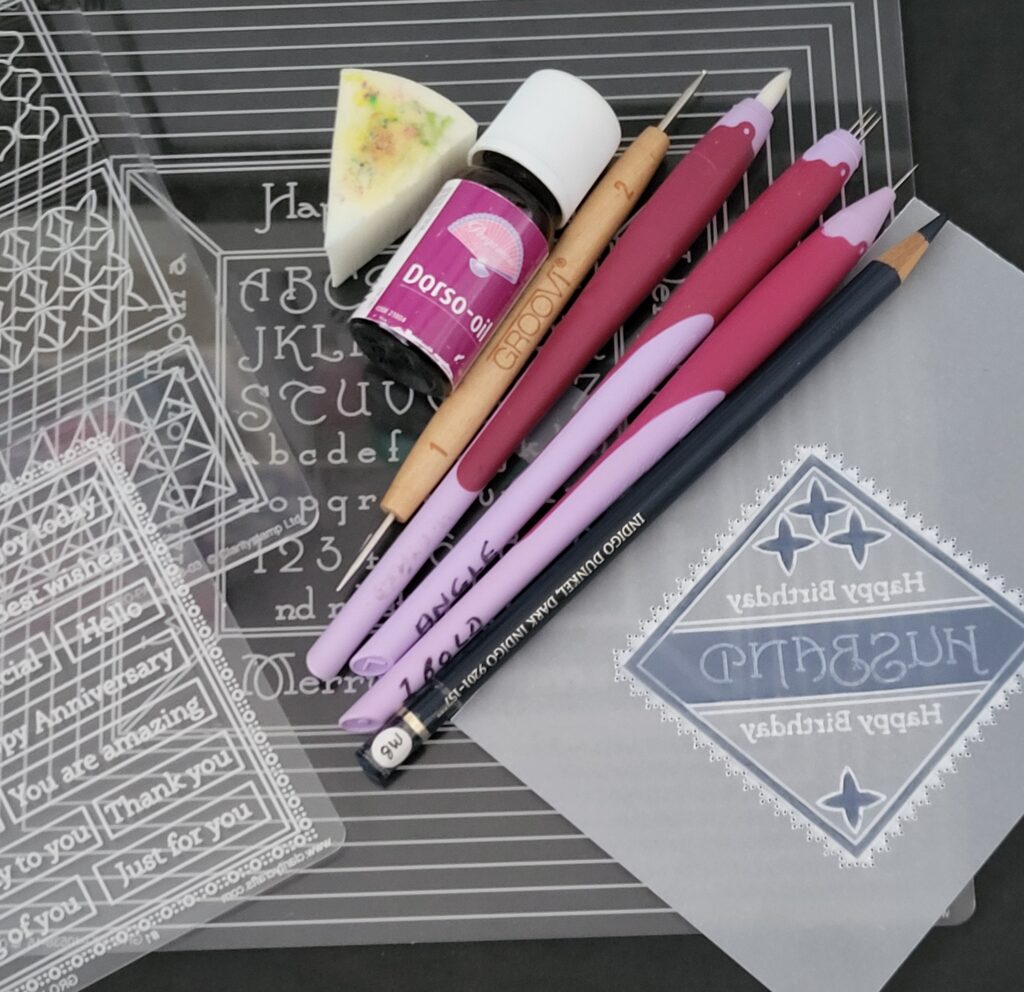
Ingredients
Alphabet A5 Sq Plate Mate (GRO-MA-40002-07)
Nested Squares Picot-Cut A4 Sq Plate (GRO-PA-41035-15)
Framework Squares A4 Sq Plate (GRO-PA-40721-15)
Nested Squares Ext & Alphabet Frame A4 Sq Plate (GRO-WO-40538-15)
Tina’sGeometric Layering Rectangles A5 Sq Plate (GRO-PA-41076-03)
Tina’s Layering Plate Inset (GRO-WO-42199-11)
Groovi A4 Clear Parchment Paper (GRO-AC-40024-A4)
Angle Perforating Tool (PER-TO-70029-XX)
1-Needle Bold Perforating Tool (PER-TO-70028-XX)
Pergamano Excellent–Embossing Mat (PER-AC-70075-XX)
Groovi Embossing Tool 1 and 2 (GRO-AC-40026-XX)
Groovi Embossing Tool 3 and 4 (GRO-AC-40027-XX)
Black Dual-Purpose Groovi Mat A4 (GRO-AC-40194-A4)
A5 Black Super Foam (GRO-AC-41765-XX)
A4 Picot Foam Black (GRO-AC-40625-XX)
Groovi Sticker Tabs x 16 (GRO-AC-40437-XX)
Groovi Guard (GRO-AC-40345-XX)
Ringlock Scissors (PER-TO-70041-XX)
Pastel Mix Pergamano Brads (PER-AC-70270-XX)
Dorso Oil (PER-CO-70066-XX)
Blending Pen and Refill Nibs (PER-AC-70440-XX)
Spot On Sponges (ACC-MG-30537-XX)
Waimea Falls Companion Paper 8×8” (ACC-CA-31343-88)
Dry Tumble Dryer Sheet
Spare parchment for practice pieces (optional)
Soft Eraser and Soft Brush
Faber Castell Polychromo pencils:
101 White, 231 Cold Grey II, 157 Dark Indigo, 234 Cold Grey V, 175 Dark Sepia (For optional coloured version: 247 Indian threne Blue, 133 Magenta, 124 Rose Carmine, 152 Middle Phthalo Blue, 109 Dark Chrome Yellow.
Method
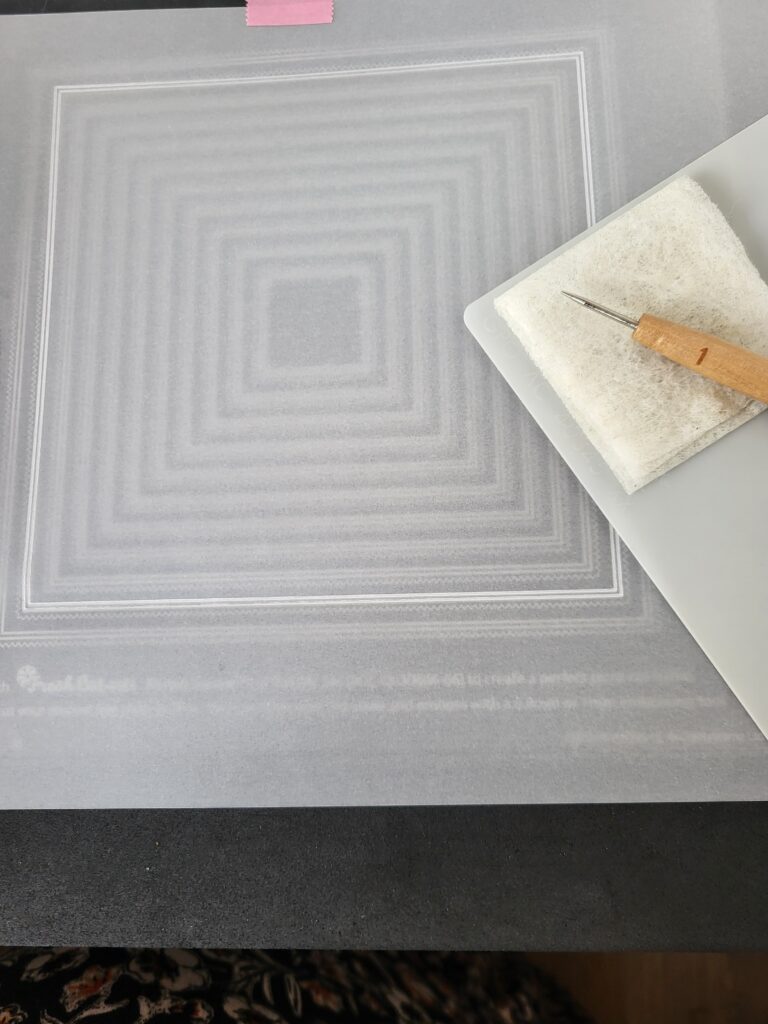
Step 1. Align your clear parchment over the Nested Squares Picot Cut plate and secure with Groovi tabs or low tack tape. Wipe a dry tumble dryer sheet across the surface to allow for smoother embossing, then use Groovi 1 to emboss the 2nd largest outer frame.
TOP TIP: Use a Groovi Guard to keep the parchment flat whilst embossing the lines.
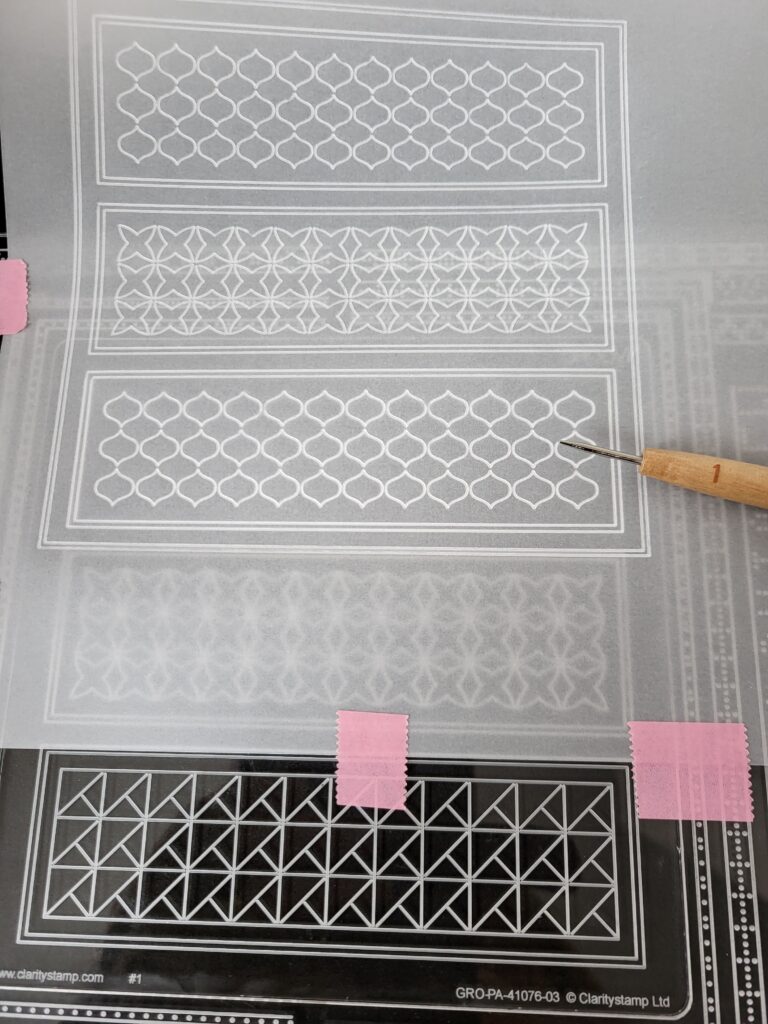
Step 2. Switch to Tina’s Geometric Layering plate and carefully align before re-attaching your embossed frame over all 3 rectangles. Emboss all of the 3 rectangle frames, then emboss only the inner geometric designs in the 1st and 2nd rectangles, leaving the 3rd empty.
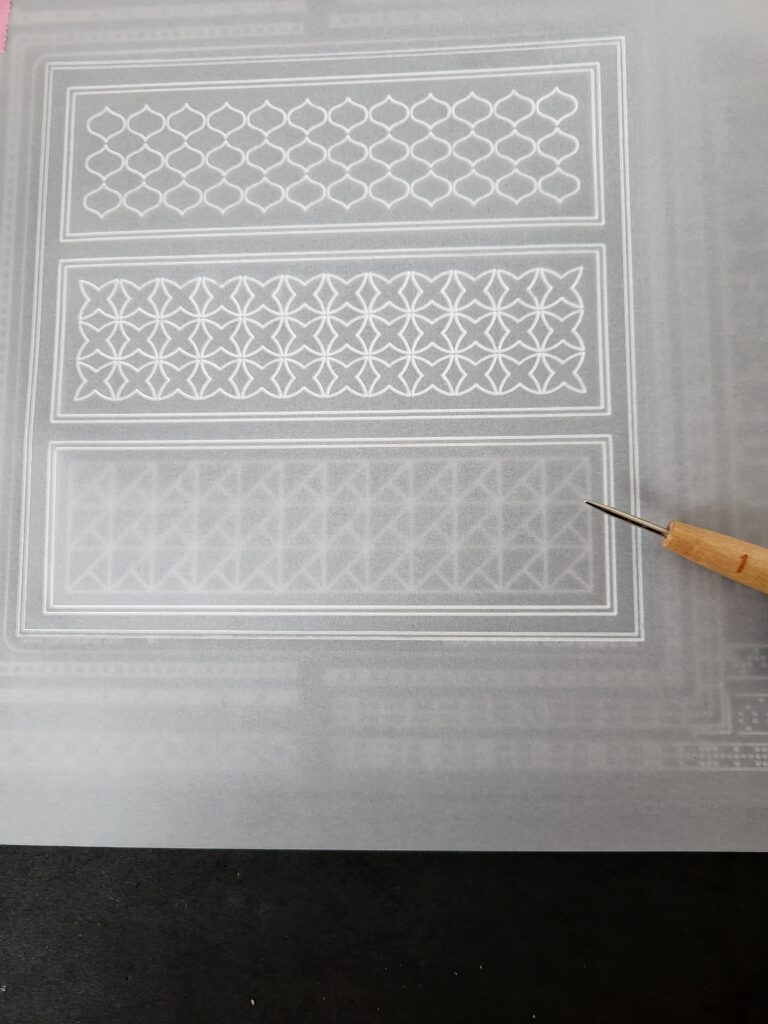
Step 3. Leave the plate where it is and carefully release, then move your parchment slightly upwards so that you can repeat the 1st rectangle design into the empty rectangle. Put the plate to one side.
Step 4. With the front of your parchment face down, place it onto a firm surface such as the front of your black dual purpose Groovi mat. Start to colour the different shapes within the rectangles with Polychromos pencils in any random colourway you prefer, or use the same colours I used which are as follows…
For the low-key card, use 101 White, 157 Dark Indigo, 175 Dark Sepia, 231 Cold Grey II, and 234 Cold Grey V.
Add 157 Dark Indigo, in the wide borders around the rectangles.
When you have finished applying your pencil colours, smooth out the individual colours with a blending nib and a little Dorso Oil taken from a Spot On Sponge or Mix Mat, remembering to use a clean nib for each of the 5 colours.
For the more colourful card use 247 Indian threne Blue, 133 Magenta, 124 Rose Carmine, 152 Middle Phthalo Blue, and 109 Dark Chrome Yellow. Add 152 Middle Phthalo Blue in the wide borders around the rectangles, then blend as above.
TOP TIP: Should you get colour anywhere on the parchment that you don’t want it, then carefully erase with a soft rubber and remove any residue with a soft brush (not the side of your hand) to avoid smudging.
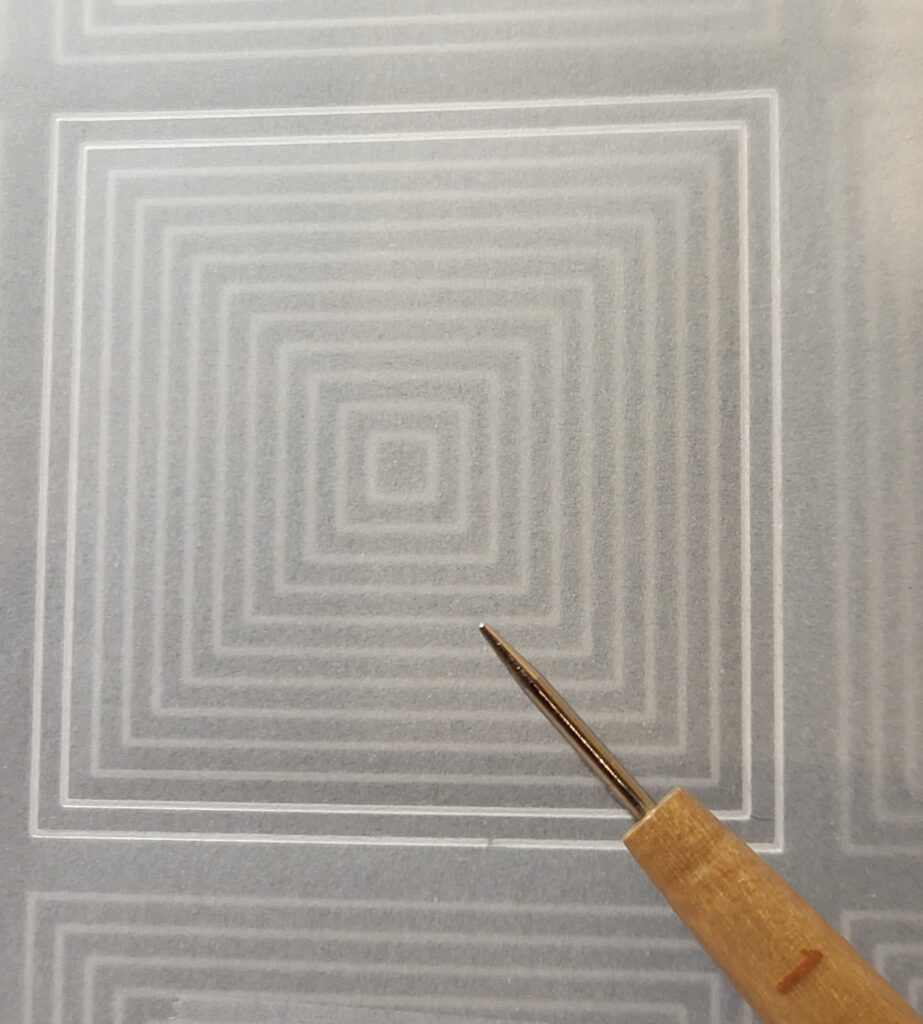
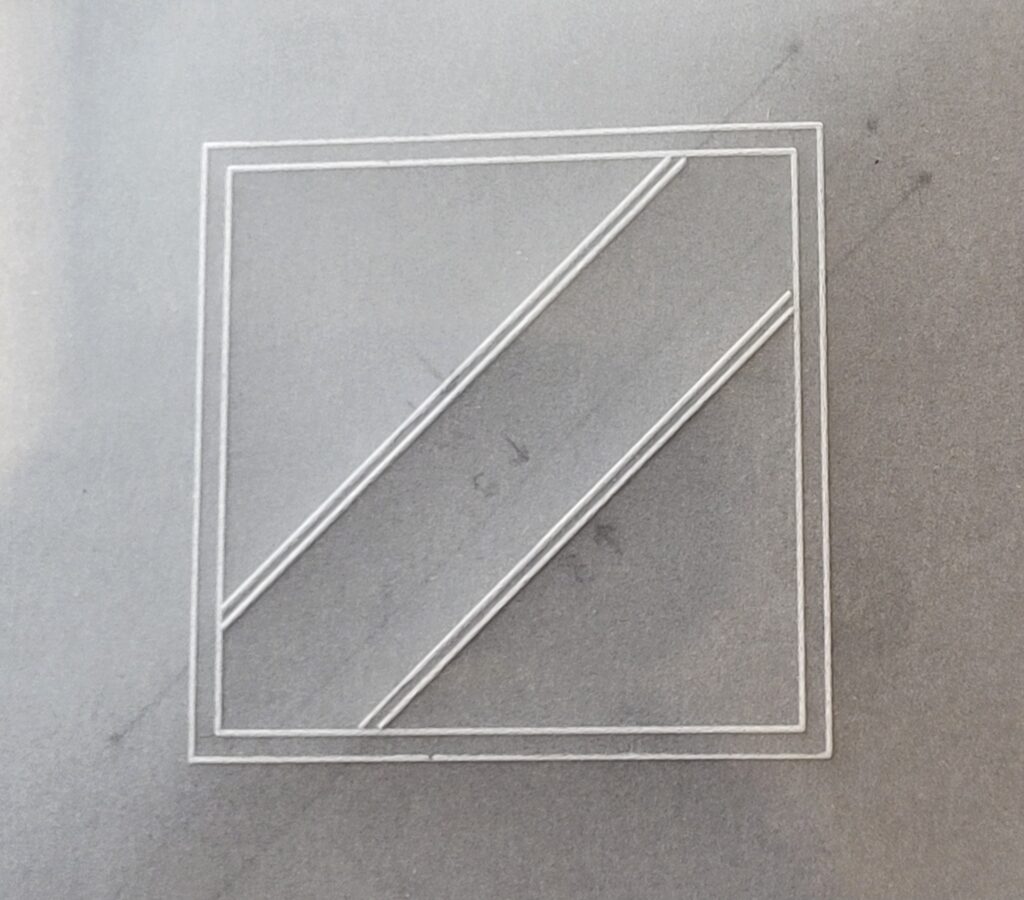
Step 5. To make the 3D diamond shaped centre piece, place a spare piece of clear parchment over one of the squares on the Framework Squares plate (or use any nested square with an outer edge measuring 6x6cm square), wipe a tumble dryer sheet across the surface and emboss the 2 largest squares.
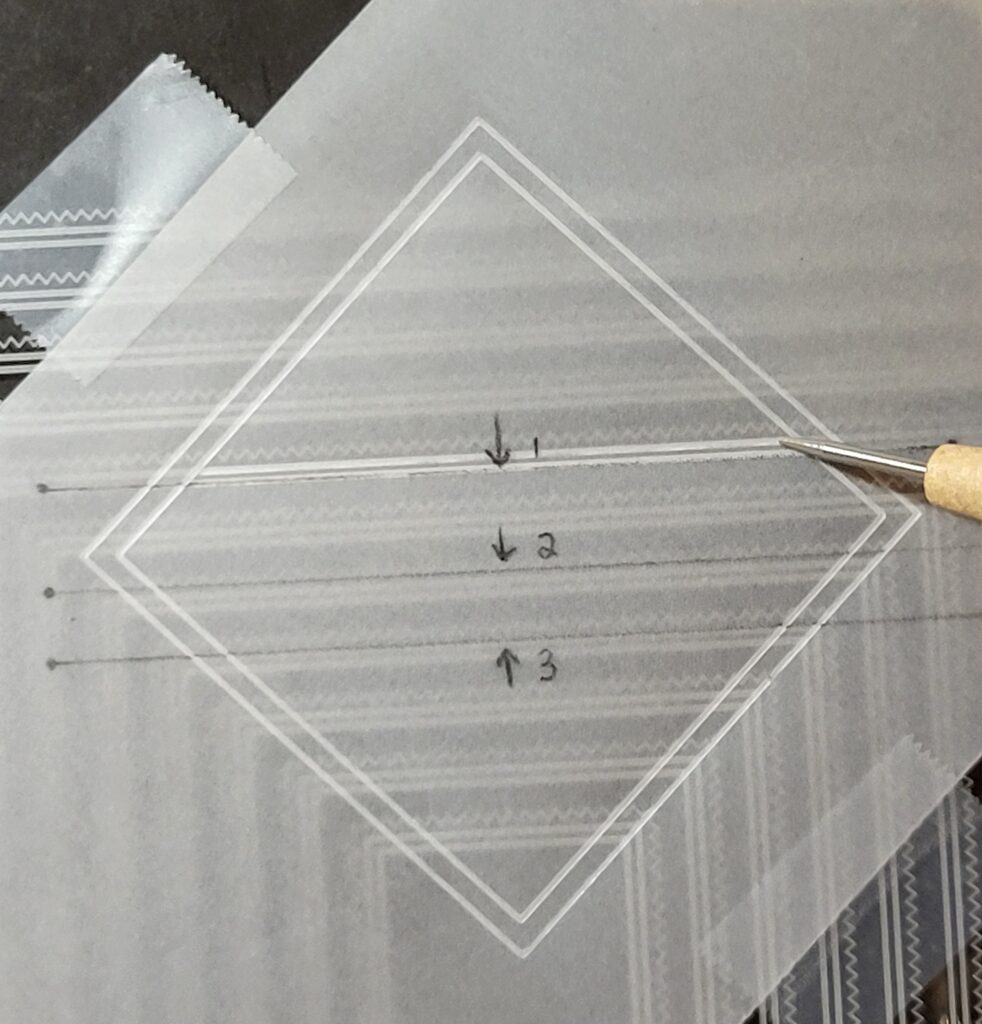
Step 6. Keep the parchment attached to the plate and use a ruler and a sharp ordinary pencil to draw diagonal lines across the box from the top left down to the bottom right as shown on the picture. To guide you – Arrow 1 (or Line 1) shows the centre of the line resting on the very corner of the 2nd smallest square on the plate. The line continues up to a corner point at the 2nd largest square on the next nest of squares up above, then it goes down to a point at the corner of the 2nd largest square on the nest of squares to the right. Follow similar guidelines as shown on the picture to draw pencil lines 2 and 3.

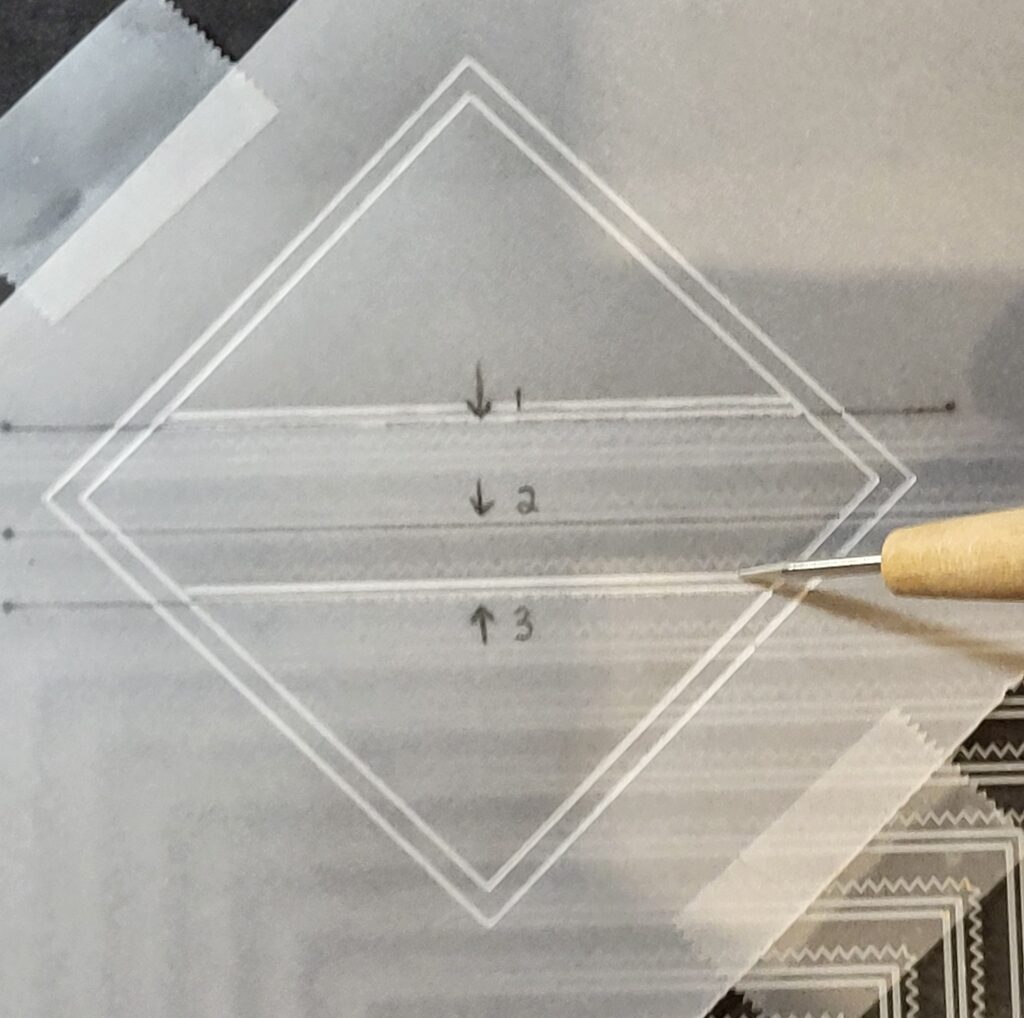
Step 7. Switch to the Nested Squares Picot Cut plate. Still working on the back, turn your parchment on its end into a diamond shape and as shown on the picture carefully align pencil Line 1 of your parchment on to the 5th largest square on the plate so you can emboss a long horizontal line over the pencil line, but make sure that your line only extends as far as the inside line of the diamond frame and not beyond.

Step 8. Leave the parchment where it is and emboss another full line above Line 1.
Step 9. Reposition your parchment over the plate so you can emboss Line 3 as you did for Line1.

Step 10. Leave the parchment where it is and emboss another full line above Line 3.
This is what it should look like from the front…
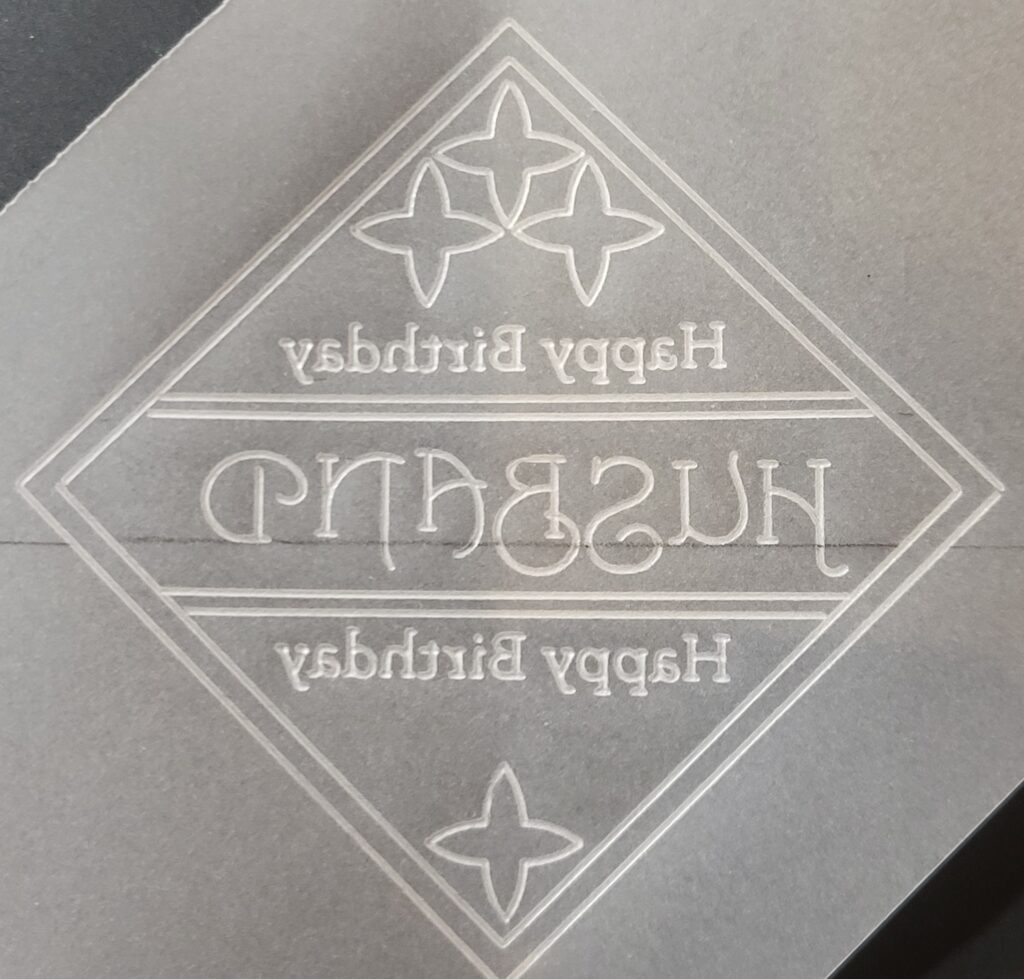
Step 11. Using the pencil guide for Line 2, align the parchment face down over the capital H on the Nested Alphabet Frame plate, making sure to start at the right-hand side, then emboss the H. Continue to line up the rest of the letters on the pencil-line to make the word HUSBAND in capital letters – but backwards of course. You can use any alphabet plate you have, and feel free to use words/greetings of your own choice. Use Tina’s Layering plate inset to emboss the 2x Happy Birthday greetings where shown on the picture, and use Tina’s Geometric plate to add some decorative designs at the top and bottom. This is what you are aiming for.
Step 12. Use a soft rubber to carefully erase any ordinary pencil lines, then on the back add colour inside the HUSBAND frame, inside the double-outline frame, and inside the 4 geometric shapes using 157 Dark Indigo (or 152 Middle Phthalo Blue if working on the more colourful card). Next, blend with a little Dorso Oil. Create a decorative cut-away border around the outside edges of the frame using an Angle tool. On the back, emboss inside the Angle shapes firstly with Groovi 2, then Groovi 3 to whiten, then turn to the front and carefully re-perforate the holes with a 1-Needle Bold tool.
Step 13. On the front snip between the perforations with parchment scissors or snips as shown.

Step 14. Create the same decorative Angle tool border around the outside edges of your main parchment. Cut two pieces of coloured background card to size – one for behind the main parchment and a smaller one for behind the diamond shaped parchment which will form our centre piece.
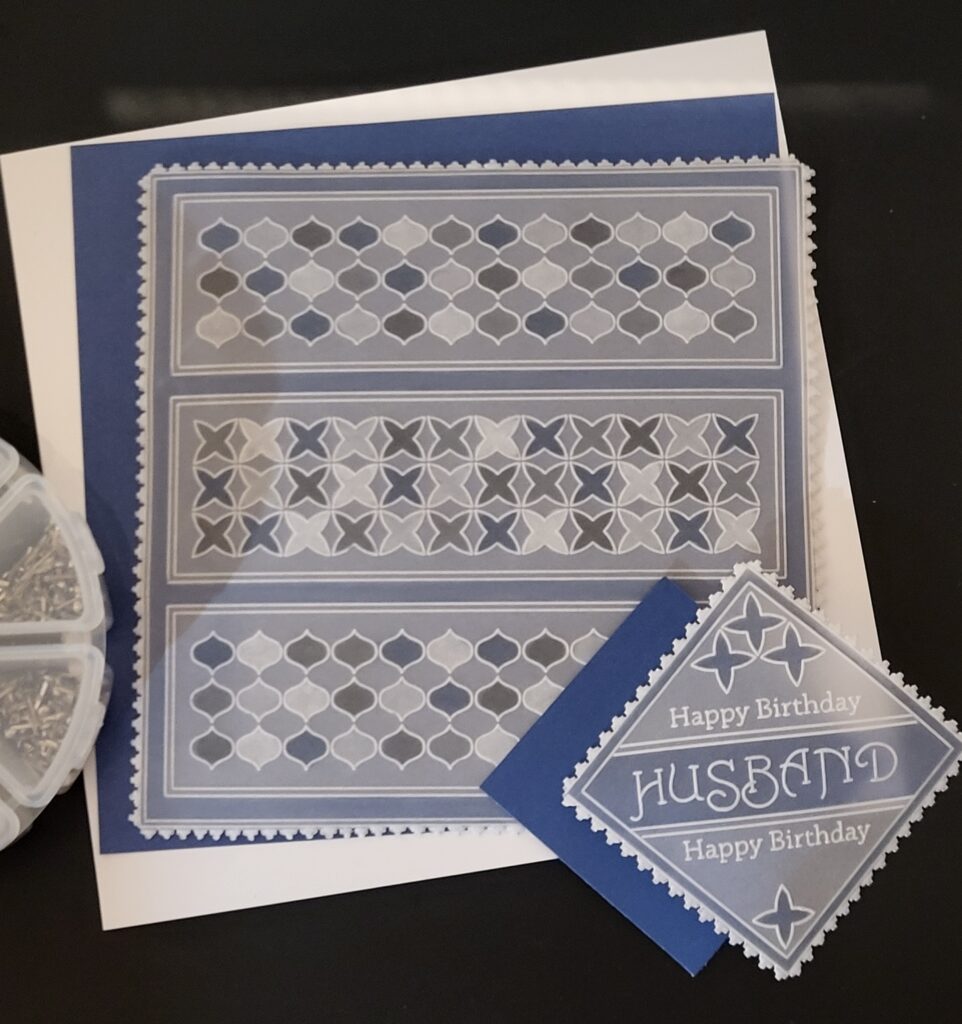
Step 15. Layer up all the above components and attach to each other using brads. Mount onto the front of folded white card cut to size using a method of your choice (I used narrow foam pads). For the low-key card this is what you are aiming for.
For the more colourful card this is what you are aiming for.
Your project is now complete!
Absolutely stunning! Thank you so much, Maggie, for sharing your tips and tricks with us.
Everything that Maggie has used in this particular project is available in a shopping list, HERE.
Now, looking at the busy week ahead…
Monday 22nd April:
In the SHAC with Barbara – 10am Live on Facebook & YouTube
Tuesday 23rd April:
Groovi Tuesday with Paul – 10am Live on Facebook & YouTube
Thursday 25th April:
Groovi Headliner with Paul on Create & Craft – 8am, 12pm & 4pm
Friday 26th April:
Crafting with Clarity with Barbara on Create & Craft – 9am & 1pm
See you there!
Travel gently, friends.
Lotsa love, Grace & Maggie xoxo
Clarity – The Home of Art, Craft, and Well-Being.
Magic – thank you both for this demo. A reminder about a very useful plate.
What a super tutorial. Thank you Maggie ! x x x
What a great project that could be used for so many occasions by changing the wording. Thanks Maggie for doing the step by step instructions & to Grace for doing the blog. Looks like another busy week at Clarity Towers so see you next weekend to see what has been happening on the FB pages xx
Lovely tutorial, thank you Maggie x
I’ve got this plate and confess I’ve not used it yet, but this example has given me a great idea. Thank you Maggie.
Great step by step, Maggie.
Thanks to you both for bringing it to us.
Enjoy the rest of your Sunday, All.
Looking forward to tomorrow – H for Hummingbird and a Happy Hour.
Again another fantastic tutorial aggie than you 😀😀
I love this. Thank you Maggie. Will definitely be having a go. X
Fabulous cards. On my to do list