Clarity Matters Blog Tutorial: How To The Basic Lace Duet Frames
Hello hello! Grace here.
I hope this finds you well, safe, and feeling crafty on this Sunday morning.
We are joined today by the talented Glynis Whitehead, craft queen, and Clarity Design Team member.
I’ll waste no precious time and hand you over to the lady herself…

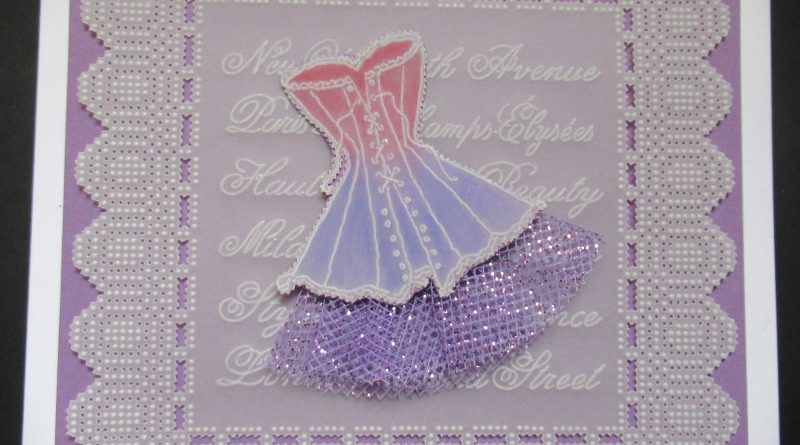
3D Corset Blog
Ingredients
Feminine Corset A5 Groovi Plate (GRO-FA-41552-04)
Calligraphy Alphabet Plate Mate (GRO-MA-40517-08)
Josie’s Oval Lace Duet A5 Sq Groovi Grid (GRO-GG-41660-12)
A4 Translucent White Super Foam (GRO-AC-40603-A4)
Nested Circle Picot Cutting Dies (ACC-DI-30680-66)
Groovi Tools 1 & 2 (GRO-AC-40026-XX)
Pergamano Perforating Tools:
1-Needle Bold (PER-TO-70028-XX)
2-Needle Fine (PER-TO-70038-XX)
Perga Liners (PER-CO-70063-XX)
Dorso Oil (PER-CO-70066-XX)
Pergamano Blending Nibs (PER-AC-70300-XX)
Silver Pergamano Brads (PER-AC-70275-XX)
A5 Sheet of Parchment Paper (GRO-AC-40020-A5)
Northern Lights Companion Paper (ACC-CA-31339-88)
6 x 6 White Card Blank (ACC-CA-30618-66)
Perga Glue (PER-AC-70133-XX)
Red Liner Tape or very strong double-sided tape (ACC-AD-30375-XX)
A small amount of netting fabric
Method
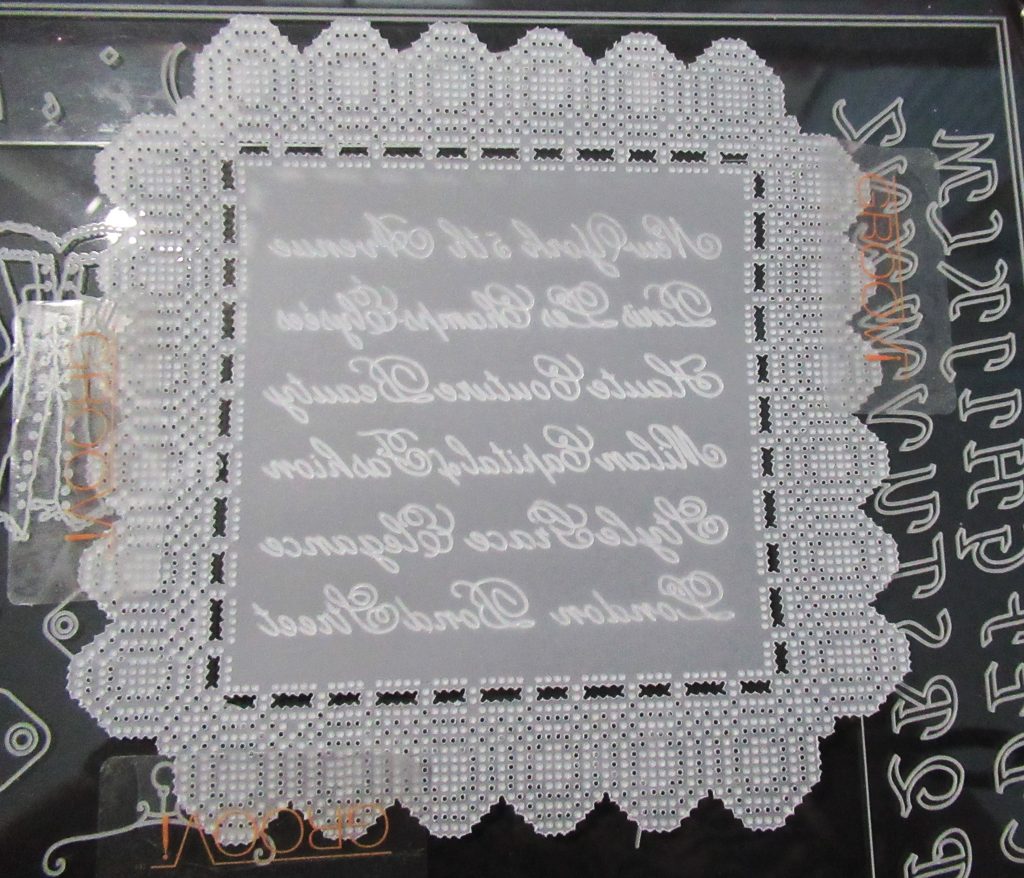
Step 1. Place the Oval Lace Duet plate into the plate mate and use Groovi Tabs to stick it in place. The plate needs to be embossing side up. Measure how large you want the centre to be by lining the corset plate up with the inside lines of the grid. This way, you will know how many repeats of the lace pattern you need.
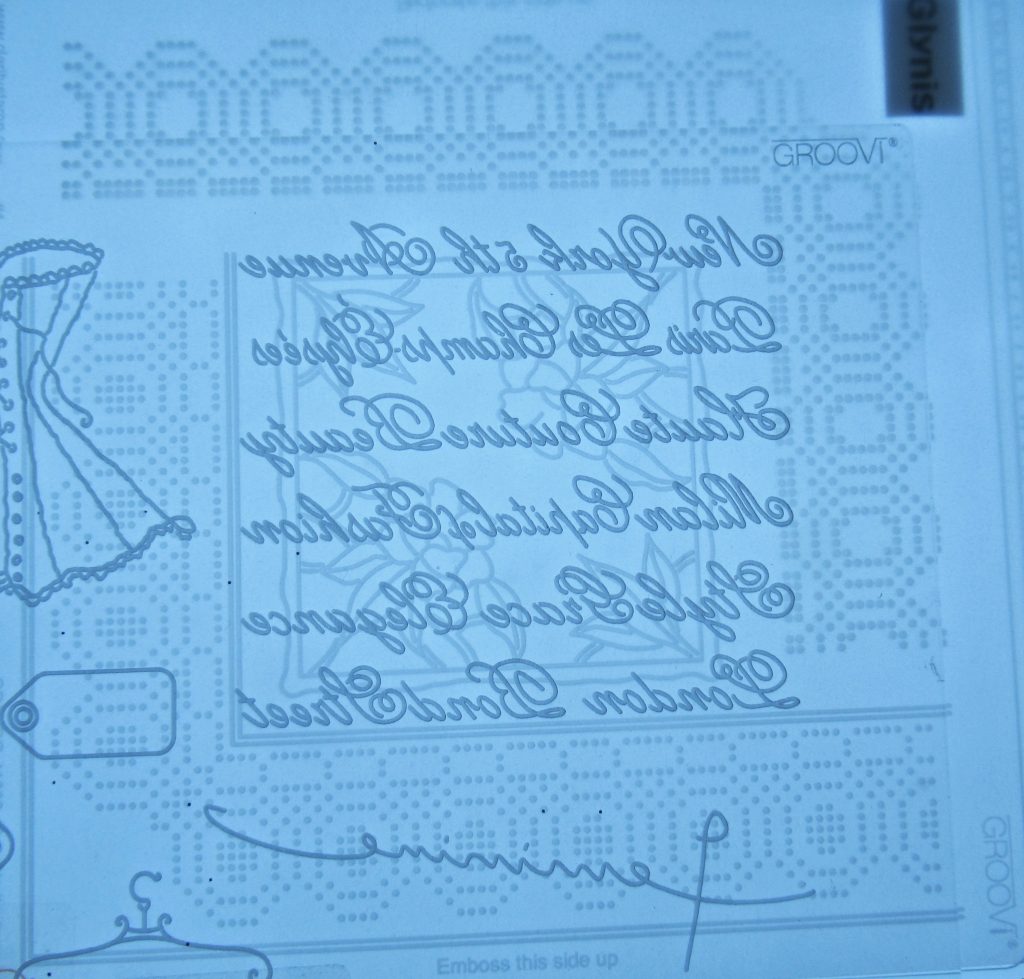
Step 2. Emboss some registration marks, using the number 2 tool. These dots are to help you with lining up the parchment accurately to complete the grid. I found with this grid, 6 repeats on each side will fit the script nicely.

Step 3. Now you will be able to complete all the embossed dots. When you have done that, take the parchment off the grid, and without removing the grid from the plate mate, flip the plate over onto the white super foam. Line up the parchment so that the holes fit between the dots and perforate with the 1-needle bold perforating tool.
*Remember to hold the tool upright when you do this and perforate deeply so that you have nice, deep round holes to aid with picot cutting.
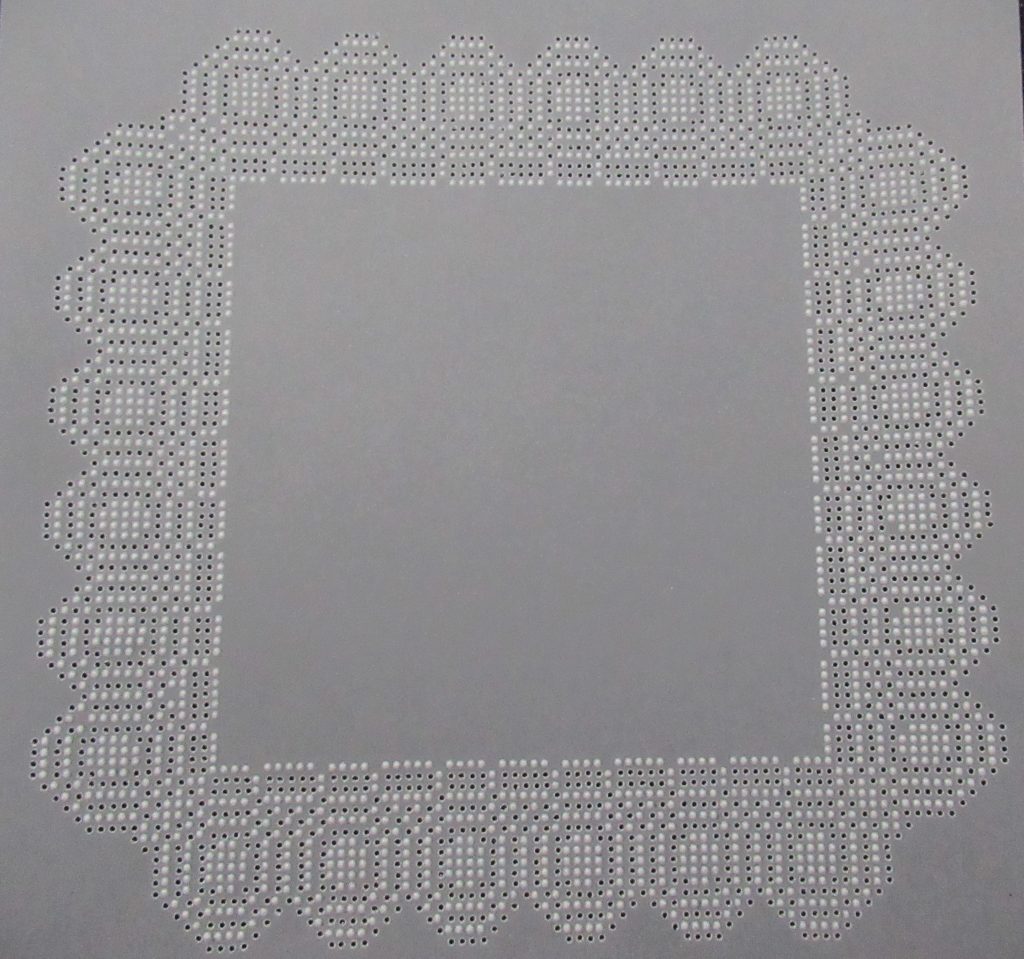
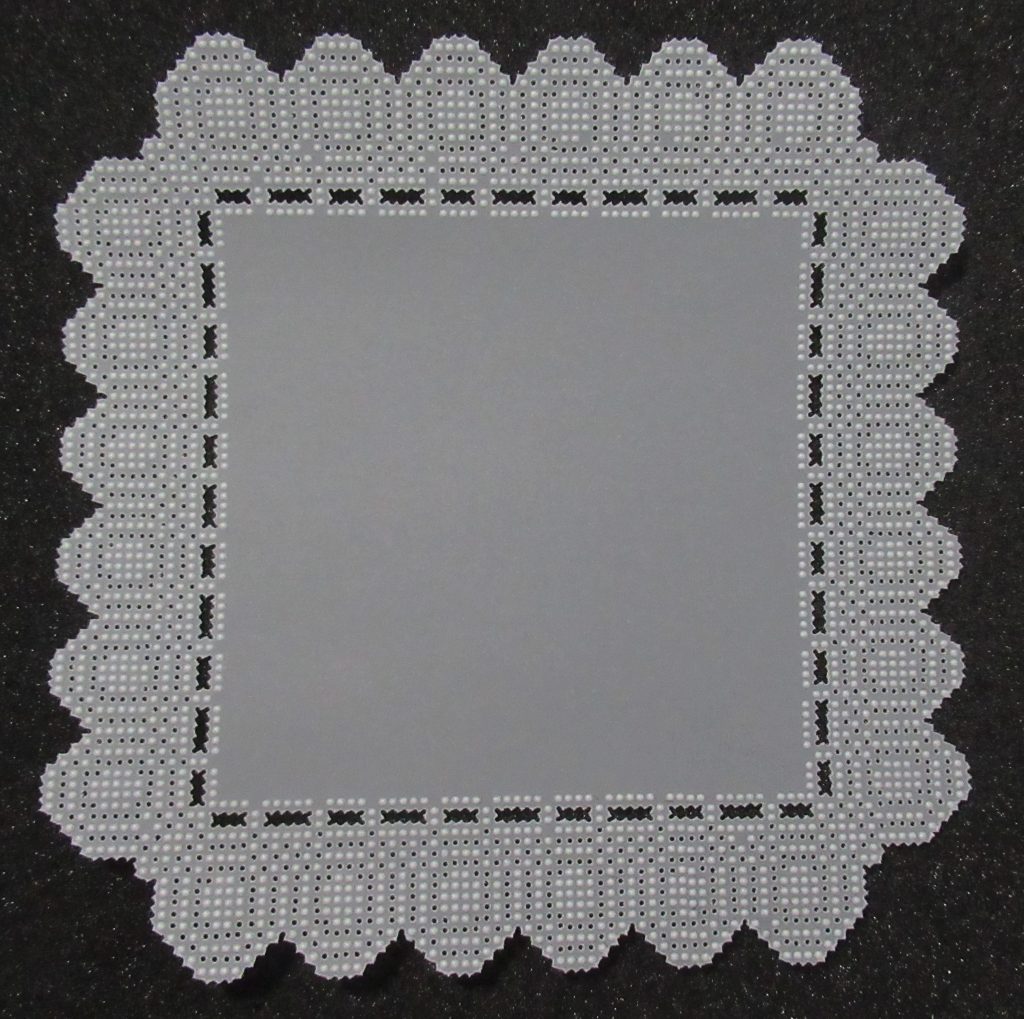
Step 4. Snip out the slots and around the edges of the piece.
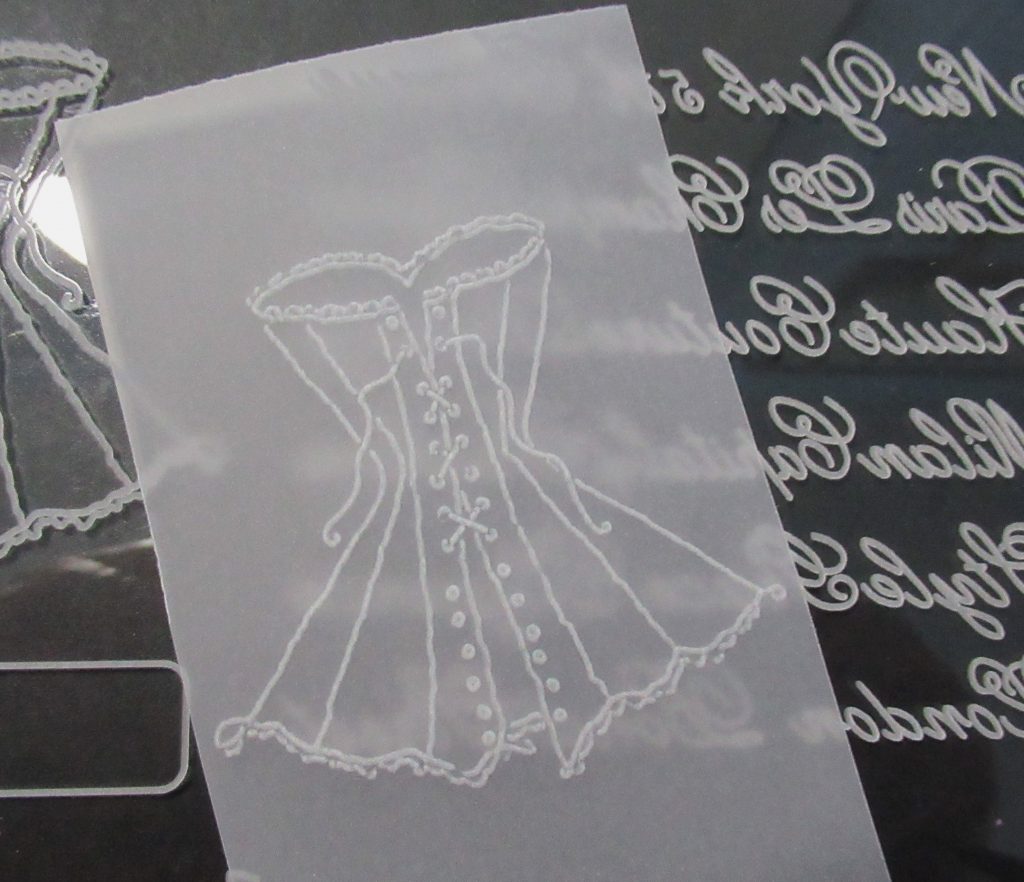
Step 5. Put the Corset plate into the Calligraphy Alphabet plate mate and lay the parchment piece onto it, centralising the script into the middle of the lace frame and emboss it with the number 1 tool.
Step 6. You should have a little piece of parchment left from the A5 piece. Attach this to the plate over the corset and emboss the image.
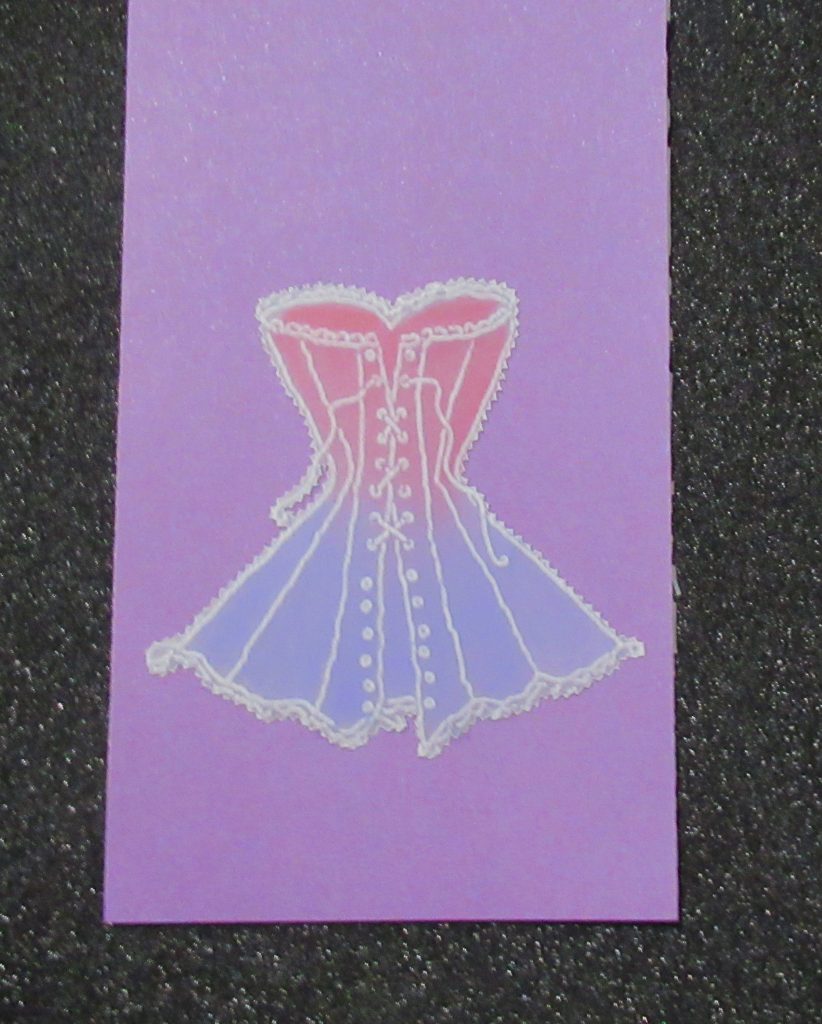
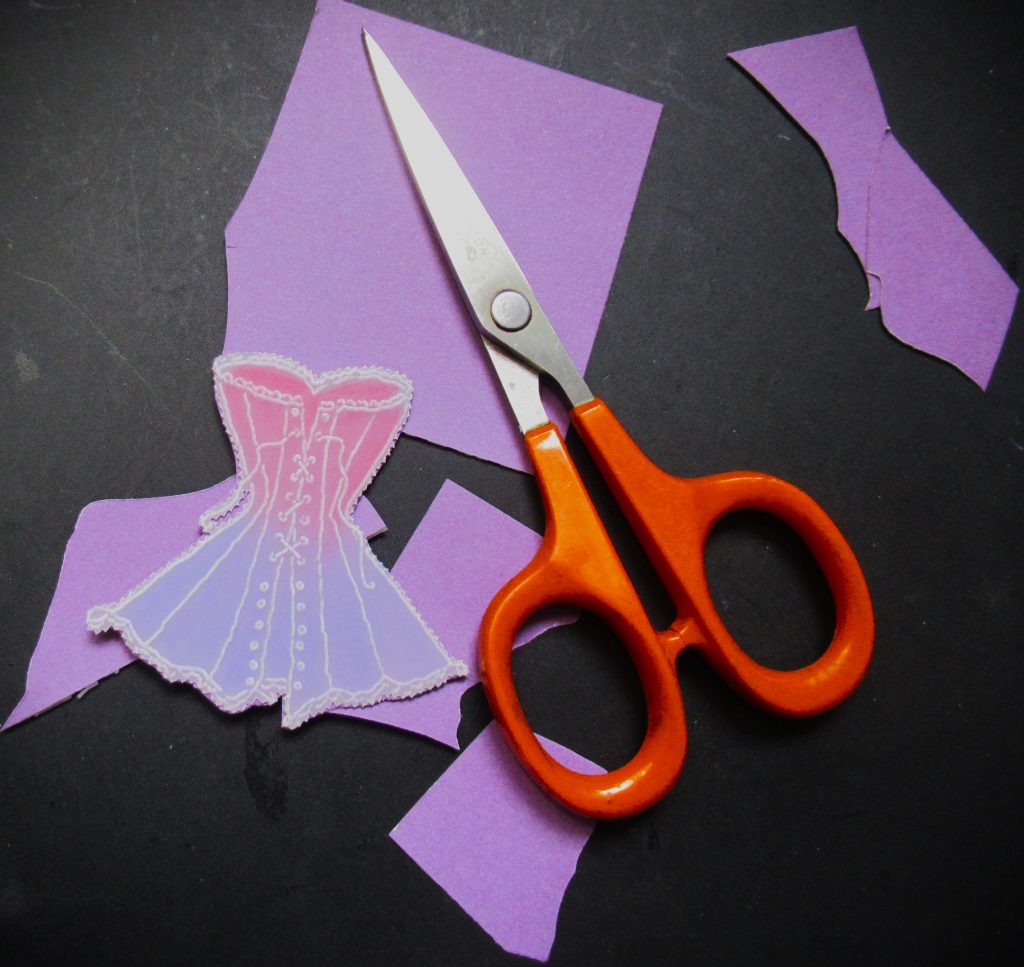
Step 7. Use the B pencils (5 and 11) to colour on the back of the corset. Only a tiny bit of red at the top and then the purple at the bottom. Blend the colours with a little Dorso oil and a blending nib.
Go round the outside of the corset with the fine 2-needle tool and then snip the piece out. Put a spot of Perga Glue onto a piece of cello bag and use a cocktail stick to apply tiny bits of glue to the picots around the edge. Stick it to an off cut of the backing paper.
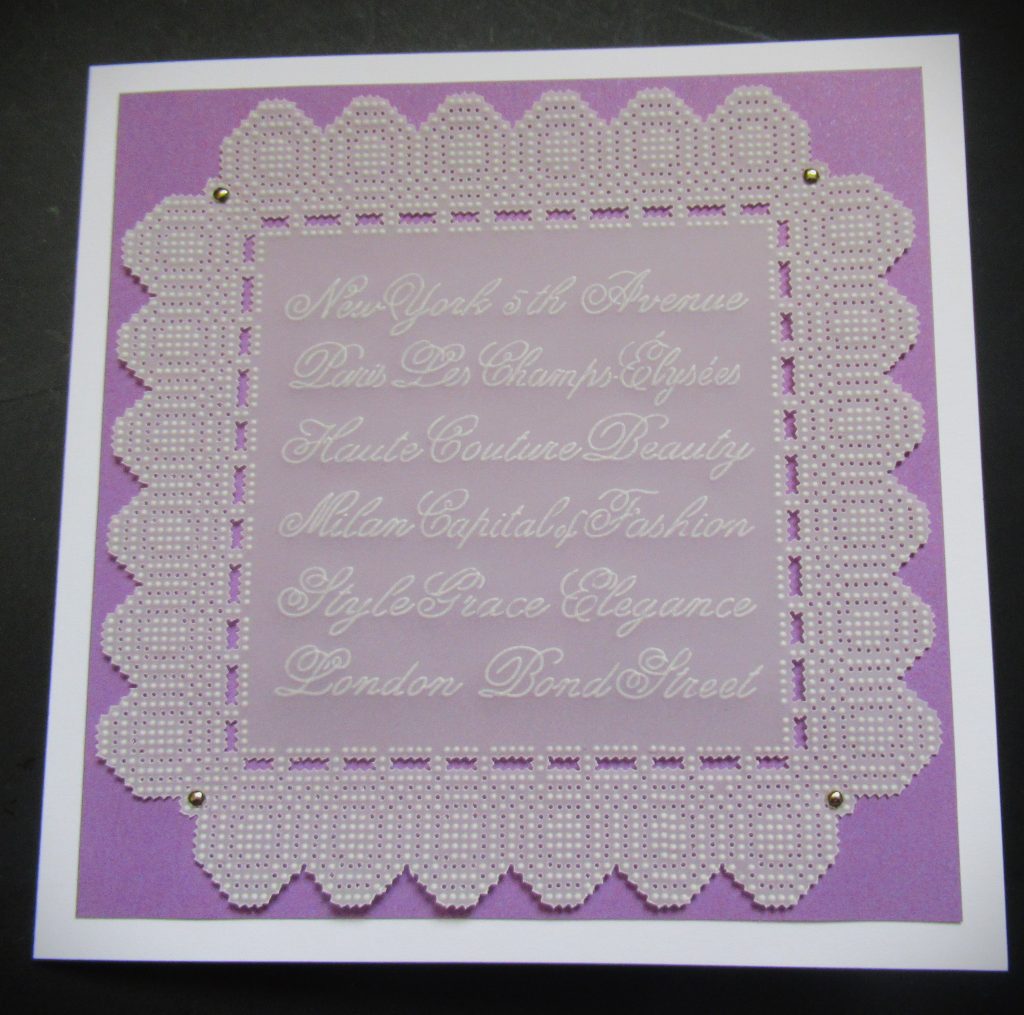
Step 8. Leave that to dry whilst you mat and layer up the lace square. You need a 5.5 x 5.5 inch piece of companion paper. Attach it to the paper with brads and then stick this to a 6 x 6 inch card blank.
Step 9. Now cut the corset out, as close as you can to the picots without actually cutting into them. Keep the largest scrap, because it is big enough for another corset!
Step 10. Cut a circle from your piece of fabric with the 6th Nested Picot Cutting die from the outside edge. I use a Gemini machine, and the cutting sandwich I used was, cutting plate, plastic folder pocket, fabric, die (cutting side down), magnetic shim, plastic shim and then the top plate. I found that the picot dies can cut through fabric like butter!
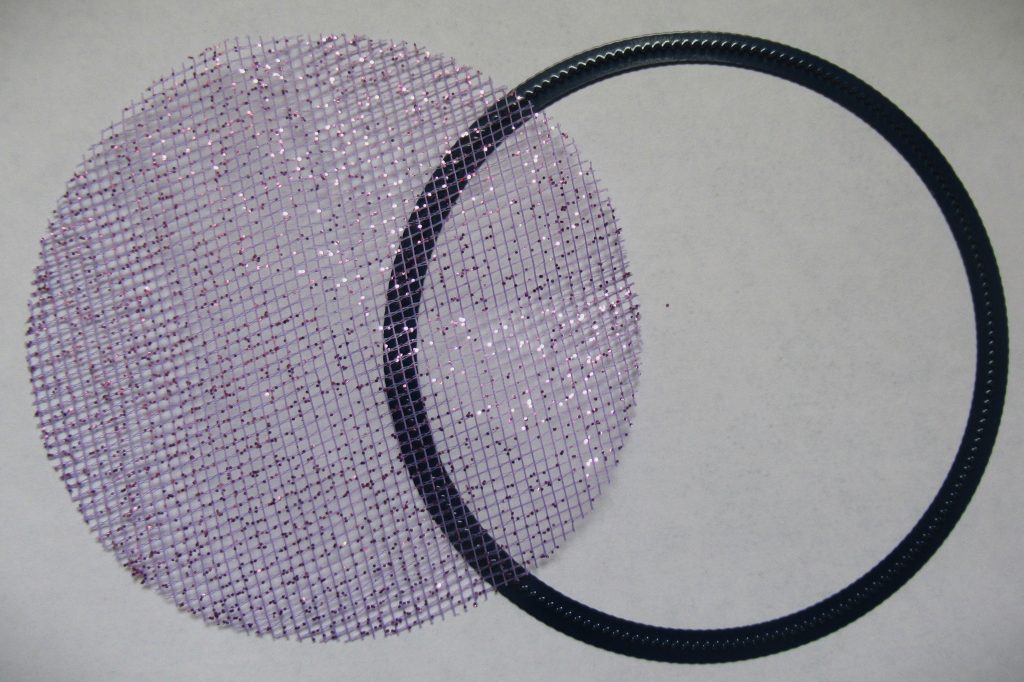
Step 11. Fold the circle in half and pinch in some folds and pleats. Fix them in place with some strong double-sided tape. When you are happy with it, use some more d/s tape and secure it to the centre of the lace square.
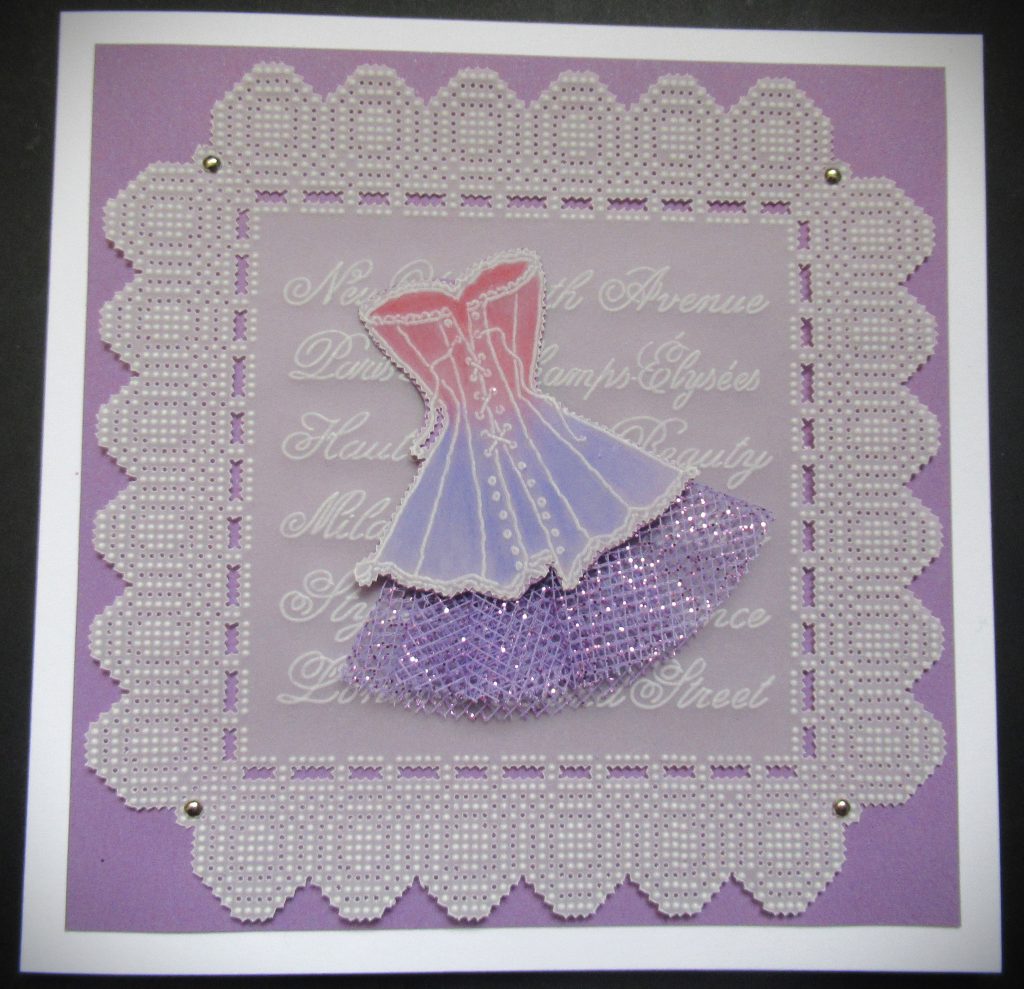
STUNNING card! I love it.
This corset design has been around at Clarity for many years. I remember watching stamping demos as a teenager, using Fusible Fibres and Fusible Film. It’s always been a personal favourite, so thank you, Glynis, for casting some light on it and showing what can be done with the Groovi plate design.
If you are a Craft Club Member, don’t forget the Half Price Club Members Sale is still in place and many of the products that Glynis has used are included – Click HERE to investigate

The stamp is currently in the Half Price Club Members Sale…
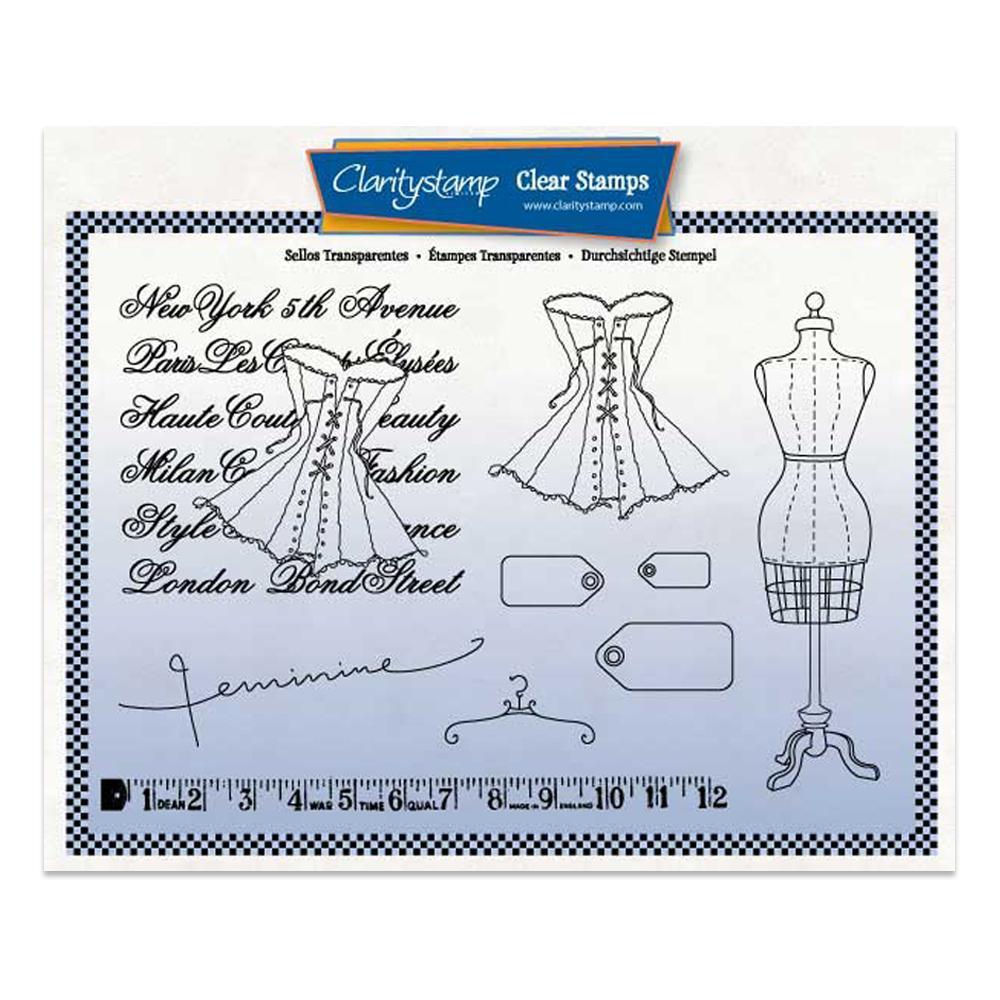
Click HERE to find it.
Everything that Glynis has used for this project can be found in one place over on the Clarity website, HERE.
A busy week ahead at Clarity Towers:
Monday 24th July :
In the SHAC with Barbara – 10am Live on Facebook and YouTube
Tuesday 25th July:
Groovi Tuesday with Paul – 10am Live on Facebook and YouTube
Thursday 27th July:
In the SHAC with Clarity with Barbara on Create & Craft – 3pm & 7pm and then New & Exclusive with Paul on Create & Craft – 4pm & 8pm
Friday 28th July:
New & Exclusive with Paul on Create & Craft – 8am and then Crafting with Clarity with Barbara – 9am & 1pm
Travel gently, friends.
Lotsa love, Grace & Glynis xoxo
Clarity – The Home of Art, Craft, and Well-Being.
Fabulous project Glynis, im sure lots of folk will love to recreate it xx
Thank you Glynis for another lovely project. I know I have this design but can’t remember whether its stamp or Groovi but will check it out.
Hope you had a fabulous time last night Grace.
Have a good week everyone – it looks as if its going to be a busy one at Clarity Towers. At least there will be plenty to keep us occupied as the weather forecast doesn’t look too good for the coming week so we can stay indoors & watch Barbara & Paul work their magic on TV & the SHAC xx
Very pretty project, thank you xx
Beautiful, thank you Glynis for a brilliant step by step. x