Clarity Matters Blog Tutorial: How To Use The Star Point Tool
Hello hello! Grace here.
I hope this finds you well, safe, and enjoying your Sunday morning.
Have you been following Paul and his Groovi Tuesday sessions on Facebook & YouTube? He is currently working his way through the various multi-needle tools that are showcased in the Pergamano Handbook for Multi-Needle Tools – Volume 2. This week he moved on to the next tool in the book – The Star Point Tool.
If you missed those last sessions though, then you can catch up here:
Picot V Small Perforating Tool – HERE
Picot V Medium Perforating Tool – HERE
Picot V Large Perforating Tool – HERE
Angle Perforating Tool – HERE
Cross Perforating Tool – HERE
4-In-4 Perforating Tool – HERE
Almond Tool and Heart Tool – HERE
Moon Tool – HERE
The Semi Square Tool – HERE
During Groovi Tuesday this week, Paul started working with the Star Point Tool. You can catch up on the episode, HERE.
Meanwhile, the super-talented Glynis Whitehead (Clarity Craft Design Team Member) has made two more projects to go with this most recent tool tutoring. I’ll hand you over to Glynis…

Star Point Perforating Tool – Project 1
Ingredients
Pergamano Handbook for Multi-Needle Tools Vol 2 by Linda Williams (PER-BO-70355-X)
Nested Arch Tags Groovi Plate A5 (GRO-PA-41465-04)
Jayne’s Agapanthus Name A5 Groovi Plate (GRO-FL-40392-03)
Star Point Perforating Tool (PER-TO-70033-XX)
Flower Perforating Tool (PER-TO-70018-XX)
Single Needle Perforating Tool (PER-TO-70035-XX)
1mm Embossing Ball Tool (PER-TO-70011-XX)
1.5mm Embossing Ball Tool (PER-TO-70004-XX)
3mm Embossing Ball Tool (PER-TO-70005-XX)
4.5mm Embossing Ball Tool (PER-TO-70015-XX)
Groovi Embossing Tool 1&2 (GRO-AC-40026-XX)
Single White Ended Eraser Pencil (Faber Castell) (ACC-PE-30670-XX)
Faber-Castell Polychromos Pencils (ACC-PE-30797-XX)
or Perga-Liner Pencil (B) (PER-CO-70063-XX)
Blending Nibs (PER-AC-70300-XX)
Dorso Oil (PER-CO-70066-XX)
Perga Glue (PER-AC-70133-XX)
Method
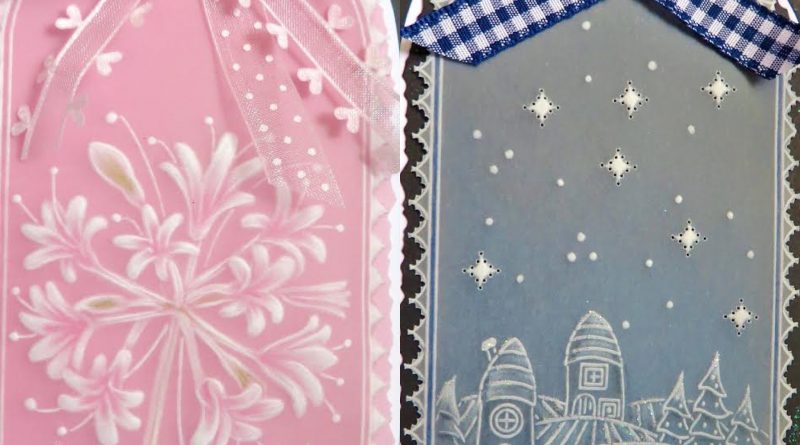
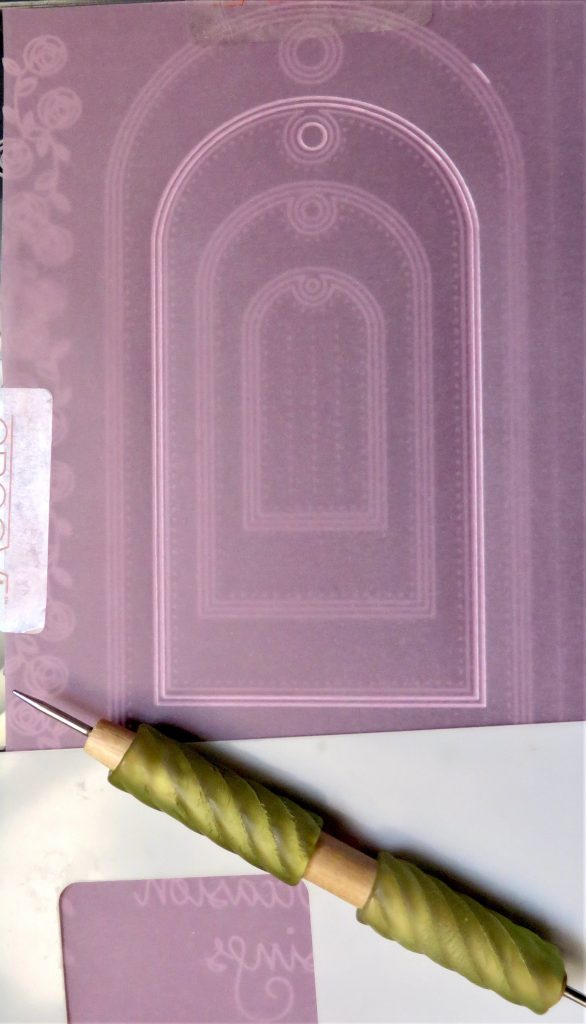
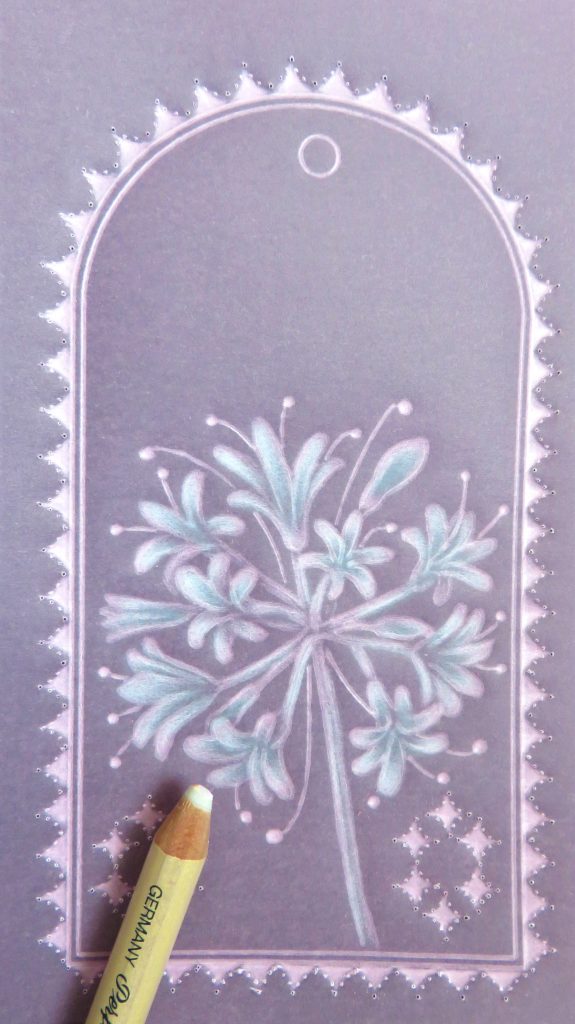
Step 1. Trace the 2nd largest tag from the Nested Arch Tag plate.
Step 2. Trace the Agapanthus from Jayne’s Agapanthus Name Groovi Plate. Tilt it to one side on the tag and you will find it fits nicely. Use the number 2 tool from the starter kit or the 1.5mm ball tool.
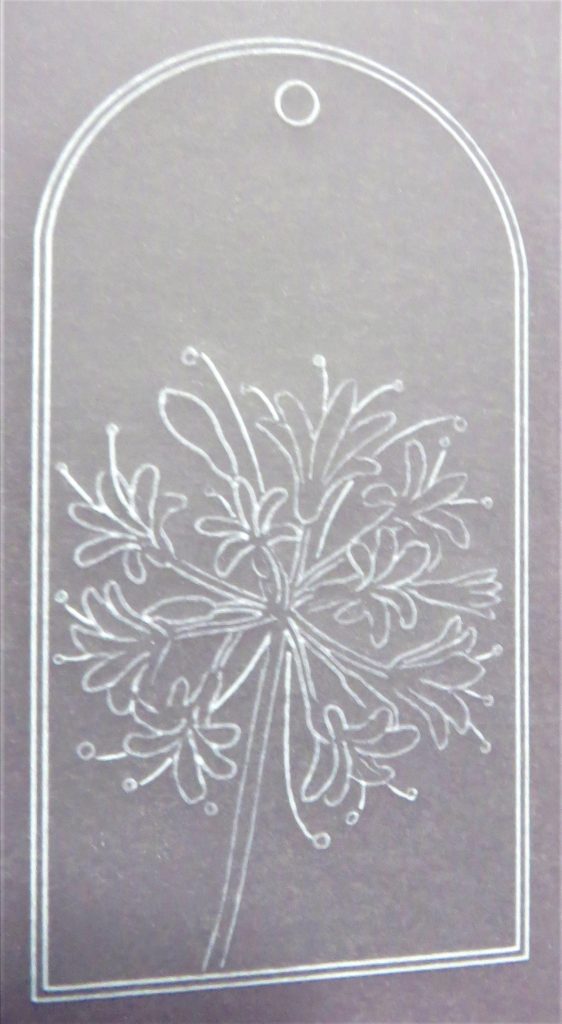
Step 3. The embossing of the flower needs to be done in stages, giving the parchment time to rest in between layers of embossing. So, start with the 4.5mm ball tool and emboss the petals very lightly. The dots can be embossed with the 1.5mm ball tool.

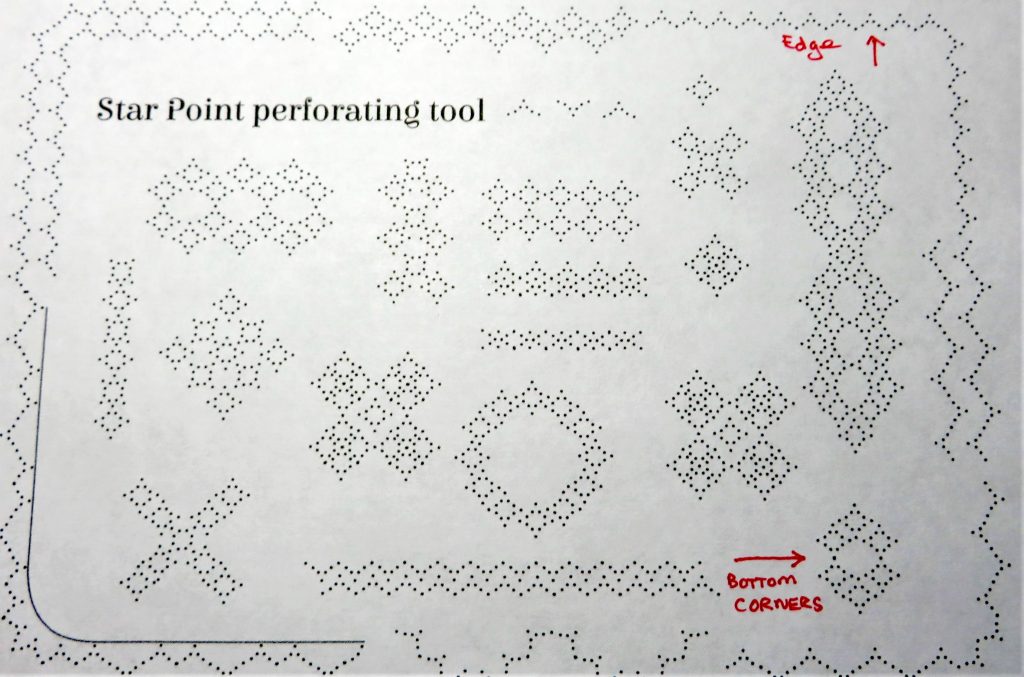
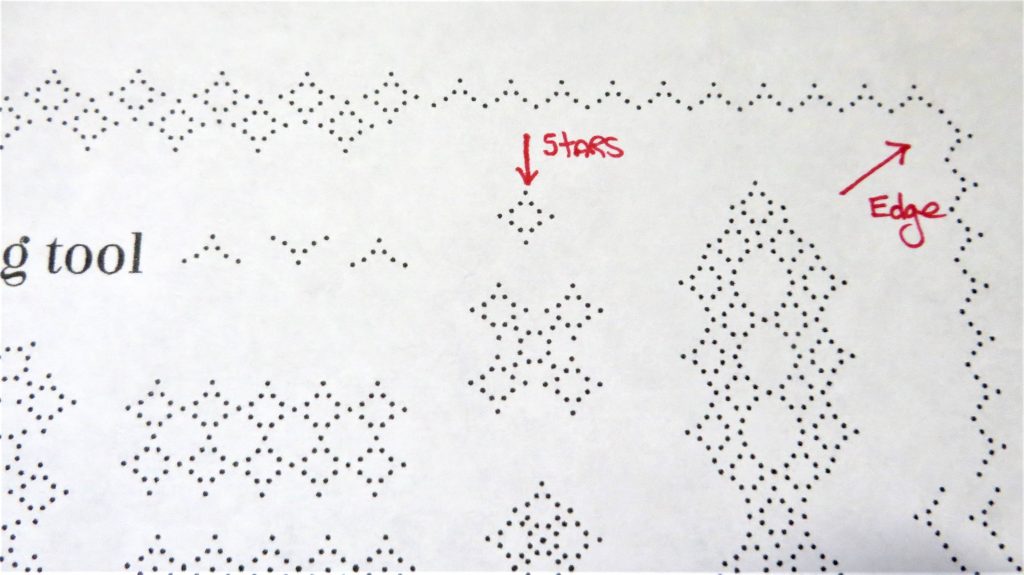
Step 4. Whilst the first layer of embossing is resting, make a start on the perforations. The Star Point perforating tool is illustrated by Linda in her handbook on pages 50 to 53 and the sampler you need to photocopy is on page 53. The perforations used for this project are marked with a red pen.
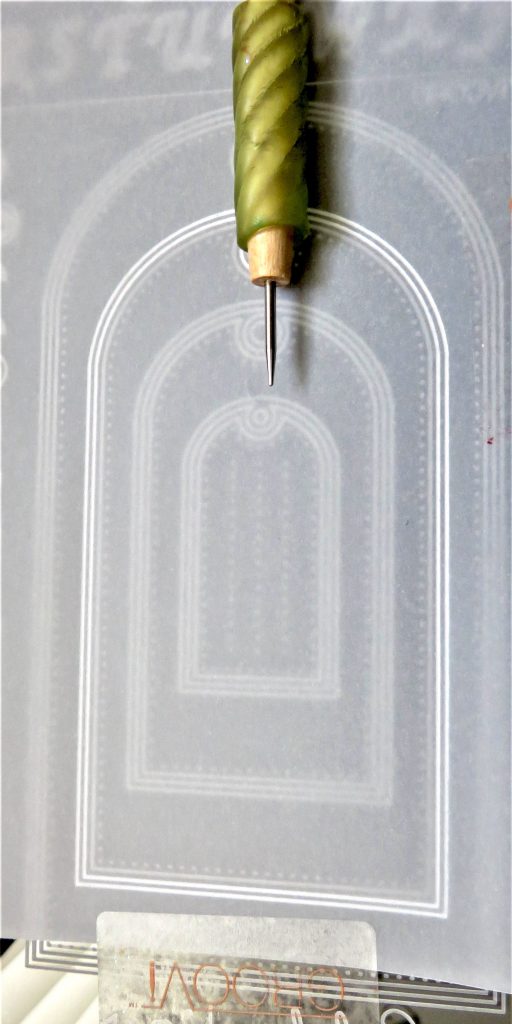
Step 5. Lay the paper pattern onto a shallow perforation mat with the tag lined up on top of it. Match each point of the needles to each dot underneath. Use the dots on the handle and the longer needles to help you line up, and perforate through the parchment and into the pattern below.
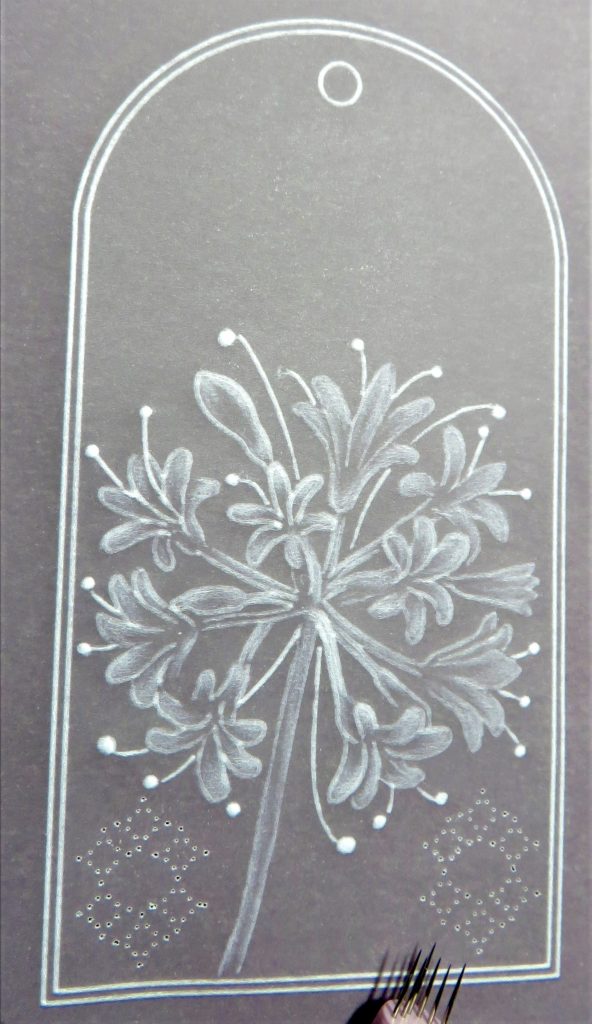
Step 6. Now go around the edge shallow perforating with the Star point tool. Start at the bottom corners of the tag, working towards the middle so that you can space the perforations out to fit. Start again at the corners and work up the sides of the tag to meet at the top.
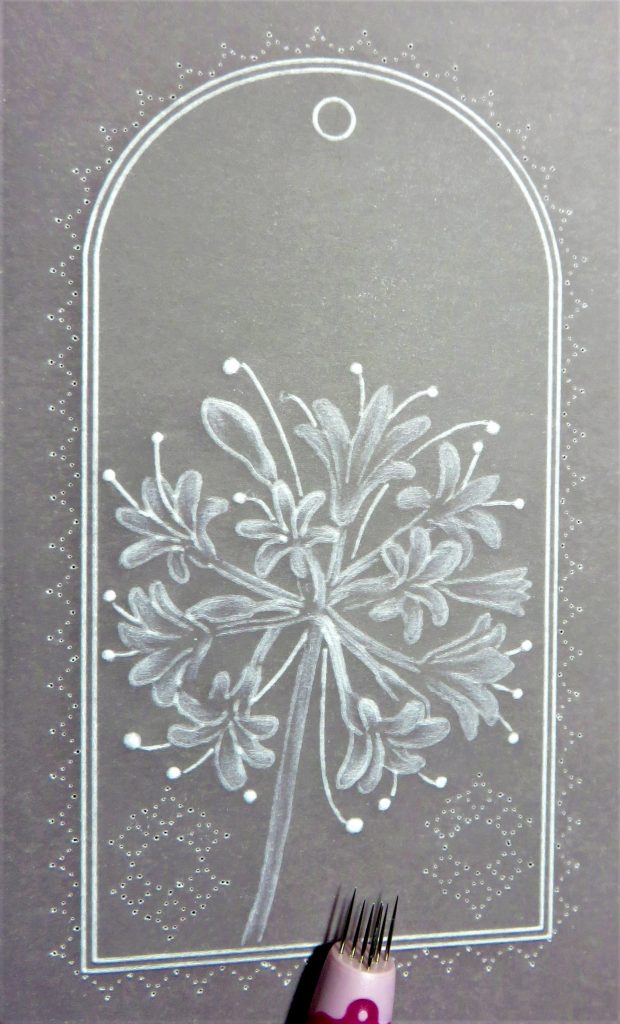
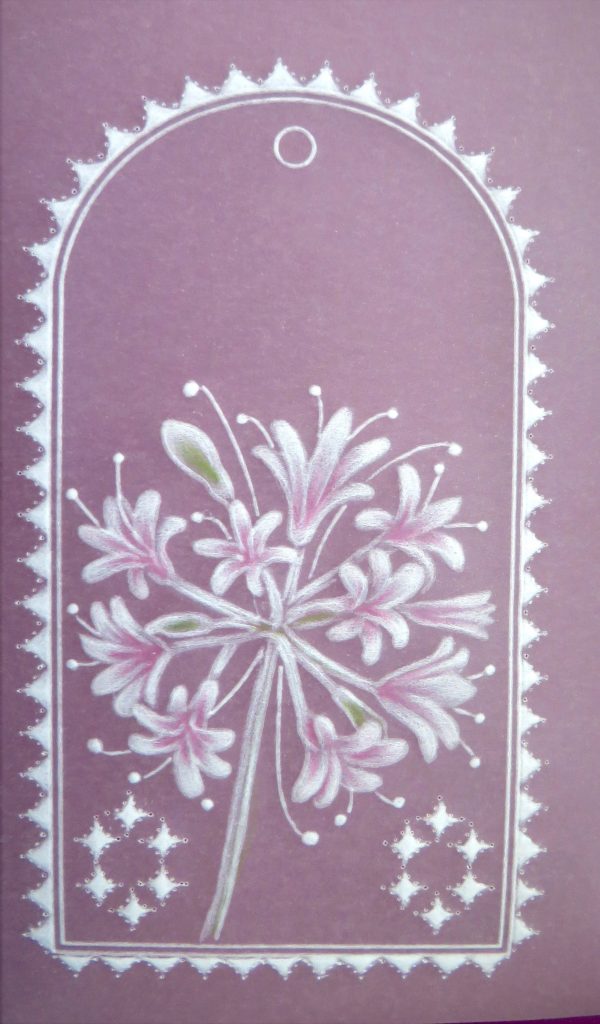
Step 7. The parchment has rested overnight. I have now put another layer of embossing over the flower with the 4.5mm ball tool and filled in the star point shapes with a 3mm ball tool, which are not quite white until I go in with the 1.5mm ball tool.
Step 8. After resting the parchment, go over the flower petals and buds with a 3mm ball tool, very lightly. Rest the parchment in between layers of embossing and do 2 layers. Use the 1.5mm ball tool, again very lightly, to whiten the star point shapes and push the embossing out towards the perforations more.
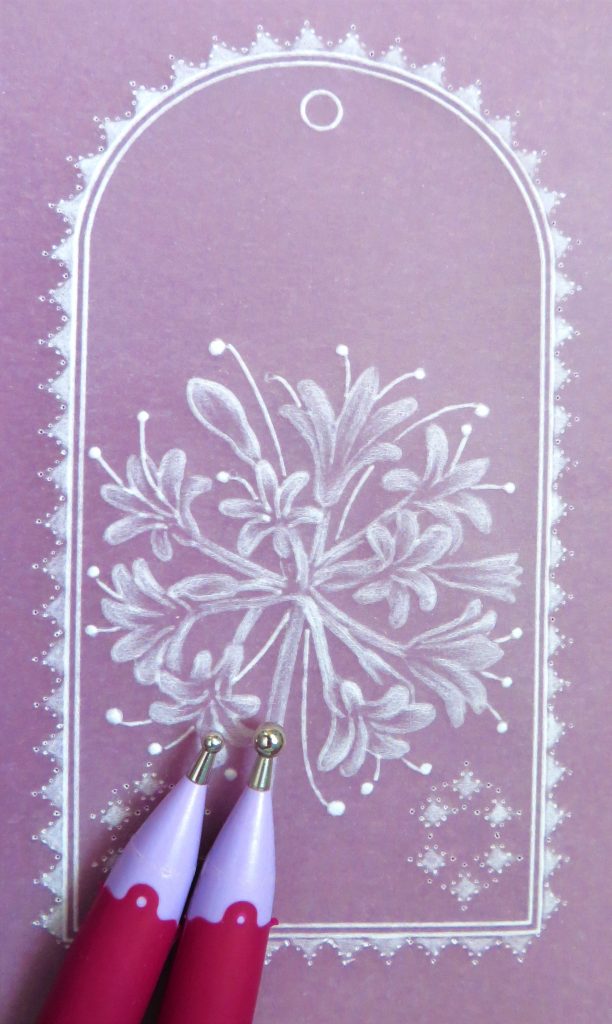
Step 9. Working on the back, use the white eraser pencil to rub out some of the colour from the pink parchment behind the petals and buds of the flower. This will help the whiteness of the embossing to shine through.
Step 10. After resting the parchment some more, use the 1.5mm ball tool to emphasise the edges of the petals more. Add a touch more whiteness to the star point shapes with the 3mm ball tool. Add some colour to the back of the petals, to help create shadow, a pink can be found in the A pencils of the Pergaliners. Use green on the buds.
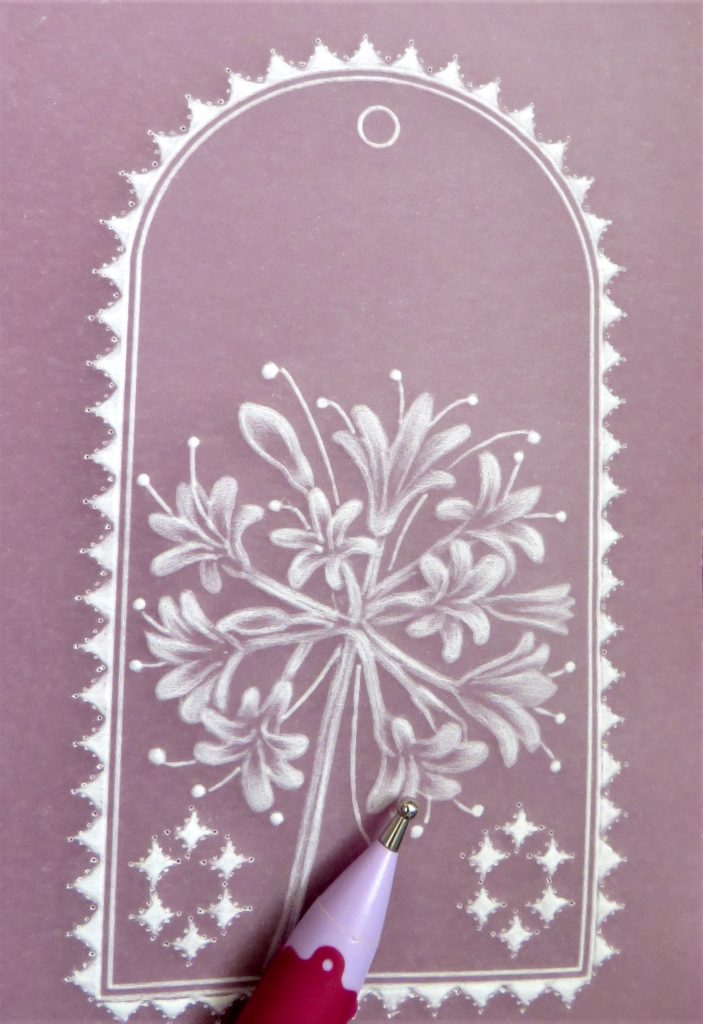
Step 12. Re-perforate all the star point shapes with the single needle tool on a deep perforating mat. Give a last embossing of the petals with a 3mm ball tool.
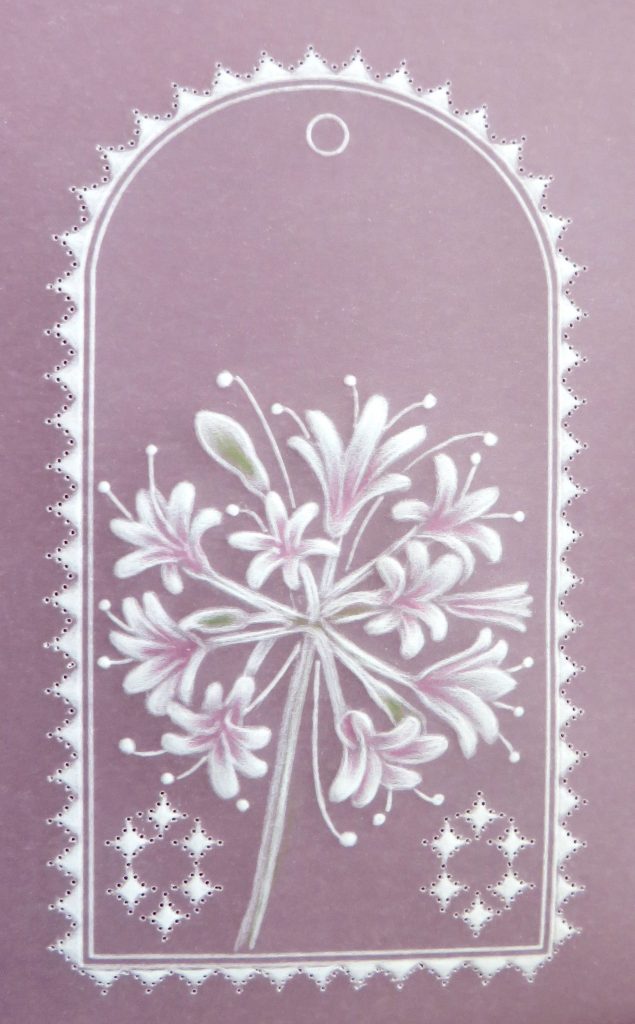
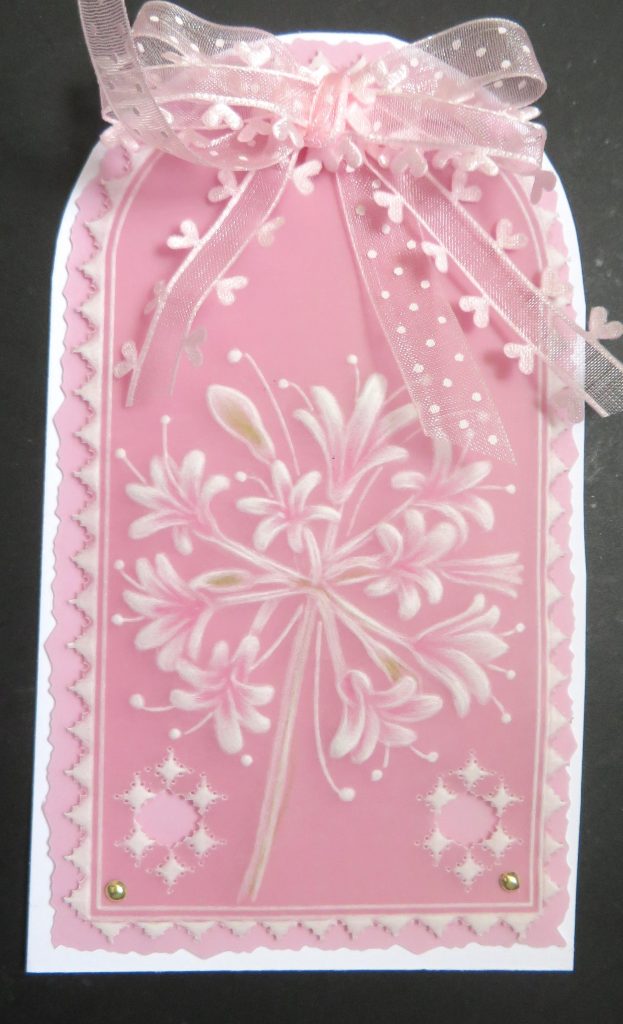
Step 13. Follow the cutting guide in Linda’s book; snip out the centre of the star point combination and then go around the outside of the tag. Mat and layer the tag onto your chosen backing papers/card and add a bow at the top. Your first project is complete!
Star Point Perforating Tool – Project 2
Ingredients
Pergamano Handbook for Multi-Needle Tools Vol 2 by Linda Williams (PER-BO-70355-XX)
Nested Arch Tags Groovi Plate A5 (GRO-PA-41465-04)
Barbara’s Funky Houses A5 Groovi Plate (GRO-HO-41721-03)
Star Point Perforating Tool (PER-TO-70033-XX)
Single Needle Perforating Tool (PER-TO-70035-XX)
1mm Embossing Ball tool (PER-TO-70011-XX)
1.5mm Embossing Ball tool (PER-TO-70004-XX)
3mm Embossing Ball tool (PER-TO-70005-XX)
Groovi Embossing Tool 1&2 (GRO-AC-40026-XX)
Faber-Castell Polychromos Pencils (ACC-PE-30797-XX)
or Perga-Liner Pencil (B) (PER-CO-70063-XX)
Blending nibs (PER-AC-70300-XX)
Dorso Oil (PER-CO-70066-XX)
Mix mat for Oil (PER-AC-70304-XX)
Pergamano Sticky Ink (PER-AC-70134-XX)
Pergamano Glitter (PER-AC-70252-XX)
Perga Glue (PER-AC-70133-XX)
Method
Step 1. Trace the 2nd largest tag from the Nested Arch Tag plate.
Step 2. Make a picture from Barbara’s Funky Houses plate, moving the tag around to create a landscape. Add a few dots in the sky to represent snowflakes, but leave some room for making some stars with the multi-needle tool.
Step 3. The Star Point perforating tool is illustrated by Linda in her Handbook on pages 50-53 and the sampler you need to photocopy is on page 53. I have marked the perforations used in this tag with a red pen.
Step 4. Emboss the dots in the sky, the dots under the landscape. Put some highlights into the trees and houses. Use the largest ball tool to fit the space.

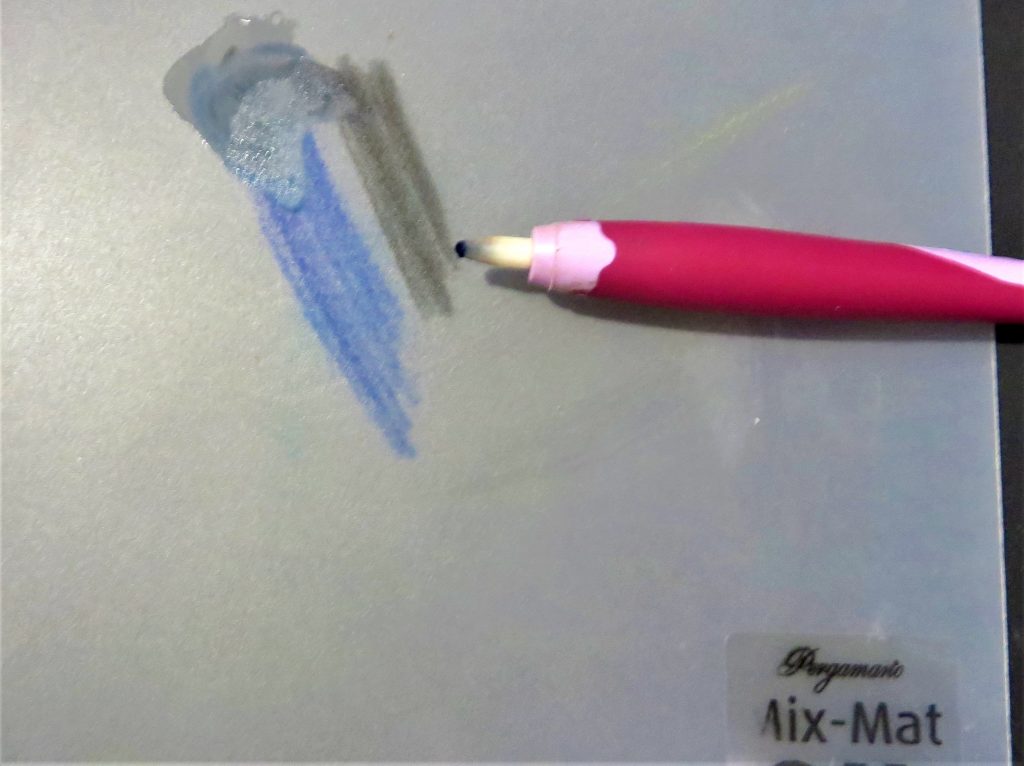
Step 5. Before perforating, you need to get the colour down (trying to colour after perforating is very difficult indeed). Use blendable pencils and take some deep blue mixed with some black to make a night sky. The mix mat and blending nibs work perfectly for this.
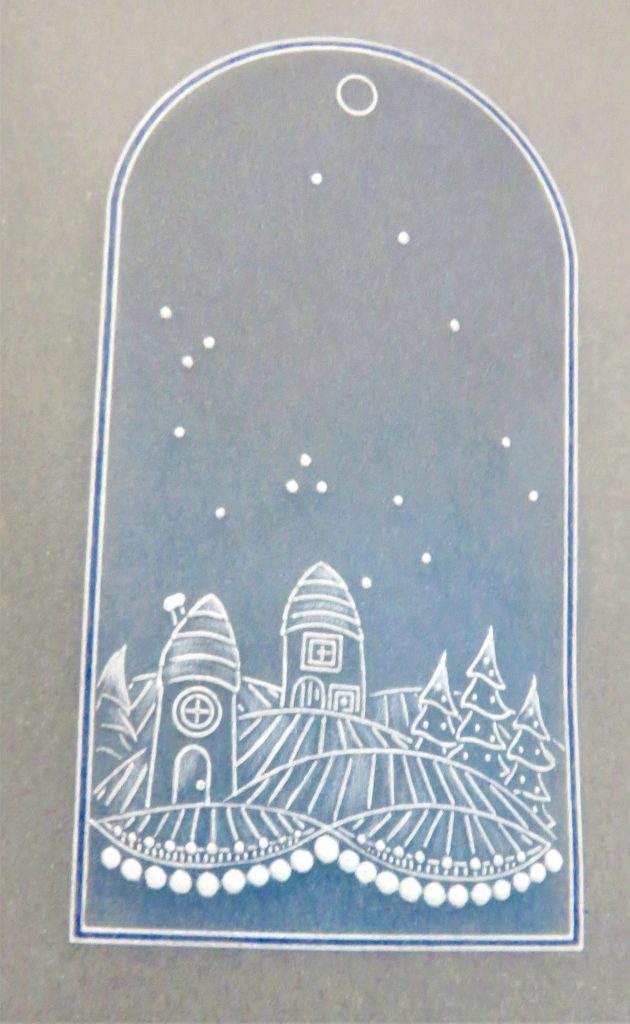
Step 6. Lay the paper pattern onto a shallow mat with the tag over the top. Match each needle of the tool to the dots underneath – use the dots on the handle and the long needles at the ends to help you line them up. Put some ‘stars’ in the sky at random.
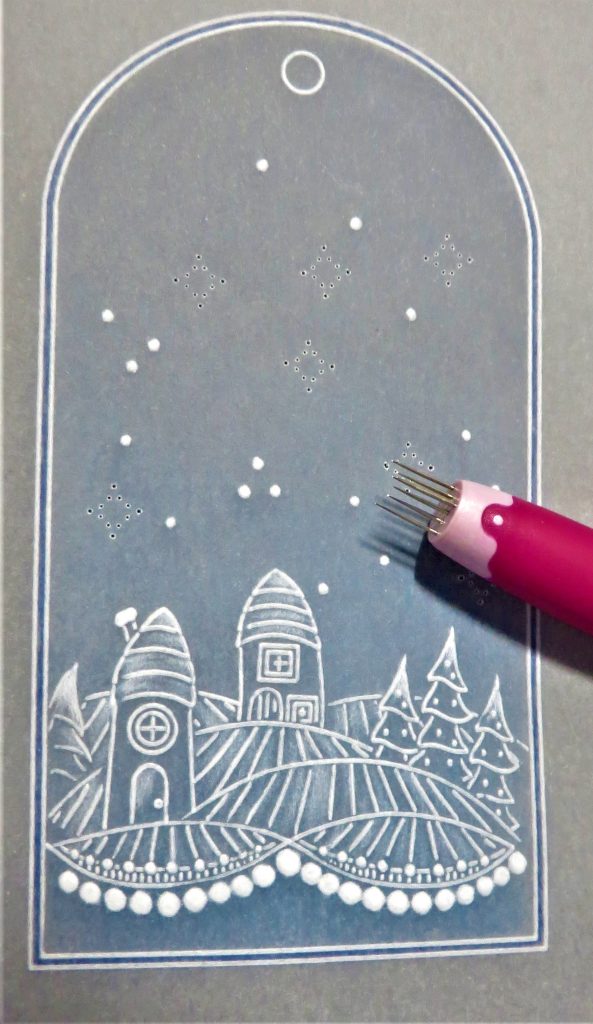
Step 7. Go around the edge of the tag, starting at the bottom two corners, and working inwards to meet in the middle. This way, you can spread out the star tool shapes to fit the space across the bottom of the tag. Starting at the corners, continue up each side of the tag in the same way to meet in the middle at the top.
Step 8. Fill in the star shapes in the sky with embossing – use the 3mm ball tool first to help soften the parchment, then go in with the 1.5mm ball tool to get nearer to the perforations. Use the 1mm ball tool to emboss a thin line near to the dots in the perforations around the tag.
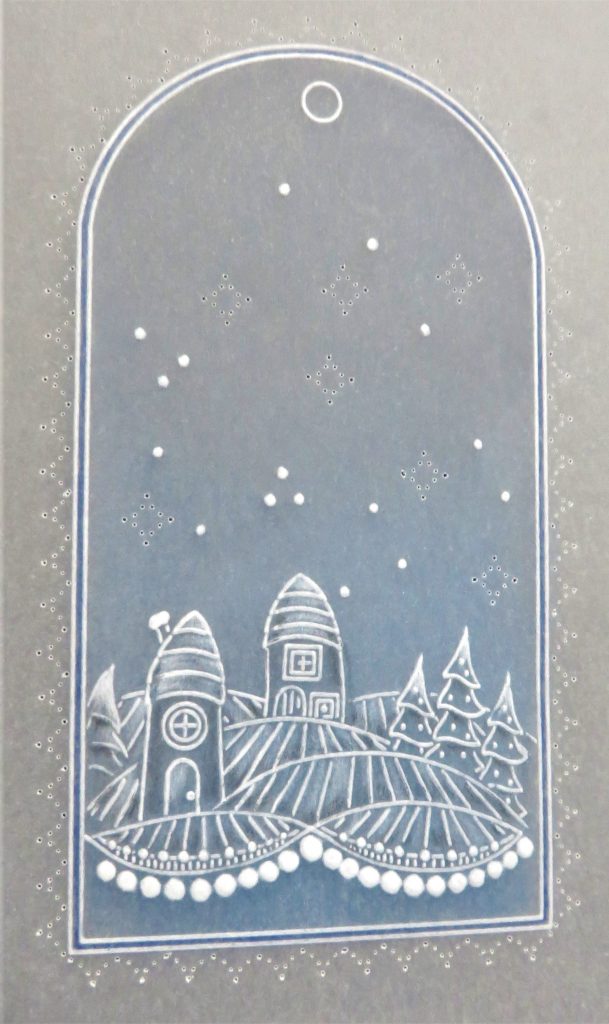
Step 9. Place the work on a deep perforating mat and re-perforate all the holes with a fine single-needle tool.

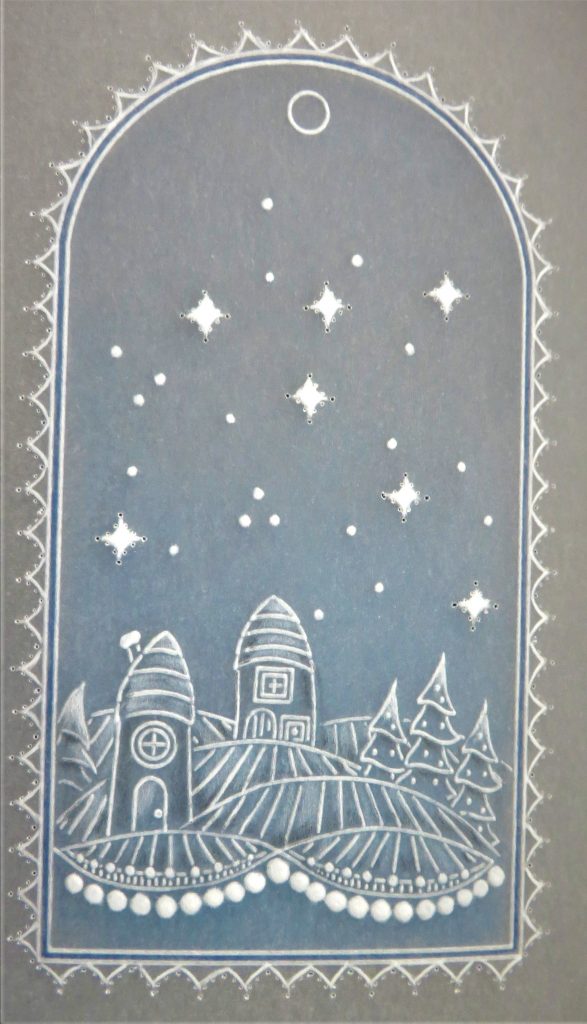
Step 10. Picot cut around the edge, making sure to turn the work as you go.

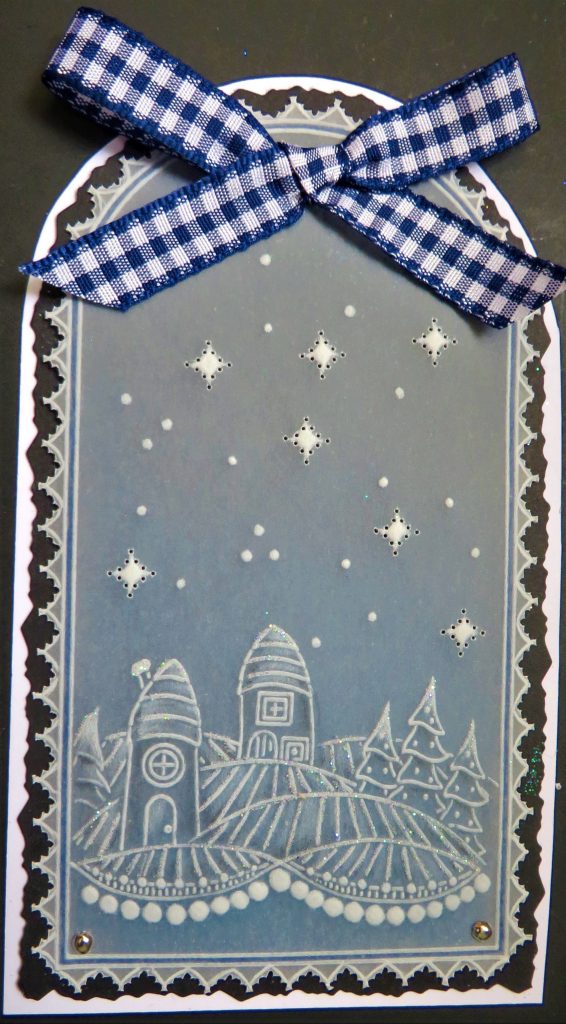
Step 11. Mat and layer the tag onto some black paper or card and then onto white. Add some sticky ink and glitter on the ground and a little on the tops of the houses and trees. Put a ribbon at the top of the tag. Your second project is complete!
TWO incredibly helpful projects! Thank you, Glynis, for sharing your tips and tricks with us. We are so very blessed to receive this tutoring from someone so gifted. I believe this is the last of the tool-focused blogs for a while! Back to our regular step-by-step blogs moving forward.
Everything that Glynis has used can be found on the Clarity website, HERE.
Looking at the week ahead…
Monday 30th October:
In The SHAC with Barbara – 10am Live on Facebook and YouTube
Tuesday 31st October:
Groovi Tuesday with Paul – 10am Live on Facebook and YouTube
Thursday 2nd November:
In the SHAC with Barbara – 7pm Live on Facebook and YouTube
Sunday 5th November:
Crafting with Clarity with Barbara on Create & Craft, 3pm – 5pm
Hope to see you there!
Travel gently, friends.
Lotsa love, Grace & Glynis xoxo
Clarity – The Home of Art, Craft, and Well-Being.
Thanks Glynis for the last 2 tags in the collection. I have sorted my plates & look forward to doing them during the week.
A nice sunny day here so going to make the most of the extra hour !!
Have a good week everyone & thank you Grace for doing the blog again today xx
Great step by step, lovely tags, thank you Glynis and Grace. x
Hi Glynis, I’m a newbie and just bought the Linda Williams Rose Arch groovi plate and looking for inspiration. I wondered if you had any card samples made with this plate in your archives? I must say I’m loving the groovi world.
You make it look so easy I’m sure it’s not but, I can’t wait to have a go when I gather all the tools ( soon be Christmas!!! )😀