
Clarity Matters Blog Tutorial: How To Combine Designs
Hello hello! Grace here.
I hope this finds you safe, well, and feeling crafty!
We’re joined this weekend by the super talented, Glynis Whitehead. You’ve likely seen Glynis’s artwork samples all over our Facebook groups, Clarity Worldwide and Groovi Worldwide, as well as Create and Craft.
I’ll hand you over to our teacher…

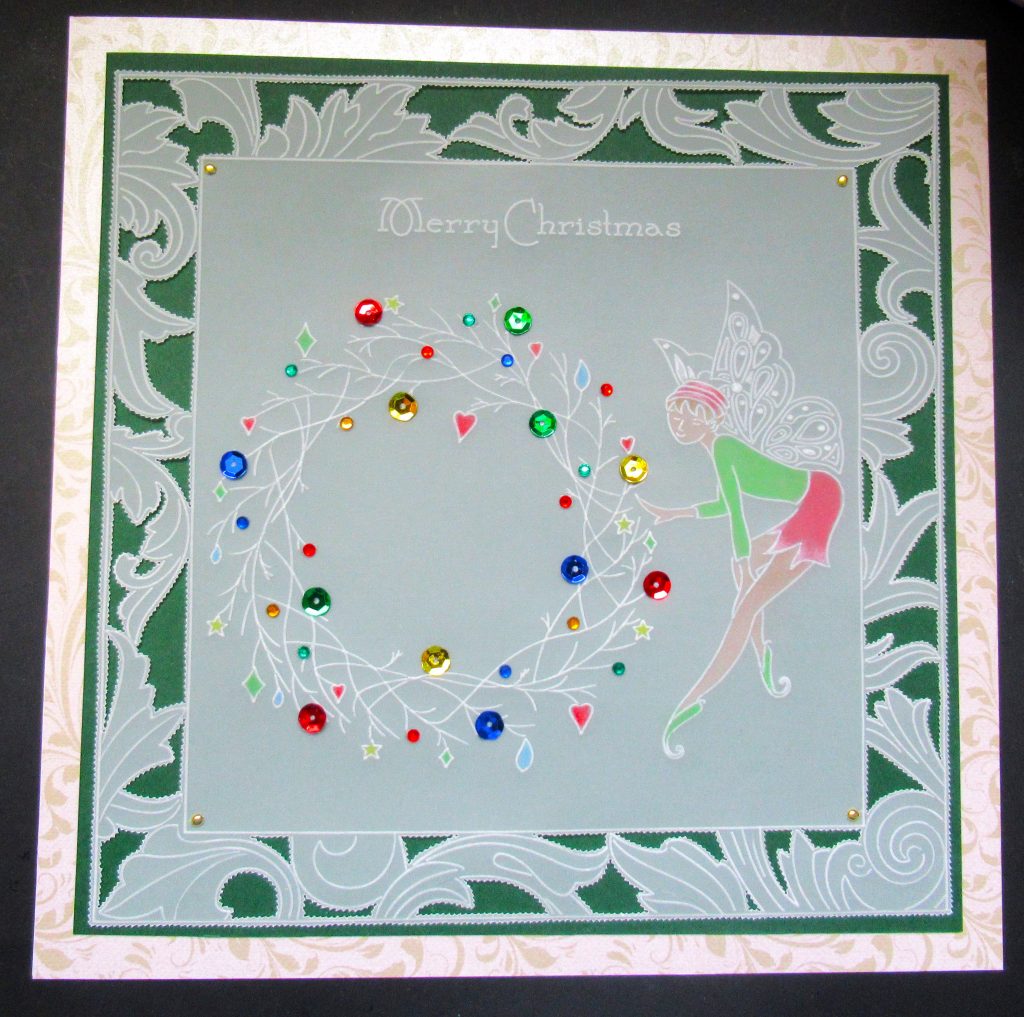
Christmas Wreath Fairy
I was asked if I would blog about this project after people had seen it on Create and Craft, so here it is…
Ingredients
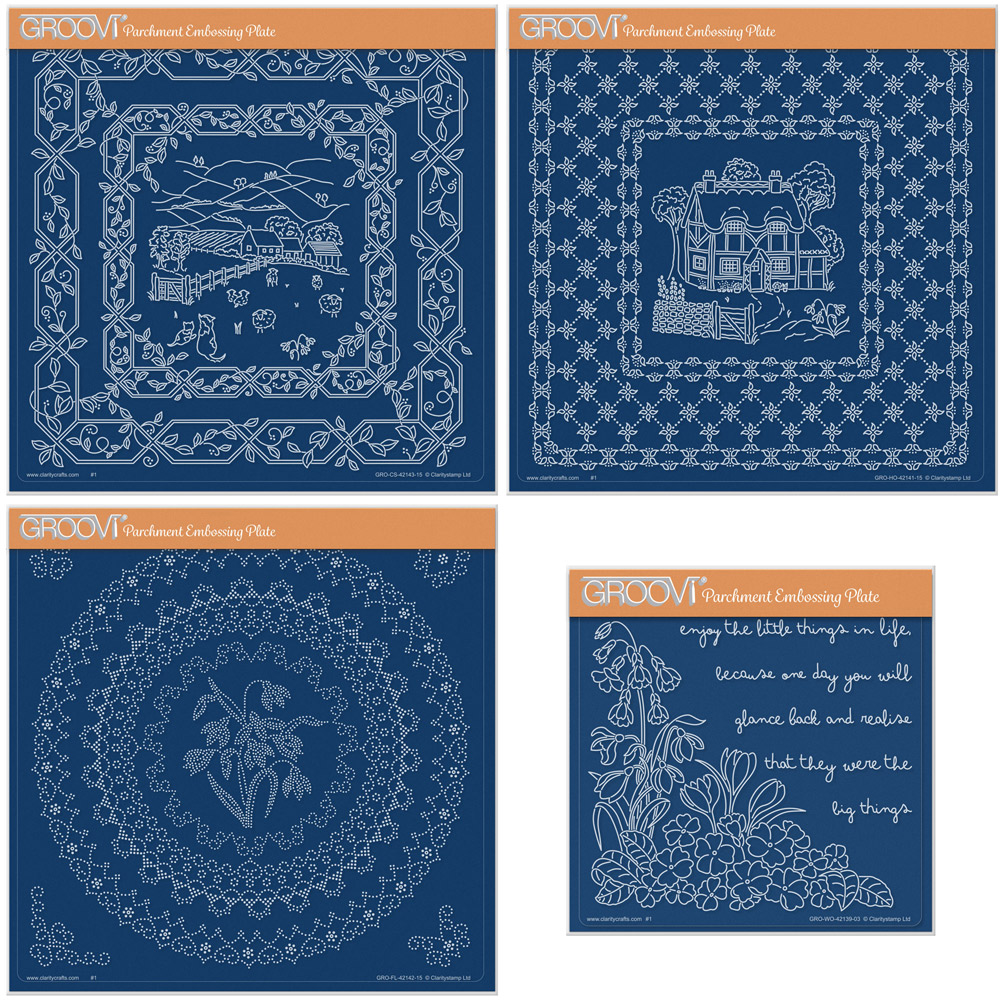
Groovi A4 Clear Parchment (GRO-AC-40024-A4)
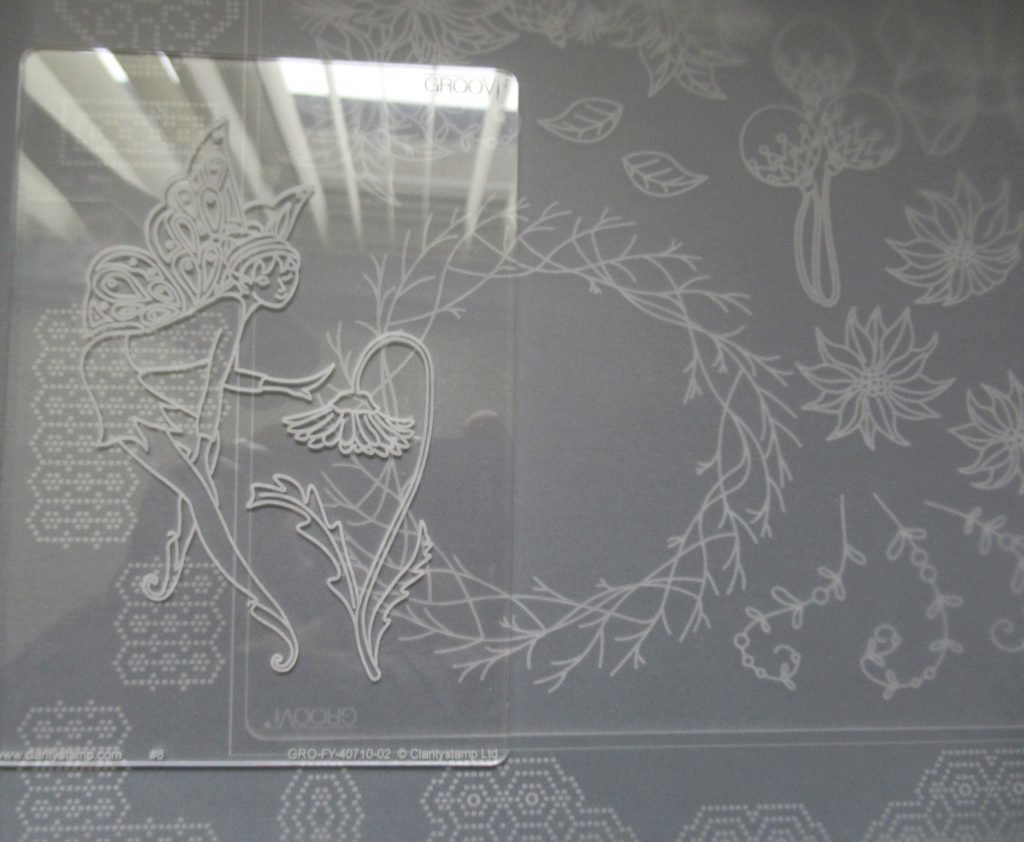
Fairy 3 A6 Groovi Plate (GRO-FY-40710-02)
Naked Branch – With Love and Best Wishes (GRO-CH-41318-02)
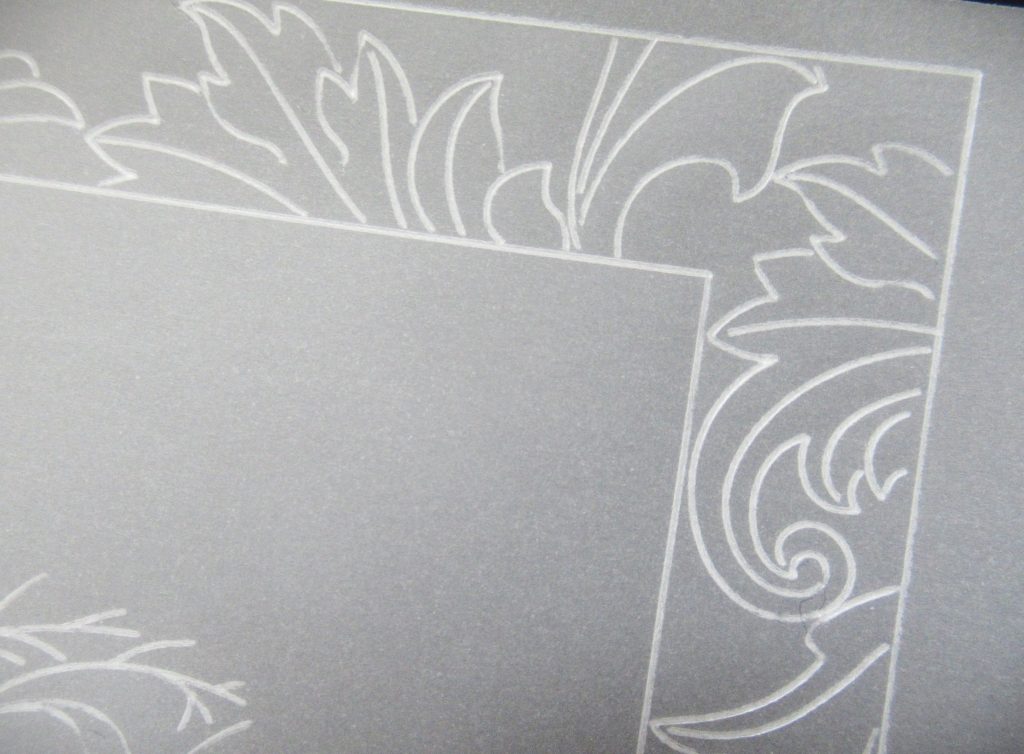
Filigree Swirls & Spacer A6 Groovi Plate Collection (GRO-PA-41963-02)
Nested Squares Extension & Alphabet Frame (GRO-WO-40538-15)
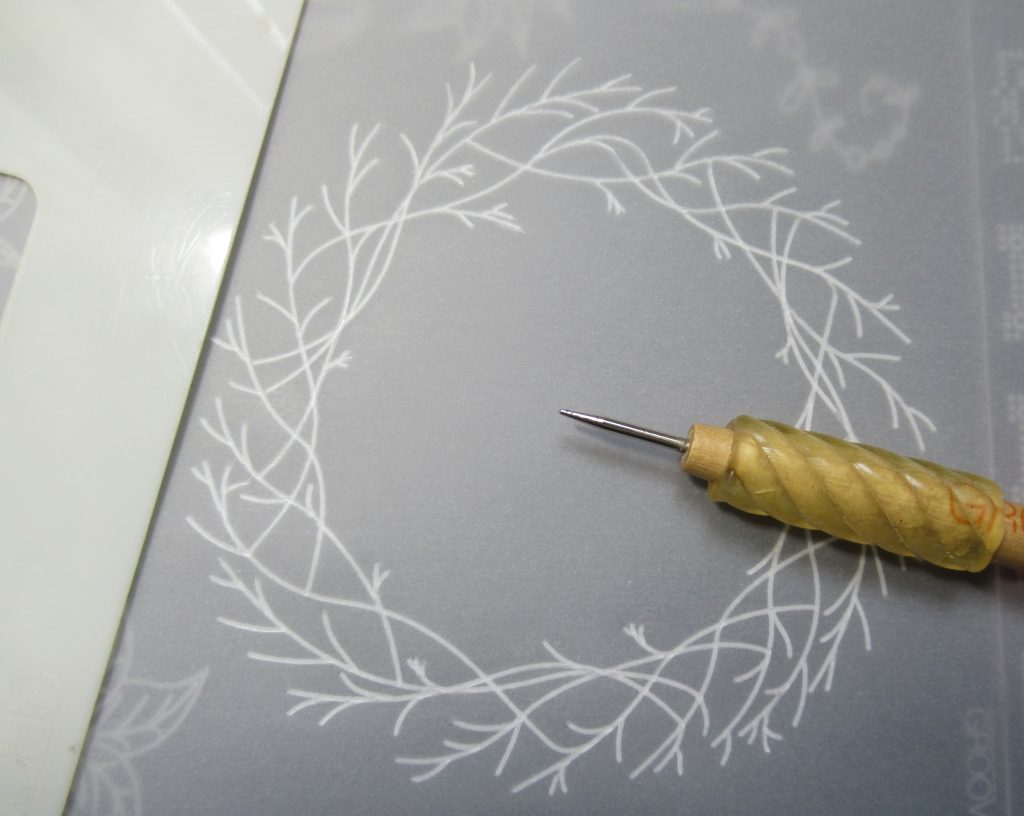
Linda’s Twiggy Wreath (GRO-LW-40433-15)
1 & 2 Tool and 3 & 4 Tool (GRO-AC-40026-XX & GRO-AC-40027-XX)
A4 Plate Mate for Grids (GRO-MA-41768-21)
Method
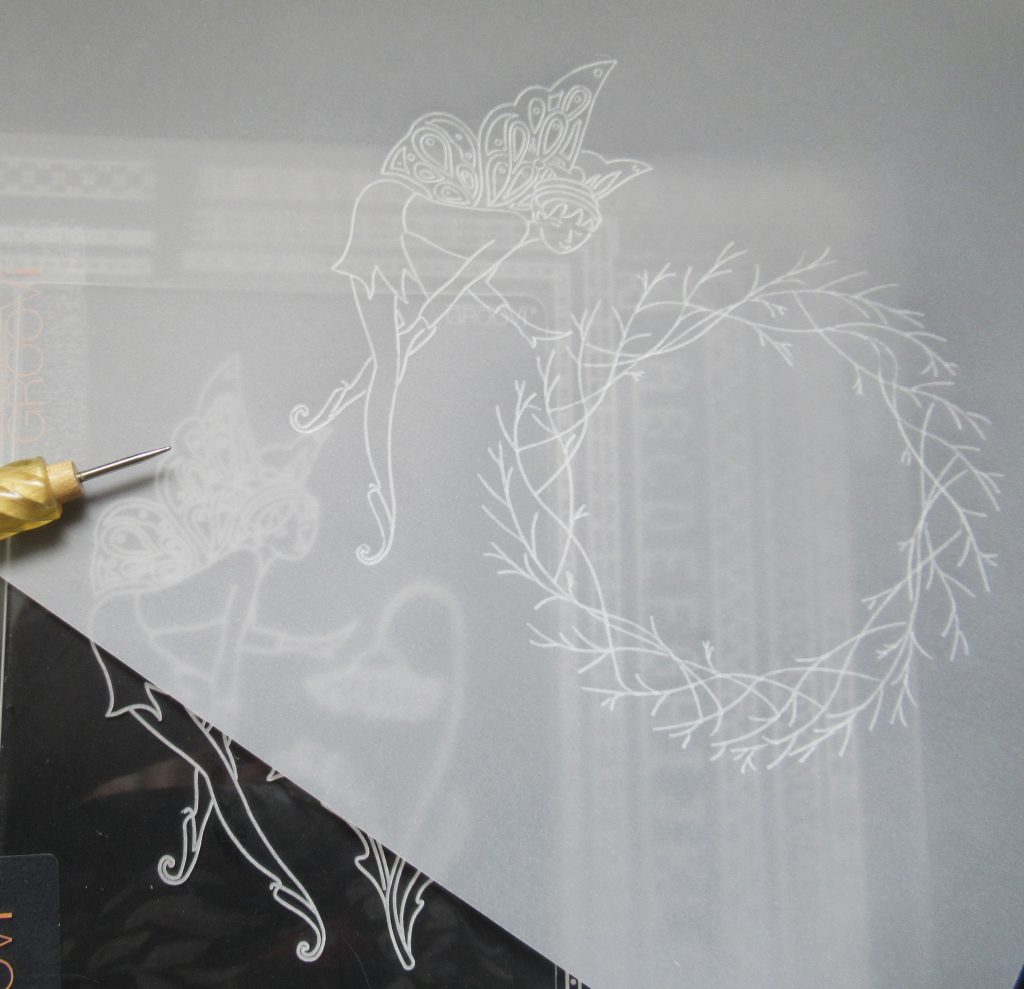
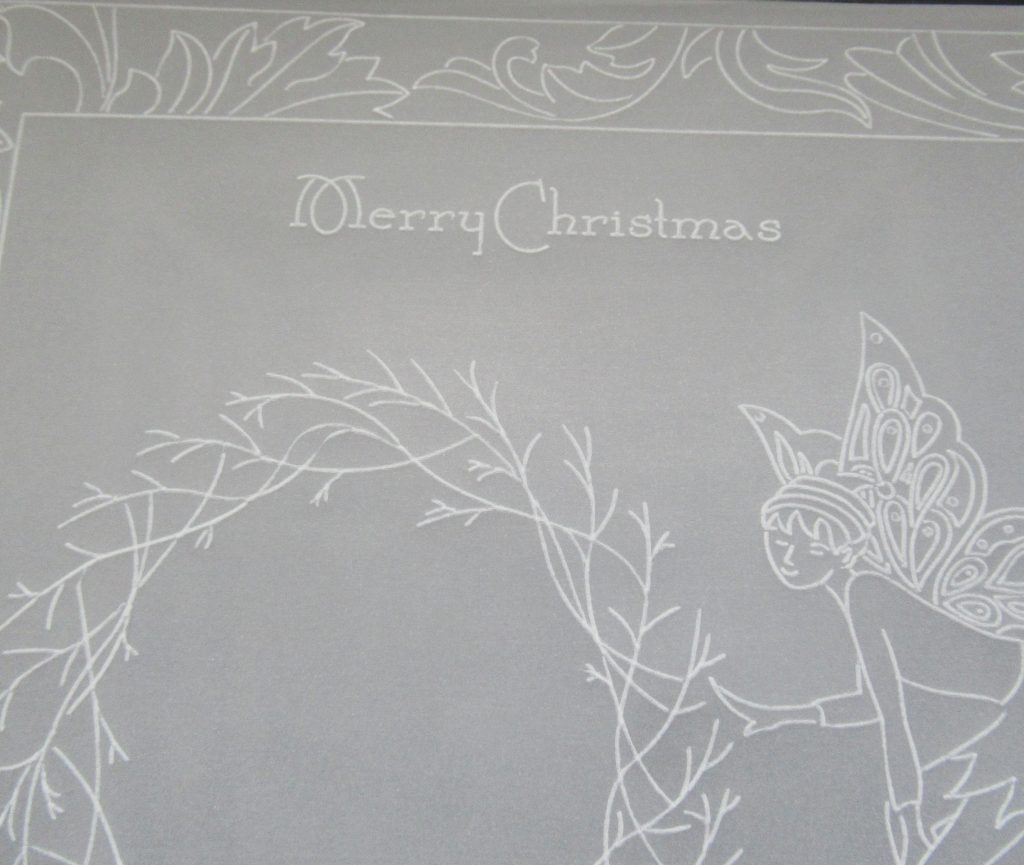
Step 1. Lay the parchment over the Twiggy Wreath plate so that the wreath is to the left of the parchment. Place the fairy plate near the wreath so that her hand is near the branches. This helps to make sure that your frame is going to fit around the picture. Use the Nested extension plate to have a little measure if you are unsure.
Step 2. The first time I made this card, I did use the Naked branch plate, embossing one branch at a time and turning the parchment clockwise, and embossing another branch over the top. For people who have not been on their Groovi journey all that long, Linda’s Twiggy Wreath makes the job much easier.
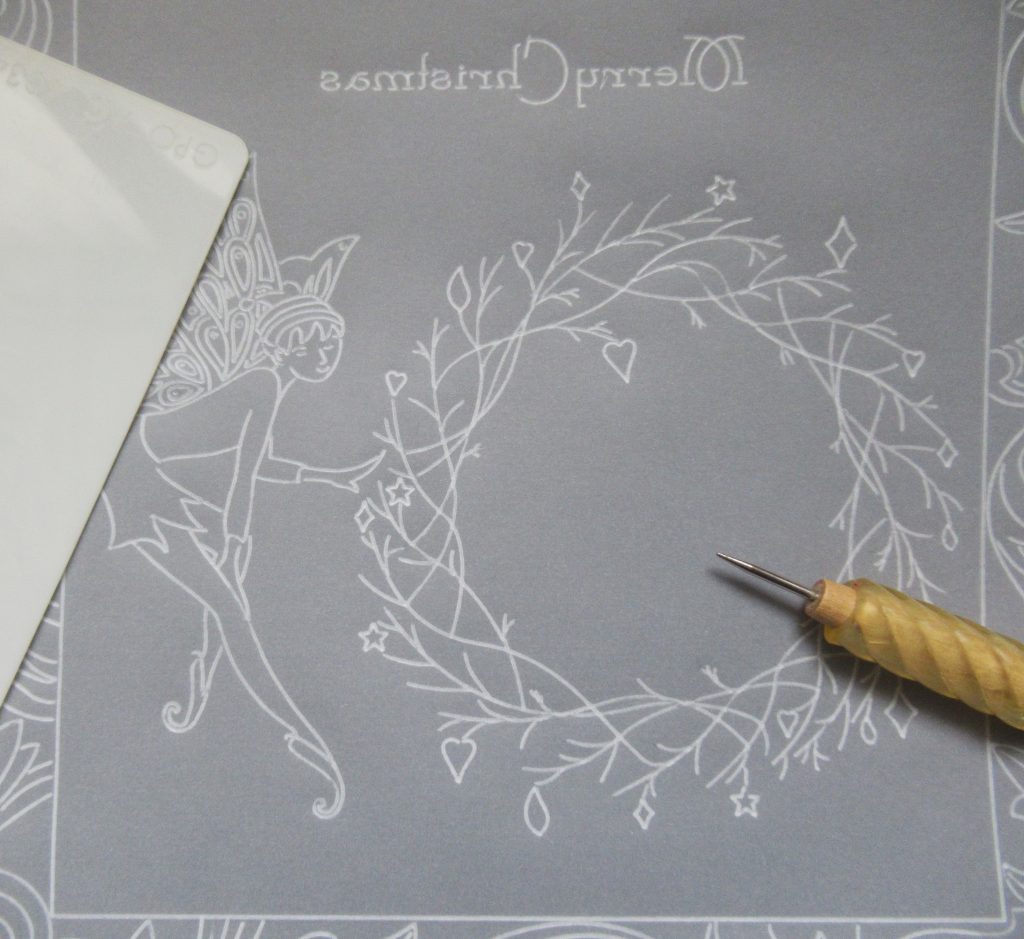
Step 3. Swap the A4 square plate mate out for the A5 square one. Use the spacer that comes with the Filigree Swirls to fill the aperture. Place the Fairy so that her hand is just over a branch (having placed an ornament).
Step 4. You are going to need the A4 square plate mate again, to put in the frame using the extended nested squares. Emboss the 1st and 5th line in from the edge of the plate. Go back to the A5 square plate mate and spacer, and use a selection of the Filigree Swirls to fill in the frame, twisting and turning the project to emboss them in at varying angles. No need to try and fit the whole images in, as partial art will look lovely. Just make sure you make little joins from one to another if you wish to picot cut out all the little spaces in between.
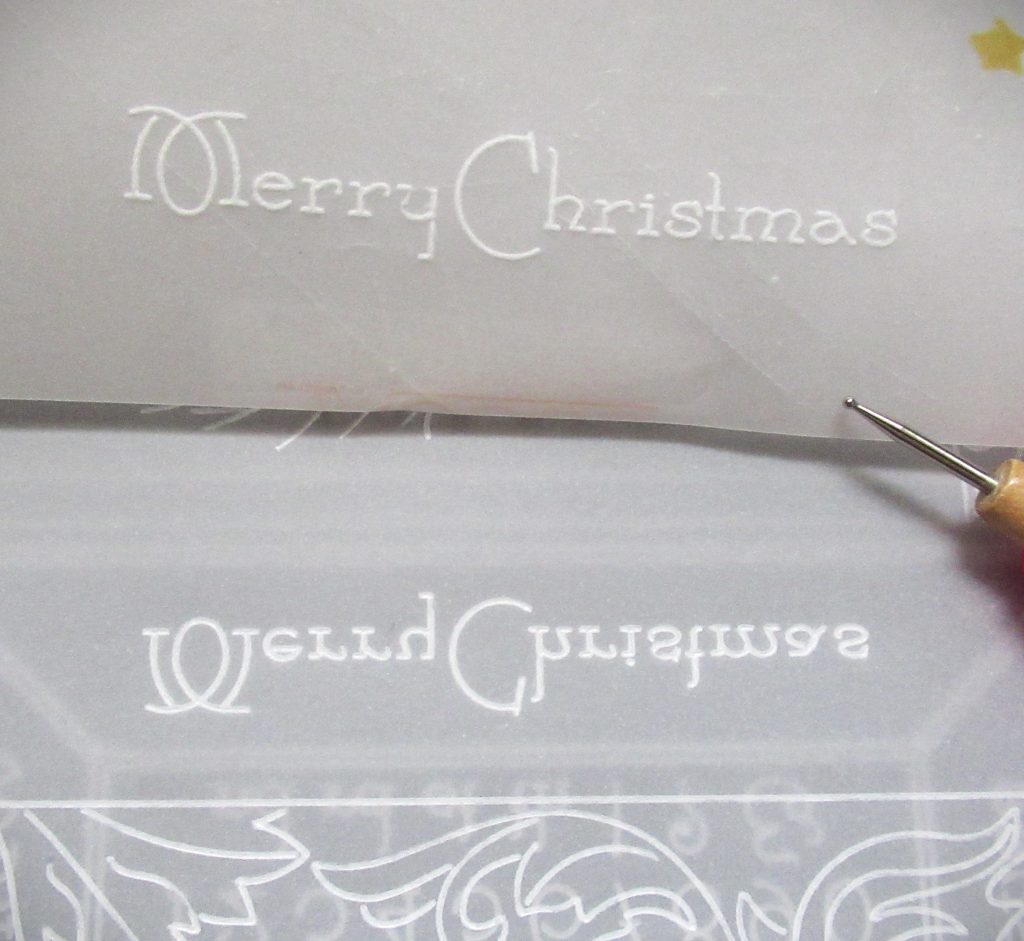
Step 5. Add the sentiment to the top of the picture. I have added ‘Merry Christmas’ from the Nested squares extension and Frame plate. If you choose to do that, make sure to get the sentiment the right way up as you need to turn your work upside down to do that. If you are unsure, make a template first on a piece of scrap parchment.
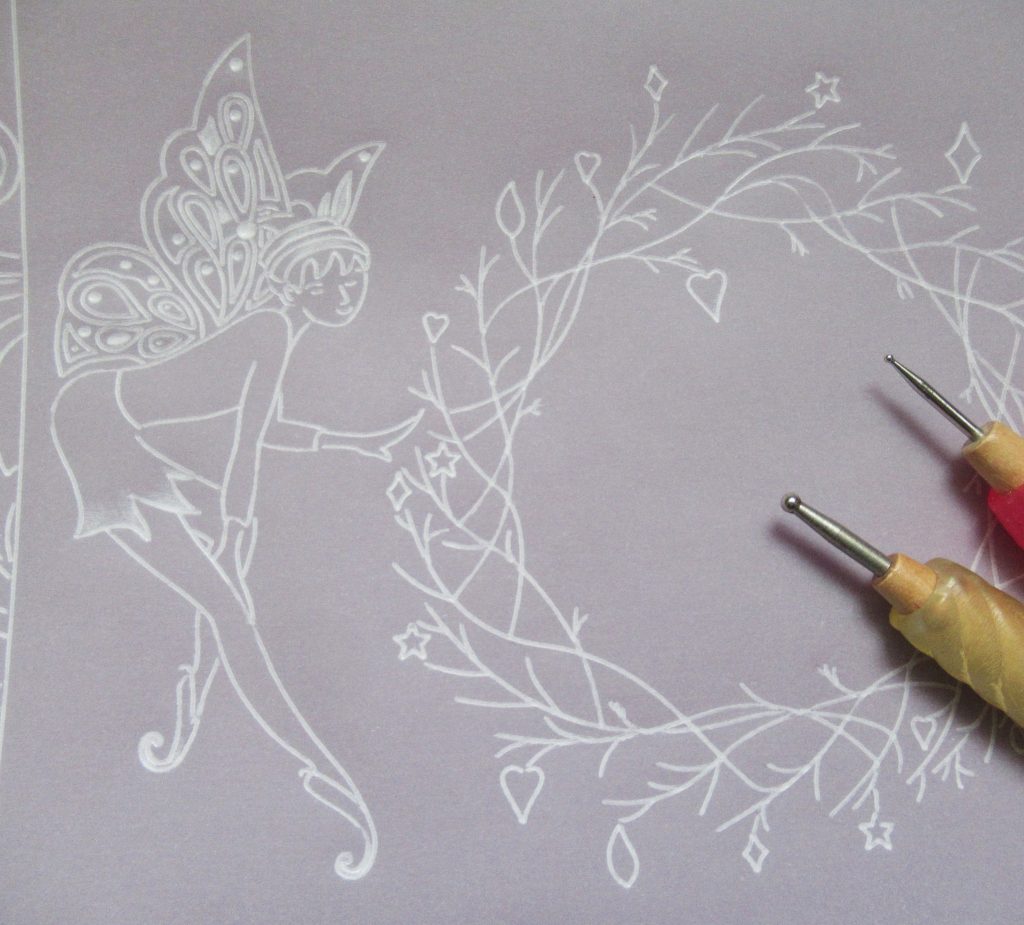
Step 6. Take some icons from the Naked Branch plate and add them to the ends of the twigs on the wreath – just here and there, because you can add gems and sequins too as you wish.
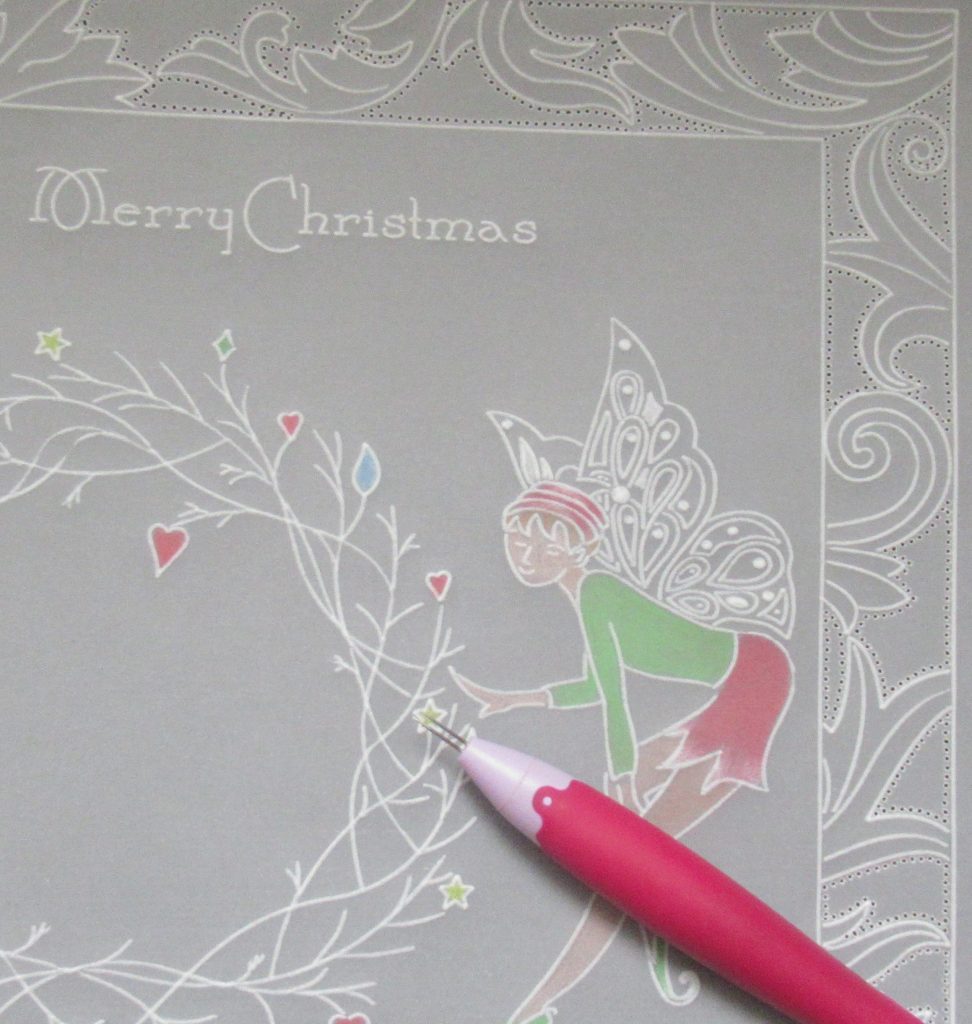
Step 7. Use the number 2 and 4 tools to emboss the dots and little elements into the Fairy wings and the edge of the skirt.
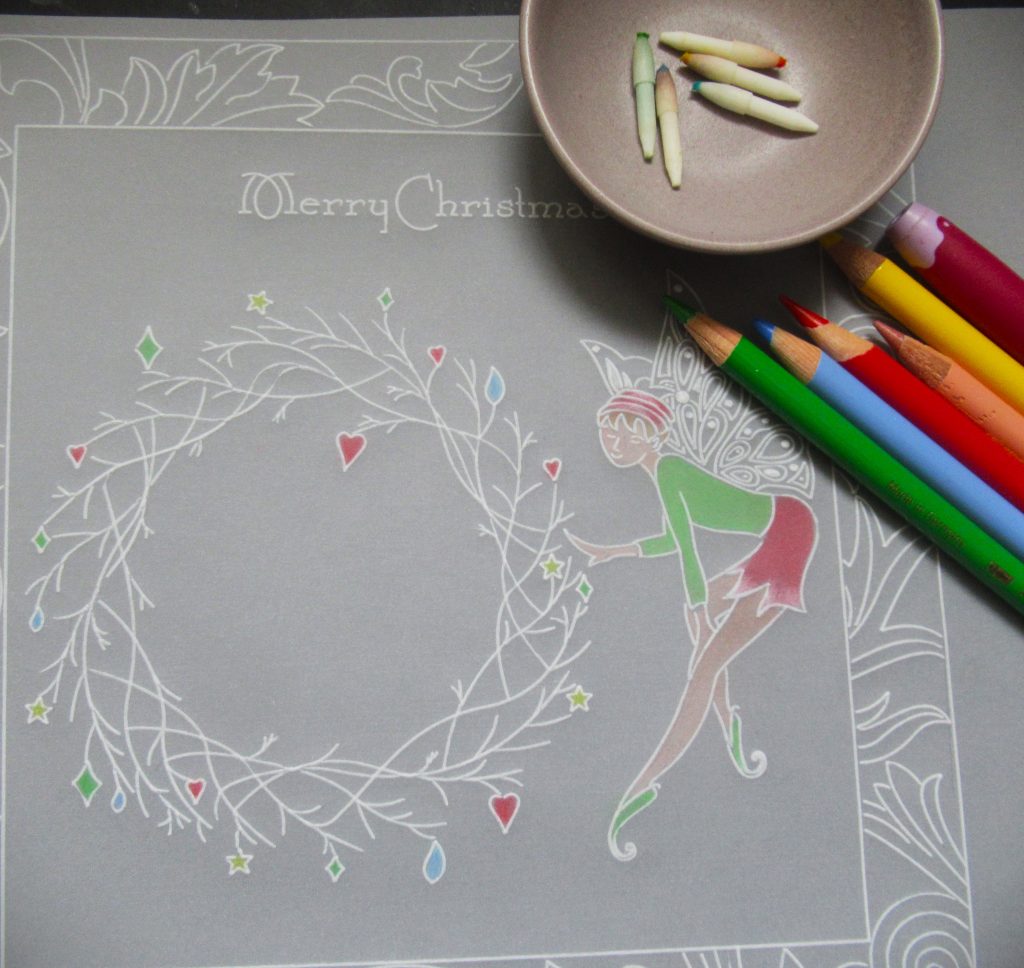
Step 8. Use blending pencils, Dorso oil, and Pergamano blending nibs to colour the skin, jumper, skirt, hat, hair, and slippers of the fairy. Colour in the icons on the wreath. I used Polychromos pencils, but you can use the Pergaliners too.
Step 9. Go around the frame, perforating all the pieces between the swirls with a fine two-needle tool. Make sure you turn around the work as you go.
Step 10. Snip out all of those bits, again, making sure you turn the work as you go. Keep your eye on which direction you have the points of the scissors or snips. You need the waste to fall out, so keep the body of the scissors over the waste, pointing towards the line art. Your choice now is to go around the outside edge with the 2-needle tool and picot cut the piece out, or use a craft knife and ruler, or even fancy edging scissors.
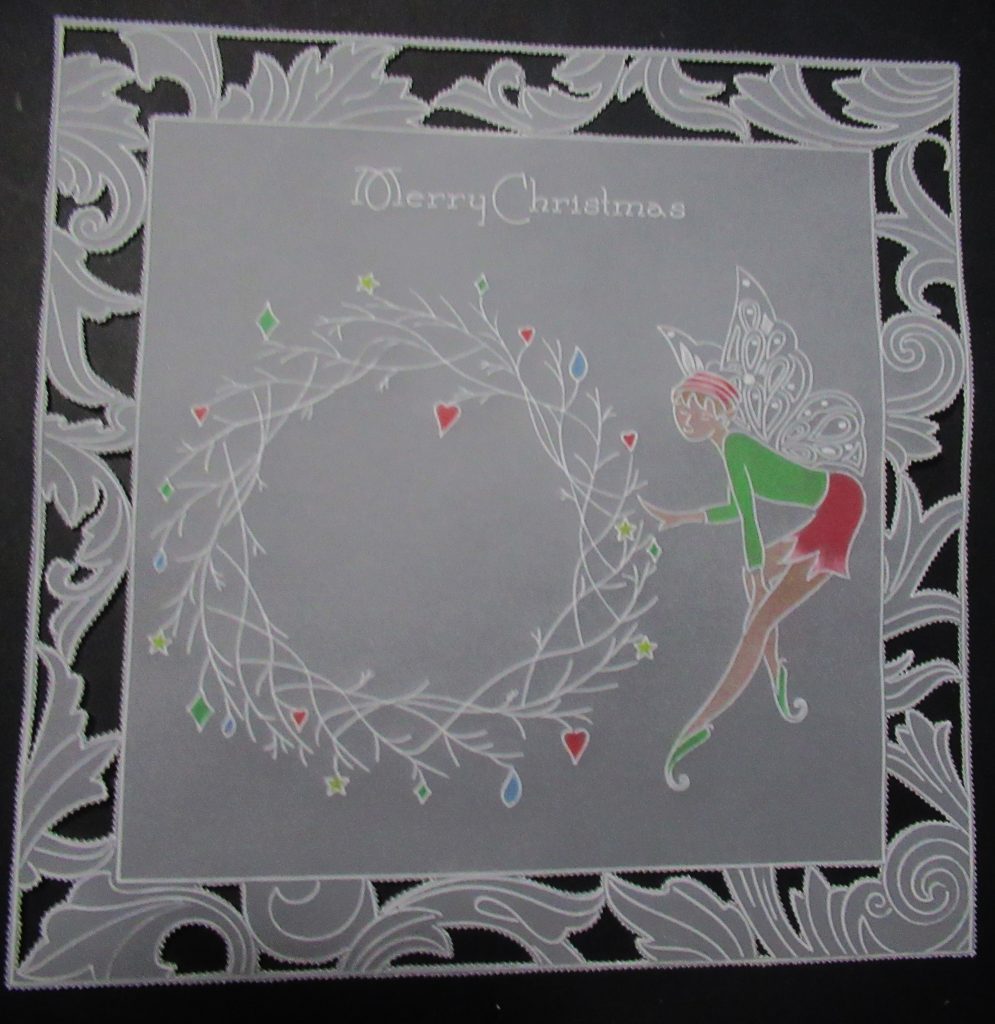
Step 11. This is an 8 x 8-inch project before we mat and layer it onto a background and foundation card, so there are choices. You can make this into wall art that can come out every Christmas, or you can cut a larger card blank from a pieces of A3 card stock.
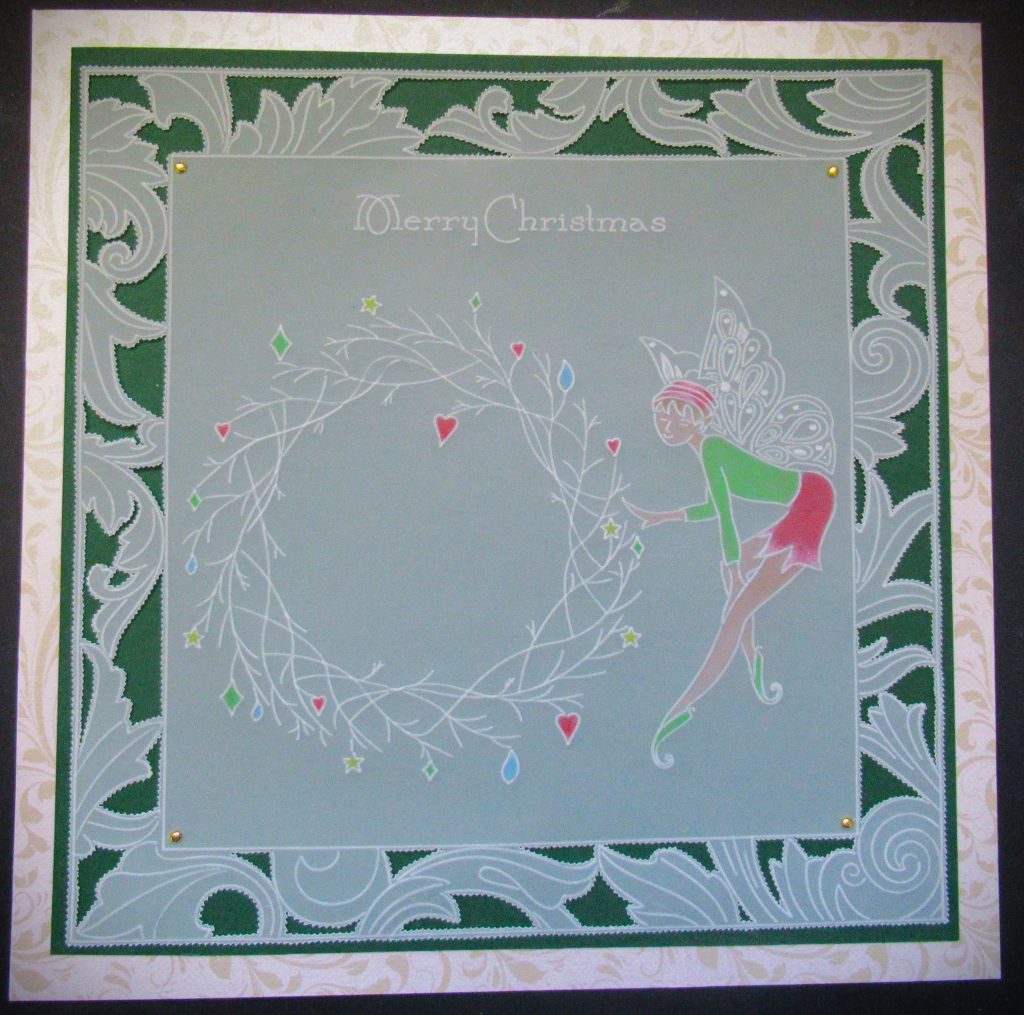
Step 12. Add some gems and sequins to the finished piece.
That is so whimsical! Lovely lovely. Thank you, Glynis, for sharing your tips and tricks with us. I can’t stop staring at that border…
Everything that Glynis has used can be found over on the Clarity website HERE
Also, if you missed it. The next instalment from Linda Williams’ Layering Collection is now available on the Clarity website HERE
Looking at the week ahead
Monday 31st July :
In the SHAC with Barbara – 10am Live on Facebook and YouTube
Tuesday 1st August:
Groovi Tuesday with Paul – 10am Live on Facebook and YouTube
Sunday 6th August:
Clarity Classics with Barbara on Create & Craft – 2 hour show – 3pm to 5pm
Travel gently, friends.
Lotsa love, Grace & Glynis xoxo
Clarity – The Home of Art, Craft, and Well-Being.
Hi Grace and Glynis, Thanks for such a pretty demo, love the swirls border – that will be good for so many projects. Love the wreath, got it and never used it, and how you’ve added the sequins and gems, seeing it like this alone would make a very quick and pretty Christmas card I think. thanks for the inspiration ! X
Such a beautiful design. Could I ask how you attached the sequins ?
Hi Val. I put a bit of Perga Glue onto a piece of cello bag, then pick a little up on a cocktail stick, pop that onto the parchment where you want the sequin or gem and then put them onto the dot of glue.
Hi Grace & Glynis, will try again as I had almost finished typing & the cursor went over the cross on the tab & closed the page down !!
A really pretty project using some of the older plates that I tend to forget about. The frame could be used with any centre piece so could be done in advance ready for a centre to be added when a quick card is needed.
Have a good week everyone xx
Hi Glynis, another lovely card and easy to follow instructions. A colourful and cheerful christmas card. Thank you Glynis and also Grace for putting the blog together.
Just like to say I’m a newbie and this is so pretty looks relatively simple to do as long as I take my time, I guess, haven’t got all the plates though but it has given me alot of inspiration using some plates I do have, but I shall use these techniques. TY for your blog x and expertise x
Lovely design and great step by step, thank you Grace and Glynis. x
Thank you for all the kind comments xx