Clarity Matters Blog Tutorial: How To Colour A Fluffy Bird
Hello hello! Grace here.
I hope this finds you well, safe and enjoying a calm Sunday morning.
We are joined this weekend by the absolutely lovely and insanely talented, Glynis Whitehead, a cherished member of our Clarity Design Team. I’ll hand you over to our teacher…

How To Colour A Fluffy Bird
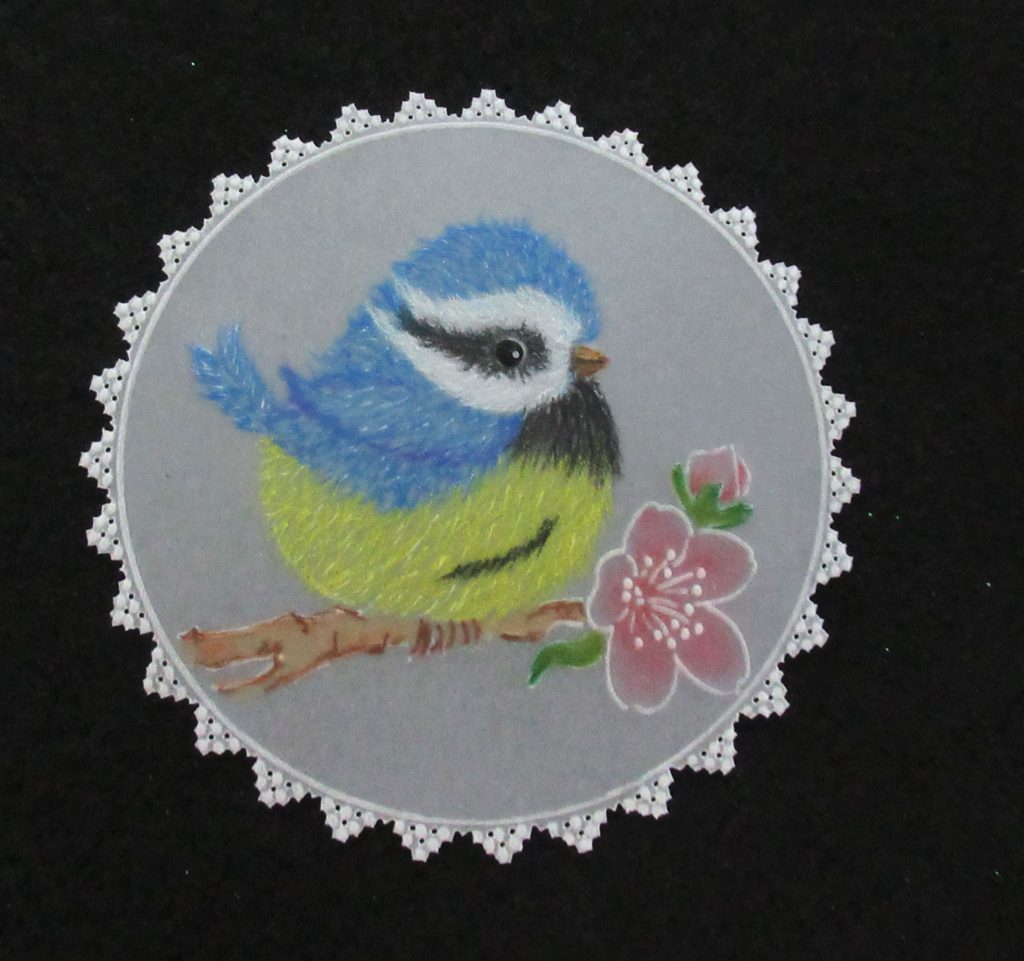
People have requested that we show you how to colour a fluffy bird, so here goes!
Ingredients
Nested Circles A5 Sq Groovi Plate (GRO-PA-40051-03)
Linda’s 123 Blue Tits A4 Sq Groovi Plate (GRO-BI-41238-15)
Josie Davidson’s Trust Circular Lace Duet A5 Sq Groovi Grid (GRO-GG-42055-12)
Nested Circles Picot Cut Die Set Clarity Fresh Cut Dies (ACC-DI-30680-66)
Groovi Embossing Number 1 & 2 Tool (GRO-AC-40026-XX)
1-Needle Bold Perforating Tool (PER-TO-70028-XX)
1-Needle Fine Perforating Tool (PER-TO-70035-XX)
6mm Ball Tool (PER-TO-70016-XX)
1mm Embossing Ball Tool (PER-TO-70012-XX)
Semi-Square Needle Tool (PER-TO-70021-XX)
Perforating Mat (GRO-AC-40307-A4)
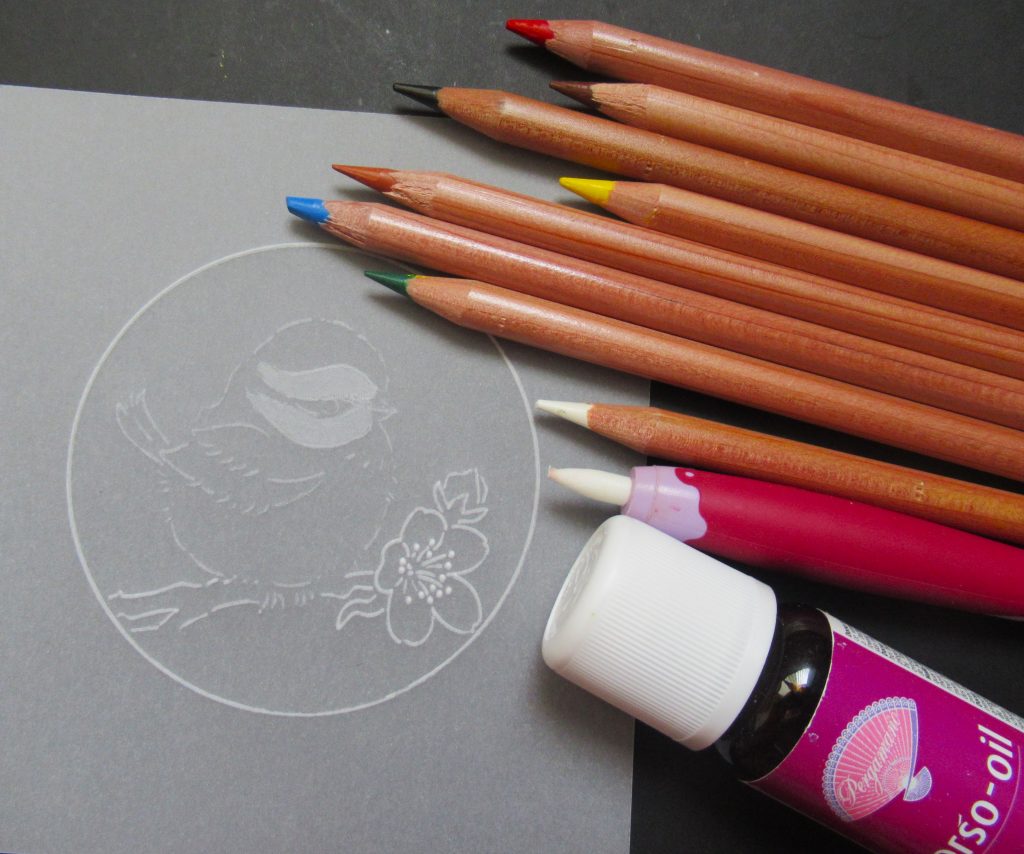
PergaLiner B Pencils (PER-CO-70063-XX)
Plain A4 Parchment (GRO-AC-40024-A4)
Scissors or Snips
Blending Pen & Nibs (PER-AC-70440-XX)
Dorso Oil (PER-CO-70066-XX)
Spot On Sponges (ACC-MG-30537-XX)
(All included in The Pergamano Colouring Essential Kit)
Micron Pen (ACC-PE-30778-XX)
White Posca Pen (POSCAWHITEFINE)
Pergamano Ruler (PER-AC-70278-XX)
Double Sided Tape (ACC-AD-30375-XX)
Brads (PER-AC-70272-XX)
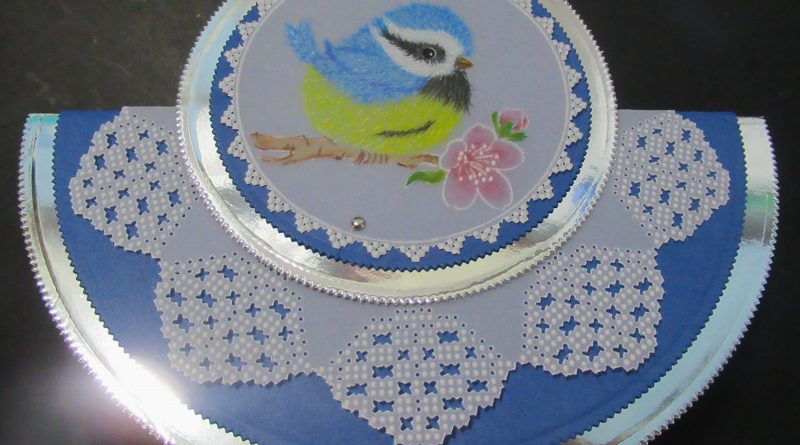
Card of your choosing – I’ve used Blue & Silver.
Method
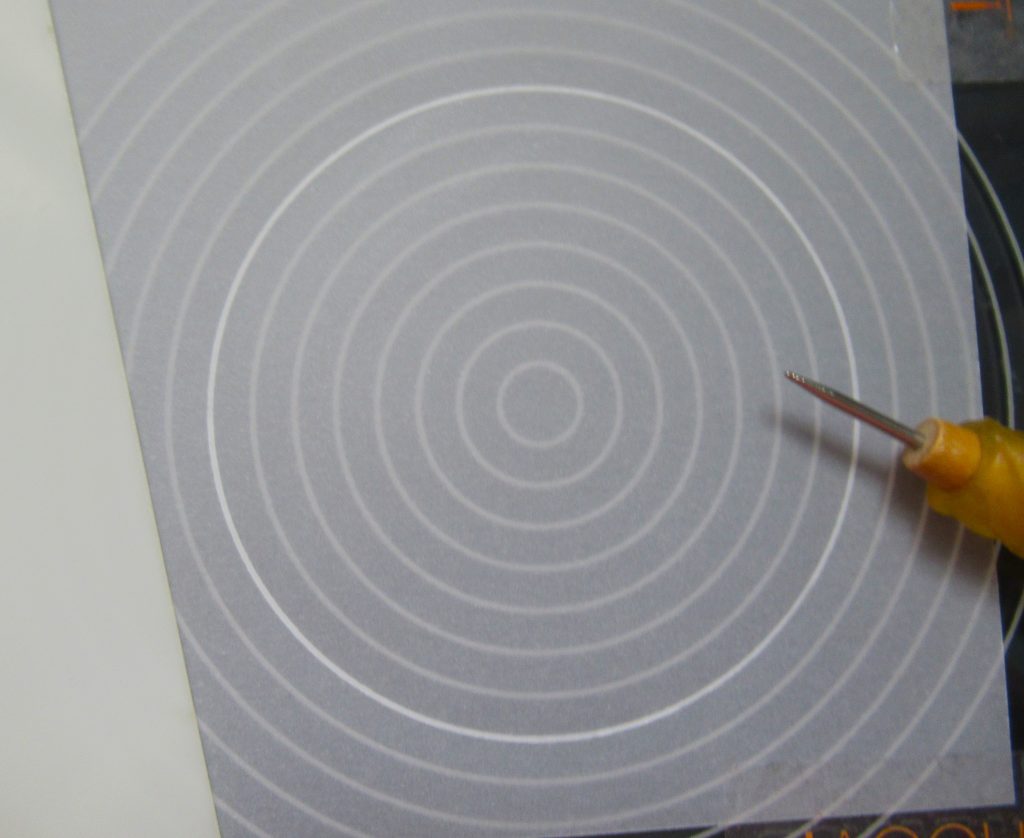
Step 1. Attach the parchment to the nested circle plate. Attach it so that the circle is at the bottom corner of the parchment, but leave enough room to make a fancy edge to the circle. Using the number 1 Groovi tool, emboss the 7th line in from the edge.
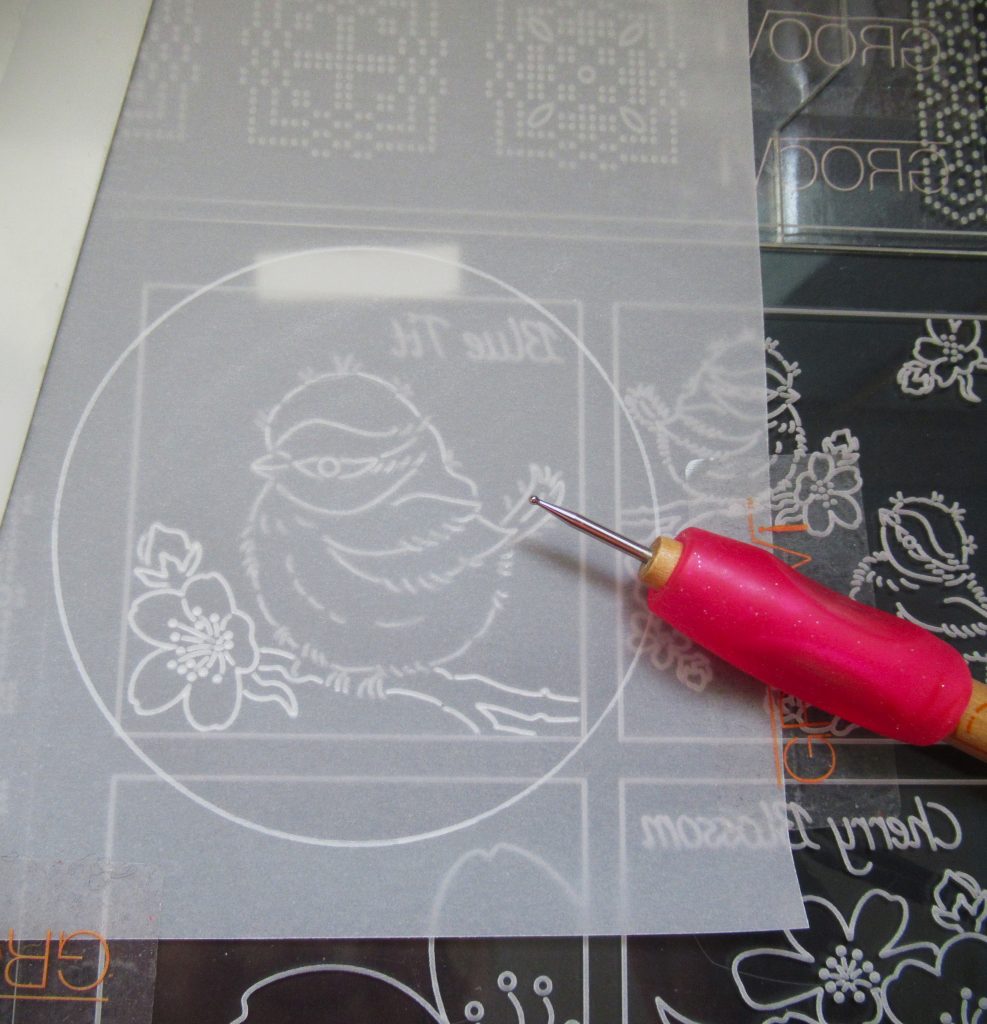
Step 2. Now line up the parchment on the 123 Blue Tits Plates, with the largest bird on the top line, so that the design is in the centre of the circle. Emboss the blue tit lightly, using the number 2 Groovi tool, then flip the tool over to number 1 and emboss the blossom and branch. Be careful as you get near the square frame, to avoid jumping out of the groove and catching the line.
Step 3. Working with the Circular Grid, perforate the holes using a bold single needle tool. Matching up the design segments to complete the circle has been made really easy by Josie Davidson, who designed them. Just plug the parchment into the last lot of holes.
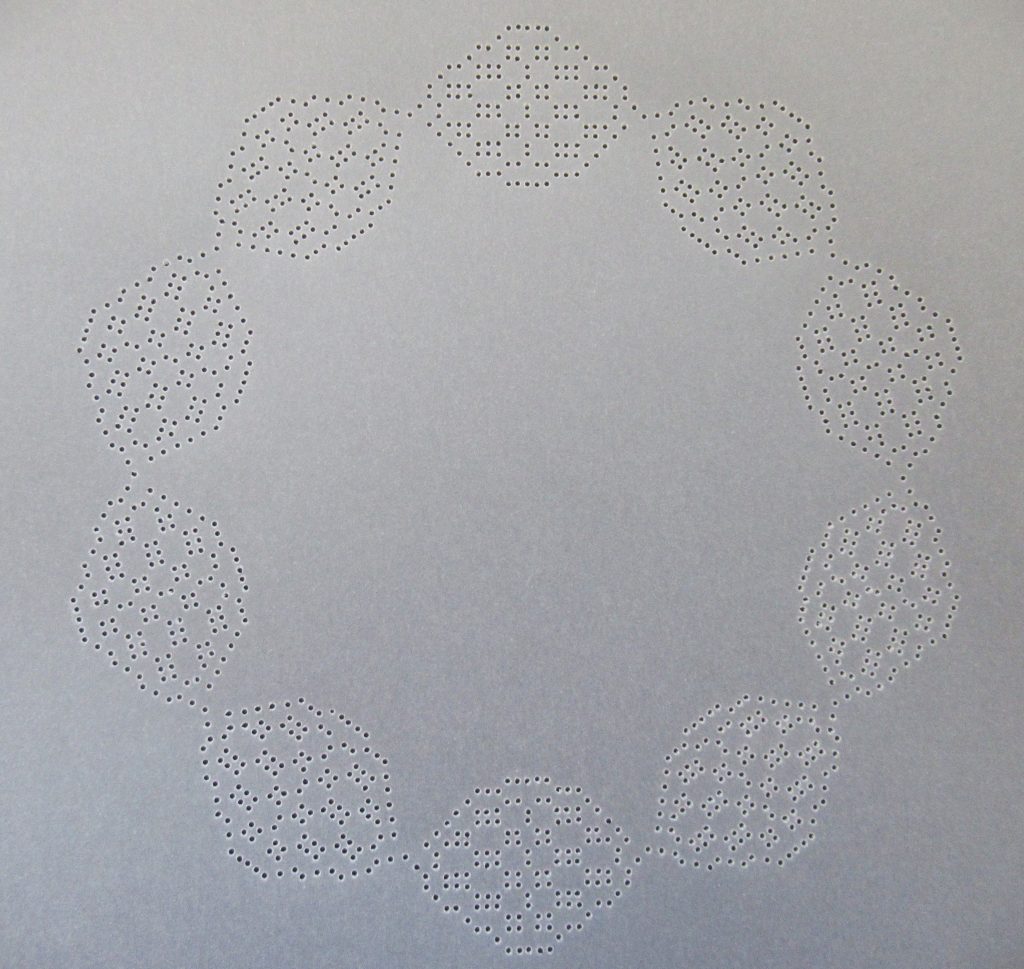
Step 4. Turn the parchment over and use the number 2 Groovi tool to place all the dots into the grid pattern, lining up the dots so that they fit between the holes.

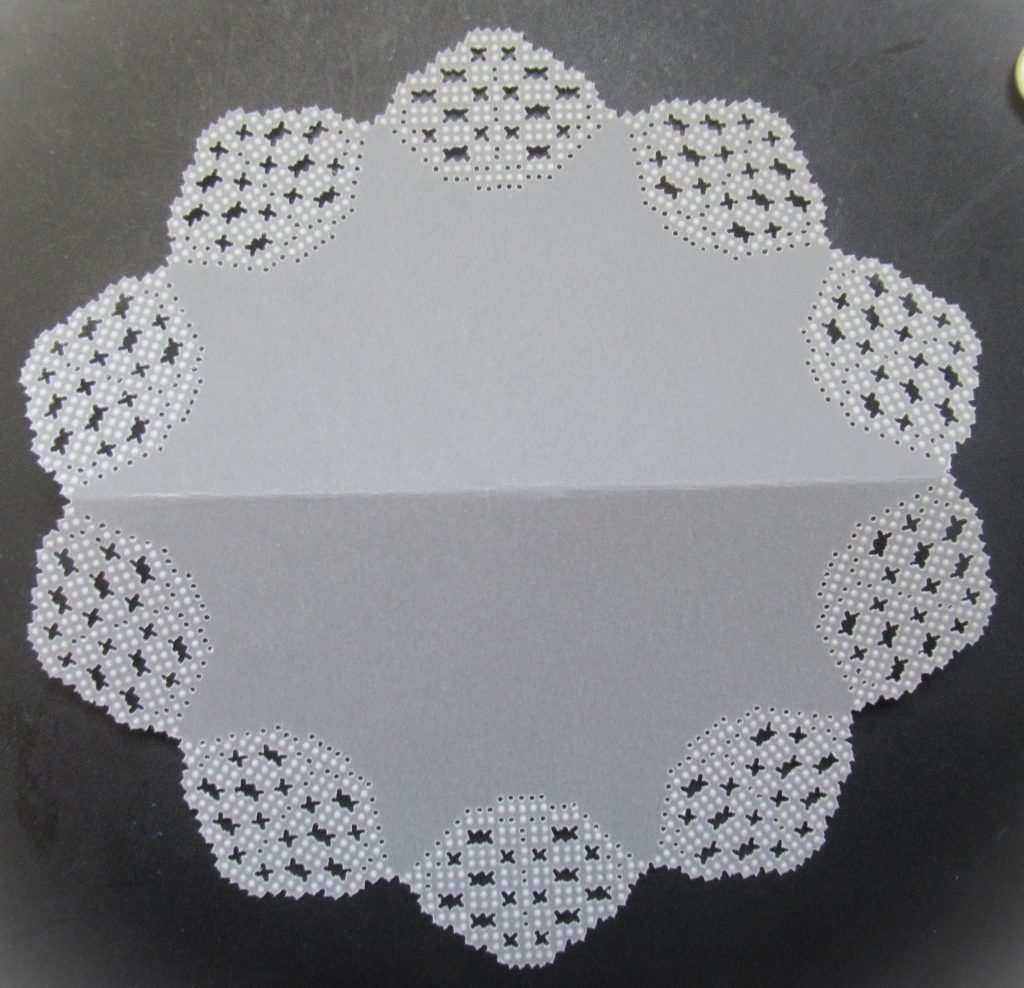
Step 5. Snip out the slots and crosses, then around the outside. Josie has provided full-cutting instructions in the packaging of the plate, so always keep those to help you. Gently, gently fold the piece in half – there should be 5 lace sections on each side.
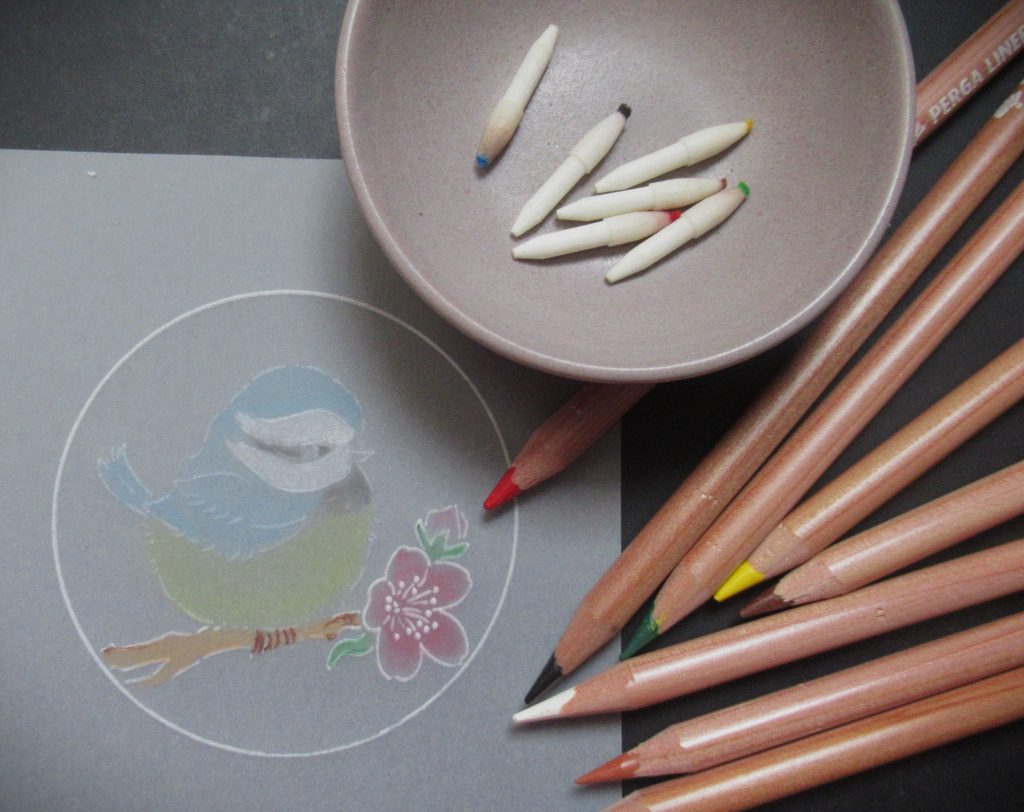
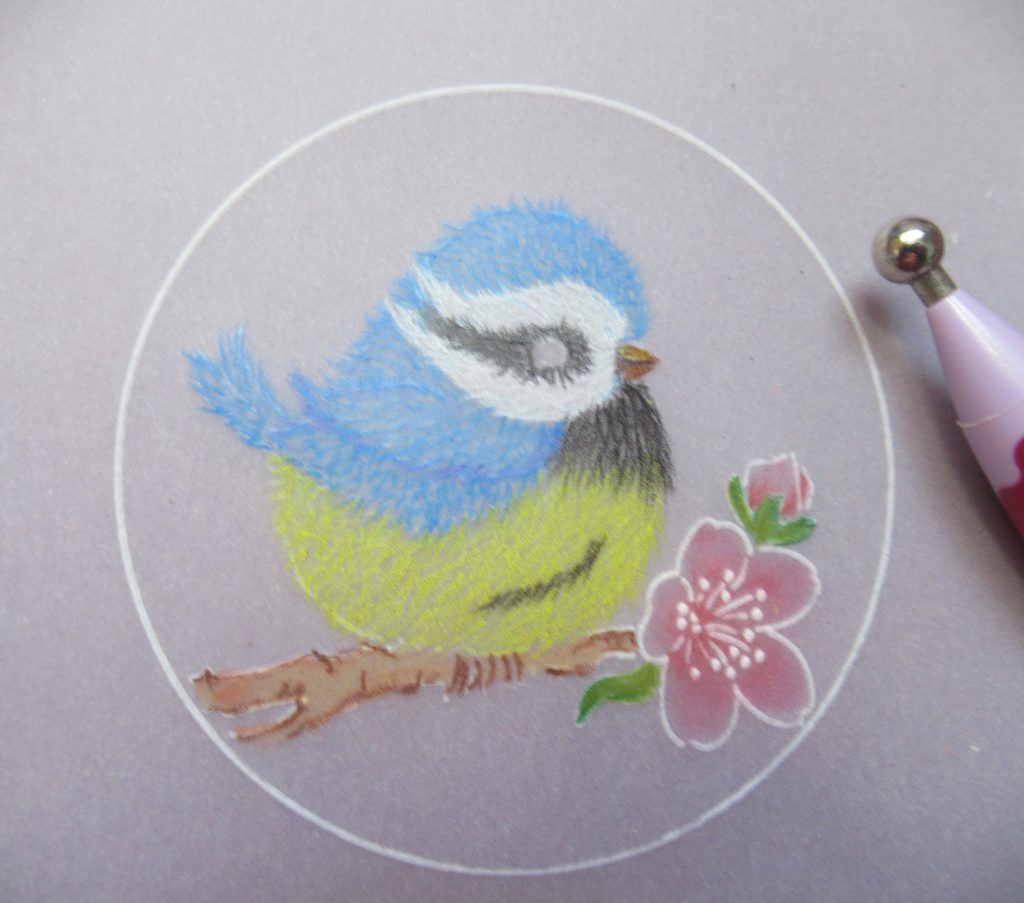
Step 6. Use PergaLiner B pencils – 1, 8, 4, 5, 2, 12, 3, 6, 15 and 11. Colouring is done on the front for this one. Use a blending nib and a tiny dot of Dorso oil put onto a Spot On sponge. Always apply white first and colour around the outside of the eye. Then blend it out.
Step 7. Keeping an eye on the finished picture, colour the yellow parts and blend out the colour – this needs to be quite faint so use a tissue to take some colour off if it is too bright. Do all the blue, then black, being very careful with it as it is rather strong. B12 on the branch and B3 for the claws. B6 for the leaves and calyx. The B11 is for use on the back of the flower in the centre to give it depth.
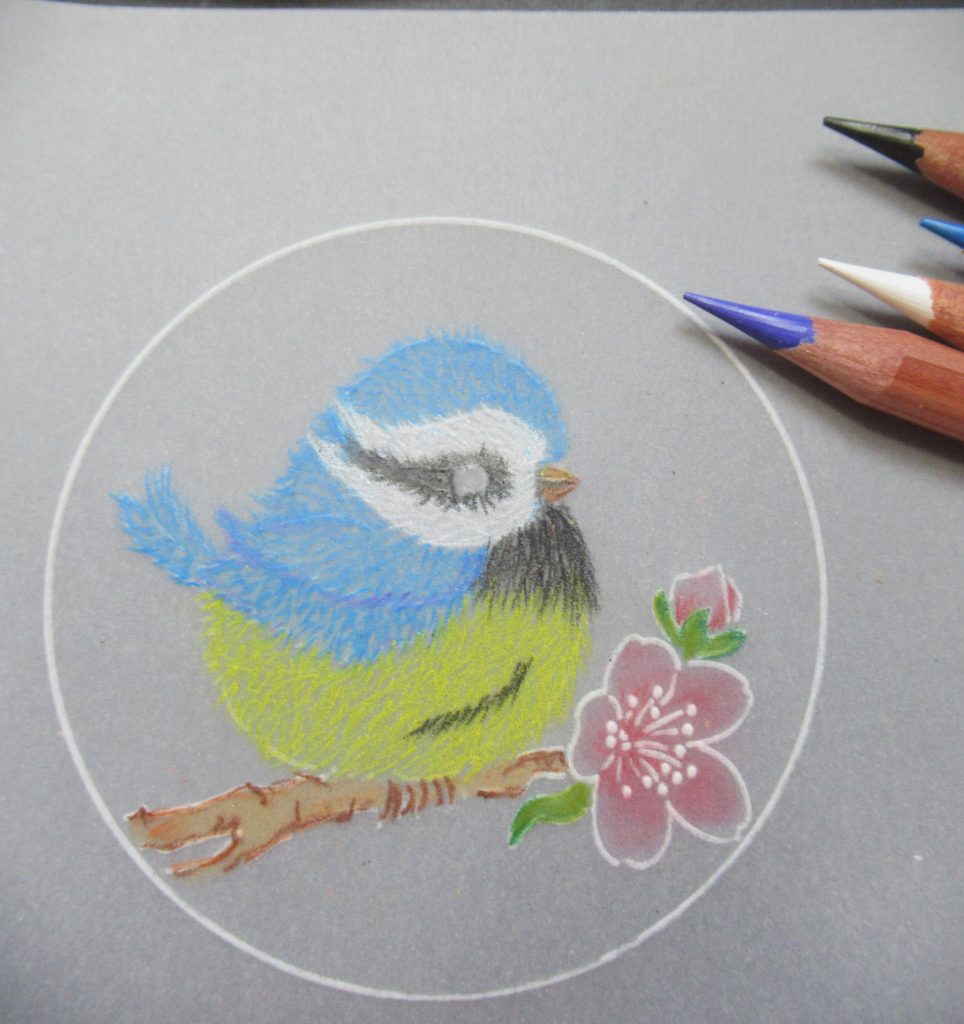
Step 8. Sharpen your pencils as they have to be pinpoint sharp for the next stage. With tiny feathery strokes (with a dry pencil) and again, keeping an eye on the finished picture, use all the same colours to make a ‘fluffy’ look. Check the plate to see which direction to make your strokes, so that you are following the line of the feathers. The B5 violet is to outline under the wings to separate them out from the body.
Start at the outlines of the sections first and work your way in. Use some darker brown on the branch and use lighter and darker greens for the leaves.
Step 9. Turn your work over now and work on the back of the parchment. Use the 6mm ball tool to lightly emboss some shape and depth to the body of the bird. Keep checking your work on the front so you do not overdo it.
Step 10. Continue working on the back and use a 1 needle tool to add some feathering strokes. Be very gentle with this and hold the tool horizontally (rather than upright) to avoid puncturing the parchment. Go in the direction of the feathers again.
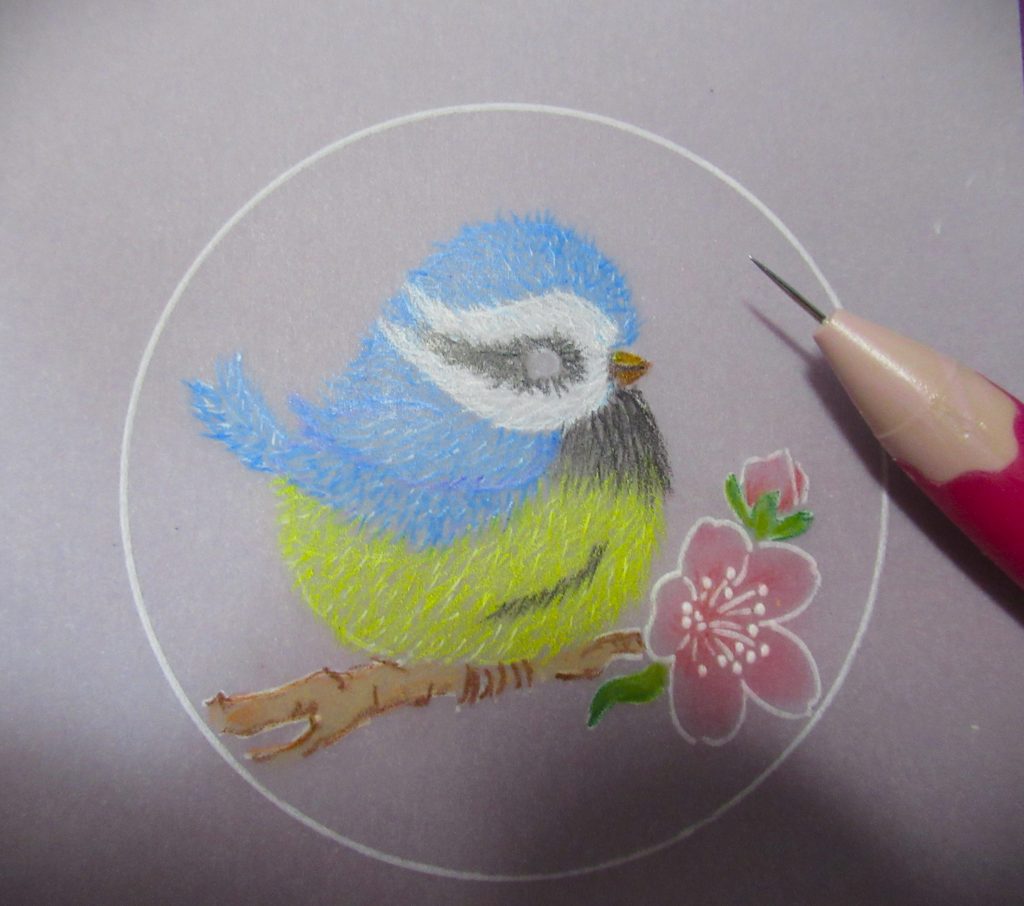
Step 11. Back on the front again, fill in the eye with a black micron pen. Give it a minute to make sure it is dry and then add a white dot using a Posca pen or white gel pen.
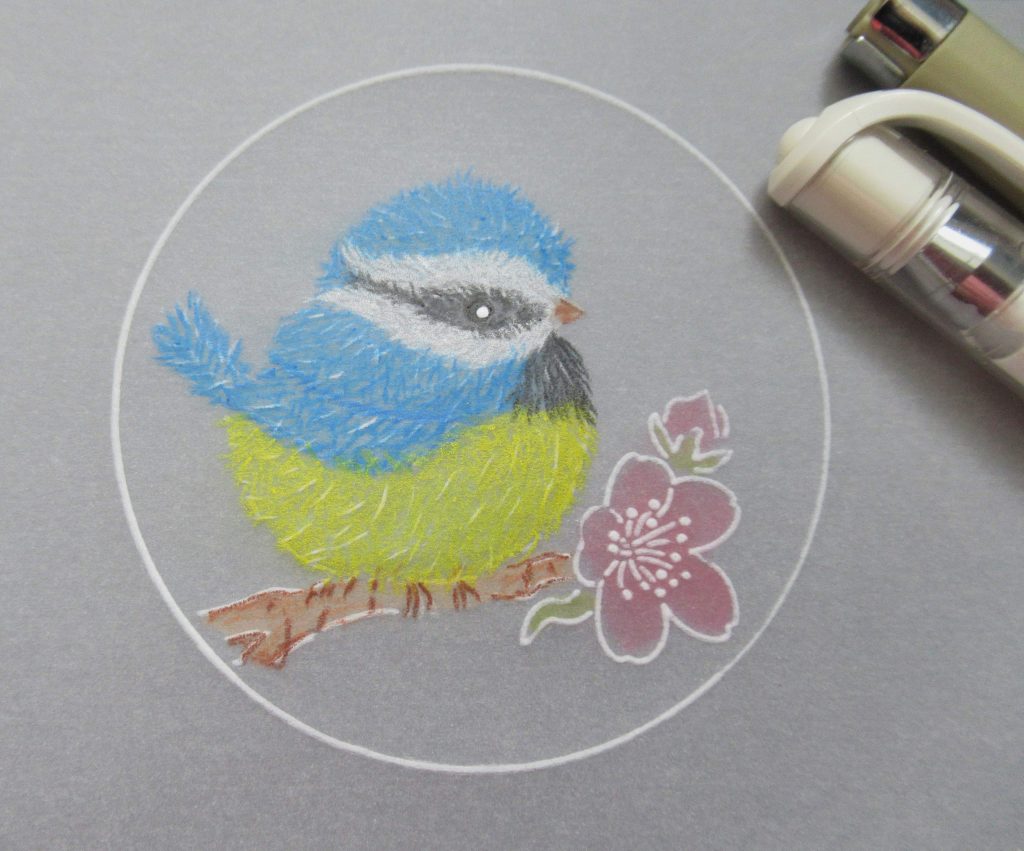
Step 12. Again, working on the front, shallow perforate around the outside with the Semi-Square needle tool.
Step 13. With a 1mm embossing ball tool, emboss a little dot in between all the perforations within the Semi-Squares. Then put the work onto a deeper perforating mat and make deep perforations.
TOP TIP: If you find that you have problems re-locating the needles, use a fine single-needle tool and perforate them one at a time. Then snip out the work.
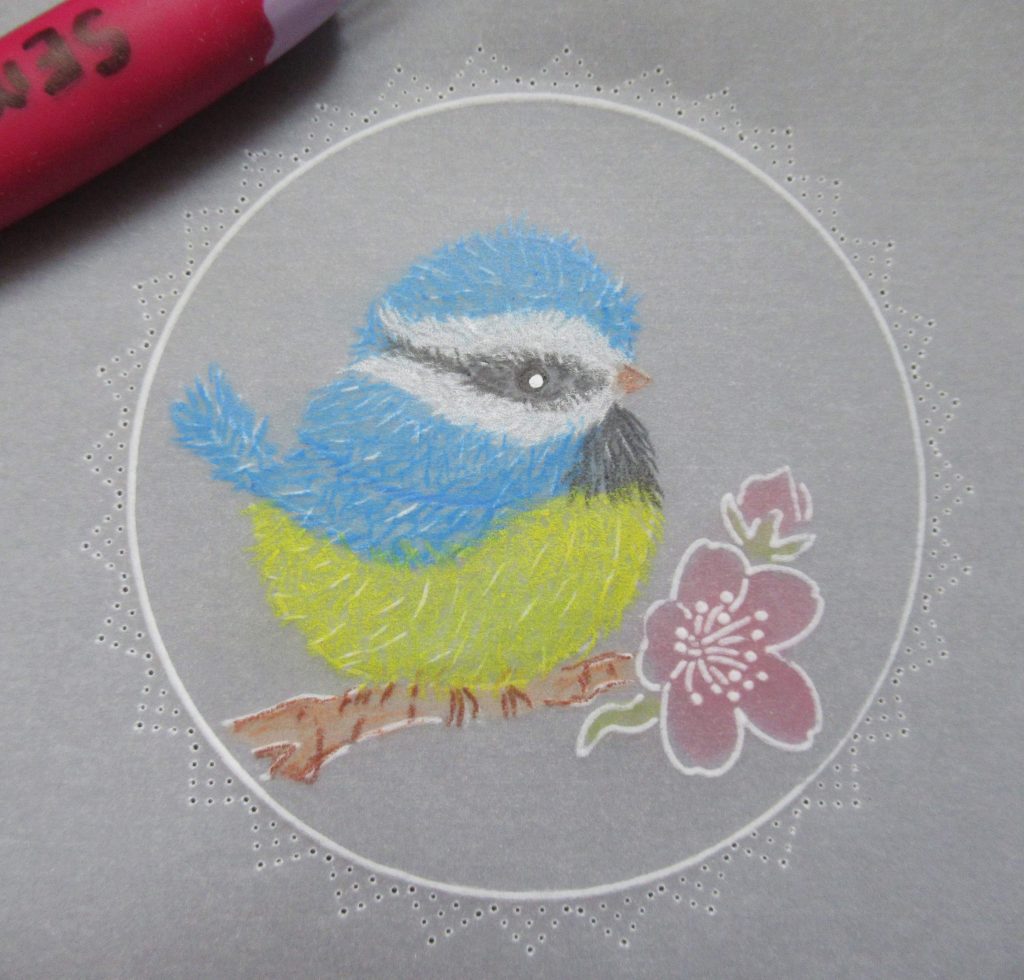
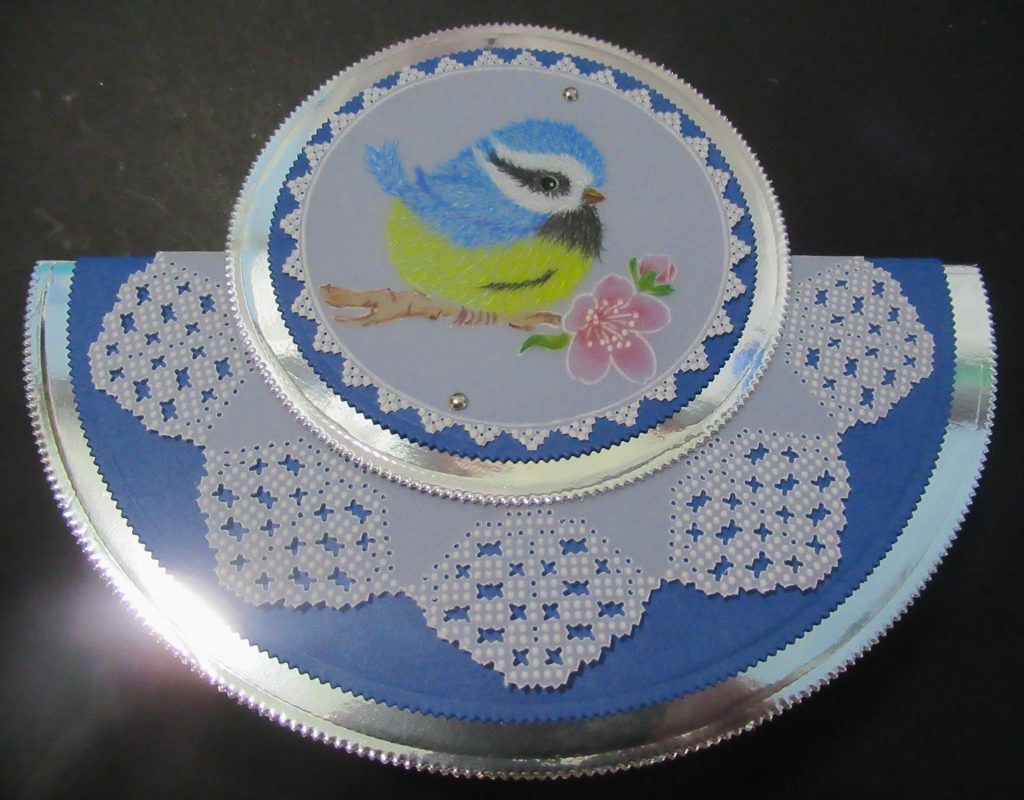
Step 14. Use the Picot Circle dies – to cut mats and layers. Select the largest and 6th one in from the edge for the silver card (or a contrast layer). Select the 2nd one in from the edge and 7th for the blue card (or your chosen colour background card). Fold only the larger ones in half and burnish the fold with a bone folder or the edge of a ruler.
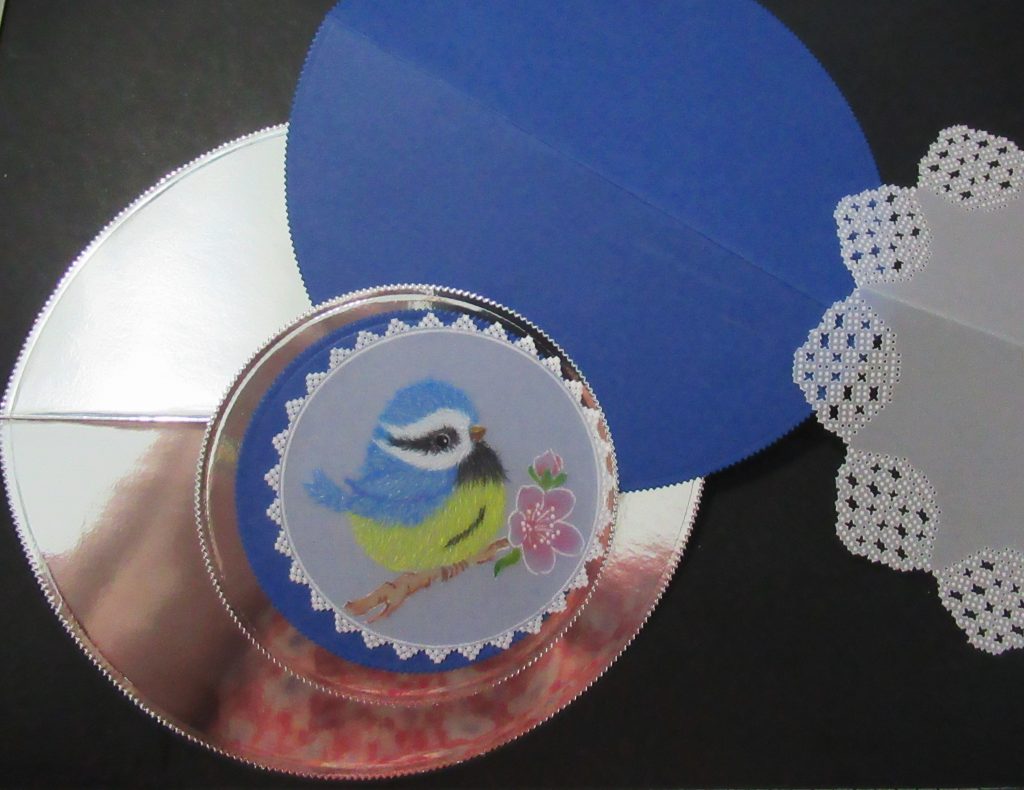
Step 15. Fix the centre piece onto the small blue circle with brads. Layer up the folded circles with the parchment lace circle on top. Fix this with some double-sided tape on the front, where the topper will hide the glue.
Make sure to only put your double-sided tape onto the bottom half of the topper circle and sit it centrally into the lace circle. And you’re all done!
Wow! That is such a cute card, Glynis. Thank you so much for your tricks and tips. Glynis does so much for the Clarity Design Team. We’re so so lucky to know and love her! She’s a crafting machine!
Everything that Glynis has used can be found in a shopping list, over on the Clarity website, HERE.
Another super busy week ahead at Clarity Towers:
Monday 26th June:
In the SHAC with Barbara – 10am Live on Facebook and YouTube
Tuesday 27th June:
Groovi Tuesday with Paul – 10am Live on Facebook and YouTube
Thursday 29th June:
In the SHAC with Clarity with Barbara on Create & Craft – 3pm
Christmas Crafting with Clarity with Paul on Create & Craft – 4pm
In the SHAC with Clarity with Barbara on Create & Craft – 7pm
Christmas Crafting with Clarity with Paul on Create & Craft – 8pm
Friday 30th June:
Christmas Crafting with Clarity with Paul on Create & Craft – 8am
Mixed Media with Clarity with Barbara on Create & Craft – 9am
Mixed Media with Clarity with Barbara on Create & Craft – 1pm
Sunday 2nd July:
Clarity Classics with Clarity with Barbara – 3pm-5pm – 2 hour show
Busy busy busy!
Right, I’m off! I hope it’s lovely wherever you are, and you can enjoy the rest of your weekend.
Travel gently, friends.
Lotsa love, Grace & Glynis xoxo
Clarity – The Home of Art, Craft, and Well-Being.
So pretty. Thank you.
Wonderful blog, Glynis 💙 Thank you for all of your tips and tricks.
OXOX
Thanks Glynis for a great step by step project showing or reminding us how to do the fluffy bird. My first attempt at this was at Leyburn where I was sat opposite Glynis & next to Hilda. We were using a plate designed by Linda Williams who unfortunately couldn’t make it so Barbara had to take the class. There was lots of oohs, ahs & giggles as we tried to replicate Linda’s project but I think overall we managed to produce a reasonable piece which I found the other day still in the folder.
Thank you Grace for collating the blog again today – looks like a very busy Clarity week ahead xx
What a beautiful bird. Thank you Glynis. Hope you are fully recovered now Grace. Take care.
Thank you Glynis fir an absolutely wonderful blog. Enjoy the rest of your day xxxxx
Glynis thank you for the blog, and thanks for your tuition at the show on 10th June at Ditton. My daughter and I loved the show it was our first time, and spent all our money. I bought another pair of the tweezer picot scissors which I prefer using. I will have to buy this blue bird plate now.
Love Janet x
Thank you Glynis for the great tutorial today. Would I be able to use this to teach my students. Its a wonderful step by step. And also thank you Grace for another Sunday blog.
Hi Jenny. Please can you message Glynis directly about this. Thanks. X