Clarity Matters Blog Tutorial: How To Emboss a Frill & Apply Colour to Clear Parchment
Hello hello! Grace here.
I hope this finds you well, safe and enjoying your Sunday morning!
We are joined this weekend by Maggie Byford, an incredibly talented member of the Clarity Design Team. I’ll pass you right over to our teacher!
Frill & Dorsing
HOW TO: Emboss a frill and apply colour to clear parchment using Dorso Crayons
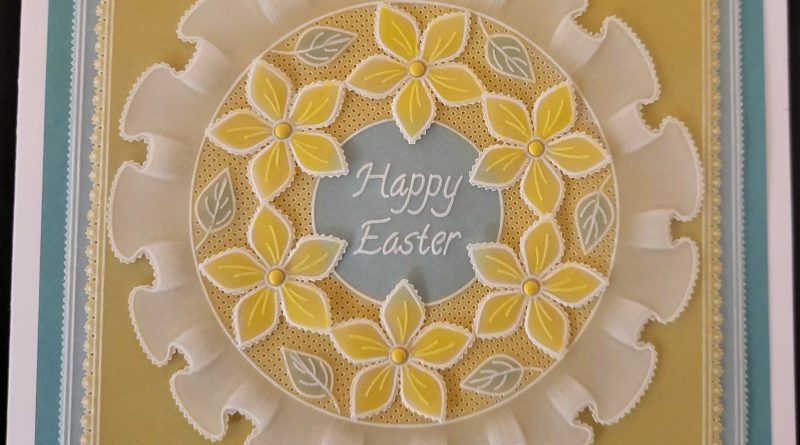
I’m very pleased to show you how I made this Easter Card, as it not only demonstrates to you how I emboss a frill, but it also introduces you to a technique of adding colour to clear parchment in a way that you may not have done before. The technique is called Dorsing, which simply means colouring the parchment with Dorso crayons and blending the colour with Dorso Oil to give a smooth finish. Dorsing can also be used with any oil-based blendable pencils, such as Perga Liner B pencils or Polychromos pencils. For this card, I’ve used Pergamano Dorso Crayons which are easy to use and the soft colours look beautiful on parchment paper.
You may ask why would you need to colour parchment yourself when Clarity has so many beautiful coloured parchment papers to choose from – well, sometimes you may not have the coloured parchment you want for a particular project, in which case… why not colour your own?! In a Part 2 tutorial, I’ll show you how to colour your own rainbow parchment using two or more different colours, and how to Dorse with oil-based pencils.
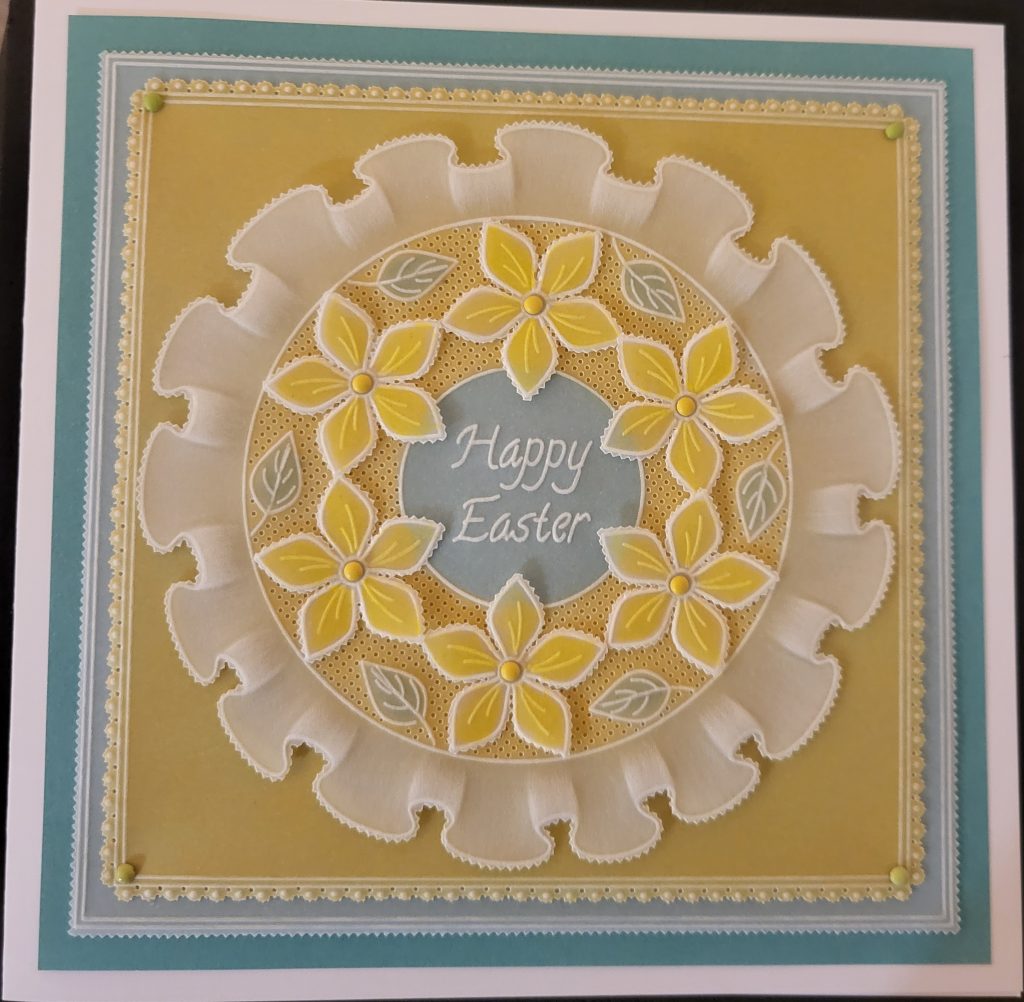
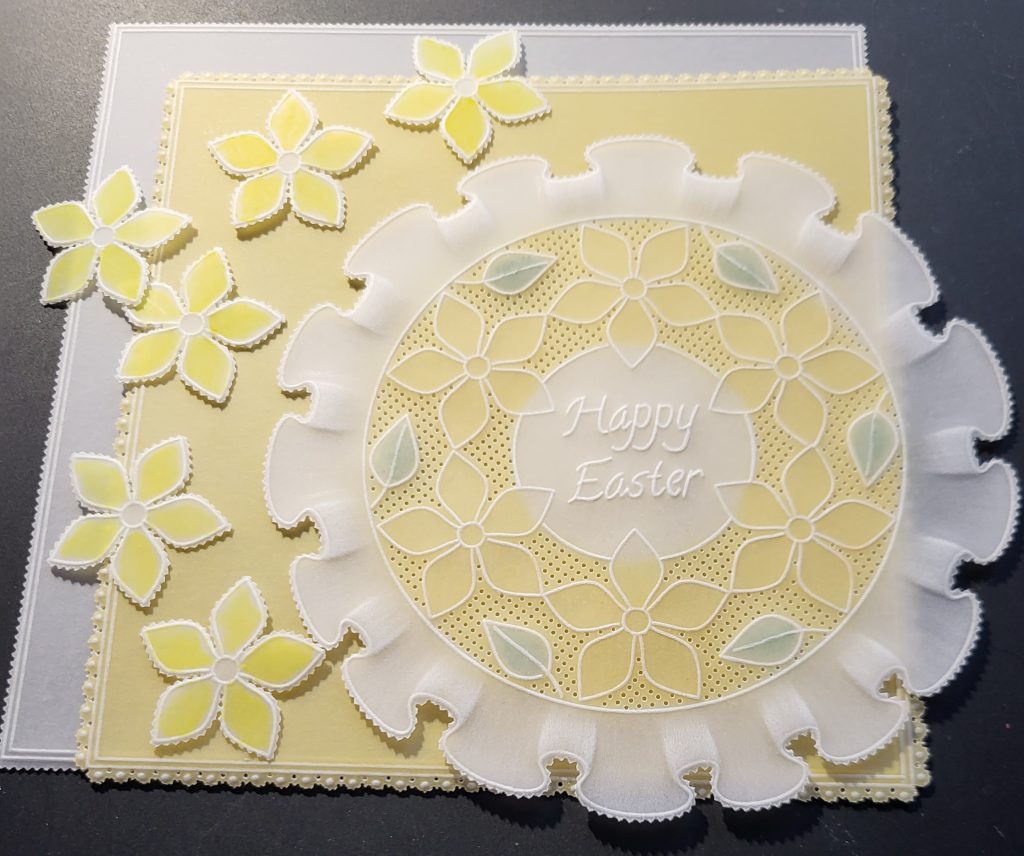
This is what my Easter Card looks like.
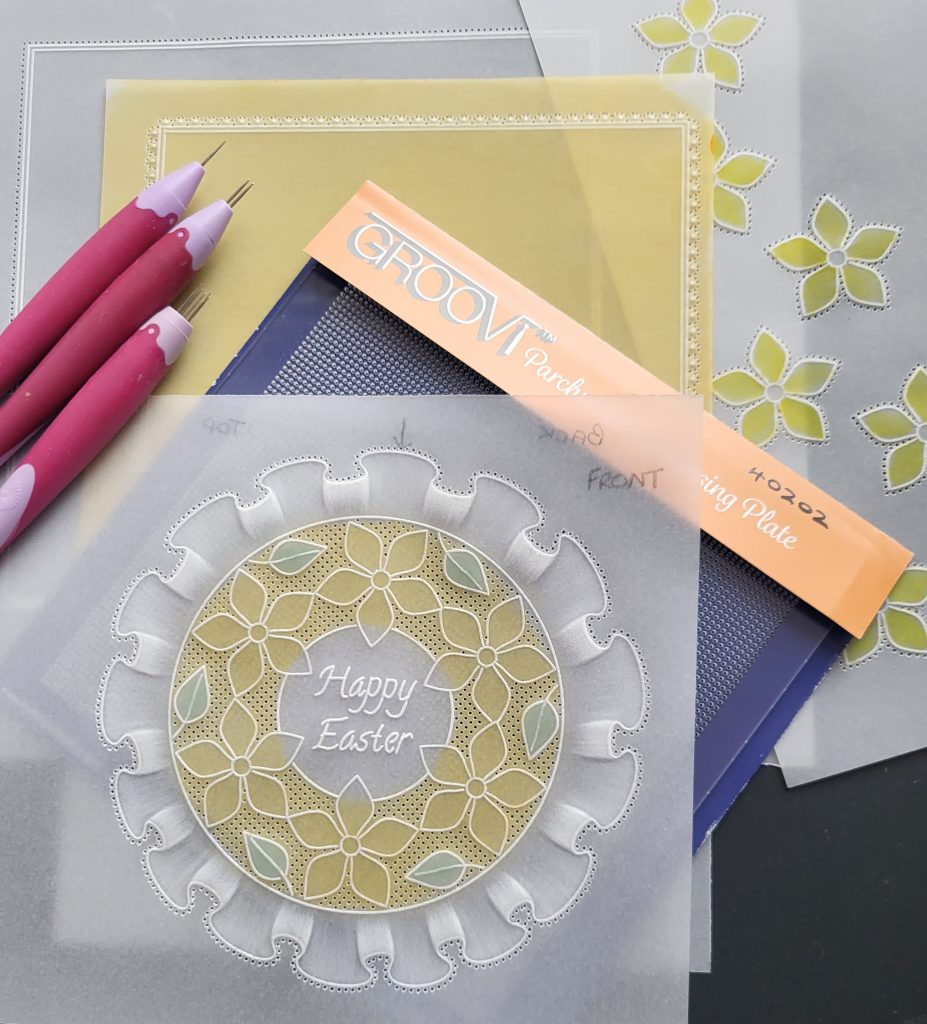
INGREDIENTS
Alphabet A5 Square Plate Mate (GRO-MA-40002-07)
Nested Squares Picot Cut A4 Square Plate (GRO-PA-41035-15)
Frilly Circle A5 Square Plate (GRO-FL-40077-03)
Nested Circles A5 Square Plate (GRO-PA-40051-03)
Tina’s 3D Flowers & Butterflies A4 Square Plate (GRO-FL-40553-15)
Straight Basic Bold A5 Square Piercing Grid (GRO-GG-40202-12)
Groovi A4 Clear Parchment Paper A4 (GRO-AC-40024-A4)
Dorso Crayons Lively Colours (PER-CO-70061-XX)
Dorso Crayons Natural Colours (PER-CO-70062-XX)
Semi-Circle Mini Perforating Tool (PER-TO-70034-XX)
1-Needle Bold Perforating Tool (PER-TO-70028-XX)
2-Needle Bold Perforating Tool (PER-TO-70279-XX)
Pergamano Excellent – Embossing Mat (PER-AC-70075-XX)
Groovi Embossing Tool 1 and 2 (GRO-AC-40026-XX)
Groovi Embossing Tool 3 and 4 (GRO-AC-40027-XX)
3mm Ball Tool Large (PER-TO-70005-XX)
4.5 mm Ball Tool (PER-TO-70015-XX)
Black Dual-Purpose Groovi Mat A4 (GRO-AC-40194-A4)
A5 Black Super Foam (GRO-AC-41765-XX)
A4 Picot Foam (GRO-AC-40625-XX)
Groovi Sticker Tabs x 16 (GRO-AC-40437-XX)
Groovi Guard (GRO-AC-40345-XX)
Ringlock Scissors (PER-TO-70041-XX)
Pastel Mix Pergamano Brads (PER-AC-70270-XX)
Card Blanks Pre-scored x 20 7×7” White (ACC-CA-30619-77)
Waimea Falls Companion Paper 8×8” (ACC-CA-31343-88)
METHOD
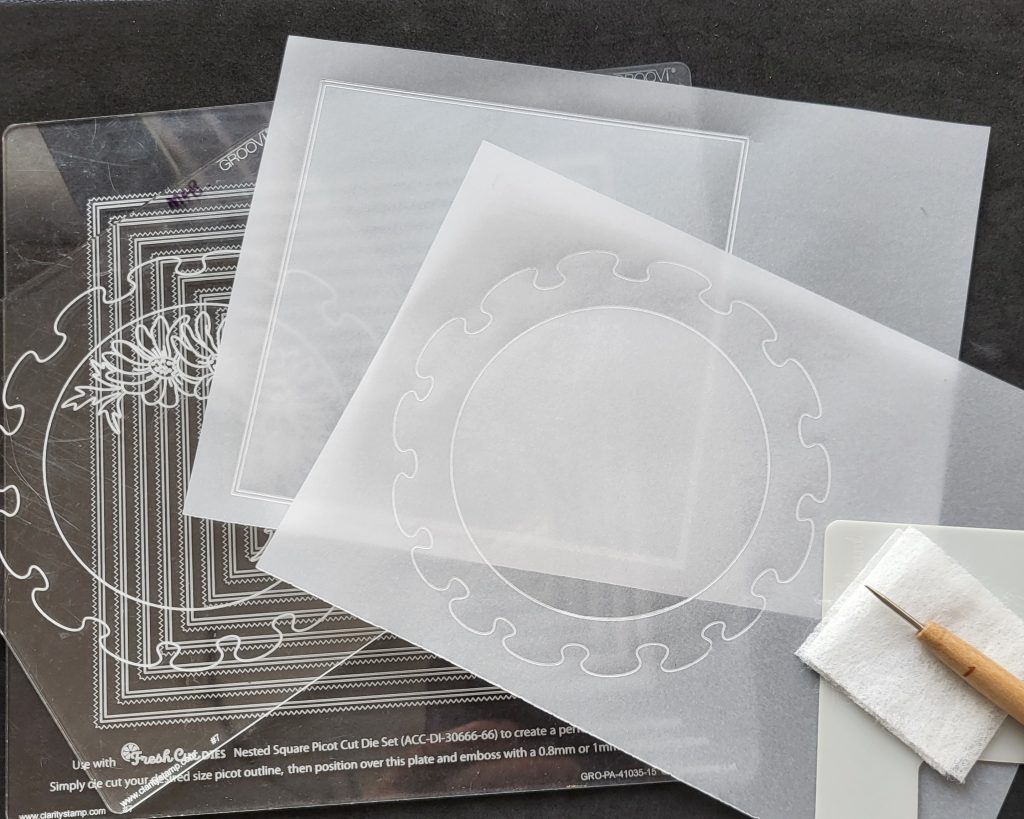
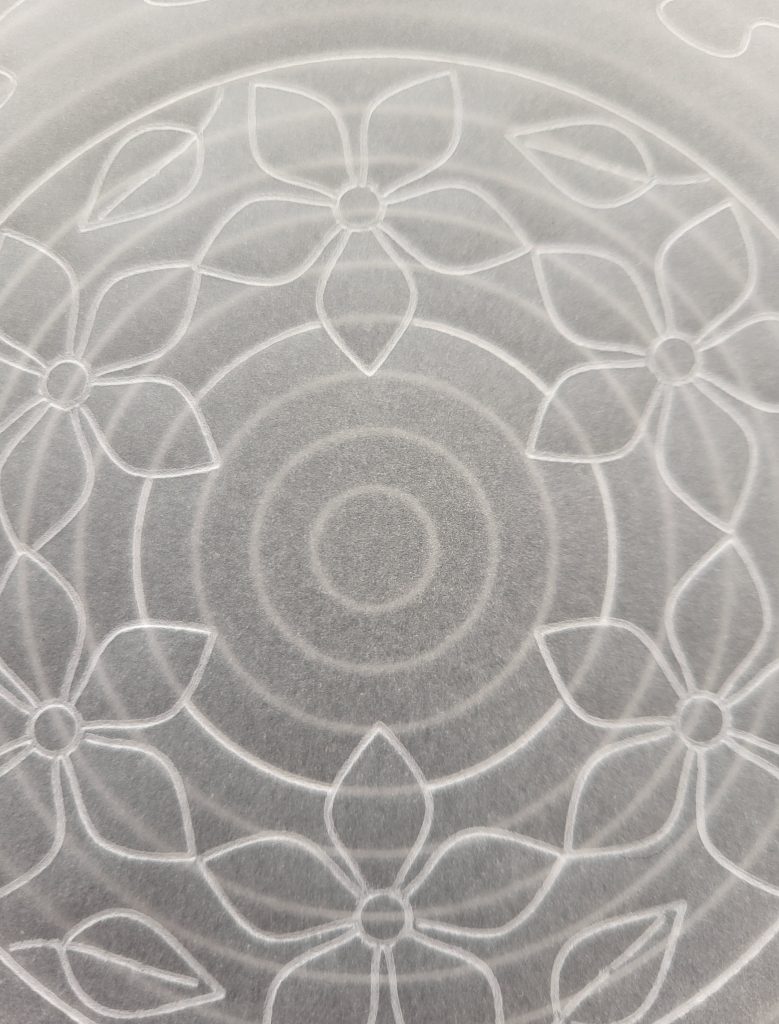
Step 1. Position your clear parchment over the Nested Squares Picot Cut plate and use a Groovi #1 tool to emboss the 3rd largest double outline on the plate to form a frame. Position a separate piece of clear parchment over the Frilly plate and emboss the frill and circle.
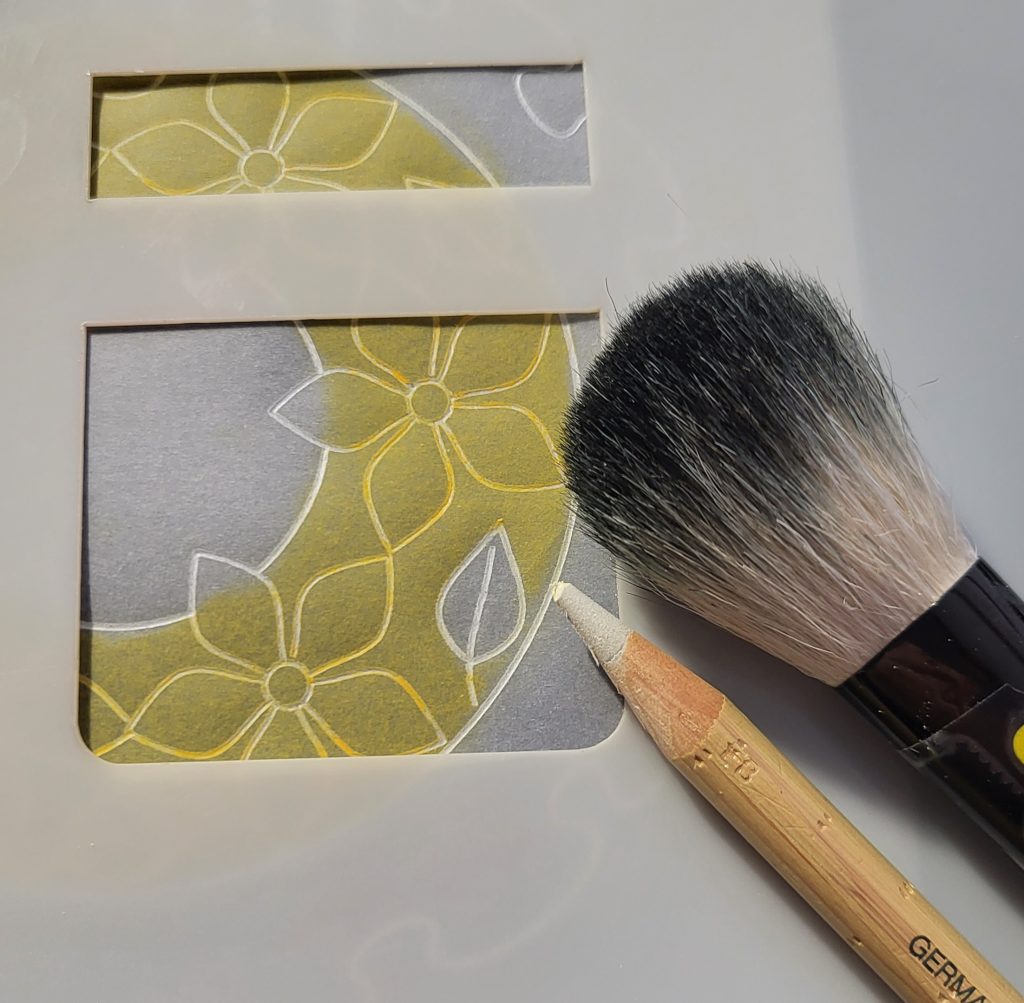
Step 2. Using low tack tape, section off a flower and leaf design on Tina’s 3D Flowers plate as shown.
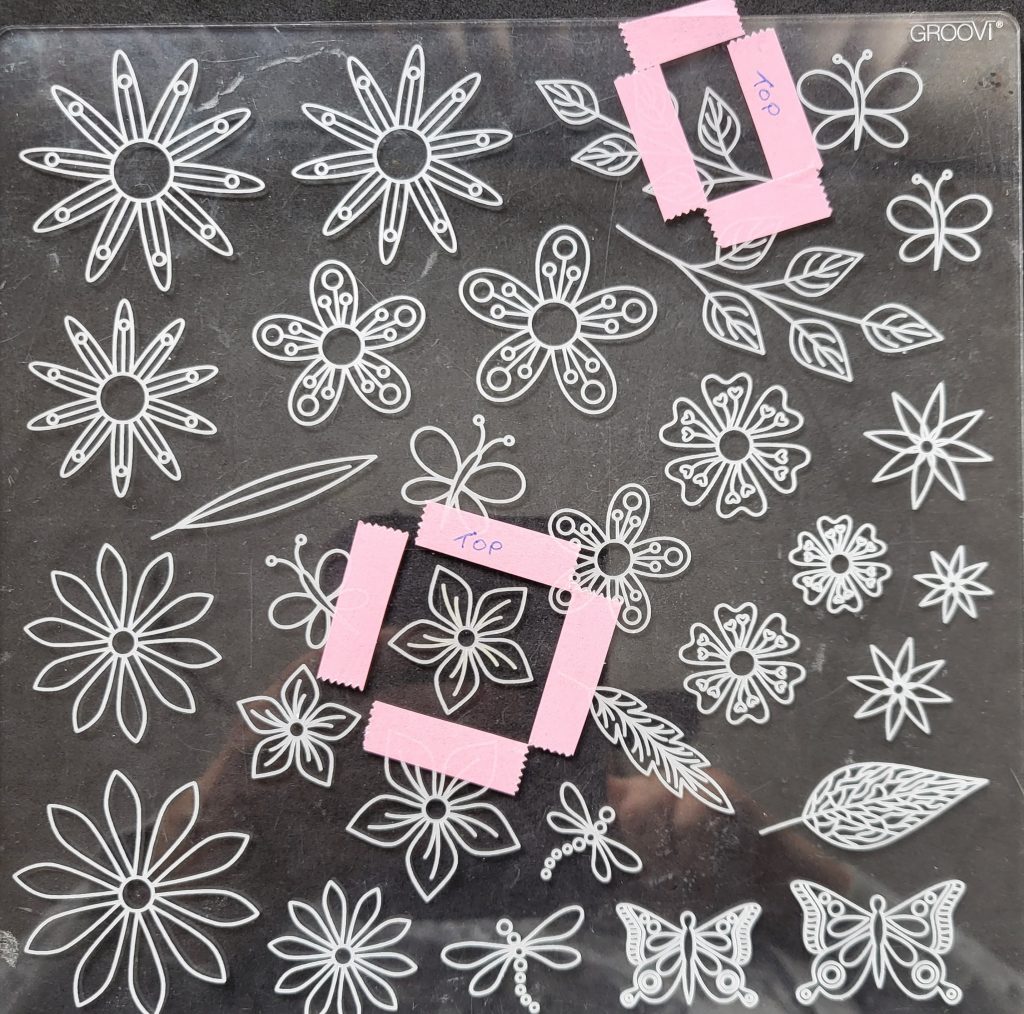
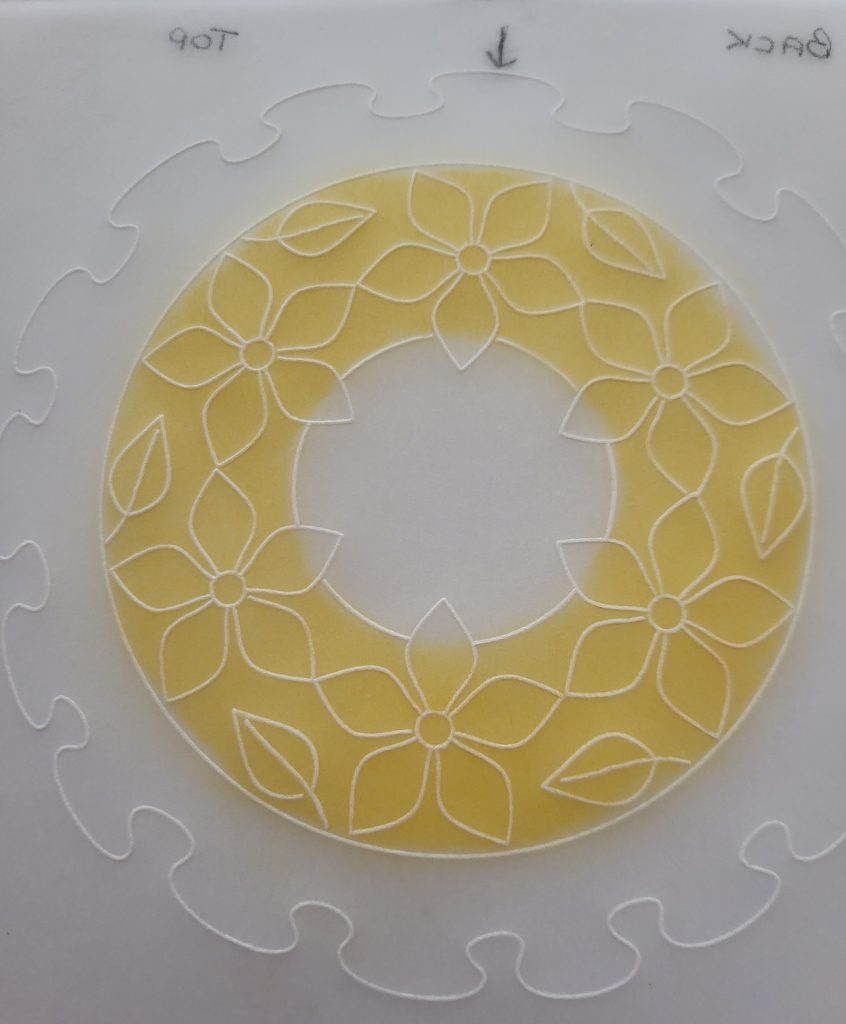
At the top of your parchment (with the frilly circle), use an ordinary pencil to write the words TOP and BACK, and also mark an arrow. Position your parchment over the sectioned-off flower on the plate, so that the tips of two petals are very close to the top of the inner circle (the arrow sits in the middle of the top part of the frill, and your flower should be centralised with this arrow in mind). Emboss the flower outline but not the veins.
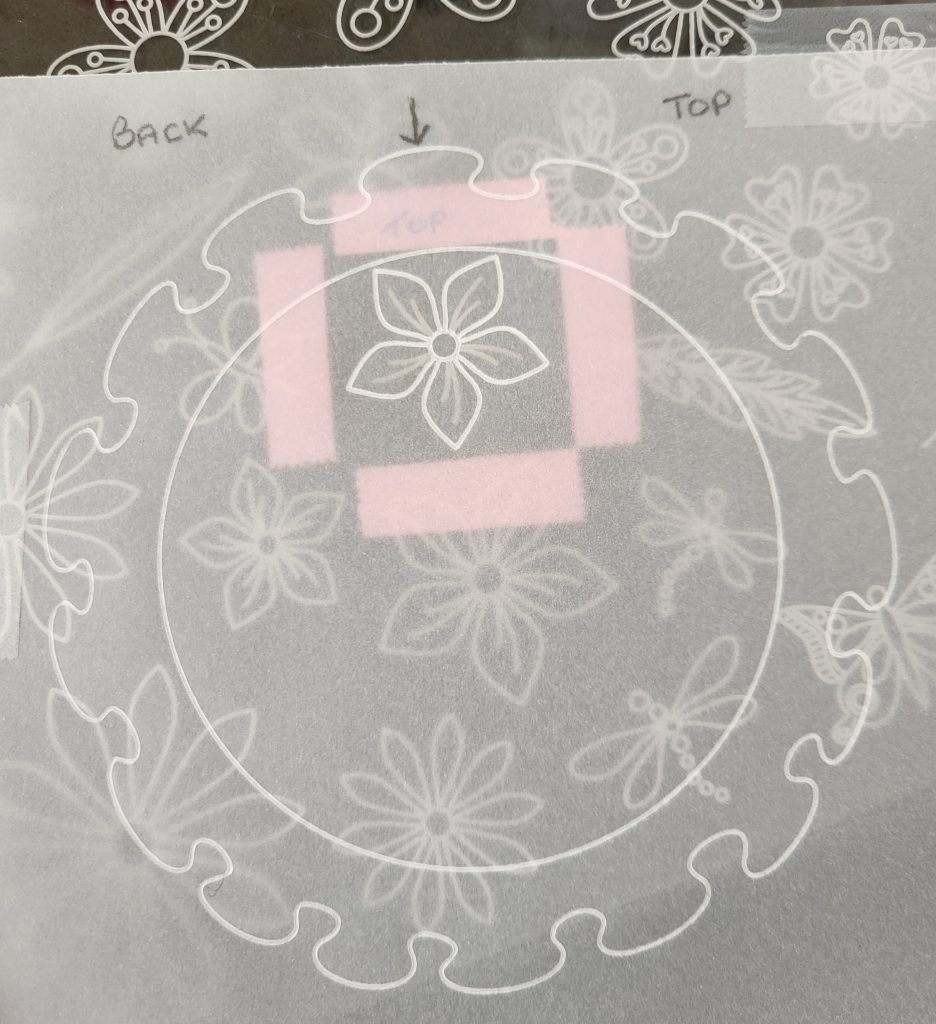
Emboss another flower to the right, making sure both flowers are very close together.
TOP TIP: Once you have embossed the first flower it won’t be necessary to move the plate again for the second and remaining four flowers – simply move your parchment each time, and not the plate.
Emboss another four flowers, in the same way, making sure they are all very close together so they fit nicely within the circle.
TOP TIP: It may be a good idea to do a practice piece on some spare parchment to see if you can get all the flowers to fit in the circle.
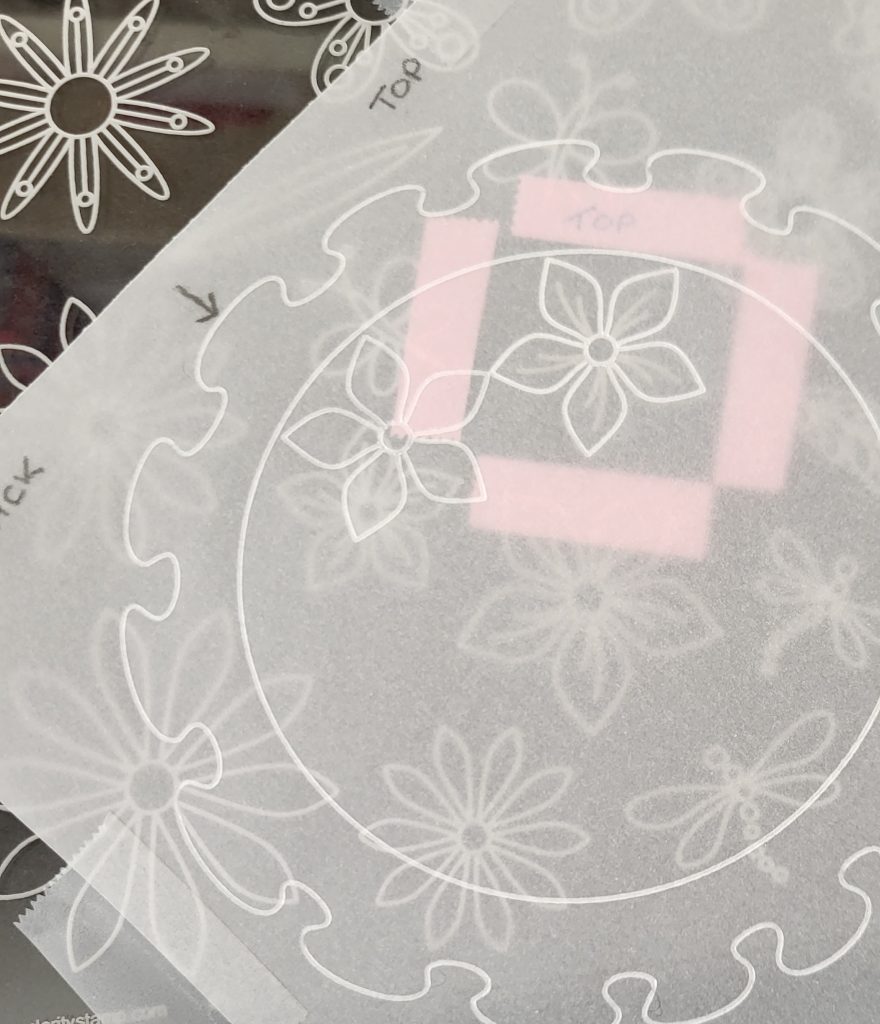
Position your parchment over the sectioned-off leaf on the plate, then emboss the outlines of the leaf, including the centre vein but omitting the side veins.
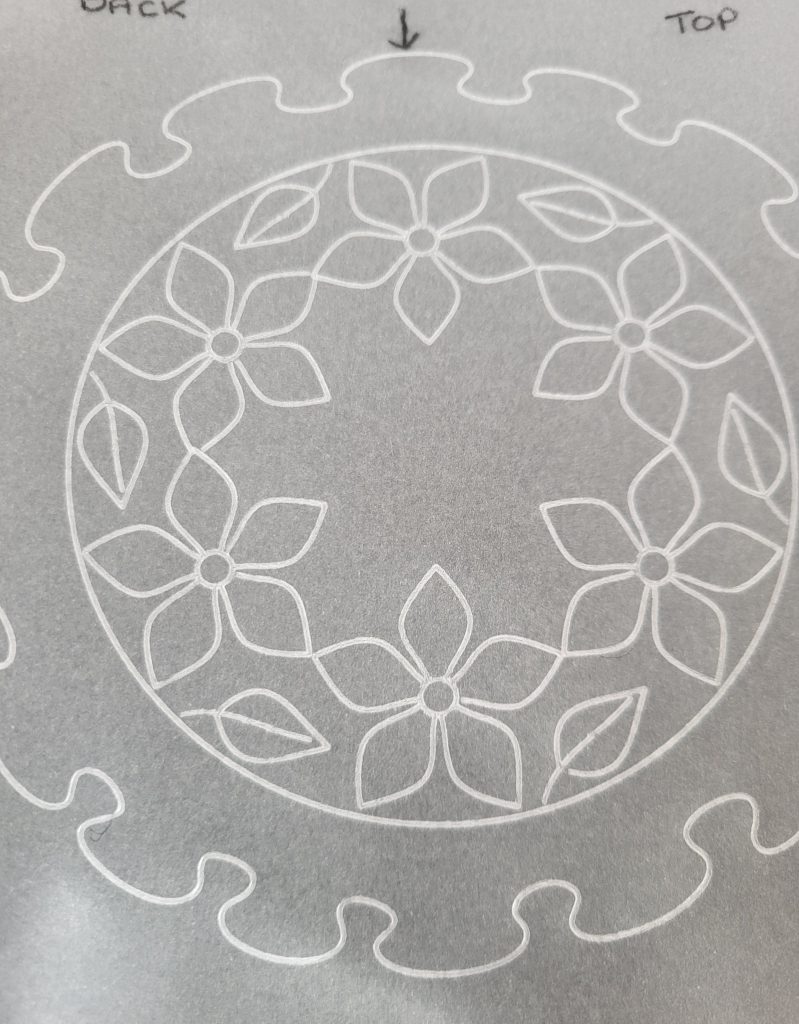
In the same way, emboss another five leaves around the inside of the circle. It should then look like this.
Step 3. Position your frill parchment over the top of the Nested Circles plate and emboss the 4th circle from the centre of the plate. Be careful not to emboss through any of the hanging petals.
Step 4. Dorso colouring and blending: These are some of the items we’ll be using.

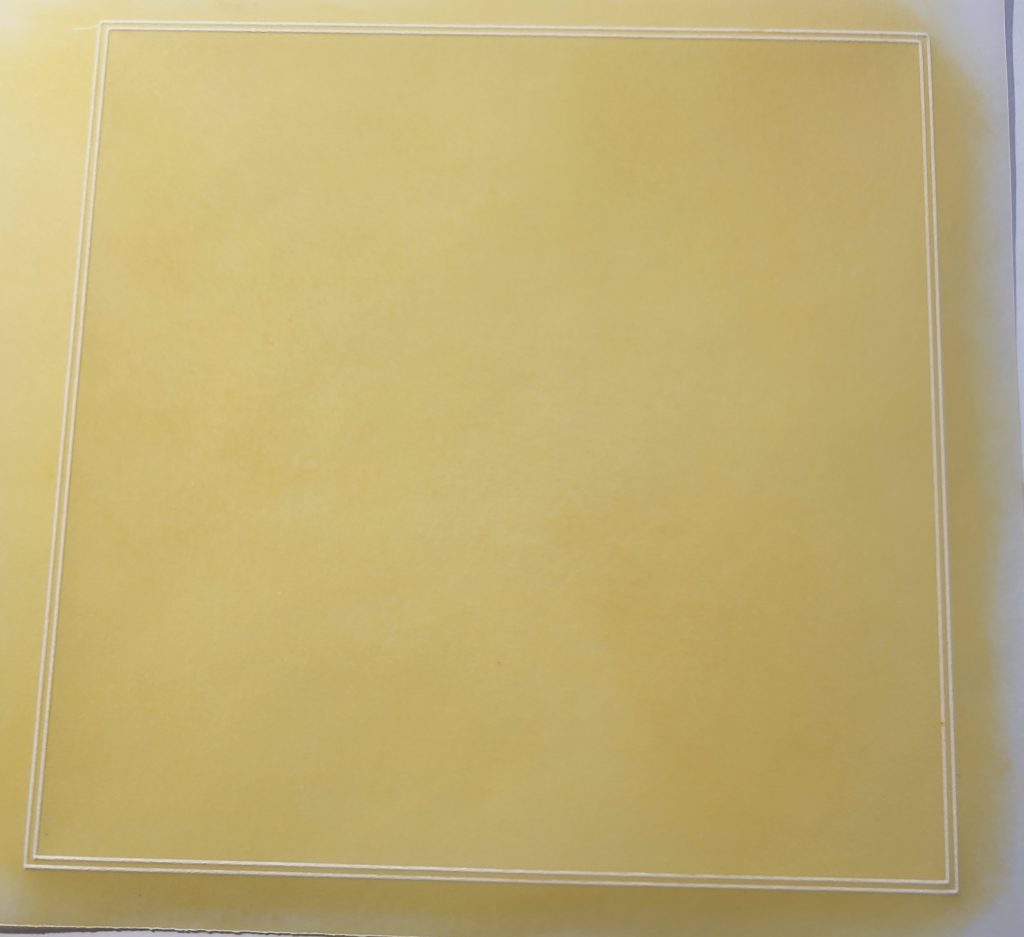
Return to your parchment with the embossed frame on it as we are now going to apply colour to the back of it as can be seen on the below video.
Have to hand Dorso Oil, tissue paper and the orange crayon from the Lively Colours box (the order and name of the colours are shown on the front side of the box).
Secure a piece of white paper (bigger than the embossed square) to a firm surface (I used A4 size).
With the front of your parchment facing downwards, attach its corners to the white paper using low tack tape so it is secure whilst you work. In the video you’ll see that I’ve already started some of the colouring from the top left corner down, so for this demo, I’ll be working from the bottom right corner upwards as follows.
Holding the crayon upright (with the flat end flat against the parchment), apply colour using long, sweeping strokes diagonally from left to right, working across the parchment all the way up and over all four sides of the embossed frame.
Note: The more colour you apply the darker the colour will appear once blended with oil.
Blending: Apply a couple of drops of Dorso oil to a folded piece of tissue paper. Starting at the bottom right corner of the embossed frame, rub the tissue across the parchment in circular movements, as well as from side to side, in order to evenly spread the colour.
TOP TIP: Take care in the amount of oil you apply to the tissue – too much and the colour will disappear, too little and it won’t spread the colour evenly. If you have put on too much oil then simply add more colour to the parchment with the crayon and start blending again until you reach the desired effect. When blending, concentrate on a small area at a time rather than trying to spread the colour over the entire parchment all at once.
Continue to blend the colour, working your way slowly up the page and over the embossed frame. To finish, take a clean piece of folded tissue and gently wipe it over the page to smooth out the colour. Any loose residue from the crayon can be carefully removed with a soft craft brush. This is what it should look like from the front.
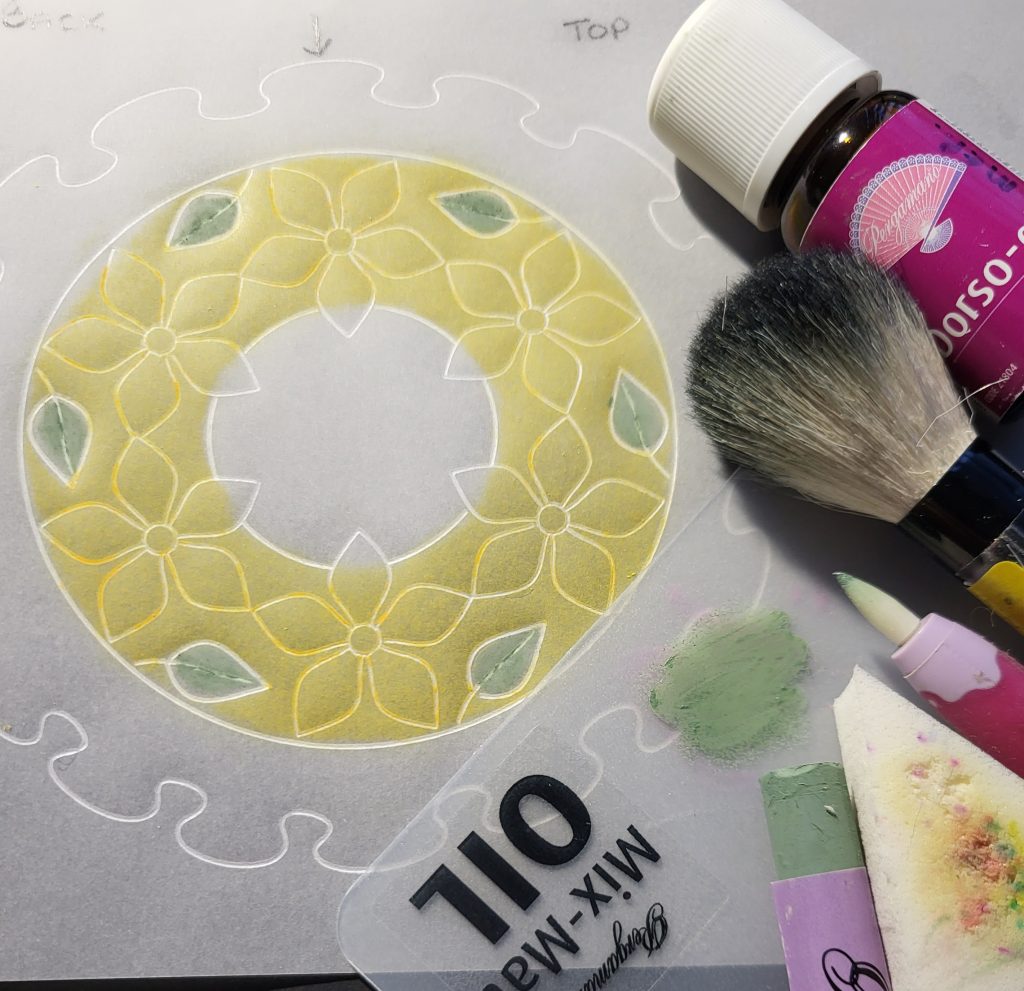
Step 5. Return to your frilly parchment piece. In a similar way to the above colouring, apply the orange crayon to the floral design in between the two circles.
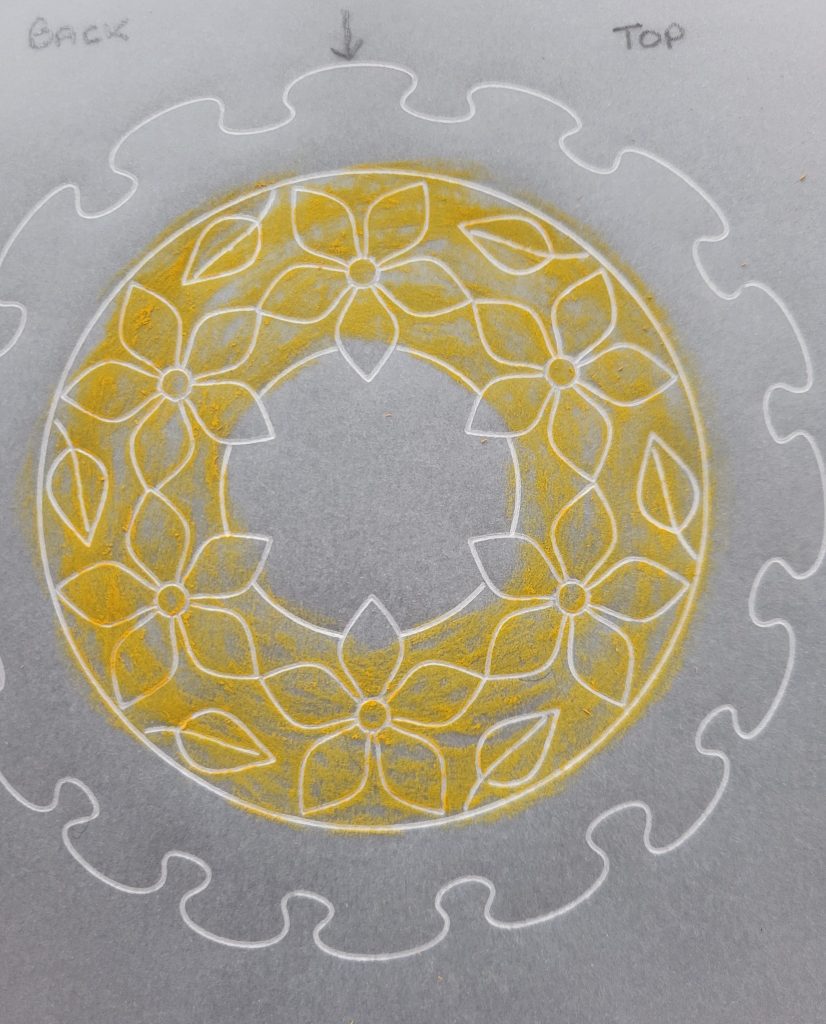
TOP TIP: If you get any crayon marks outside of the circles, then wait until the colour has been blended with oil before using a soft eraser in circular movements to carefully remove any unwanted colour – especially in the frill areas. Any eraser residue can be removed with your soft craft brush.
Blend the colour with oil on a piece of tissue as before, then wipe over the surface with a clean tissue to smooth out the colour so it looks like this.
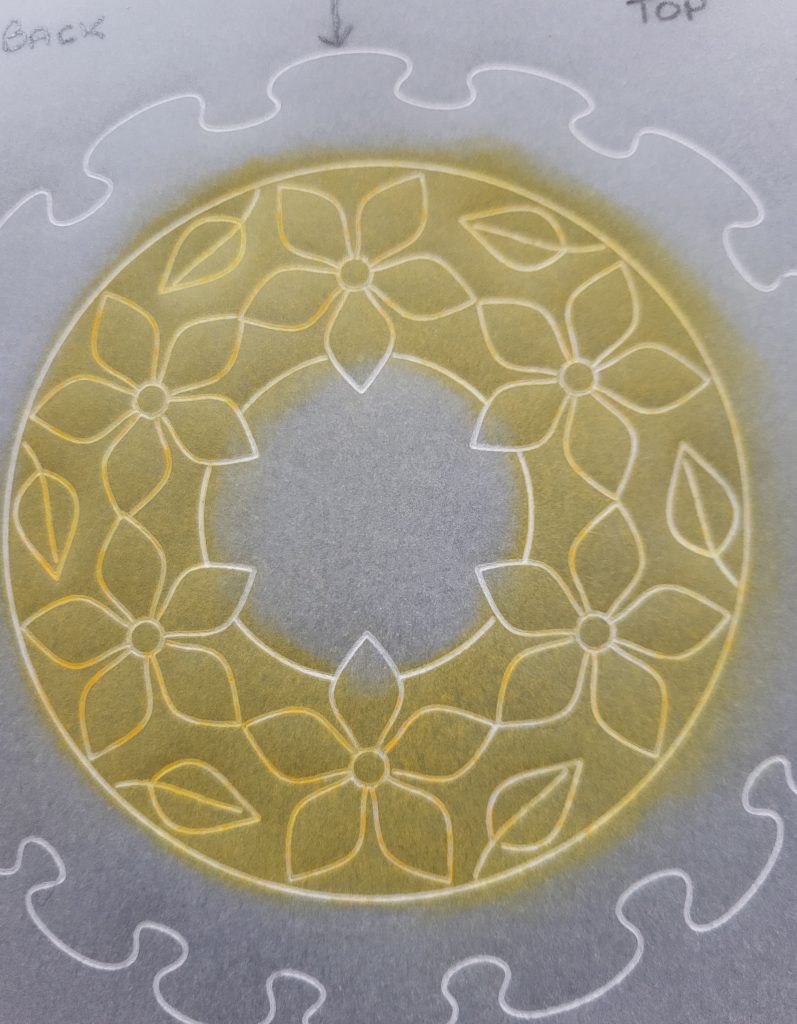
This is a front view of the parchment, showing how the colour looks. You’ll see that I’ve erased the unwanted colour that was outside the circles.
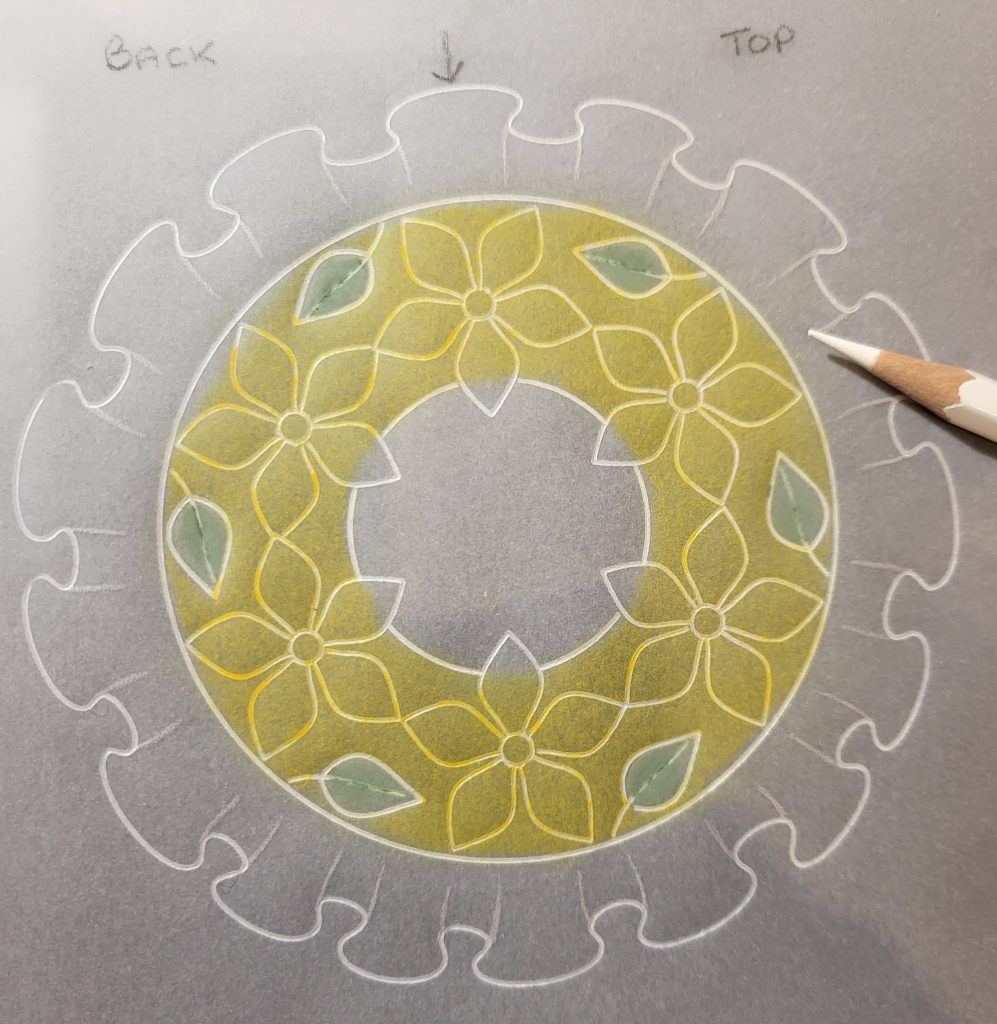
Place your parchment (front facing down) onto the firm side of the Black Duo mat. Use the Faber Castell eraser (with the white tip, not the pink tip as it’s not firm enough) to carefully erase the colour from all the leaves within the floral design.
TOP TIP: I used a Groovi Guard to keep the parchment flat and secure whilst I was erasing as it needs to be done firmly. I also used a soft brush to brush away any residue. There’s no need to remove any colour from the flowers as we’ll be making some 3D flowers to cover these.
Step 6. Position a separate piece of clear parchment over the Nested Squares Picot Cut plate and emboss the 2nd largest double outline on the plate to form a frame.
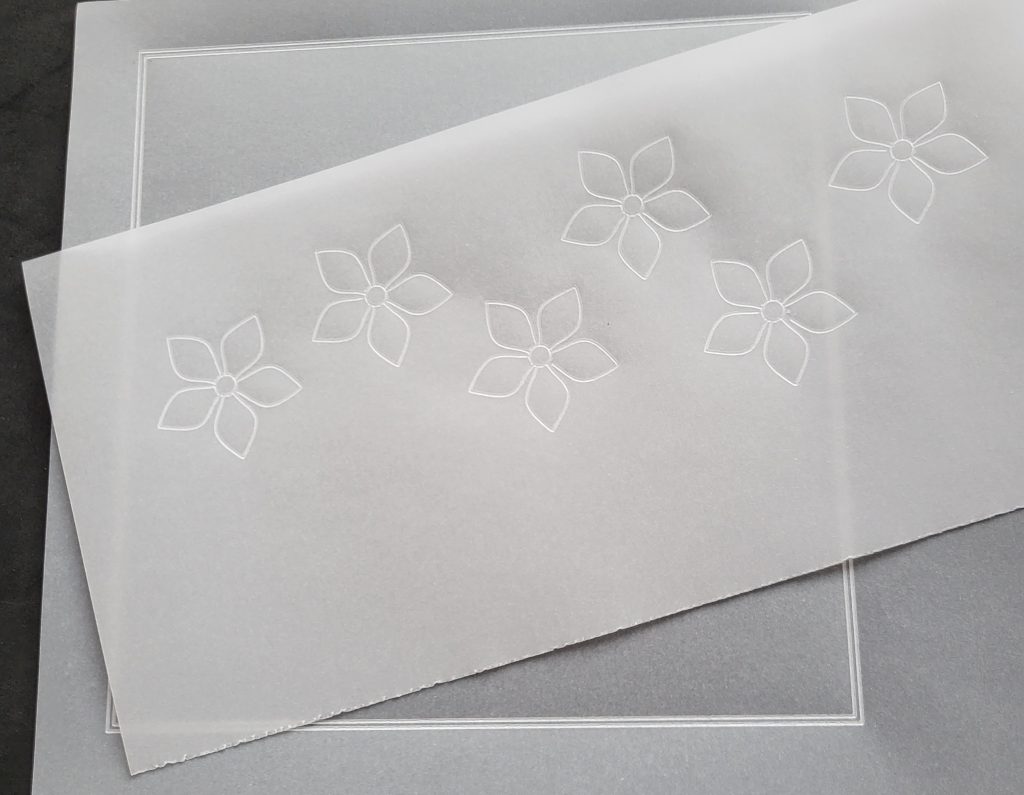
On another separate piece of clear parchment paper, use the sectioned-off flower on Tina’s 3D Flowers plate to emboss six separate flowers – all of them without the veins.
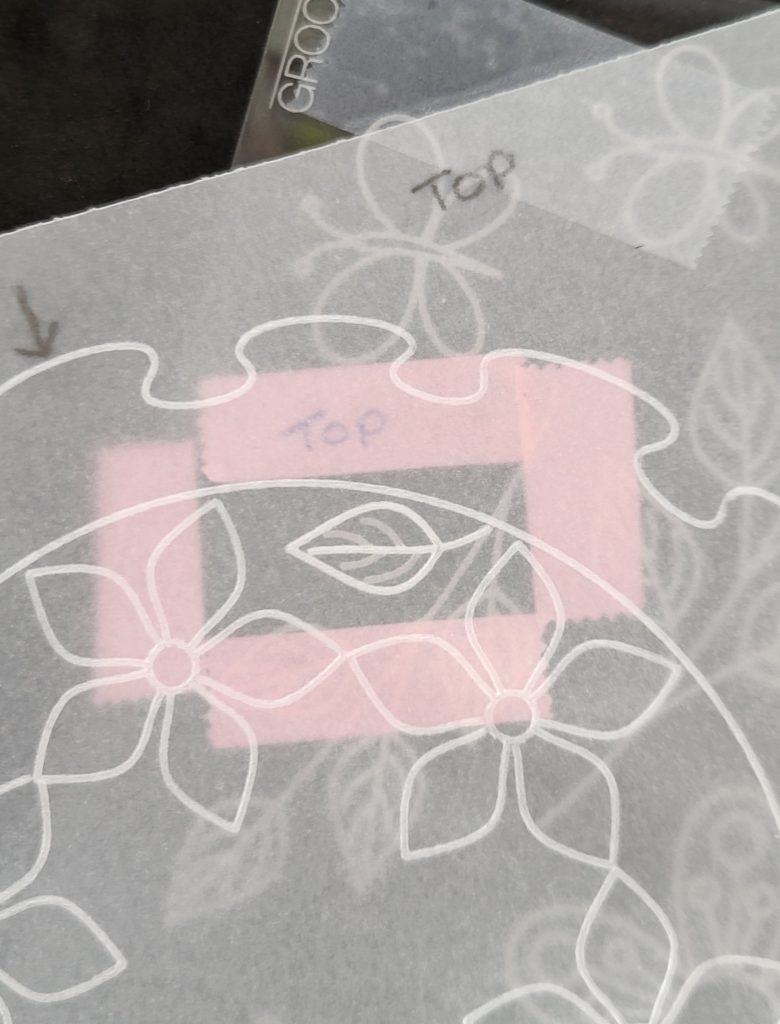
Step 7. On the back of the frill parchment, use the bottom edge of the light green crayon from the Natural Colours box to apply colour, in small circles, directly to the centre of each leaf.
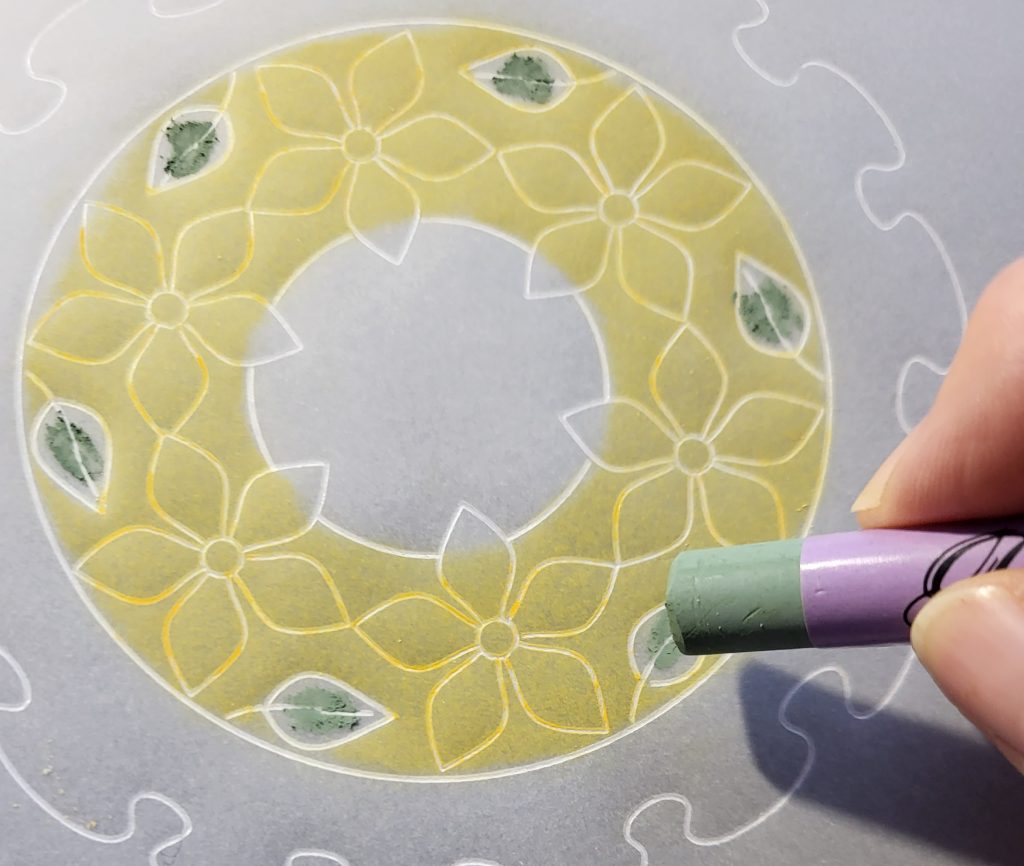
Add a drop of Dorso Oil to a blending sponge or Oil Mix Mat and use your Blending pen and nib to blend the colour on the back of each leaf. Be careful not to go over the white outlines.
If the colour needs to be darker, add more directly to the parchment and blend again. Alternatively, rub the crayon directly onto the Mix Mat, blend with a tiny amount of oil, pick up the colour with a blending nib and spread inside the leaf.
Position the back of each leaf over the sectioned-off leaf on Tina’s plate and emboss the side veins with the Groovi #1 tool. The purpose of doing this after dorsing is because the embossed veins will show up better on the front.
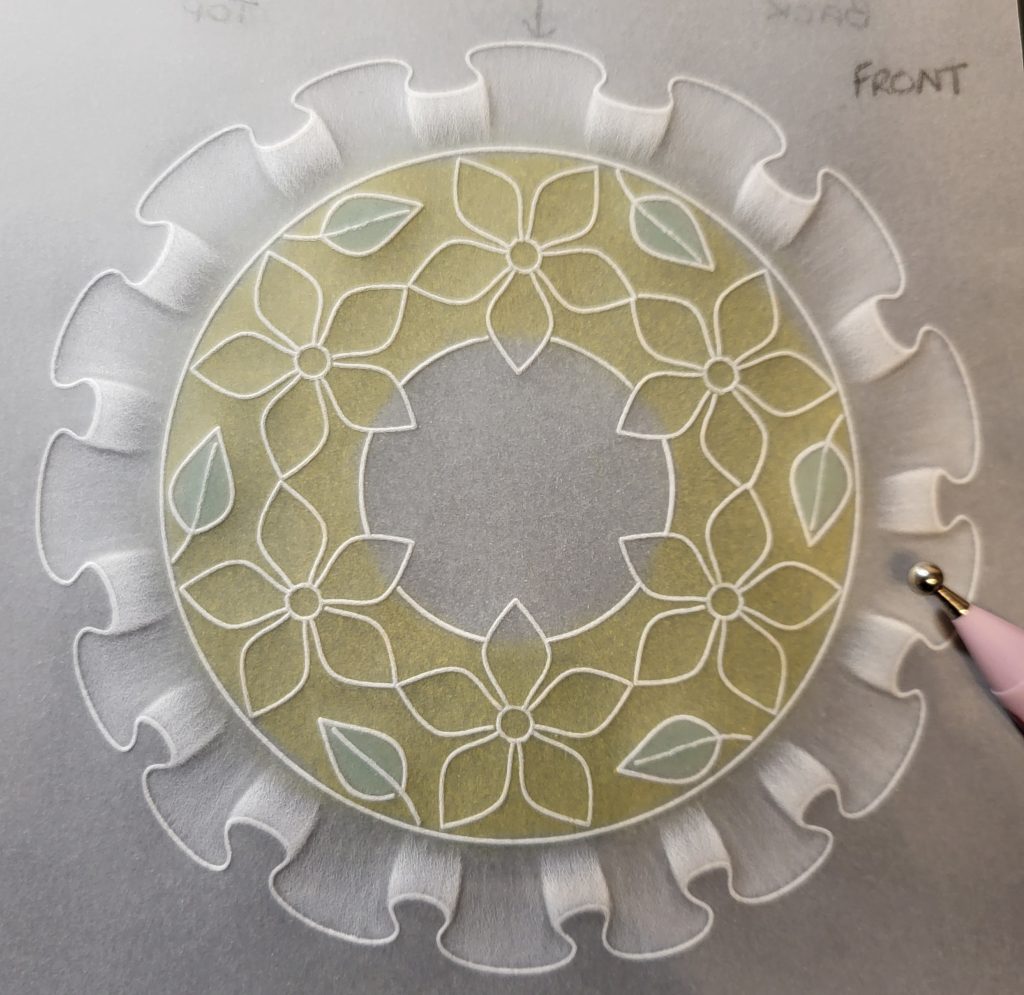
Step 8. Embossing: Before you start embossing the frill you need to take your white pencil and add some white lines on the back of the parchment, as shown in the picture. These lines indicate the area within which you’ll do your embossing.
Following the next three videos, emboss as follows.
First embossing: On the back of your parchment, use Pergamano tool 4.5 to emboss some long and short strokes between two of the lines as shown – these soft strokes should be very close together, even over-lapping, so the embossing appears smooth. Work your way all around the frill and then put it to one side to let the embossed area rest for a short while before you do the second embossing.
TOP TIP: I’ve done my embossing by pushing the embossing tool away from my body, applying individual strokes with a slight lift at the end (like striking a match) and always going back to the top of the outline for each stroke.
Second embossing: Change to Pergamano 3 tool (or Groovi #4 tool) and emboss over the same areas a second time to whiten, then change to Groovi #2 tool to add some slight definition to the sides only, as shown.
Turning to the front of your parchment, use Pergamano 4.5 tool to emboss another section of the frill as shown. Traditional crafters may want to emboss on the front over a piece of cellophane to stop the parchment from going shiny, but it isn’t needed here.
This is what the embossed frill looks like from the front.
Step 9. Moving on to the parchment with six flowers on it… Apply colour to the FRONT of the petals using the bottom edge of the yellow crayon (from the Lively Colours Box) working in small circles.
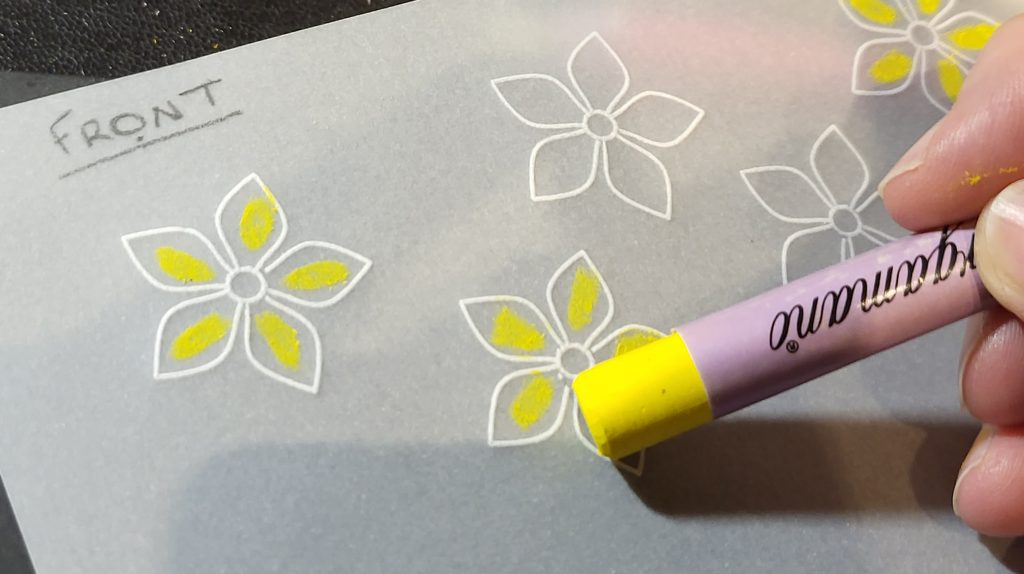
Using a blending nib take a tiny amount of Dorso Oil from the Mix Mat and spread the colour inside each petal trying to keep it smooth and being careful to stay within the white outlines.
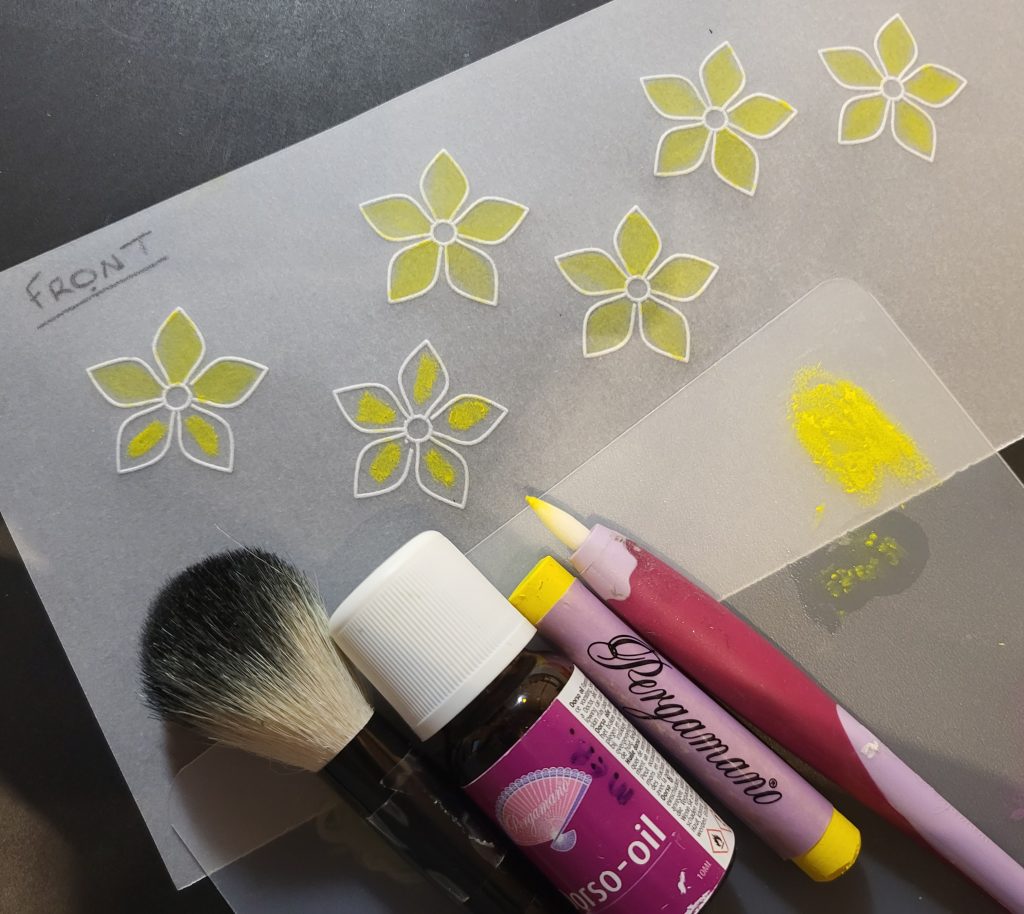
Position the back of each flower over the sectioned-off flower on Tina’s plate and emboss the veins with Groovi #1 so they show up better on the front.
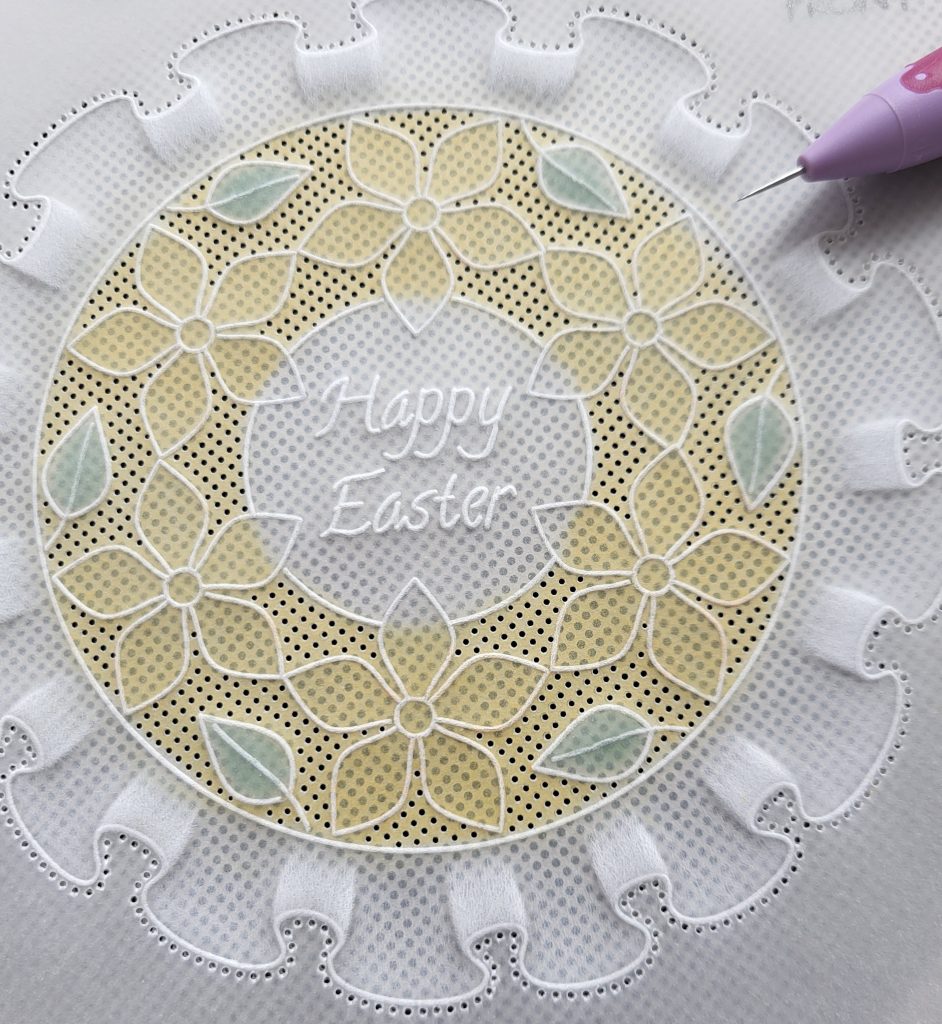
Step 10. Perforating and Cutting: Using your 2-Needle tool over a thick Super Foam mat, perforate all the way around each of the six flowers, as well as around the outside edges of the frill and around the larger clear parchment frame.
For the smaller coloured parchment frame use your Mini Semi-Circle perforating tool to perforate all around the outside edges of the frame using the shallow-perforating technique, but before re-perforating with a 1-Needle Bold use Groovi #2 to emboss a dot on the back in the centre of each semi-circle shape.
(For information: my shallow-perforating technique is mentioned in the Clarity Matters Blog under “How to Create a Fancy Frame by Maggie Byford” dated 22nd May 2022; follow Steps 10 to 12). Once all perforating has been done use parchment scissors or snips to picot-cut between all the 2-needle and semi-circle perforations.
Optional: For added detail inside the circle of flowers I used a 1-Needle Bold over the Straight Basic Bold Grid to perforate holes in between the flowers and leaves.
TOP TIP: I placed my grid in front of me in a diagonal position rather than having it straight.
Step 11. Finishing and Assembly:
– Cut to size your choice of coloured paper from the Waimea Falls Companion Paper Pad.
– Layer the clear parchment frame and the coloured parchment frame onto the Waimea Falls paper and secure with a brad in each corner.
– Centralise the frill parchment on top, with the six cut-out flowers in place, and secure all of the layers together using a brad inserted into the centre of each of the cut-out flowers (which will keep all 4 layers and the flowers in place).
– Secure everything to the front of folded white card using foam pads or a Tape Runner.
Here is the finished card.

WOW! That is incredible. Thank you, Maggie, for putting together such a detailed blog tutorial for us. This is so helpful!
Everything that Maggie has used can be found on the Clarity website HERE
A busy week at Clarity Towers this week. Here is our schedule for the week ahead:
Sunday 4th June:
Crafting with Clarity with Barbara on Create & Craft – 3pm-5pm (2 hours) Monday 5th June:
In the SHAC with Barbara – 10am Live on Facebook and YouTube
Tuesday 6th June:
Groovi Tuesday with Paul – 10am Live on Facebook and YouTube
Thursday 8th June:
The Pergamano Show with Tina Cox on Create & Craft – 11am & 3pm
Friday 9th June:
Day 1 of the Clarity Open Days in Ditton, Near Maidstone in Kent – 9am – 4pm
Saturday 10th June:
Day 2 of the Clarity Open Days in Ditton, Near Maidstone in Kent – 9am – 4pm
Tickets for the Open Days are still available HERE
Travel gently, friends.
Lotsa love, Grace & Maggie xoxo
Clarity – The Home of Art, Craft, and Well-Being.
Great tutorial again! Thanks Maggie and Grace.
What a beautifully detailed project, thanks Maggie and Grace xx
Fabulous tutorial! Thank you, Maggie and Grace, 😊 OXOXO
Gorgeous card. Very detailed explanation.
Thanks Maggie.x
Thank you for this beautiful tutorial, it’s incredible!
Best wishes to you Grace, hope all goes well for you. xx
Stunning with an easy to follow tutorial. Many thanks.
Brilliant tutorial, thank you.
What a lovely card – thank you for the tutorial Maggie
Xx
Thank for this…I have these crayons and have struggled with using them..thanks to you I have a niche clearer vision of how they work..lovely tutorial
Great Step by Step Maggie, if only I could find my Frilly circle plate !! I have it ticked off in my book & I can find the square one & the larger A4sq plate but the circle is AWOL. Must check with my granddaughter tomorrow.
Thanks Grace &Maggie xx
Thank you for a brilliant tutorial. I’ve never got to grips with the dorso crayons and just managed to make a mess so this is perfect xx
Beautiful card x thank you for this tutorial