Clarity’s Blog Tutorial: How To Make A Gnome Coaster
Hello hello! Grace here.
Happy Sunday! Thanks for stopping by. I hope this ‘ere blog finds you safe, happy and feeling creative.
What’s going on? Well, firstly! Mum’s tv shows this afternoon on Create & Craft… 3pm to 5pm. She will be highlighting Jayne Nestorenko’s amazing artwork. Not to be missed!
But for now, we are joined this weekend by the wonderfully talented Josie Davidson, a friend and valuable Clarity Design Team member. Since the Gnomes blew the door off last weekend, Josie’s sharing a Gnome-themed step-by-step project with us! Glorious. I’ll hand you straight over.

A simple, easy-to-make gift using the Gnome Groovi plates. Or perhaps a gift to yourself!
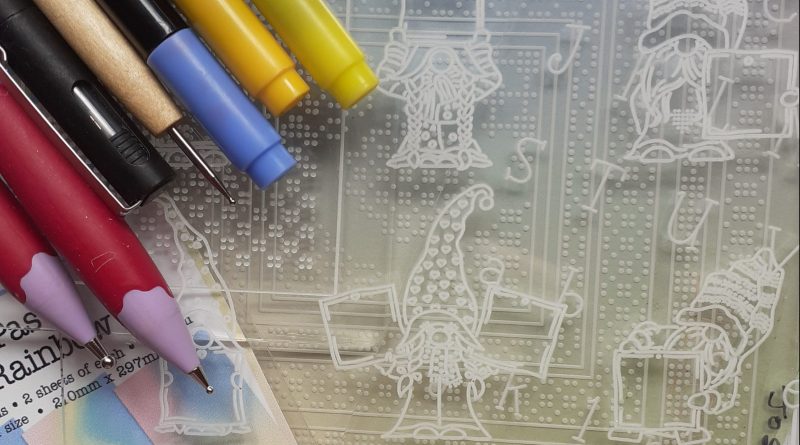
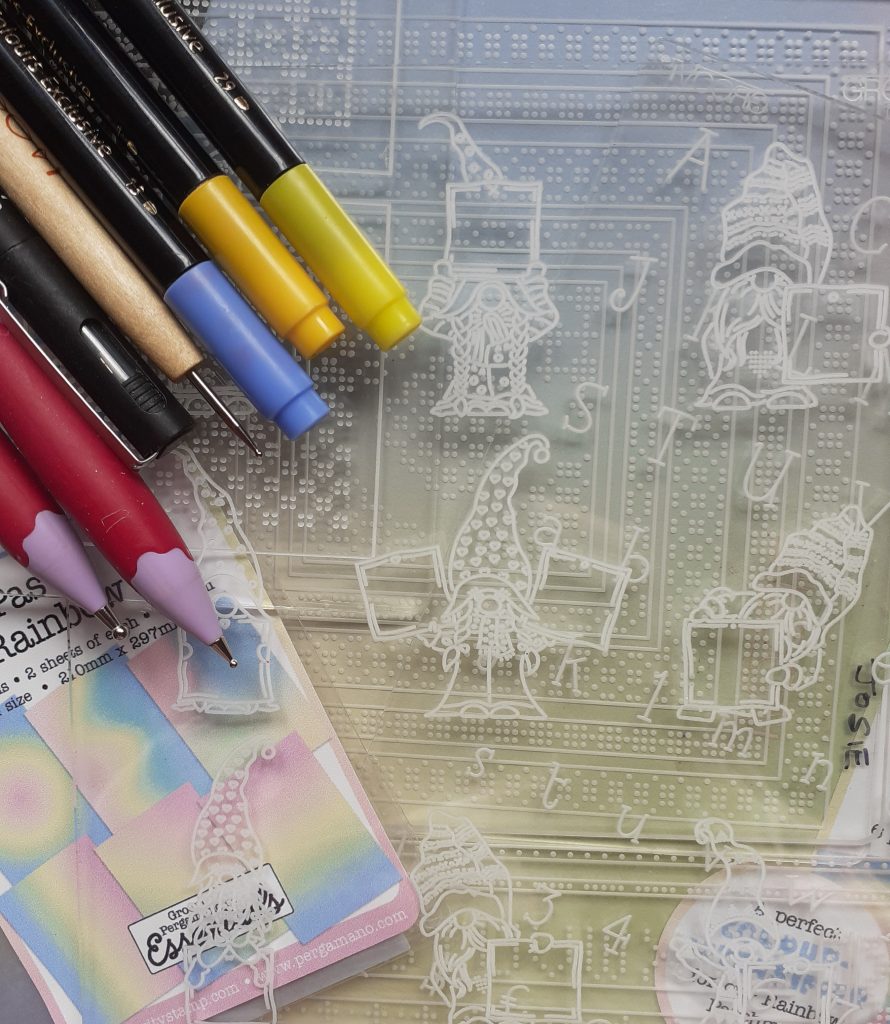
INGREDIENTS
Barbara’s Feel Güd Gnomes & Letterboxes A5 Groovi Plate (GRO-FY-41669-04)
Barbara’s Feel Güd Gnomes Alphabet A5 Groovi Plate (GRO-WO-41810-04)
Groovi Plate Mate For A4 Sq Grids (GRO-MA-41768-21)
Josie’s Straight Embossed Patterns 2 A4 Sq Groovi Plate (GRO-GG-41792-24)
Pergamano Coaster (PER-AC-70132-XX)
Groovi Tool 1 & 2 (GRO-AC-40026-XX)
Pergamano 1.5mm Ball Tool (PER-TO-70004-XX)
Pergamano 3mm Ball Tool (PER-TO-70005-XX)
Groovi Guard (GRO-AC-40345-XX)
Pergacolours 1, 13 and 29 (PER-CO-70060-XX)
Ink Eraser (ACC-PE-30670-XX)
Pastel Rainbow Parchment
Pastel Rainbow Paper
Narrow Red Liner Tape (ACC-AD-30375-XX)
Tumble Dryer Sheet
METHOD
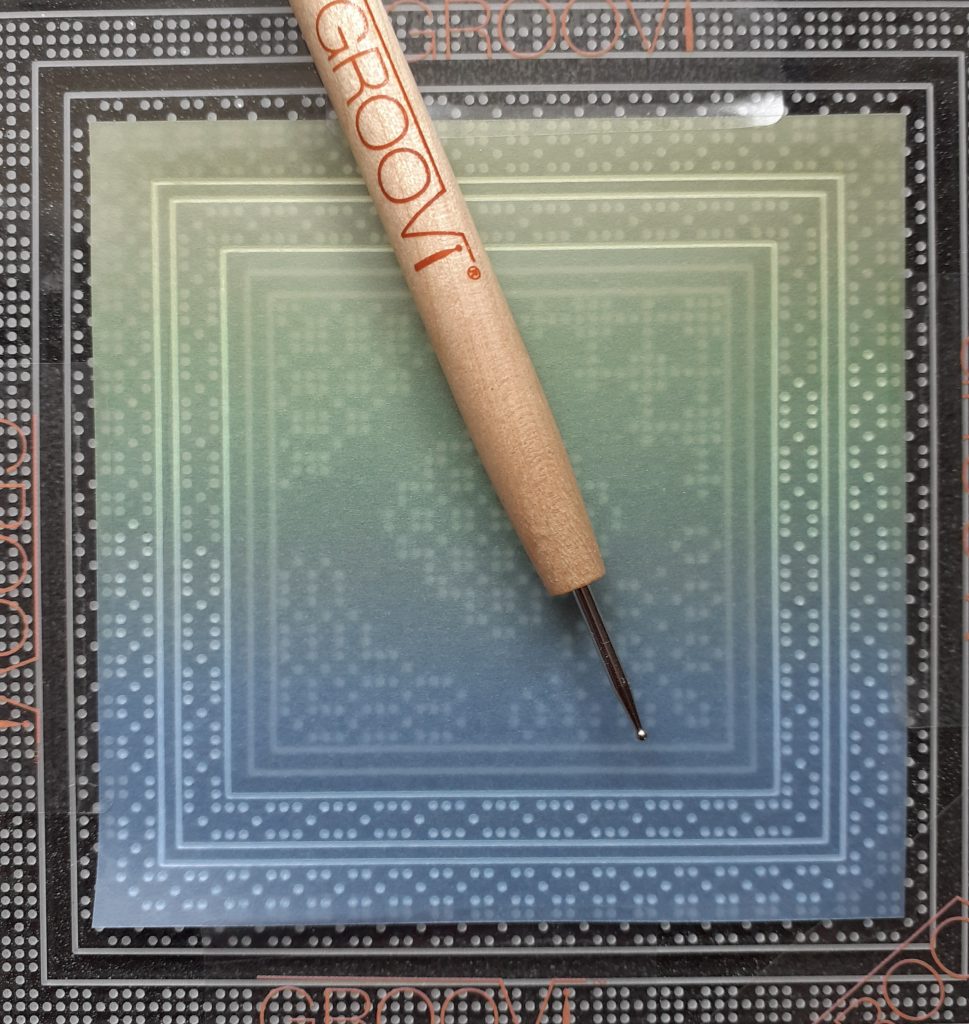
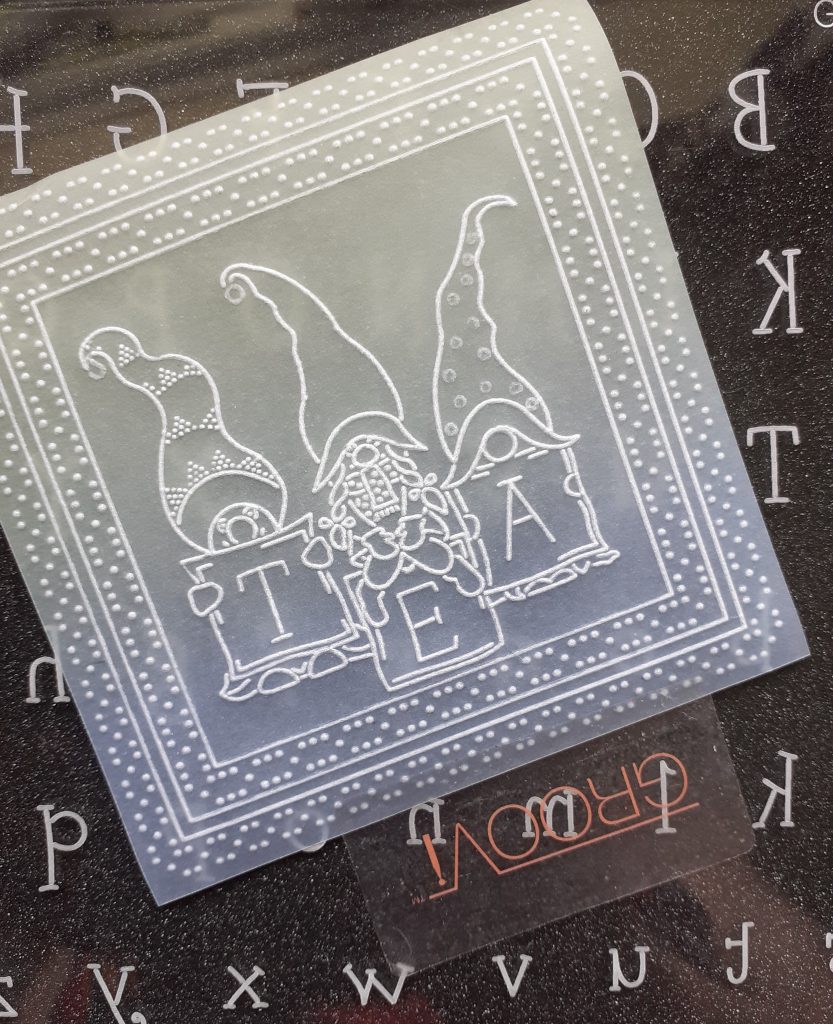
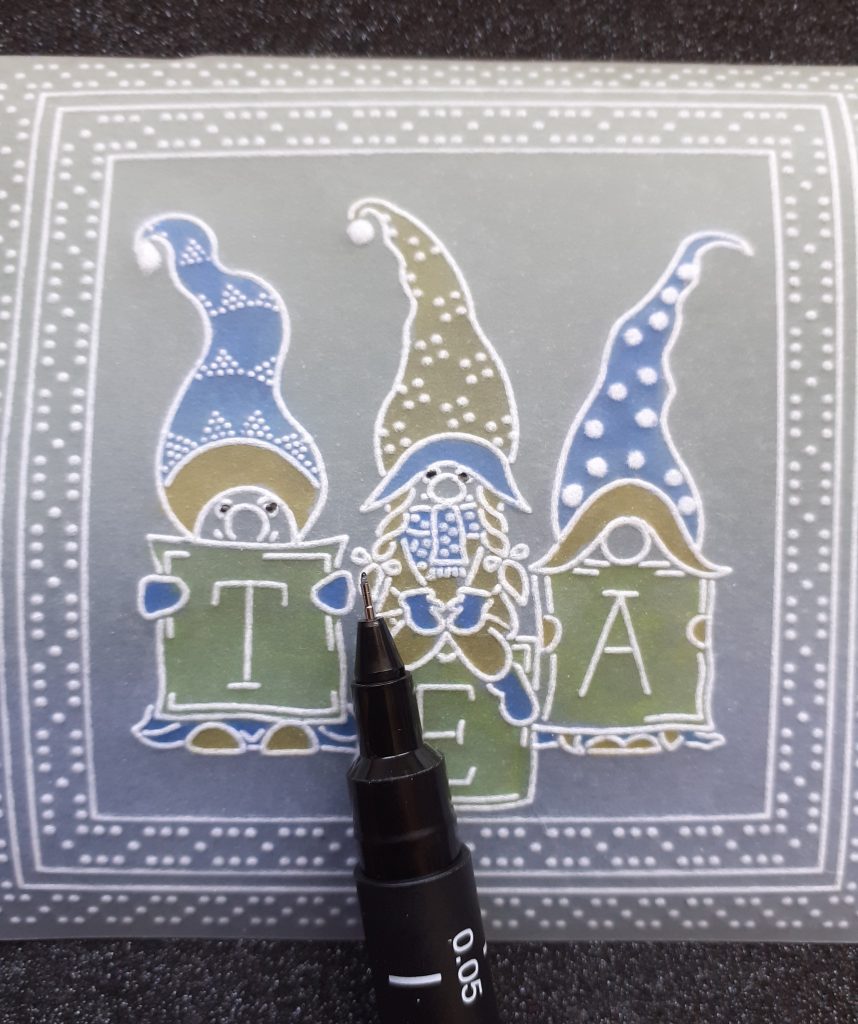
Step 1. Cut a piece of rainbow parchment 3.5 inches x 3.5 inches. Place the parchment face down on the centre plate in your grid plate mate. Emboss the innermost full border with the No 2 Groovi tool. Now emboss the first three lines of dots of the next full border. Emboss the line inside the first border and the two lines between your borders with the No 1 Groovi tool.
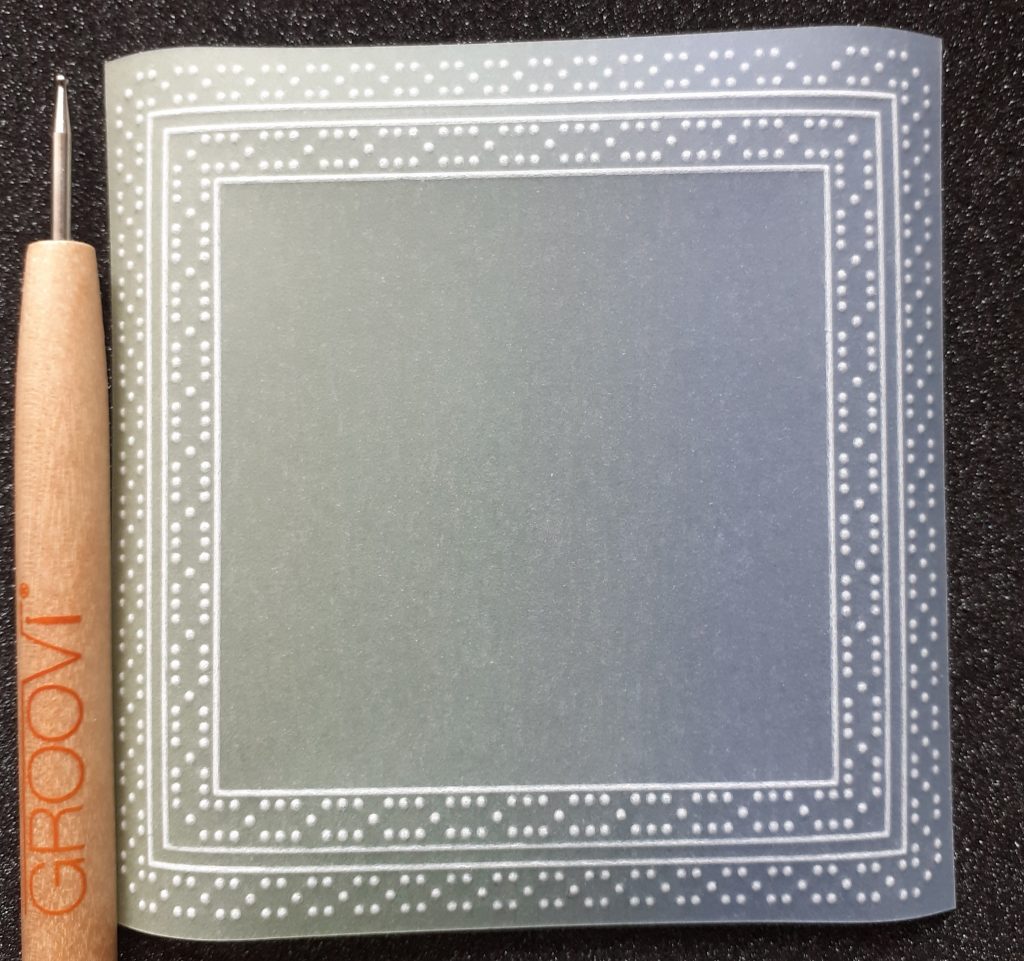
Your work will now look like this…
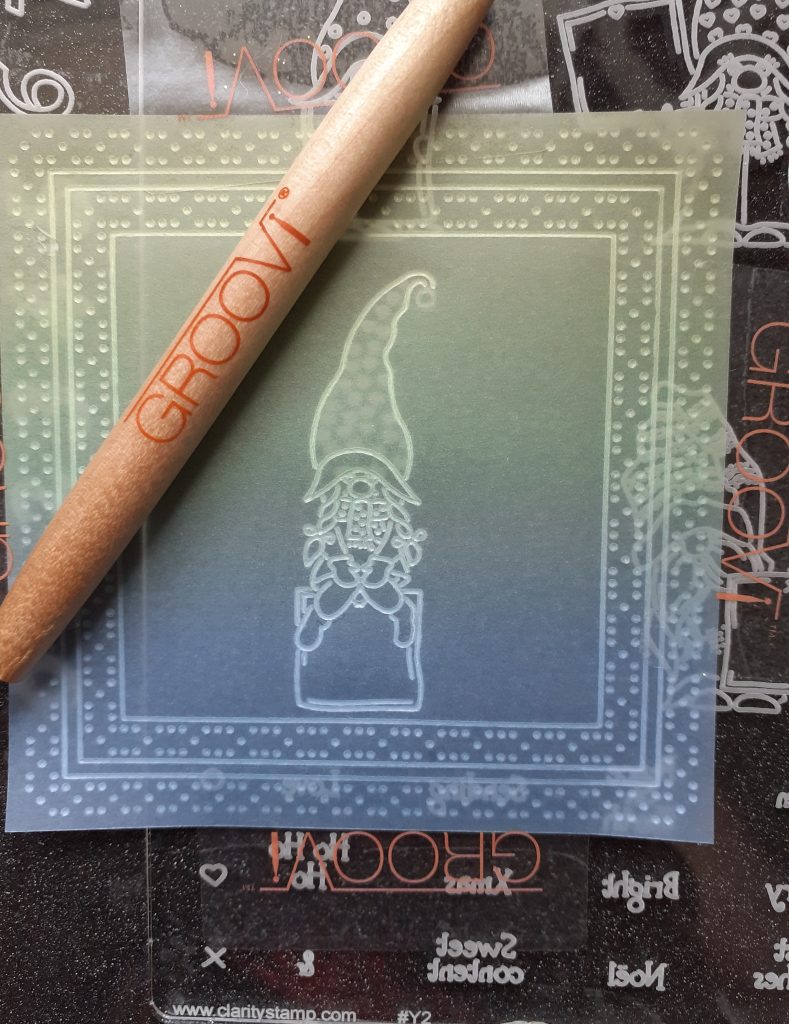
Step 2. Position the lady gnome so she is sat on the letterbox in the centre of your work. Emboss using the No 1 Groovi tool, except the bobble on her hat, which is embossed with the No 2 tool and the design in her hat is omitted.
Step 3. Now position the second gnome to one side of her and slightly higher than she is. Emboss with the No 1 tool, omitting the heart in the letterbox. The bobble on his hat is embossed with the No 2 tool.
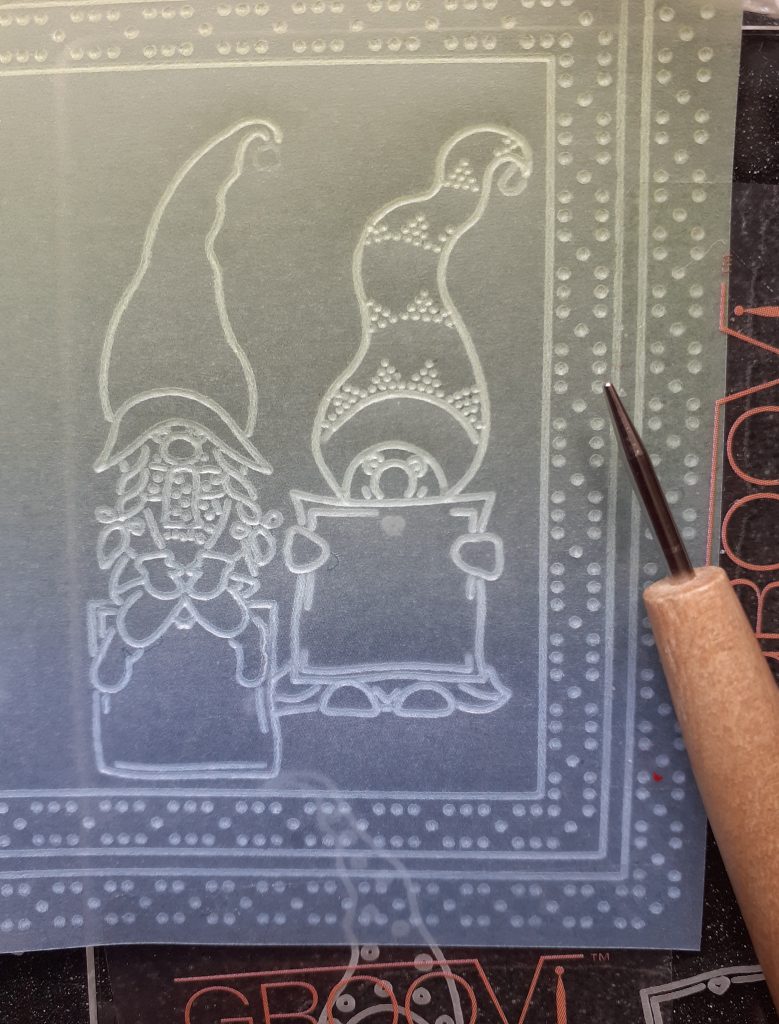
Step 4. Position the 3rd Gnome in line with the second one to the other side of your centre Gnome. Emboss with the No 1 tool omitting the heart in the letterbox again. The dots in her hat are embossed with the No 2 tool.
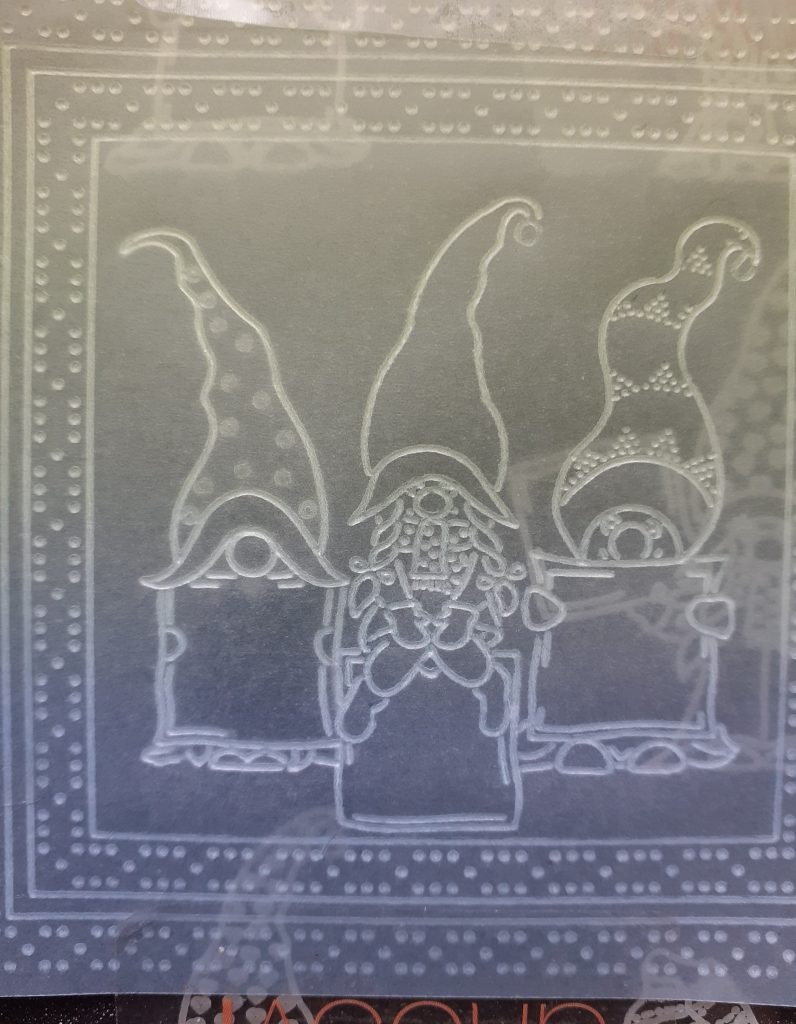
Step 5. Emboss the letters in each box to read TEA. Remember you are writing backwards so it may be a good idea to write the word on a spare piece of parchment and turn it over to help you get the letters in the right order. Alternatively, you could write the letters on the front lightly in white pencil and erase them after you have embossed the letters.
Step 6. Emboss the pattern from the top left-hand corner of the sampler plate in the centre Gnomes hat, using the No 2 tool.
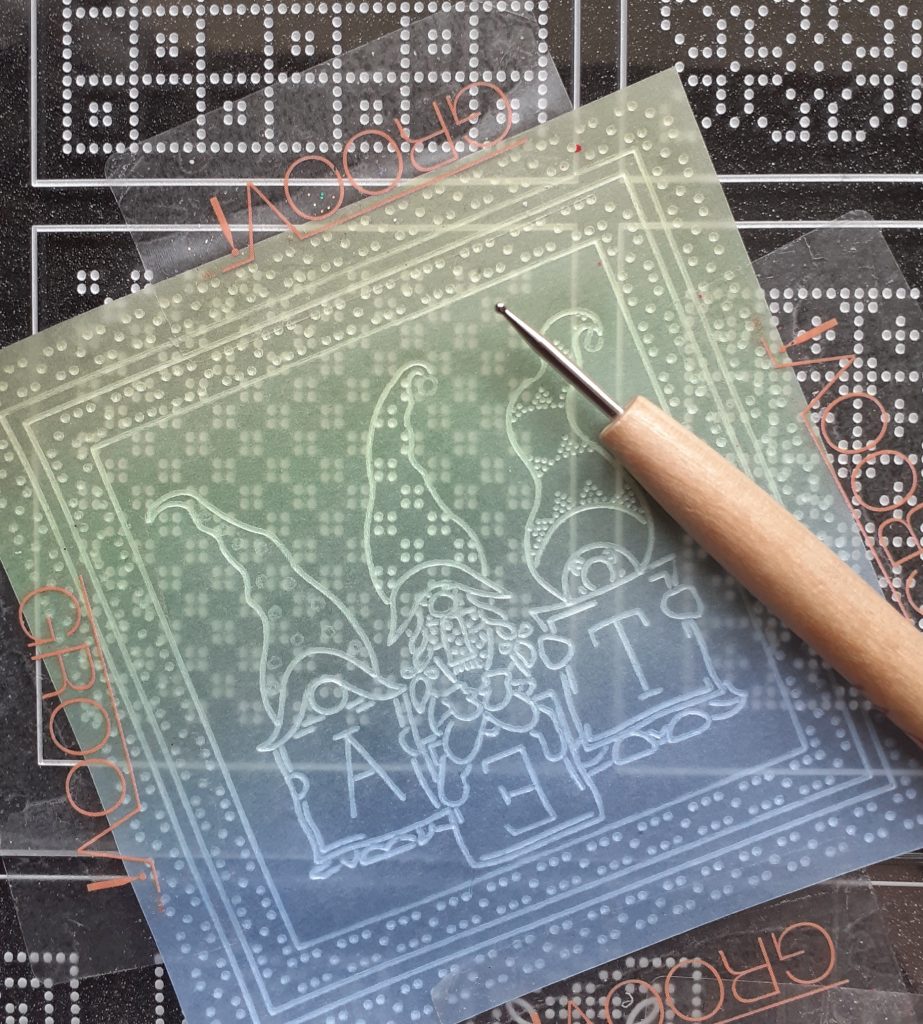
Step 7. Emboss the hat bobbles and dots within the hat with the 1.5mm and 3mm ball tools.
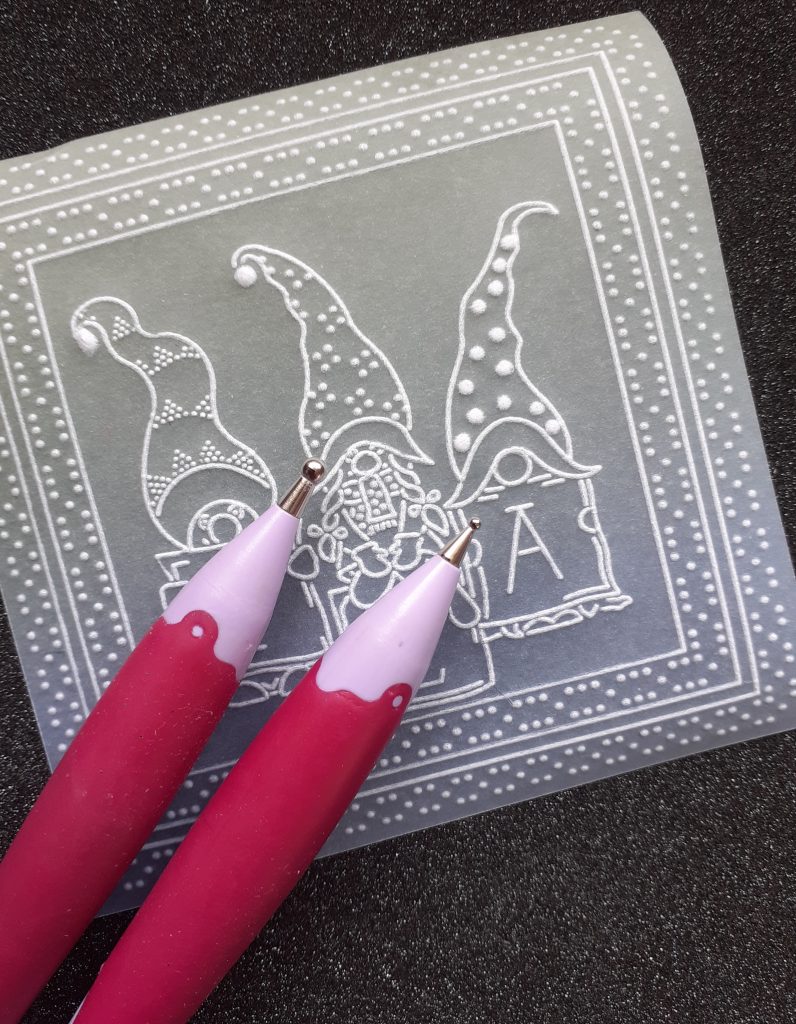
Step 8. Erase the colour from the back of the parchment and colour directly onto the back of the parchment using the Pergacolours.
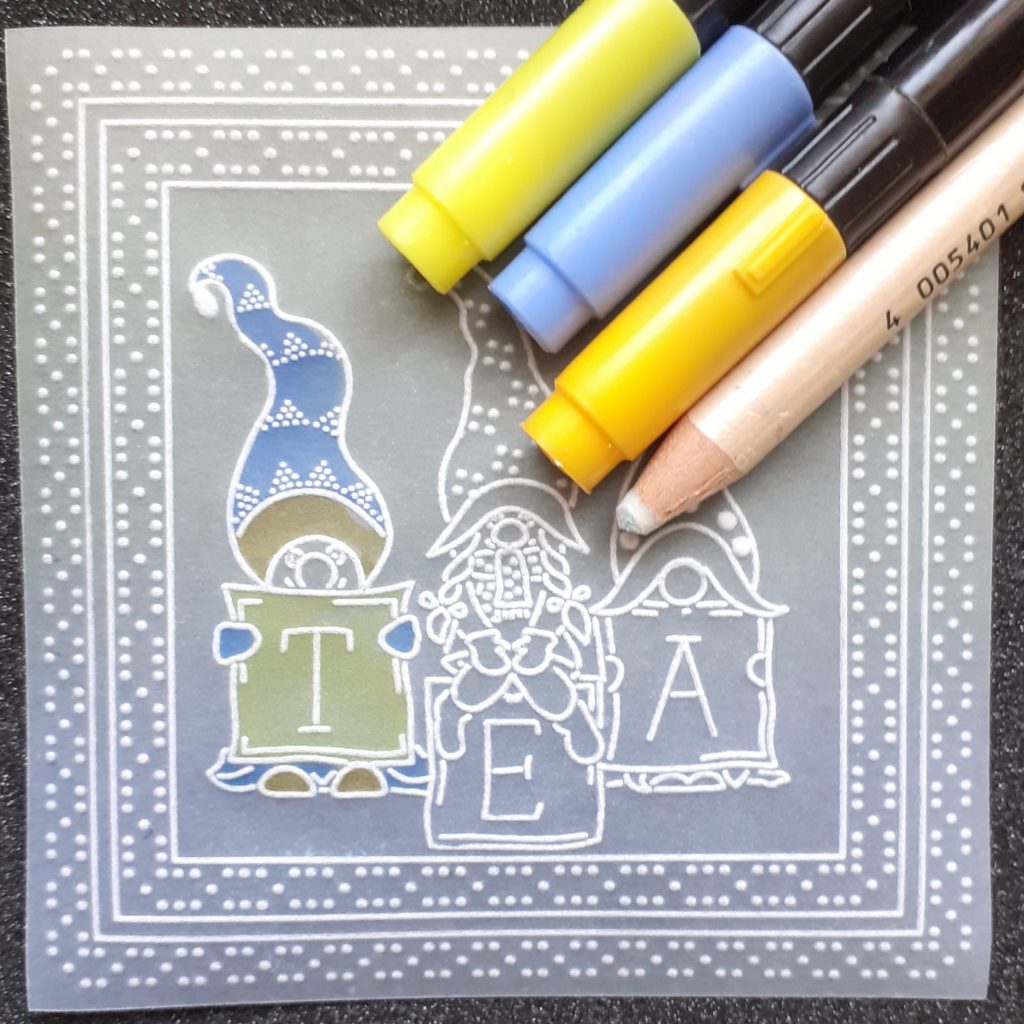
Step 9. Use the micron pen on the front of the parchment to add eyes to two of the Gnomes.
Step 10. Cut a piece of rainbow paper 3.5 inches x 3.5 inches and put it behind your parchment, this will enhance the colour. Place it inside your coaster, and use a small piece of red liner tape in each corner of the coaster to hold it together. And voila! Your gift is now complete!
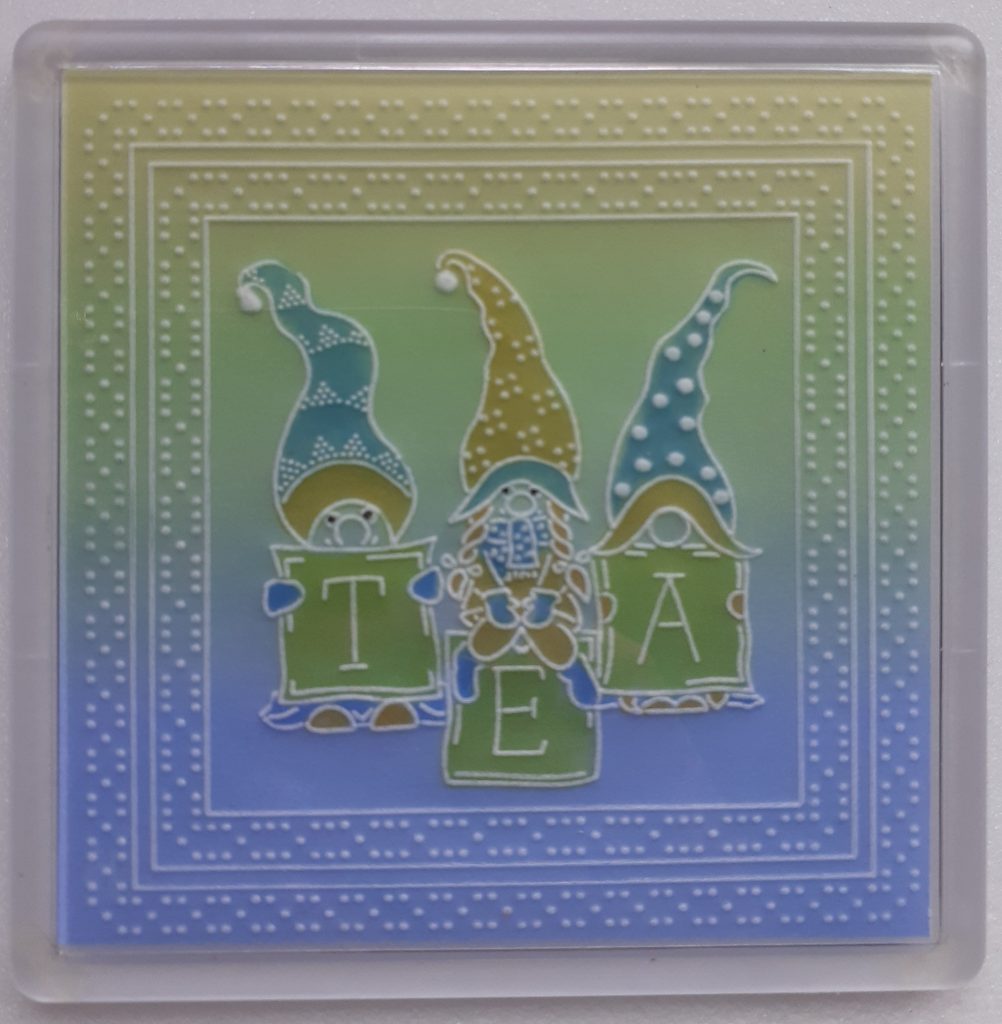
SO CUTE! I do love these coasters. Many of you made coasters with the brilliant Jane Telford at our Clarity Open Days. The options are endless, in terms of what can be placed inside them. But since SO MANY of you have ordered the cheeky gnomes, what a perfect project this will be.
Thank you so much, Josie, for sharing your tips and techniques with us!
Everything Josie has used can be found over on the Clarity website HERE and don’t forget that we currently have our Club Members Half Price Summer Sale HERE. If you are a Club Member, make sure you log into your account first!
If you’d like to have a go at this yourself, please email it to me: grace@claritystamp.com – Perhaps we can have a little coaster gallery!
Right, I’m off! Don’t forget to catch Mum on Create & Craft this afternoon: 3pm to 5pm.
Sky 683 | Freesat 813 | Freeview 85 | Virgin 748 | Apple TV | Fire TV | Roku
She will be demonstrating Jayne Nestorenko’s beautiful work. HERE is a fabulous little gallery to give you a taste.
Jayne’s art is so special. I know Mum misses her a lot and loves to share her work. It’ll be a lovely show.
Let’s look at the week ahead:
Sunday, July 3rd:
Crafting with Clarity with Barbara between 3pm & 5pm on Create and Craft
Monday, July 4th:
SHAC Shack with Barb – Live at 10am on Facebook & YouTube
Tuesday, July 5th:
Groovi Tuesday with Paul – Live at 10am on Facebook & YouTube
Wednesday, July 6th:
Crafting with Clarity One Day Special with Barb & Paul – 6pm & 9pm on Create and Craft
Thursday, July 7th:
Crafting with Clarity One Day Special with Paul – 10am & 2pm on Create and Craft
Thursday, July 7th:
SHAC Shack with Barb – Live at 10am on Facebook & YouTube
LOTS to look forward to 🙂
Travel gently, friends.
Lotsa love, Grace & Josie xoxo
Clarity – The Home of Art, Craft, and Well-Being.
Looking forward to my gnome set dropping through letterbox – ordered the whole kit – I’m not a big gnome fan but these little cuties took my eye, especially after managing to draw them in the shac – some of my best work I think ! Thanks for the project, will watch the shows this afternoon and have a good Sunday xx
Fabulous tutorial- thank you xx
Great tutorial and gift idea.
Wonderful project. Just dug out my coasters, will make these for two special friends who are avid gardeners and tea drinkers. Thanks for the idea.
another great project, look forward to having a go when my gnomes arrive x
Hi Grace & Josie – Thank you – another great tutorial – will be having a go at this.
Have a lovely week
Seta x