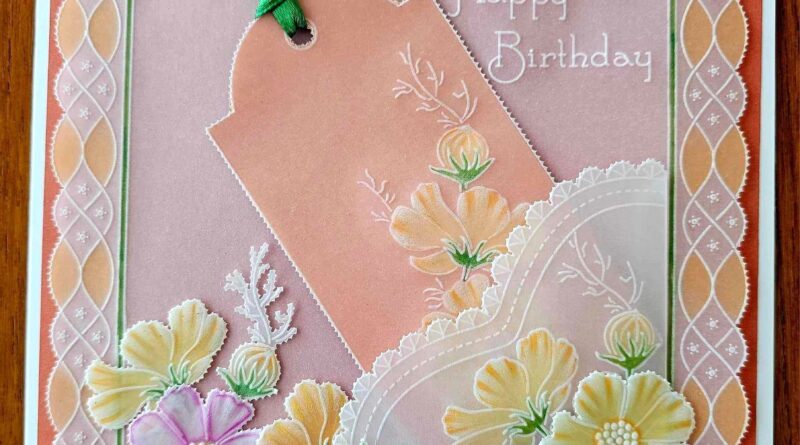
Clarity Matters Blog Tutorial: How To Create A Decorative Corner/Pocket
Hello hello! Grace here.
I hope this finds you well, happy and enjoying your Sunday morning. Time to get crafty!
We are joined this weekend by the fabulously talented Clarity Design Team member, Julie Campbell. She has kindly put together a beautiful step-by-step blog project for us! I’ll hand you over…
Ingredients
Clear Parchment A4 (GRO-AC-40024-A4)
Peach Parchment (GRO-AC-40772-A4)
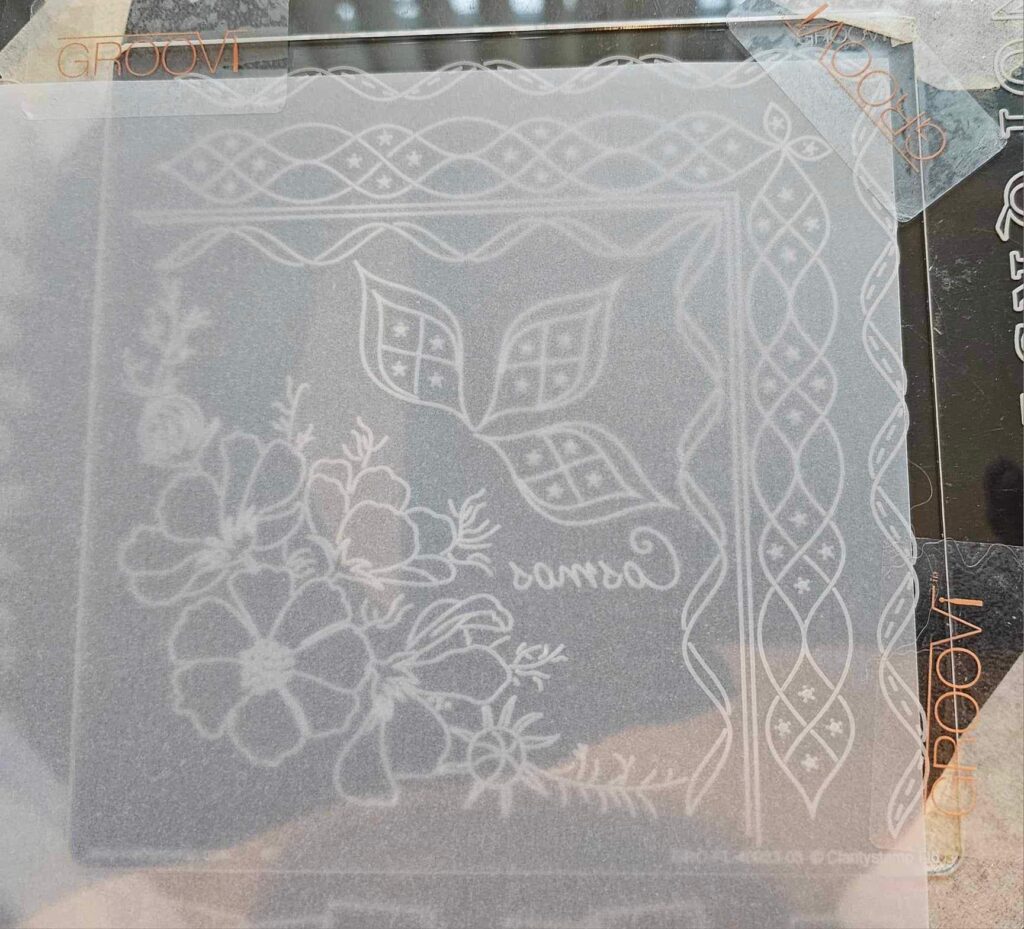
Linda Williams Cosmos & Lace A5 Sq Groovi Plate (GRO-FL-40923-03)
Groovi Club Back Issue Plate #93 Pocket (Call the office to order!)
Nested Tags A5 Groovi Plate (GRO-PA-40654-04)
Nested Squares Extension & Alphabet Frame A4 Sq Groovi Plate (GRO-WO- 40538-15)
2-Needle Bold Perforating Tool (PER-TO-70279)
Pergamano Embossing Tools:
1mm Ball Tool (PER-TO-70012-XX)
1.5mm Ball Tool (PER-TO-70004-XX)
3mm Ball Tool (PER-TO-70005-XX)
4.5mm Ball Tool (PER-TO-70015-XX)
Perga Glue (PER-AC-70133)
Perga Cutter – Curved (PER-TO-70042)
Pergamano Exclusive Pointed Scissors (PER-TO-70040)
Ring Lock Scissors (PER-TO-70041-XX)
Pergacolour Exclusives (Number 16) (PER-CO-70060-XX)
B14 Pergaliner Fuschia (PER-CO-70339-XX)
Faber Castell Polychromos (Specifically Naples yellow 185 & Cadmium Orange 111) (ACC-PE-30797)
Blending Pen and Nibs (PER-AC-70440)
Dorso Oil (PER-CO-70066-XX)
Spot on Sponge (ACC-MG-30537-XX)
Northern Lights Companion Paper (for main piece of the project) (ACC-CA-31339-88)
7” x7” Card Blank (ACC-CA-30619-77)
Sticky Tape (ACC-MS-31065-XX)
Stix2 3mm x 5m Double-Sided Tape (ACC-AD-30375-XX)
Method
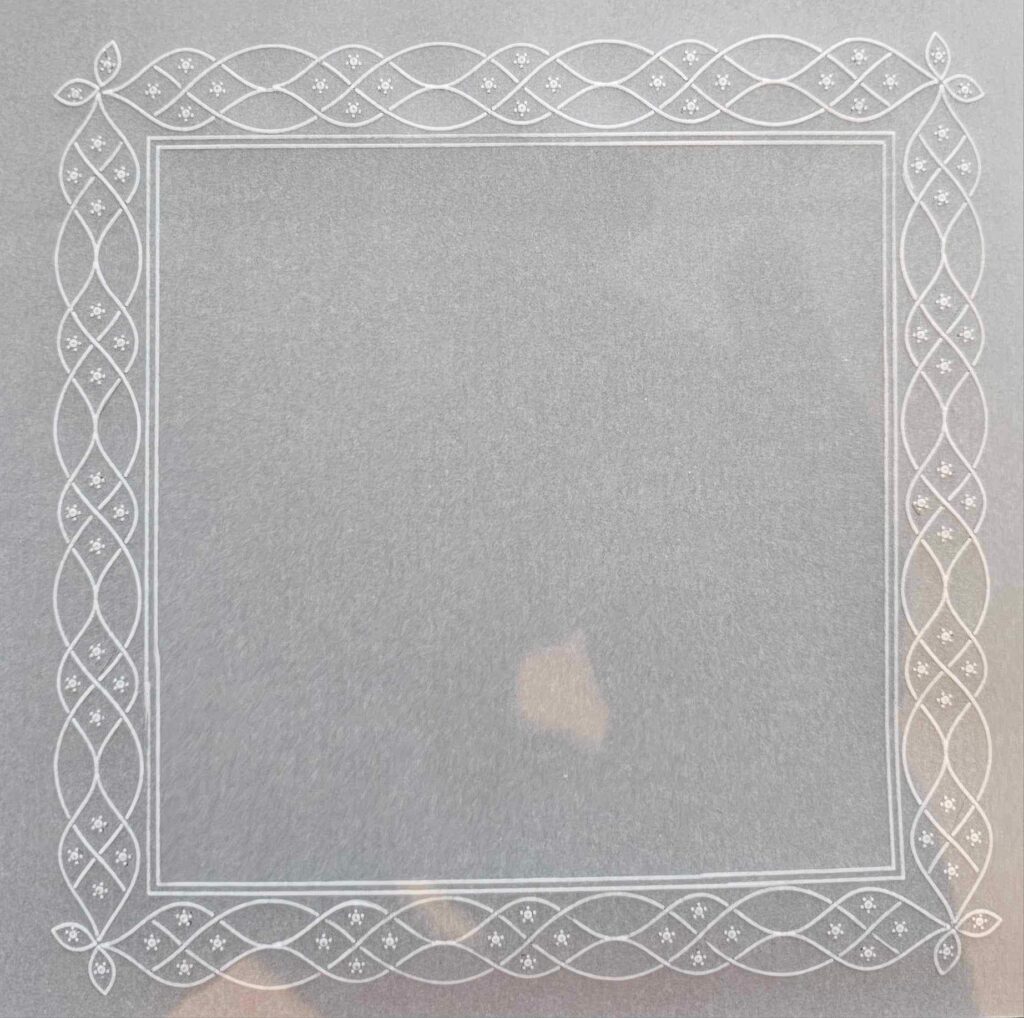
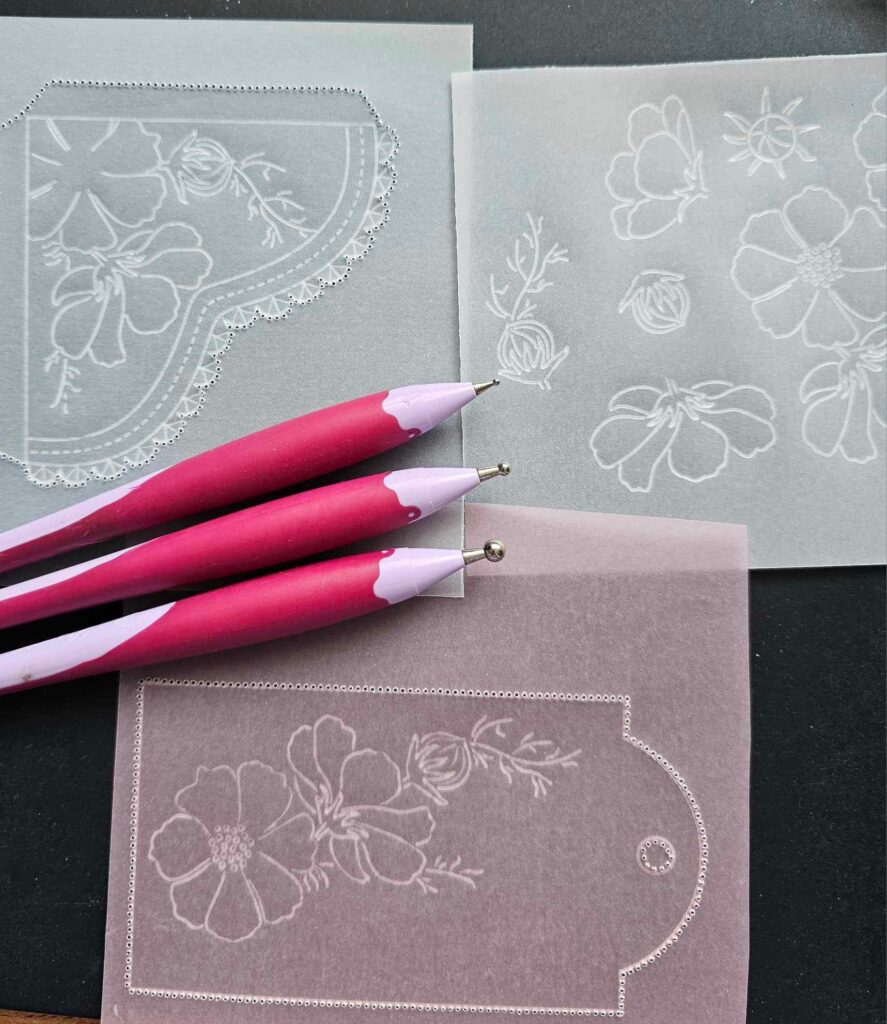
Step 1. Using the clear Parchment (A4 size) and Linda’s Cosmos Plate, trace out the outer border, extend by 1 repetition and trace the inner lines too. Turn your work around by 90 degrees until the square border has been completed.
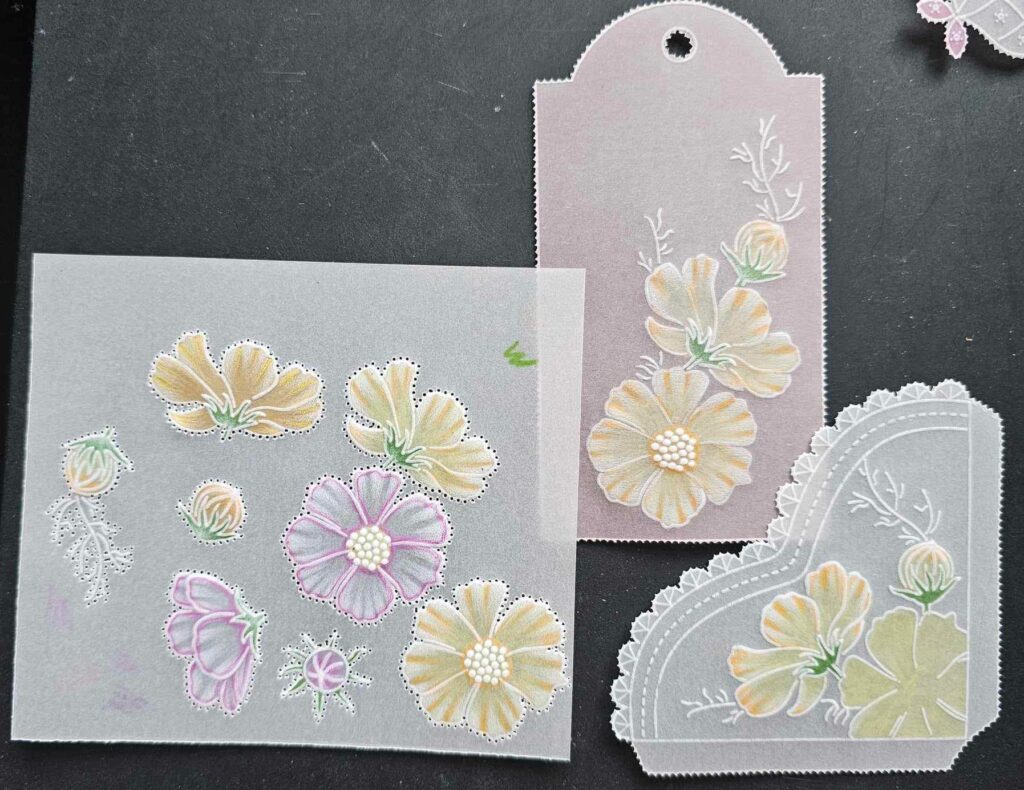
Step 2. Using leftover clear parchment from the A4 sheet above, trace out the pocket from Groovi Club plate #93. However, only trace the outline as you are going to trace some of the cosmos flowers over the pocket.
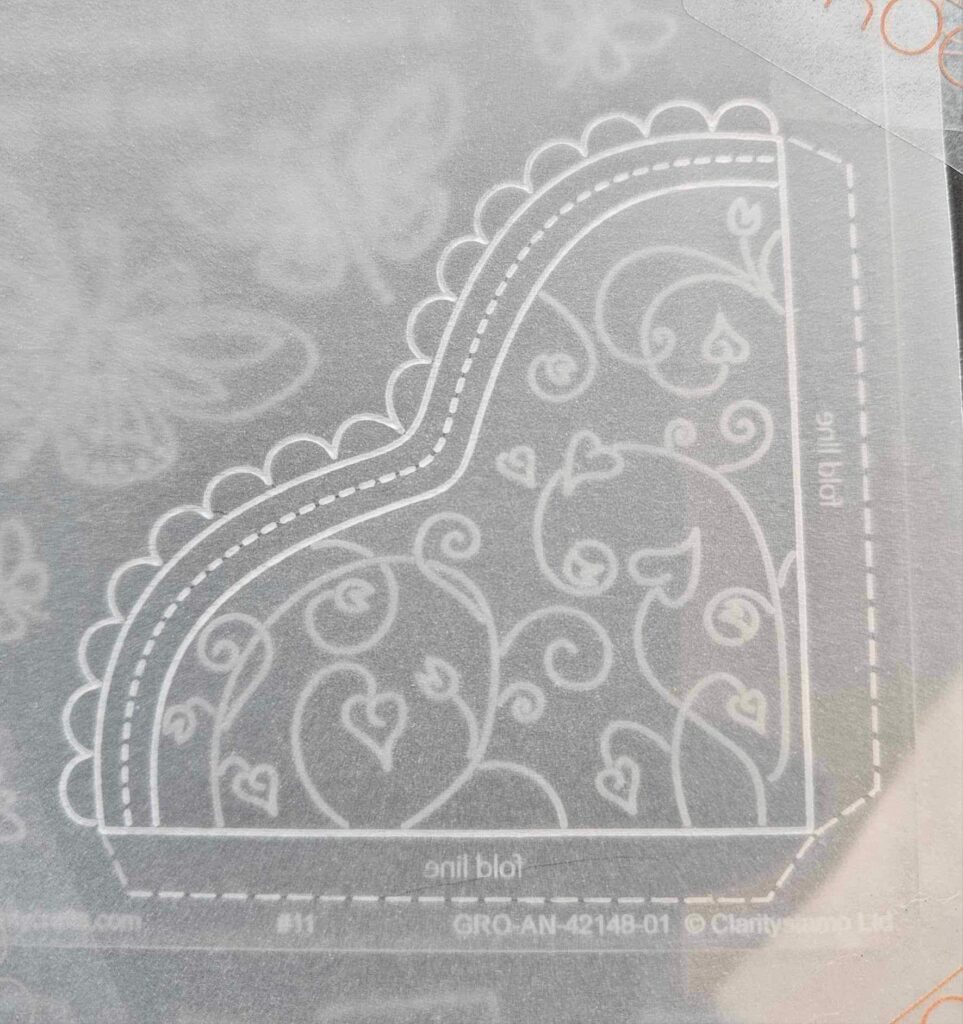
Step 3. Place the outlined pocket over the cosmos flowers, deliberately overlapping the fold. Trace out the portion of flowers as shown in the photo.
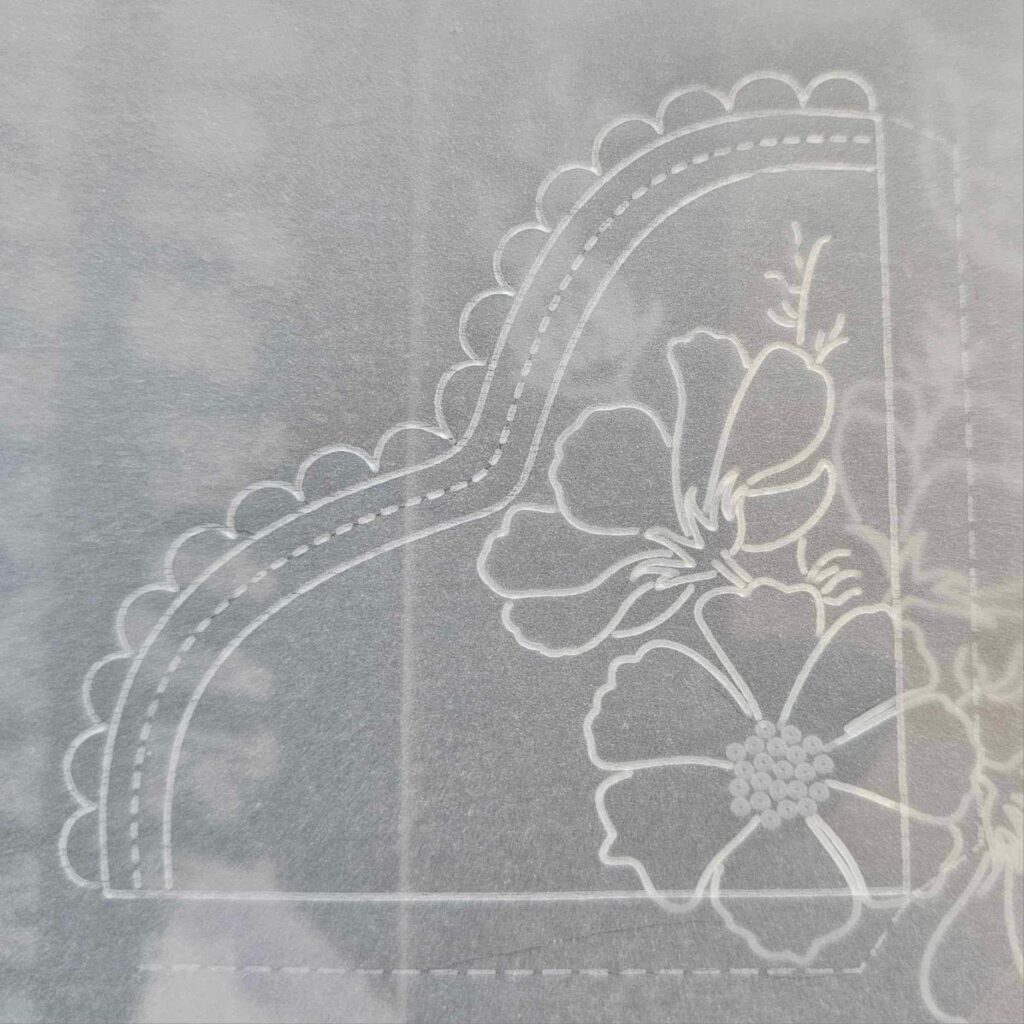
Step 4. Turn the pocket round on the cosmos plate to include the bud at the bottom corner of the pocket.

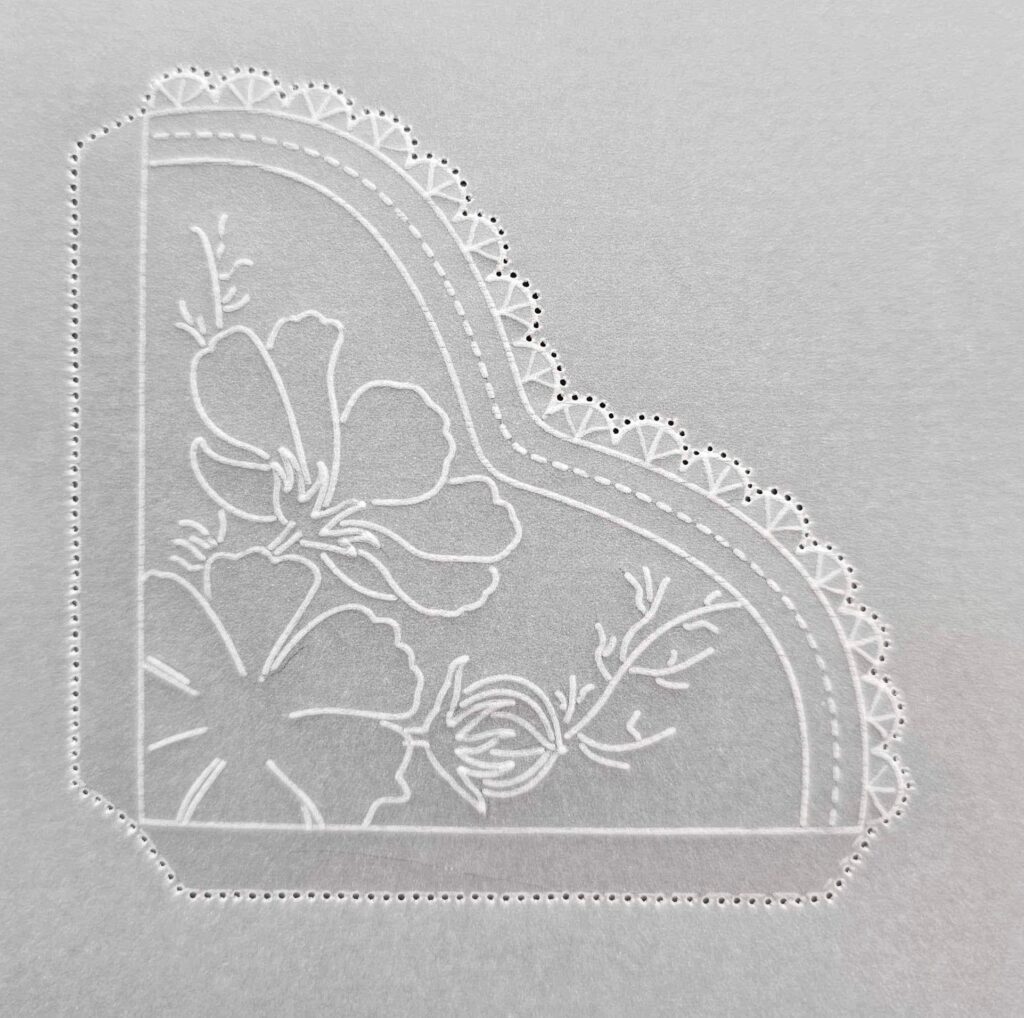
Step 5. On the other spare parchment, trace out the flowers that you have in the pocket as you will add these at the end of your project.

Step 6. On the pocket (still working on the back of your parchment) emboss lines in a star pattern on the semi-circle edge. Then, using a 2-needle bold perforating tool, perforate around the outside of the pocket.
Step 7. Now back to the main piece of parchment (the outer cosmos border). Working on the front of your parchment, in the right top corner, draw 2 lines (I used a pencil lightly but a white Pergamano pencil works well) where you want to insert Happy Birthday. Turn back over so that you are now working from the back.
Using the nested square extension plate, emboss ‘Happy’ on the top line and ‘Birthday’ on the bottom line. Then colour on the back where you want (or where I have coloured) in a colour of your choice (or what I have used) and then use a blending tool and dorso oil from the spot-on sponge to blend the colour. Be careful not to use too much oil as it will just take the colour off!
I also coloured inside the line with Perga Colour Exclusive #16. Rub out the pencil lines on the front of this piece.
Step 8. Using a 2-needle bold perforating tool, perforate around the whole of the outside of the border and picot cut it all out. Set this aside as it is complete and ready for assembly
Step 9. Now on to your peach parchment. Working from the back of your parchment, using the nested tags plate…
TOP TIP: Test in a corner that you won’t be using by embossing a small white line on both sides of the parchment, the whitest line is the FRONT of your work, emboss on the back!
Emboss the largest tag with the notch (or one of your choice). Also, emboss a circle where you want the ribbon to be inserted. Pierce with a 2-needle bold perforating tool around the outside of the tag and also on the inside of the little circle (do this part on the FRONT of your work).
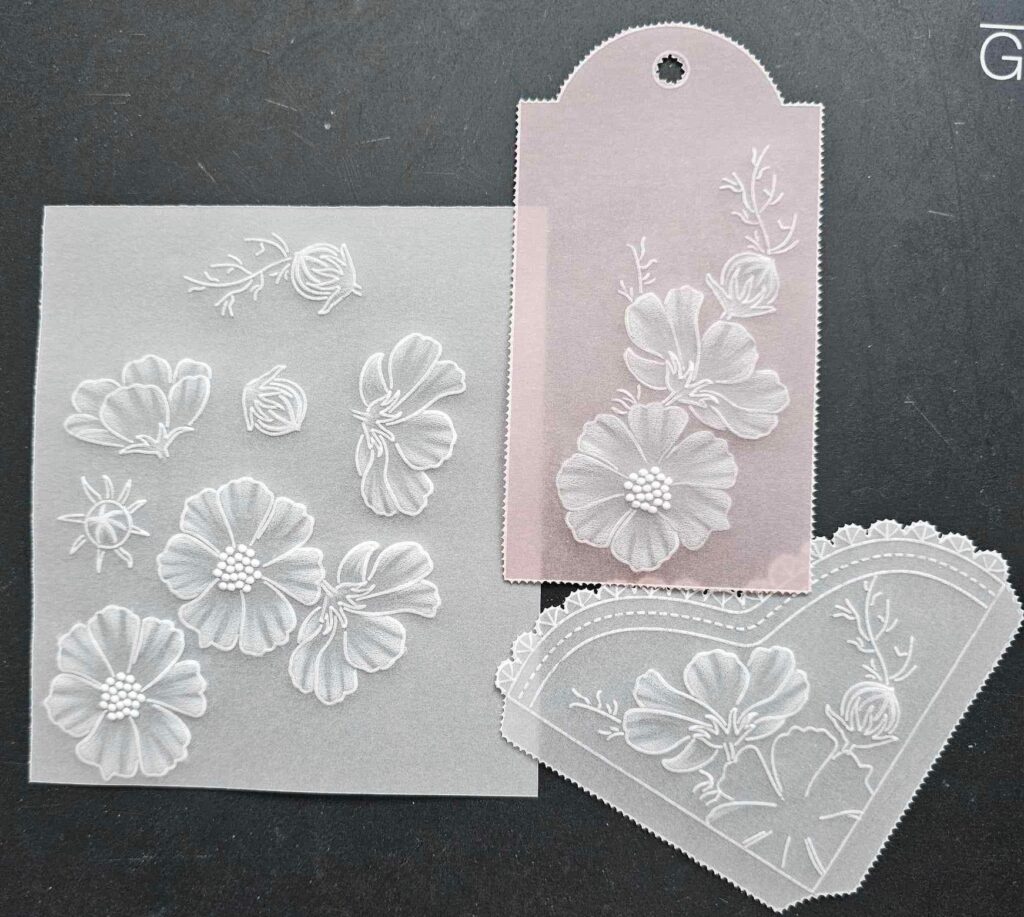
Step 10. Emboss a selection of Cosmos flowers to your tag (embossing on the back). Your tag, spare parchment and pocket should now look like the photo below.
Step 11. Now emboss all the flowers you have created on both the peach and clear parchment using a number 4.5, 3 and 1.5 embossing tool. Make sure that you start with the largest embossing tool and rest between layers of embossing. Once you have reached the level of whiteness you want, turn your work over and it should look like the photo.
Step 12. On the peach parchment (tag), turn it over and work on the back… Rub out where you are going to apply colour (ie over all of the flowers and the bud) then, apply the colour you want to use on the flowers. Blend as before with the blending tool, nib and dorso oil. Colour the calyx of the flowers. I used Perga Colour Exclusive#16. Allow to dry. When seen from the front it will look like this…
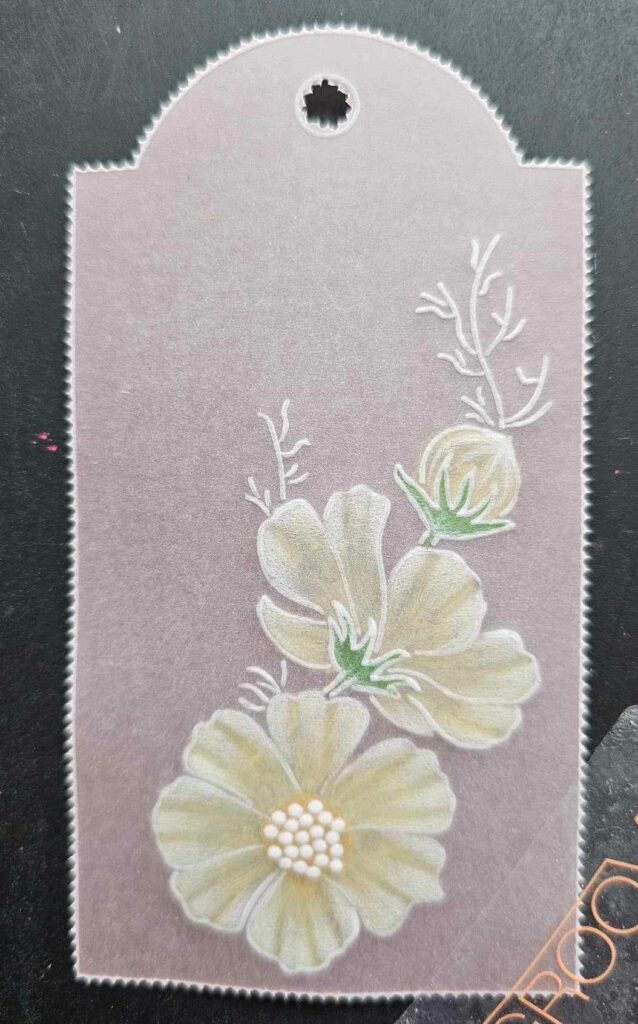
Step 13. Colour the remaining flowers on all the pieces of parchment and blend with the blending nib and dorso oil. Extra detail can be added to your flowers on the front of your work.
Step 14. On the front of your work (the parchment with all the flowers and the tag) you are now going to apply colour in parts to enhance your flowers (you can skip this part if you aren’t too confident) with a very sharp pencil. I used Faber Castell Polychromos 111, 185 and Pergaliner B14. From the outer edge of the flowers flick in some strokes of colour between your embossing and also around the base of the embossed stamens.
Make sure you keep the pencil point sharp, but be gentle when sharpening to preserve as much of your pencil as possible. If you want a softer look you can use a dry blending nib to smooth out the colour. Then when you have finished colouring, use a number 2 bold embossing tool to pierce (from the FRONT of your work) around the outside of all the flowers.
Step 15. Now picot cut out everything you need ready for assembly!
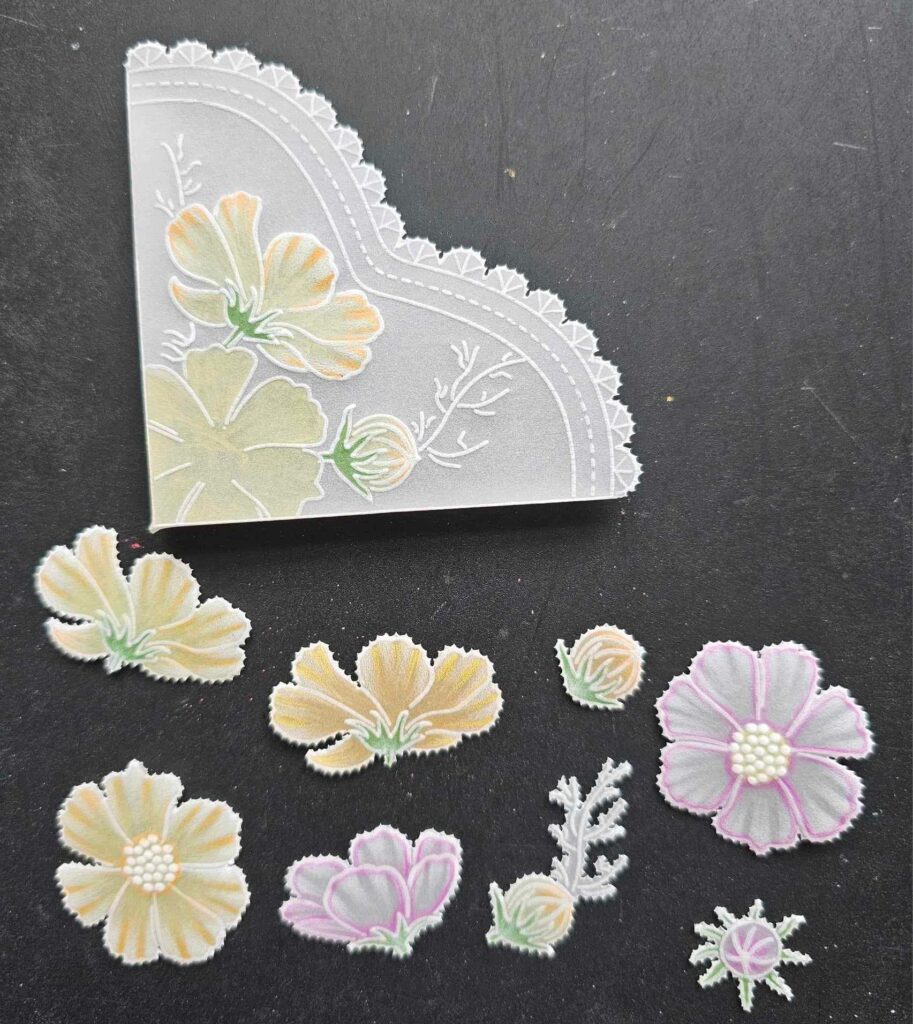
Step 16. On the back of the pocket, gently emboss the fold line and very gently ease the parchment into a fold line so that the folds are flat. I used very fine double-sided tape (cut to size) on the side of the fold that comes into contact with the main piece of parchment.
Step 17. Attach the pocket to the main parchment in the position you want. You will see I have attached the pocket to the bottom right corner of my main piece of work.
Step 18. Now assemble your individual flowers where you want them (you will see that I made too many but you then have spare for another project!).
Use a very small dot of Perga Glue to attach to the main parchment.
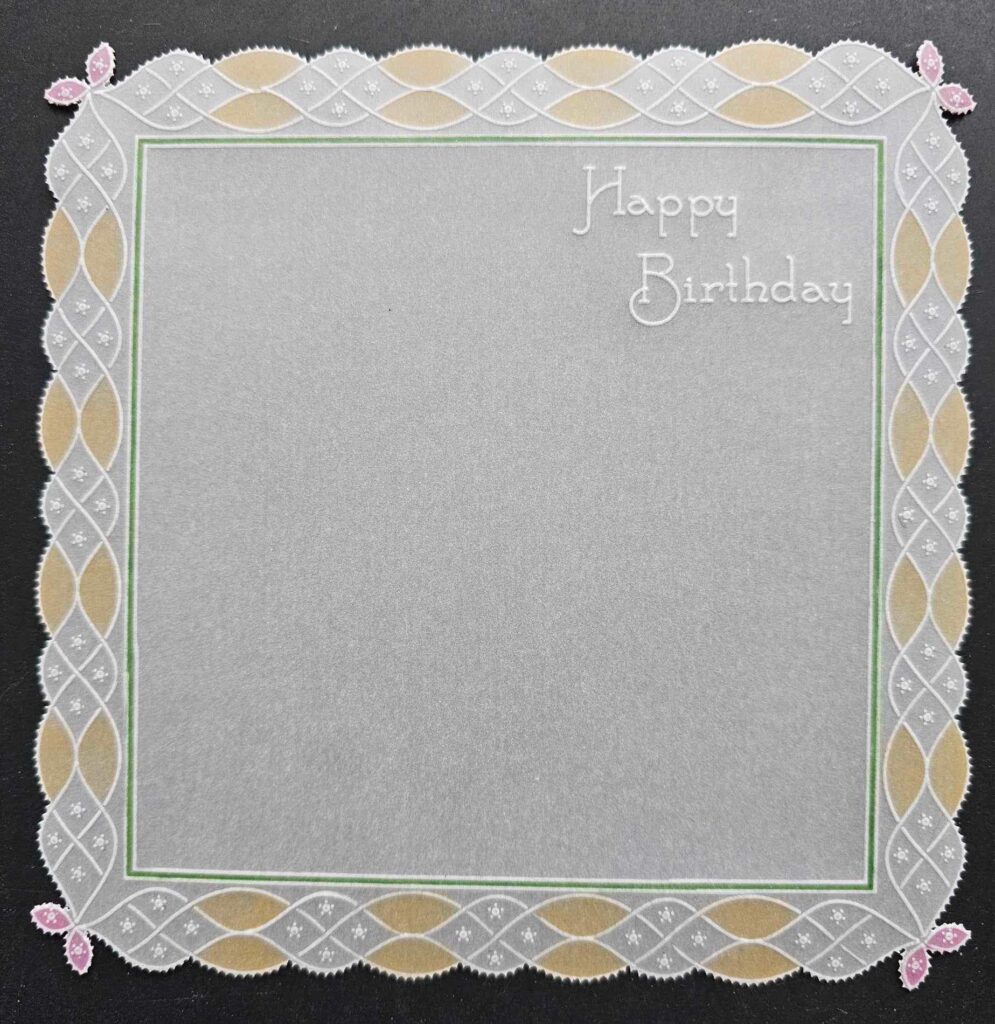
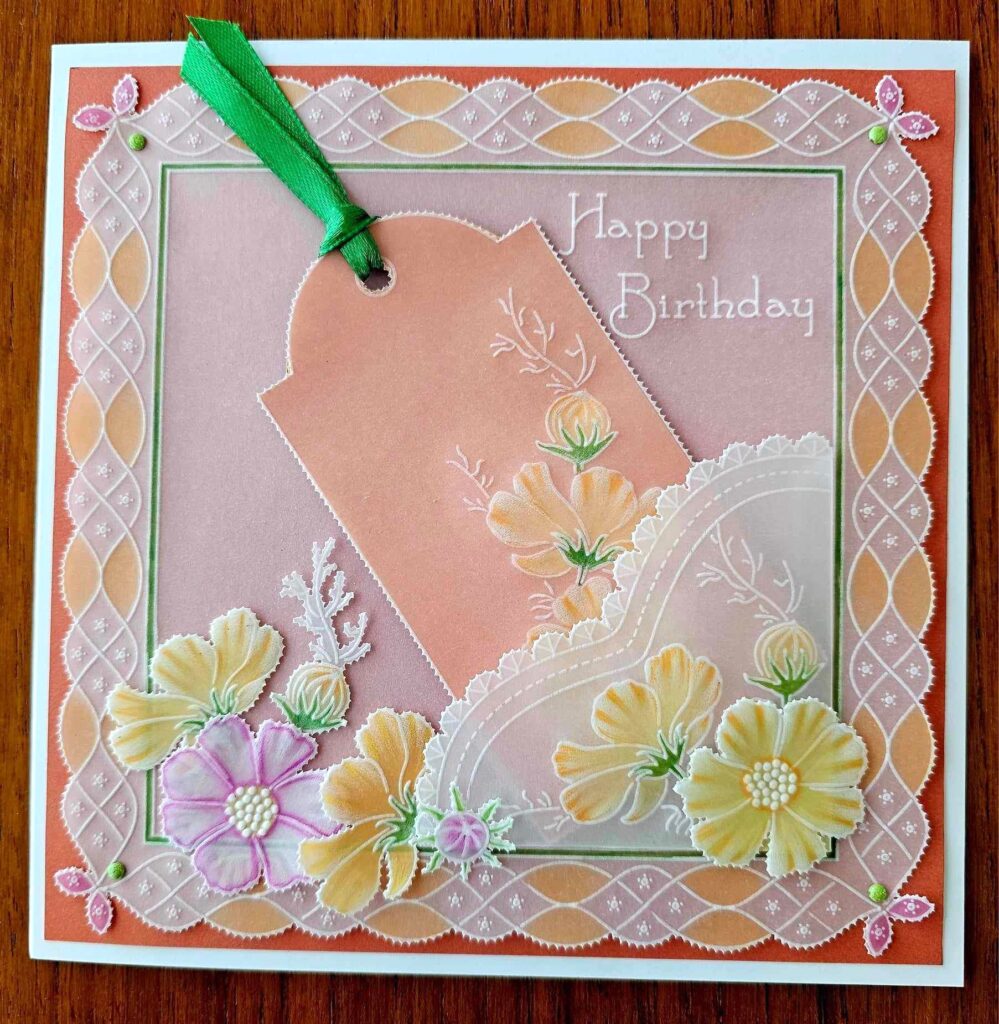
Put the backing paper on your main price of work – I used Northern Lights Companion Paper, using 4 brads one in each corner.
Using roll-a-tape on the back of the backing paper, attach to a 7” x 7” white card blank.
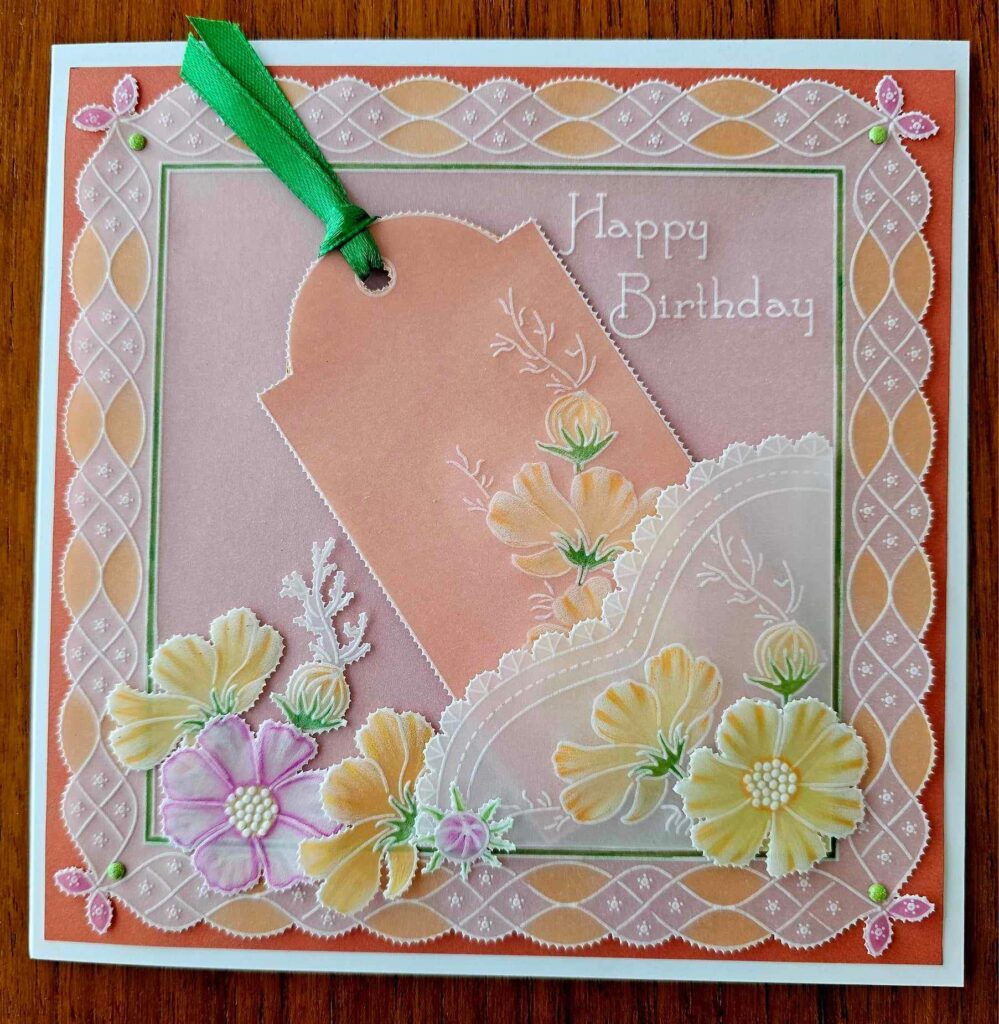
Step 19. Put backing paper on the tag. I attached with a little Perga Glue in places that couldn’t be seen. Attach a ribbon (I went with a green ribbon to pick up the green of the calyx and the green line on the main parchment). Place the tag inside the pocket and there you have your completed masterpiece!!!!
Hope you have enjoyed the project, I enjoyed making it and sharing it with you all, Have fun xx
WOW! What a fabulous finished piece of artwork, and such a brilliant step-by-step project. Thank you, Julie! It’s certainly a welcome Spring card at such a Wintery time of here. I cant wait for Spring and the flowers to bloom! 🙂
Everything that Julie has used in this particular project can be found in a shopping list, HERE.
Now, looking at the week ahead…
Tuesday 30th January:
Groovi Tuesday with Paul – 10am Live on Facebook & YouTube
Thursday 1st February:
In the SHAC with Barbara – 7pm Live on Facebook & YouTube
Saturday 3rd February:
Crafting with Clarity (with Barb) on Create & Craft – 1pm & 4pm
Sunday 4th February:
Crafting with Clarity (with Barb) on Create & Craft – 3pm – 5pm
See you there!
Travel gently, friends.
Lotsa love, Grace & Julie xoxo
Clarity – The Home of Art, Craft, and Well-Being.
What a beautiful project. Thank you Julie for demonstrating your work. X
Beautiful, will give this a try.
Gorgeous card. Thank you Julie, I will have a go at this one. X
What a beautiful card and really clear instructions. Thank you, Julie. I’m sure I have all the ingredients in my stash too.
Wow!!! What a beautiful idea. Must give this a go.
Another stunning project; thank you.
What a pretty card, I have been using the cosmos plate for a frame on a couple of my WIP so its out on my desk so I just need to get the pocket & tag plates & I will be ready to go. Thank you Julie for a lovely project & great instructions x
A lovely card, thank you Julie for the step by step instructions. x
Thank you Julie, for the instructions for this beautiful card, the cosmos plate is one of my favorites. Love the coloring. Hope your ok Grace. Xxx
when is annual sale so that us newbies can purchase all the required incredients?
this is awesome!
Pingback: Saturday Share Time!