Clarity Matters Blog Tutorial: How To Make A Special Card Using A Parchlet Plate
Hello hello! Grace here.
I hope this finds you well, feeling crafty and enjoying your Sunday morning!
We are joined this weekend by the super-talented Maggie Byford, a beloved Clarity Design Team member.
I’ll hand you straight over to our teacher…
Hearts & Flowers
How To Make a Special Card Using a Parchlet Plate
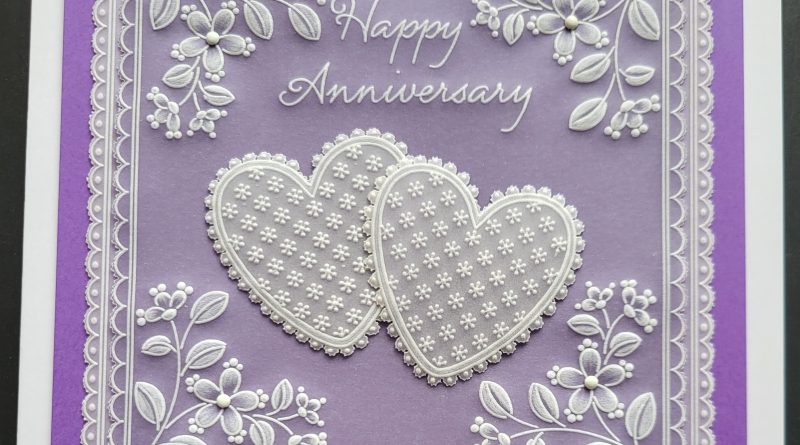
Parchlet baby plates – I love them. They are so versatile. Although they may only measure 10.5cm square, they are great for making small, medium or large cards, as well as Coasters or Toppers. For this project, I’ve used Tina’s Hearts & Flowers Parchlet Plate to make a Happy Anniversary card but it could easily be made into a Valentine’s Day card to a loved one, or made into a lovely Wedding or Engagement card.

Ingredients
Tina’s Heart Flowers Parchlet A6 Sq Baby Plate (GRO-FL-40987-01)
Nested Scallops Squares A5 Sq Plate (GRO-PA-40557-03)
Nested Scallops Squares Extension A4 Sq Plate (GRO-WO-41168-15)
Numbers, Ovals & Tags A6 Sq Plate Inset (GRO-WO-40133-11)
Diagonal Basic Bold A5 Sq Plate (GRO-GG-40201-12)
Occasions Groovi Border Plate (GRO-WO-40060-09) (optional)
Alphabet A5 Sq Plate Mate (GRO-MA-40002-07)
Semi Circle Mini Perforating Tool (PER-TO-70034-XX)
Pergamano 1-Needle Bold Perforating Tool (PER-TO-70028-XX)
Pergamano 2-Needle Bold Perforating Tool (PER-TO-70279-XX)
Pergamano Excellent – Embossing Mat (PER-AC-70075-XX)
Groovi Embossing Tool 1 and 2 (GRO-AC-40026-XX)
Groovi Embossing Tool 3 & 4 (GRO-AC-40027-XX)
Pergamano 1mm Ball Tool – Extra Small (PER-TO-70011-XX)
Black Dual-Purpose Groovi Mat A4 (GRO-AC-40194-A4)
Irys & Wisteria Duo Parchment Paper A4 (GRO-AC-40766-A4)
Groovi A4 Clear Parchment (GRO-AC-40024-A4)
Groovi Sticker Tabs x 16 (GRO-AC-40437-XX)
Groovi Guard (GRO-AC-40345-XX)
Ringlock Scissors (PER-TO-70041-XX)
Pergamano White Brads (PER-AC-70269-XX)
Perga Glue (PER-AC-70133-XX)
Card Blanks Pre-scored x 20 7×7” White (ACC-CA-30619-77)
A5 Black Superfoam (GRO-AC-41765-XX)
A4 Picot Foam (Black) (GRO-AC-40625-XX)
Dry Tumble Dryer Sheet
Cocktail Stick (to use with Perga Glue)
Coloured Background Card
METHOD
Step 1. Attach Iris parchment (with the shiny/darker side facing up) to the A5 Nested Scallops Squares Plate and wipe a dry tumble dryer sheet across the surface to make embossing easier. Use Groovi #1 to emboss around the largest double outline on the plate, including the scallops.

TOP TIP: The shiny/darker side of the parchment is the back. The matt side is the Front. If you can’t tell which side will give you white embossing then do a simple test. Use Groovi #2 tool to emboss a medium-sized dot on a corner of any side of the parchment (over an embossing mat). Check the other side of the parchment and if the dot is showing as white, then that side will be the front (matt side), but if the dot is showing as the same colour as the parchment then that side will be the back (shiny) side of the parchment. Alternatively, to tell if it’s shiny or matt, just hold it directly under a light source and you should be able to see the difference.
Step 2. Insert the Parchlet Plate into the A6 Square Plate Inset. Still working on the back of your Iris parchment, align the top left corner of your parchment over the top left corner design on the plate, re-attach and emboss the design as shown in the picture.

Repeat this design in each of the 3 remaining corners. Do this by leaving the plate where it is and moving the parchment each time. It should now look like this.
TOP TIP: I used a Groovi Guard to keep my parchment flat as I emboss the line art.

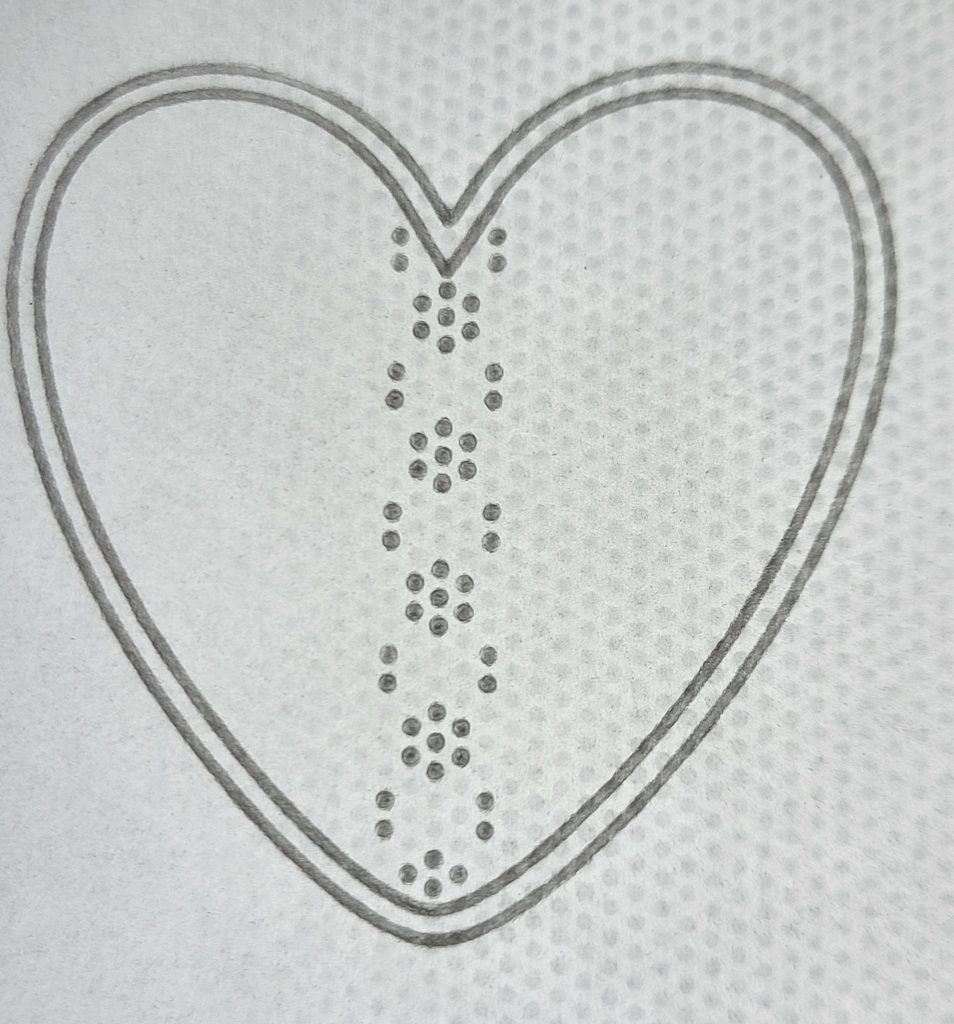
Step 3. Still using the Parchlet plate, take a spare piece of plain parchment and emboss 2 separate hearts onto it – but only emboss the double outlines and nothing else, as can be seen in the picture.
Make 2 further hearts in the same way but using Iris parchment, then put everything to one side for later.

Step 4. Return to your main Iris parchment with the corner designs on it – Place it with the front facing downwards onto an embossing mat and use various tools to emboss a corner design as follows:
– Pergamano 1 for the dots.
– Groovi #2 for the oval shapes at the base of each of the 3 tiny groups of flowers.
– Groovi #4 to emboss all of one side only of the 7 leaves, being sure to emboss right up to the centre vein but not over it as shown in the picture.

– Use Groovi #4 on the petals and leaves, including the opposite side of the centre vein of the leaves but this time don’t emboss right up to the centre vein – instead leave a tiny gap as shown in the picture.

This is what the embossing looks like from the front of the parchment…

Repeat the above steps on the 3 remaining corner designs and it should then look like this on the front.

On the front, use a 2-Needle Bold and a thick Superfoam Mat to perforate all around the outside edges of the embossed scallop shapes.

Use parchment scissors or snips to cut between all the perforations to finish.
Step 5. You’ll now be embossing a gridwork design on the 2 plain parchment hearts you created in Step 3.
TOP TIP: Before you start, you need to place your Grid Plate in front of you, with the Groovi logo at the top right, and you’ll see that all the holes on the top row are next to each other. Now give your plate a quarter turn to the right and you’ll see that the holes on the top row are now in a zig-zag position, in that the holes are not next to each other but have a gap in between, and this is the way up you will be using the Grid Plate on this occasion.
This picture shows a sample graph showing you the embossing pattern for the gridwork, but you’ll need to blink a few times to allow your eyes to focus on the black dots that are to be embossed.

You’ll now see a sequence of pictures showing you how I aligned the parchment on the Grid Plate (over a Light Wave) and how I started the embossing process within the hearts. (The arrow at the top of the graph indicates the vertical line that forms the centre of the gridwork design).
Begin by aligning and then attaching one of your plain parchment hearts (with the front facing down) onto the Grid Plate so it looks like the first picture, then use Groovi #2 to emboss dots down the centre line as shown.

TOP TIP: It may be a good idea to, first of all, practice the gridwork in the heart shape, in its entirety, on a spare piece of parchment.
Continue to follow the embossing pattern as shown in the next 4 pictures.


This picture is a front view of how it should look.

Step 6. Still working on the back of the heart, follow this next sample graph to emboss some short, fine lines to join the dots as shown in red. For this, you need to use Pergamano 1.

Note: The graph shows you the top 3 rows as an example of how to emboss the criss-cross lines, but the first three steps to making them are shown in red at the bottom of the graph.
This is how it should look when finished.

Repeat Steps 5 and 6 on the other plain heart, so now you have two.
Step 7. Continue to work on these 2 hearts as follows:
– On the back use Groovi #4 to lightly emboss between the double outlines.
– On the front use the Mini Semi Circle tool over a thin Picot Foam Mat to shallow-perforate all the way around the heart shape as shown – except for the small v shape at the top of the heart where you need to perforate 5 holes using the 2-Needle Bold.

On the back use Groovi #2 to emboss a dot within each semi-circle shape.
– On the front (over a thick Superfoam mat) use a 1-Needle Bold to carefully re-perforate through each of the semi-circle perforations.

Use parchment scissors or snips to cut between the perforations.

Use ordinary scissors to cut around the outsides of the two Iris-coloured hearts.

Step 8. Using a separate sheet of plain parchment and the Nested Scallops Squares Extension Plate, emboss around the 5th double outline, counting down from the top of the plate, including the scallops.

On the back, use Groovi #2 to emboss a dot in each of the scallop shapes.

On the front, use a 2-Needle Bold and a thick Superfoam Mat to perforate all around the outside edges of the embossed scallop shapes. Then use parchment scissors or snips to cut between all the perforations to finish.

Step 9.
– Add an embossed greeting of your choice if using one. I used the Happy Anniversary greeting from the Occasions Groovi Border Plate.
– Cut a piece of coloured background card to size (mine was 16x16cm) and round off the corners with a corner punch if desired.
– Place an Iris heart into your embossed gridwork heart to act as a coloured insert, with the darker side facing the inside. To hold them together I used very tiny dabs of PergaGlue on a cocktail stick and applied it to the cut edge of the Iris heart. Repeat for the other heart.
– Place all your components in front of you ready for layering and mounting.

– Decide where you want the heart shapes to be placed. I attached the left one to the main Iris parchment first by securing it with tiny dabs of PergaGlue on a cocktail stick and applied to cut edges as before. I then over-lapped it with the other heart and secured it in the same way.
– To begin layering up, place the coloured background card on the bottom, then the plain parchment scallop frame, then the main Iris parchment on top. Align and secure them all together with a white Perga Brad placed in each of the corner flowers.
– To finish, mount everything onto the front of folded white Clarity card 7×7” square, using foam pads. Here is the finished card.

What a fantastic project. Thank you, Maggie, for putting this together for us. You make it look easy!
Everything that Maggie has used can be found over on the Clarity website HERE
A quiet week at Clarity Towers this week. Here is our schedule for the week ahead:
Tuesday 30th May:
Groovi Tuesday with Paul – 10am Live on Facebook and YouTube
Sunday 4th June:
Crafting with Clarity with Barbara on Create & Craft – 3pm-5pm (2 hours)
Travel gently, friends.
Lotsa love, Grace & Maggie xoxo
Clarity – The Home of Art, Craft, and Well-Being.
Very pretty card. Lovely clear instructions as always – thanks,Maggie.
Thank you for another lovely step by step.
Thank you for a great piece of inspiration and tutorial.
Another great project from Maggie – I haven’t got the parchlet but have others that I can use instead.
Thank you Grace & Maggie
Have a good week everyone xx
Thank you Maggie for a great step by step, such a lovely card. xx
Perfect timing. I am looking at my plates to make a Ruby anniversary card and this is a brilliant sample. Thank you so much Maggie
What a beautiful card – with step by step instructions
Thank you Maggie
Xxx
I love the A6 parchlets too.
Thank you for Maggie for the step by step to make this beautiful card.
Lynn x
Wow… beautiful….. and so well explained.. Thank you for sharing.