Clarity’s Blog Tutorial: How To Make A Memo Book
Hello hello! Grace here
I hope this finds you well? Thank you for checking in with us on a Sunday. These fantastically free blog tutorials every Sunday are brilliant, and I’m thrilled that you are here to learn along with us…
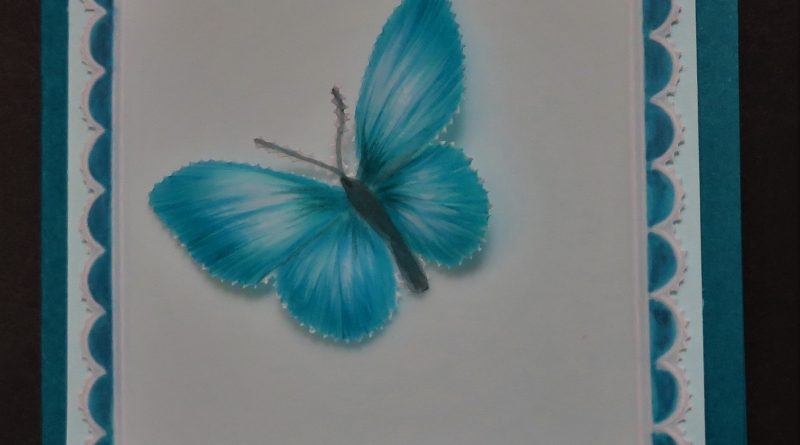
The wonderful Glynis has put together yet another step-by-step demonstration for us, which follows on from last week’s blog: How To Paint with Perga Colours. You can find that one HERE. Our tutorial today will show you how to make a lovely mini memo book or post-it note pad using the butterfly Glynis painted! What a lovely Christmas gift or stocking present that would make! Or a ‘Just Because’ gift.
I’ll hand you right over to the lovely lady herself…
How to Make a Memo Book
Ingredients
Nested Scallops Squares A5 Square Plate (GRO-PA-40557-03)
Pergamano Colour Exclusives – *PCE’s (PER-CO-70060-XX)
Clarity Tape Runner (ACC-MS-31065-XX)
Number 1 Embossing Tool From The Starter Kits (GRO-AC-40026-XX)
Pergamano Two-Needle Perforating Tool (PER-TO-70037-XX)
Pergamano Brads (Various HERE)
Pergamano Perga Glue (PER-AC-70133-XX)
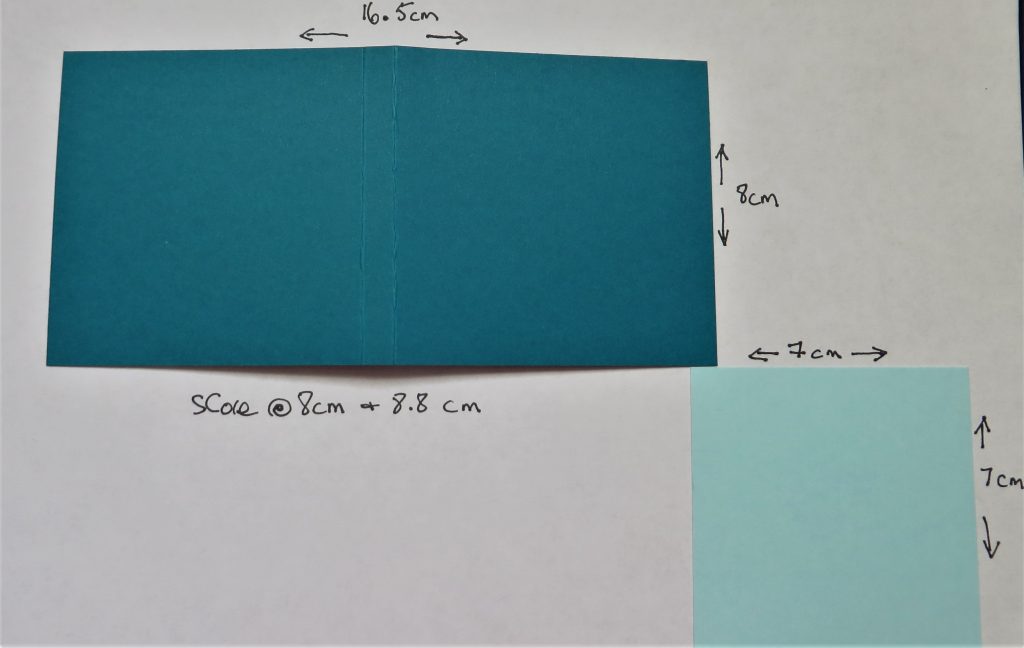
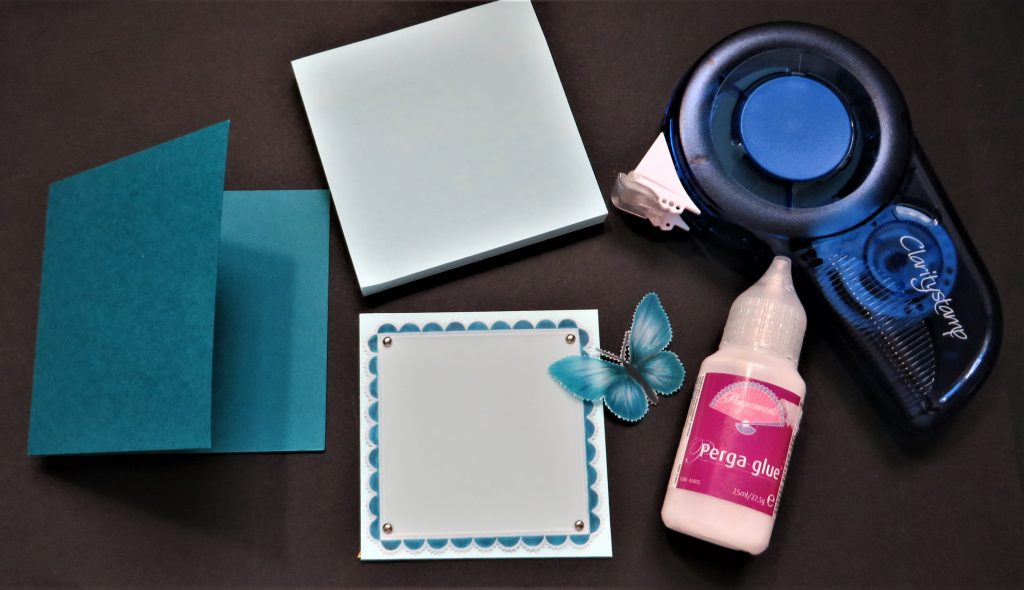
16.5 x 8 cm Piece of Card
7 x 7cm piece of Contrasting Card
7.5 x 7.5 cm Post-It Notes Pad
Method
Step 1. Cut your card to the above sizes and score the larger one at 8cm and again at 8.8cm to form the spine of the book.
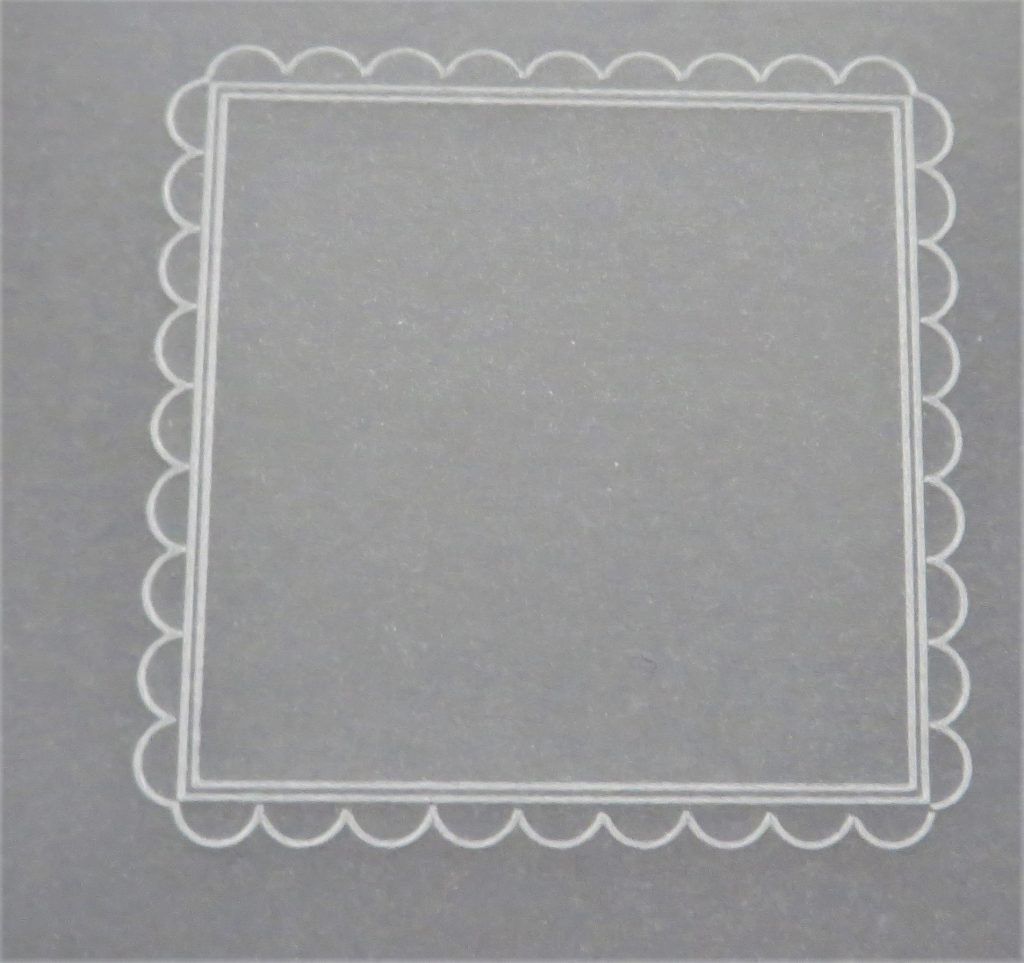
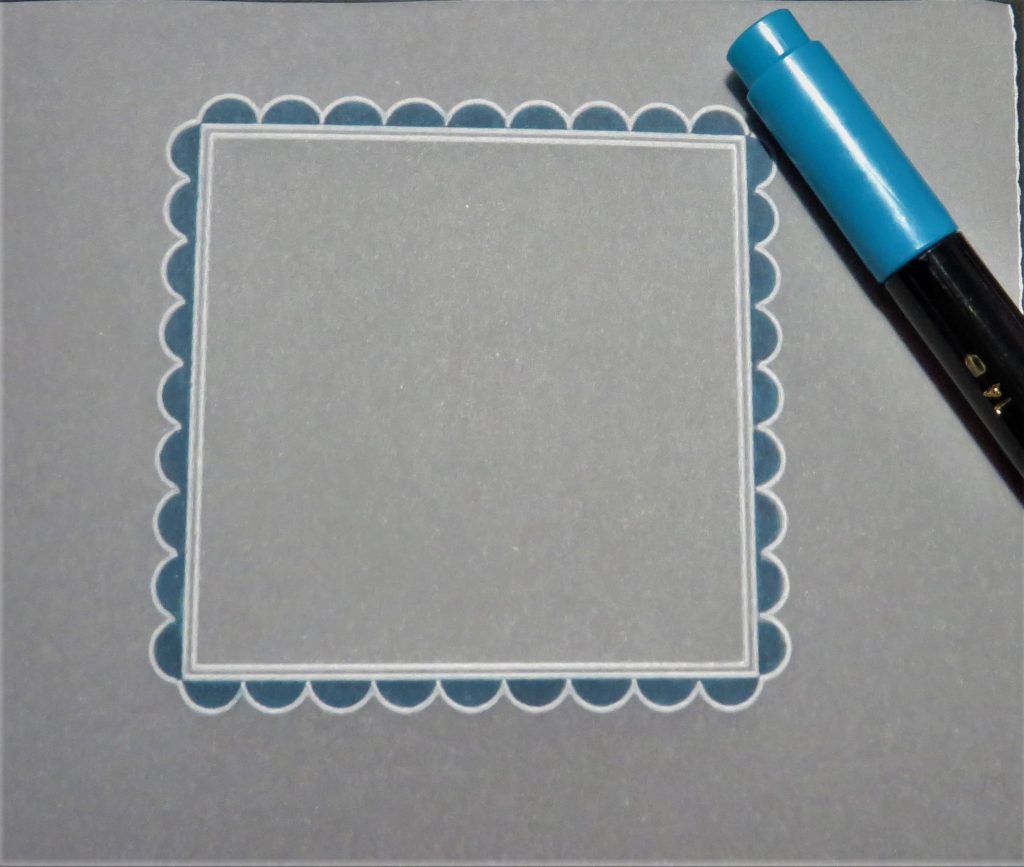
Step 2. Line up your parchment onto the Nested Scallop Square plate, and with the number 1 tool from the Starter Kit, trace out the 4th square and scallops from the centre of the plate.
Step 3. Choose one of the Perga Colour Exclusives that you used on the painted butterfly blog – I used number 14, so will use that one on my scalloped border. Colour in the scallops using the pen direct to the parchment.
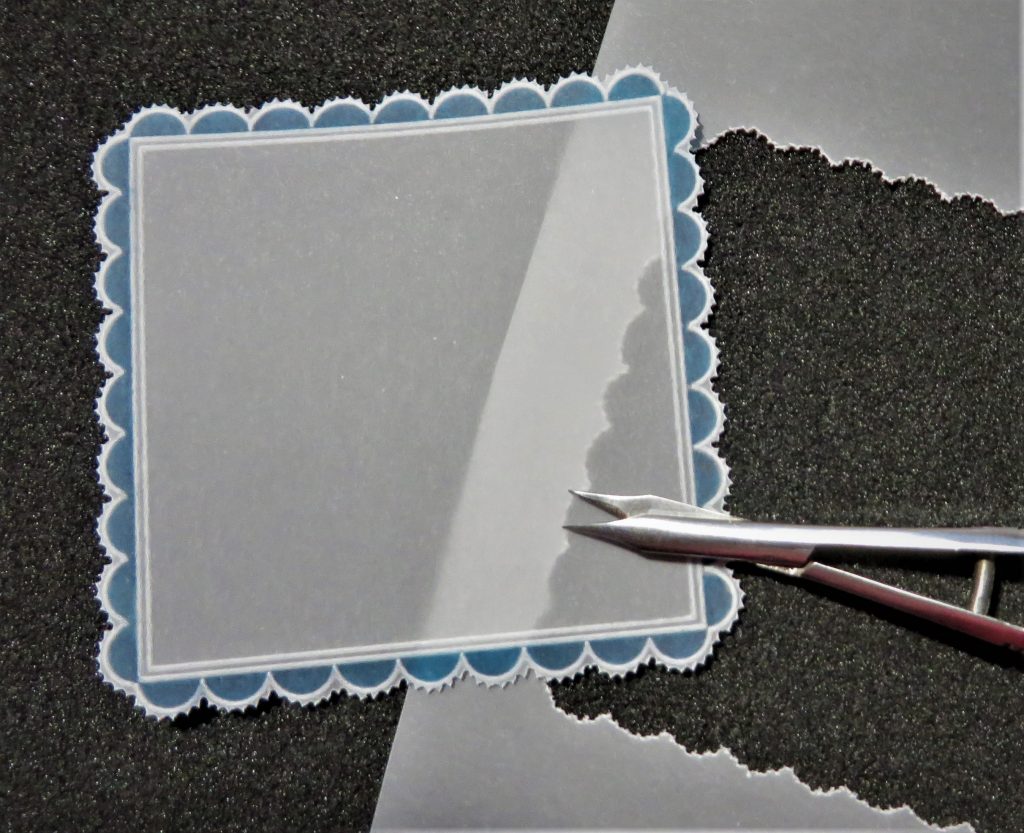
Step 4. Using 2 needle perforating tool, perforate around the piece. Remember to turn your work as you go and take your time.

Step 5. Snip out the work and remember that with scallops you need to keep turning the work or else the little picots will end up looking like the teeth of a circular saw.
Step 6. Fold along the score lines made in the cover of the memo book.
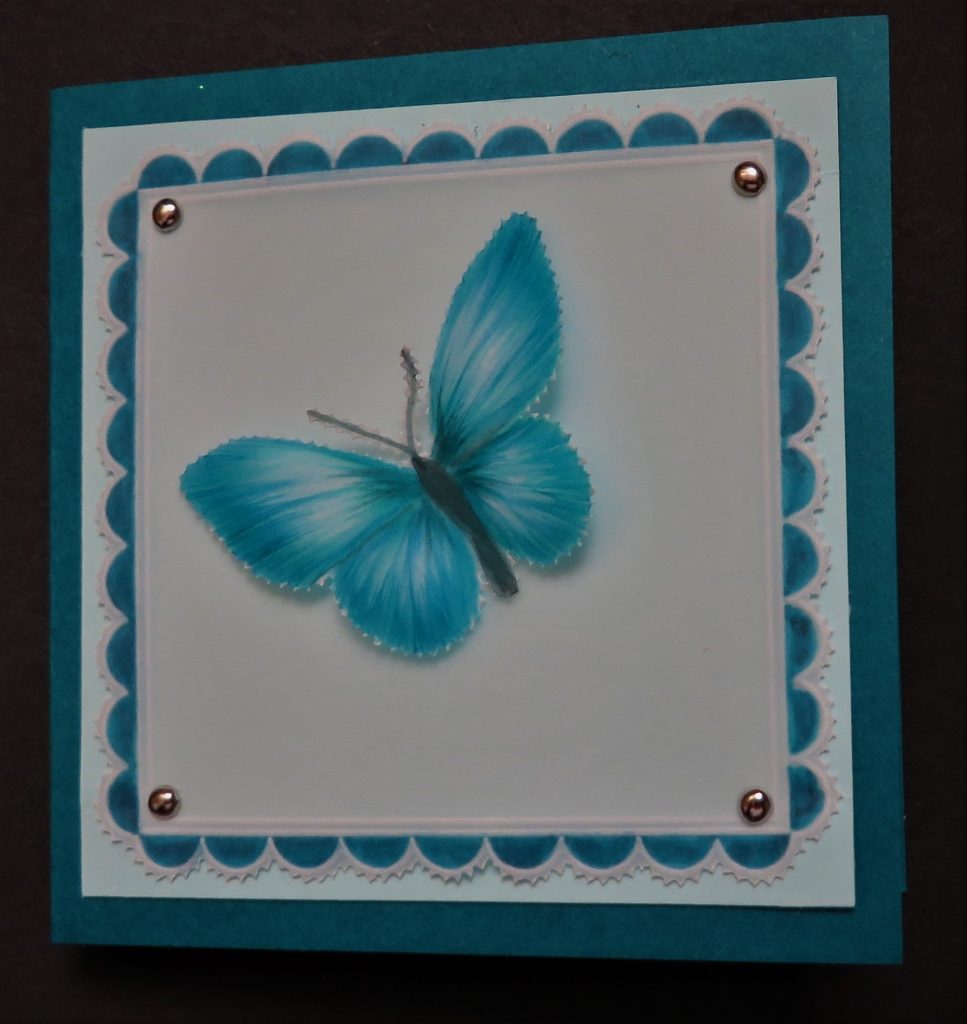
Step 7. Attach the scallop square to the mat with brads at each corner. It is possible to glue under where the butterfly will go, but you need to remember that this piece will probably be handled quite a bit, so let’s wait to attach our butterfly.
Step 8. Stick the mounted parchment topper on the front of the booklet using the tape runner. The Clarity tape runner is very strong, so be aware of this when laying the topper in place.
*TOP TIP – you could use a little bit of glue stick over the tape to give you a bit of ‘wiggle’ time before the tape ‘grabs’.
When you attach the ‘sticky notes’ into the book, just use tape on the back inside cover. Don’t put glue down the spine of the cover as you will not be able to detach the memo pages.
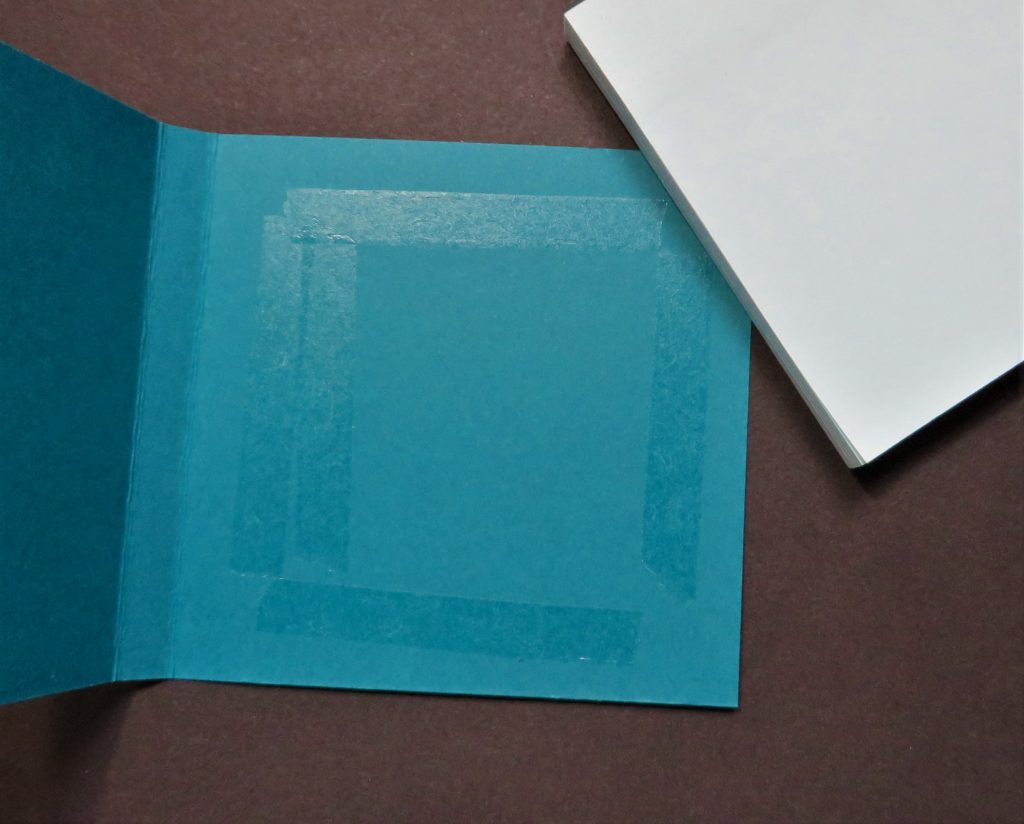
Step 9. Place the sticky notes into the spine of the cover – in such a way that the notes can open on all three sides and allows for them to be peeled away easily. Putting the note pad into the spine and then closing the cover over it helps with aligning.

Step 10. Once the booklet is assembled, you can then go ahead and add the painted butterfly.
I love this! Thank you Glynis, as always, for your helpful expertise. I have a few of these memo pads and notelets hanging around, don’t you? Now I know how to pretty them up!
We have put everything in one place over on the Clarity website HERE
This week, Paul was showing other ways to colour with the Pergamano Perga Colour Exclusive Pens. You can catch up HERE or below:
Next week, Paul will be going back to basics with Picot Cutting. So, if you are still struggling with perfecting your Picot Cutting, then tune in on Tuesday at 10am via our Facebook or YouTube page.
For now though, enjoy the rest of your weekend!
Lotsa love, Grace & Glynis xo
Clarity – The Home of Art, Craft and Well-Being.
Great idea from Glynis, will have to try this.
Missed Paul’s alternative colouring so must look it up.
Stay safe
Lovely gift idea thank you both
Need to get practicing with the painting now that schools are going back ,and won’t have to child mind so often x
What a fantastic idea thank you
Beautiful Glynis. My butterfly didn’t turn out that well, so will keep practicing and then make the memo book. Thank you
Lovely project thank you 😊
Hi Grace, Hi Glynis, Wow, stunning, stunning, stunning !! I adore this creation. Thank you.
Lots of love from Patricia xx
Hi Glynis and Grace. Lovely idea for small christmas gifts I think.
Thank you. Will definitely make a few.
Great idea for Christmas gifts for friends. Thank you Glynis.