Clarity Matters Blog Tutorial: How To Create The Monochromatic Look
Hello hello! Grace here.
I hope this finds you well, safe, and enjoying your Sunday.
We are joined this weekend by a lovely member of our Clarity design team, Tina Morris. You’ve more than likely seen her gorgeous samples online and on television.
Tina has kindly put together a step-by-step blog for us. I’ll hand you over to our teacher!

How To Create The Monochromatic Look
Ingredients
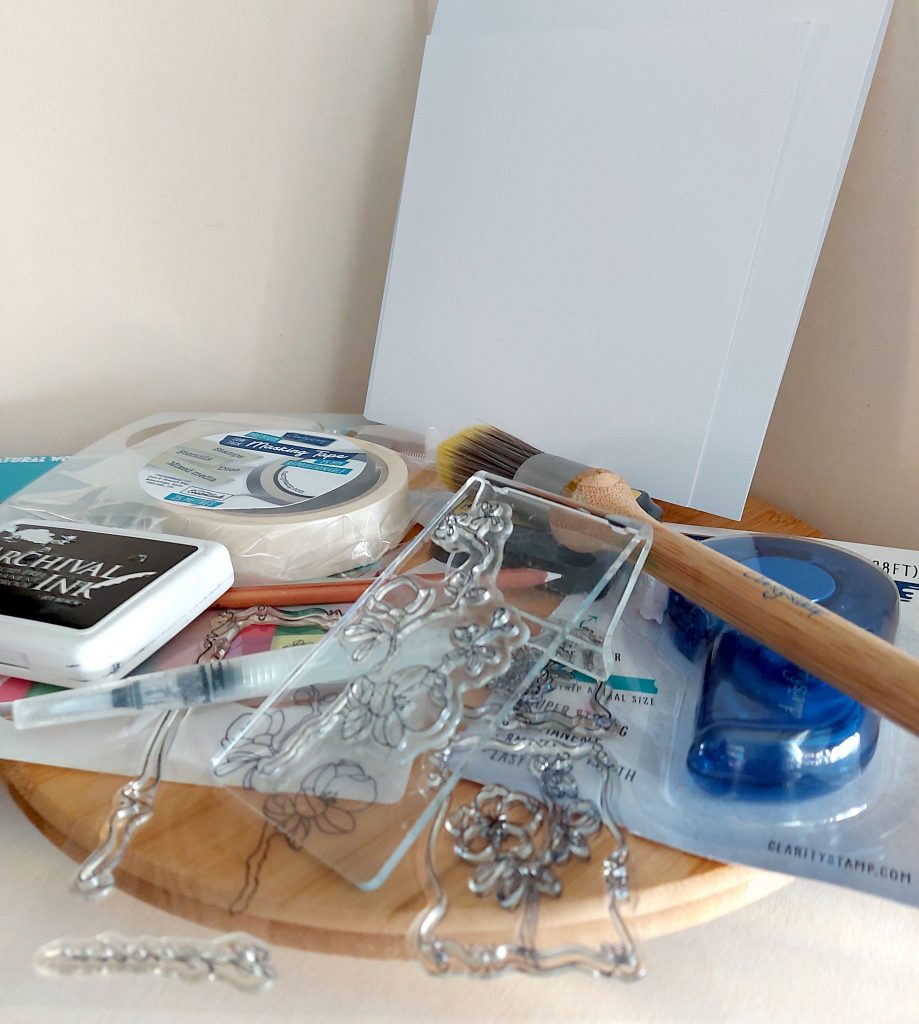
Circle Frame 7″ x 7″ Stencil (STE-PA-00113-77)
Stencil Card 7″ x 7″ (50 Sheets) (ACC-CA-30095-77)
Clarity Low Tack Masking Tape (ACC-AD-31211-XX)
Clarity Stencil Brushes (ACC-BR-30006-XX)
Barbara’s SHAC Japonica Floral Panels A5 Sq Stamp & Mask Set (STA-FL-11644-A5)
Perga Liner – B1 White Basic Pencil (PER-CO-70326-XX)
Clarity Blending Mat A4 (ACC-MS-30214-XX)
Pergamano Mix-Mat (PER-AC-70304-XX)
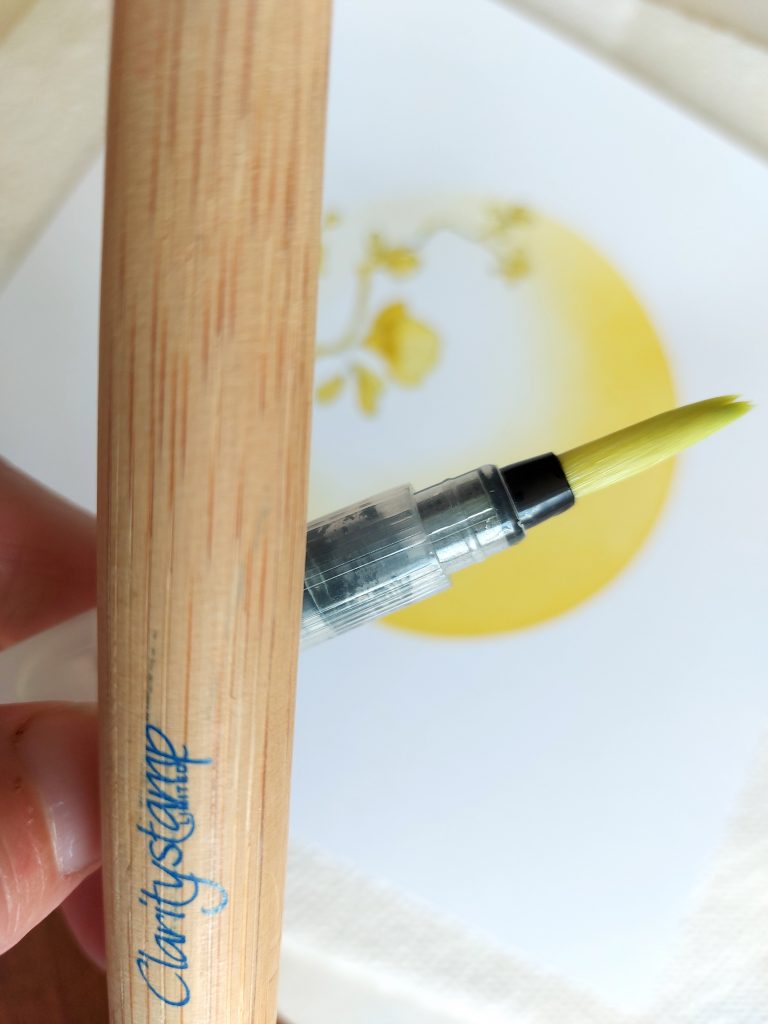
Small Watercolour Brush Pens (ACC-PE-30874-XX)
Sticker Word Booklets Complete Collection (ACC-SC-31360-XX)
(Sticker Booklets are also available separately)
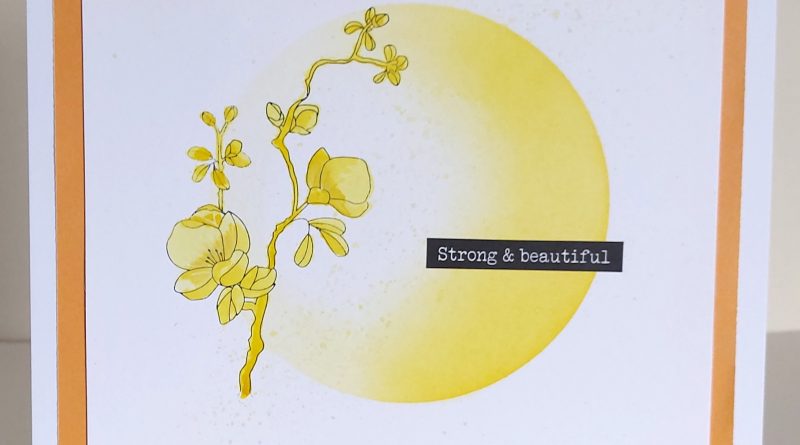
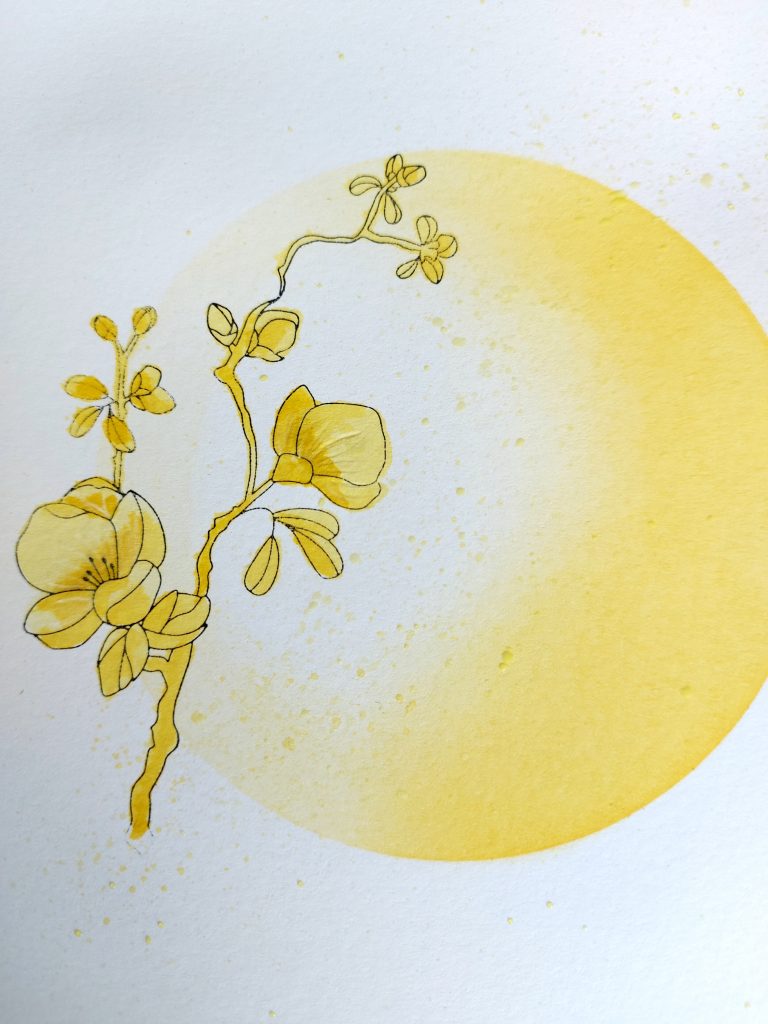
This is where we are heading…
For those of you who didn’t manage to get to the Clarity open days, or didn’t have the opportunity to book into one of the sessions, we have the steps taken to create the Inky Make and Take, run by Tina and Sonia. This can be done in any colour you fancy and without the time constraints of the days, you can colour your flowers in with pencils adding additional shading and really making a lovely classy card,
I hope you enjoy and we would really love to see your versions on Clarity Worldwide. Let’s jump right in!
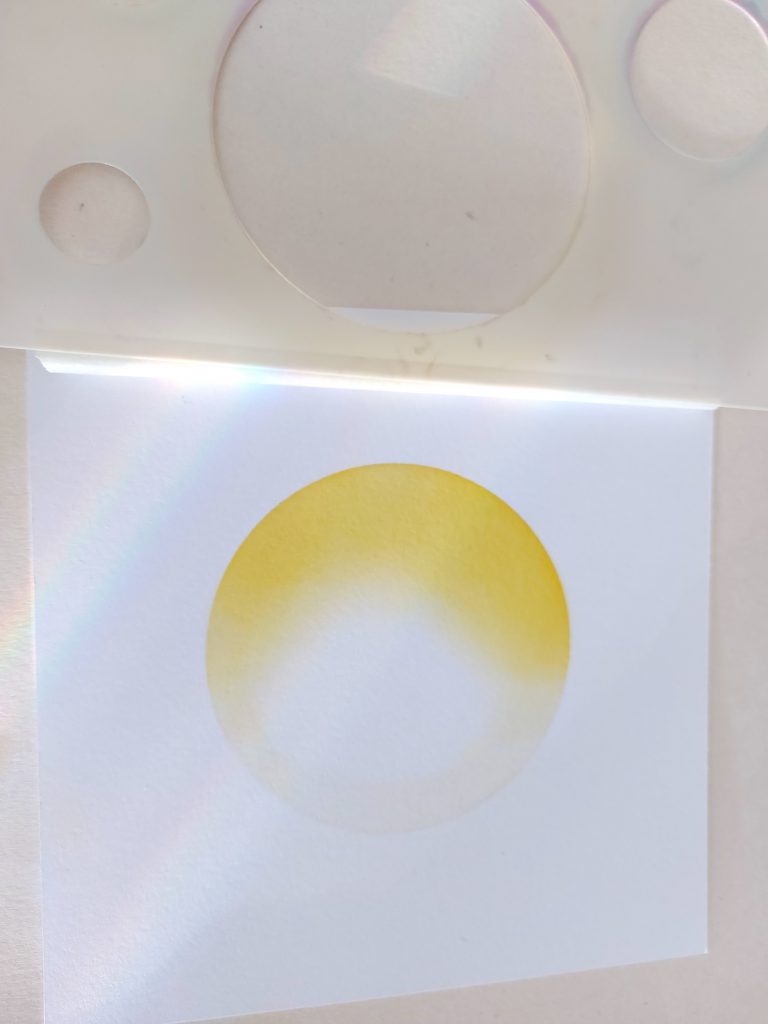
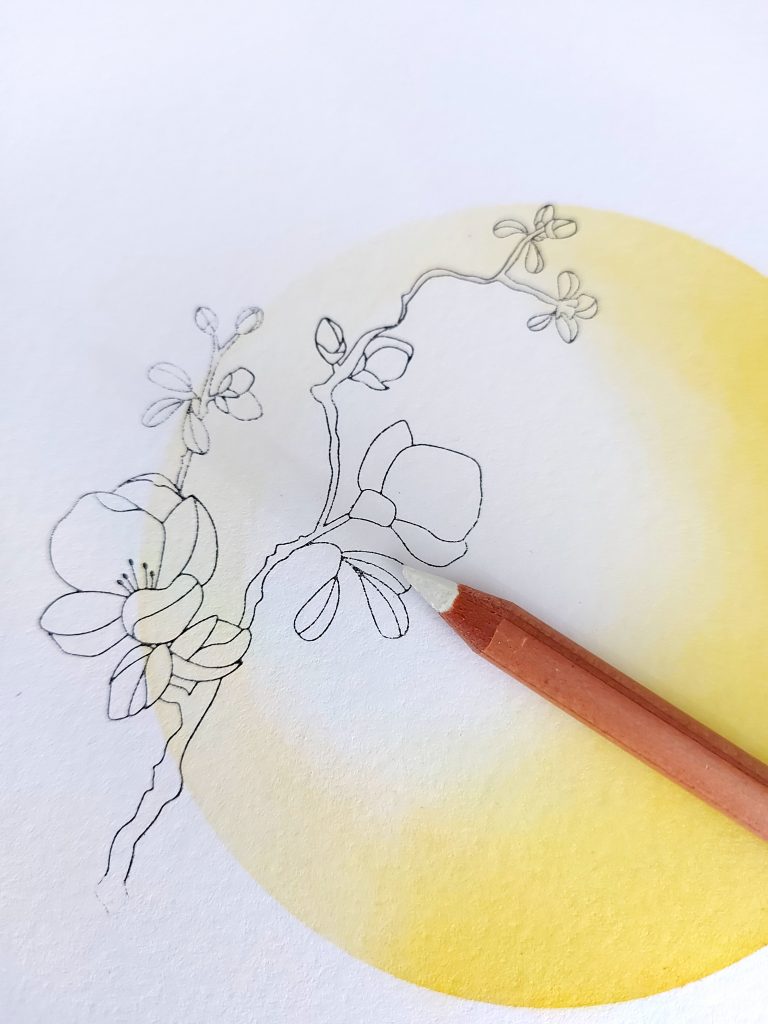
Step 1. Take a piece of stencil card 7×7 and the round 7×7 stencil using the stencil tape, tear off a piece of tape long enough to adhere the card to the stencil at the top, making a hinge, this is to enable you to check if you have enough ink blended around your circle. If your card is smaller than the stencil, place the stencil flat on your surface and stick the card in position on one side with the tape, again making a flapped hinge.
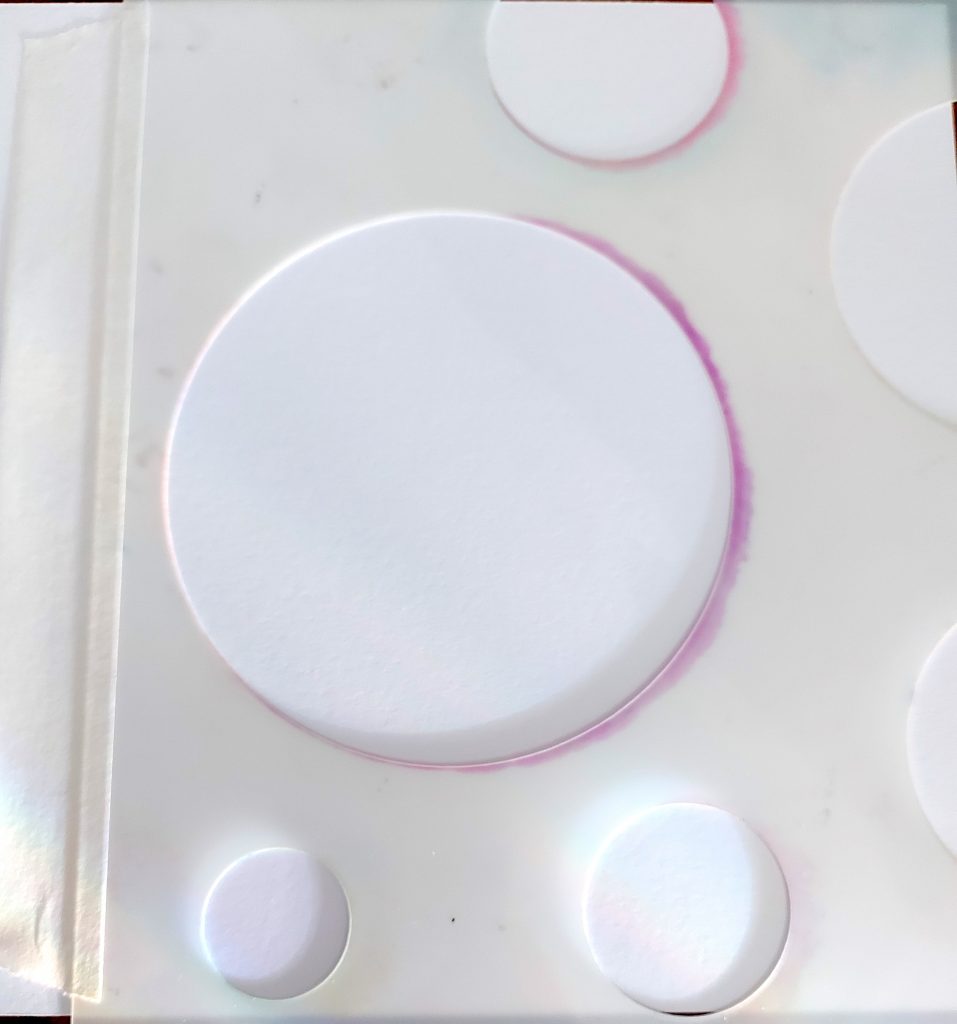
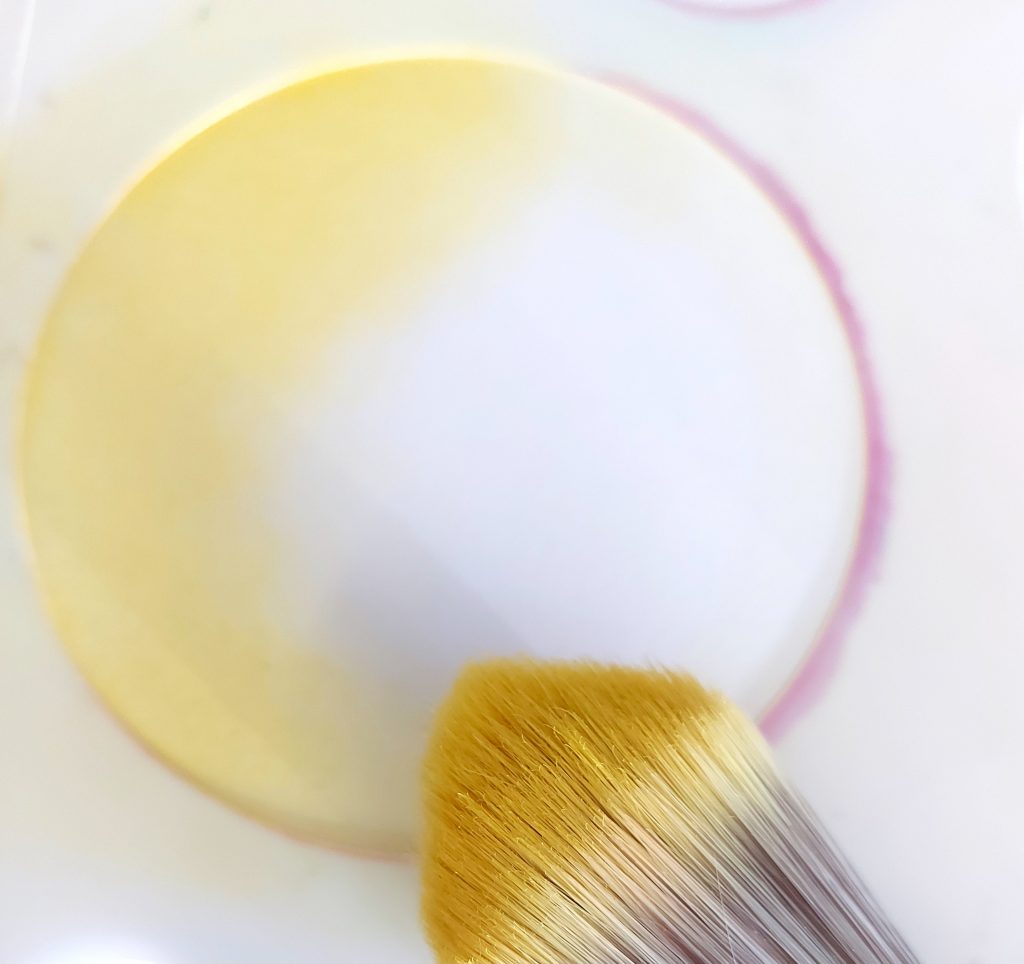
Step 2. Take your Coloured ink. Load your Clarity Stencil brush with your Coloured ink. (distress ink, Adirondack, distress oxide if you like a chalky look – more opaque look). Using your copy paper remove some of the ink before going directly to your stencil and card. You don’t want to overload your colour – as BARB says you can add it but you can’t take it away.
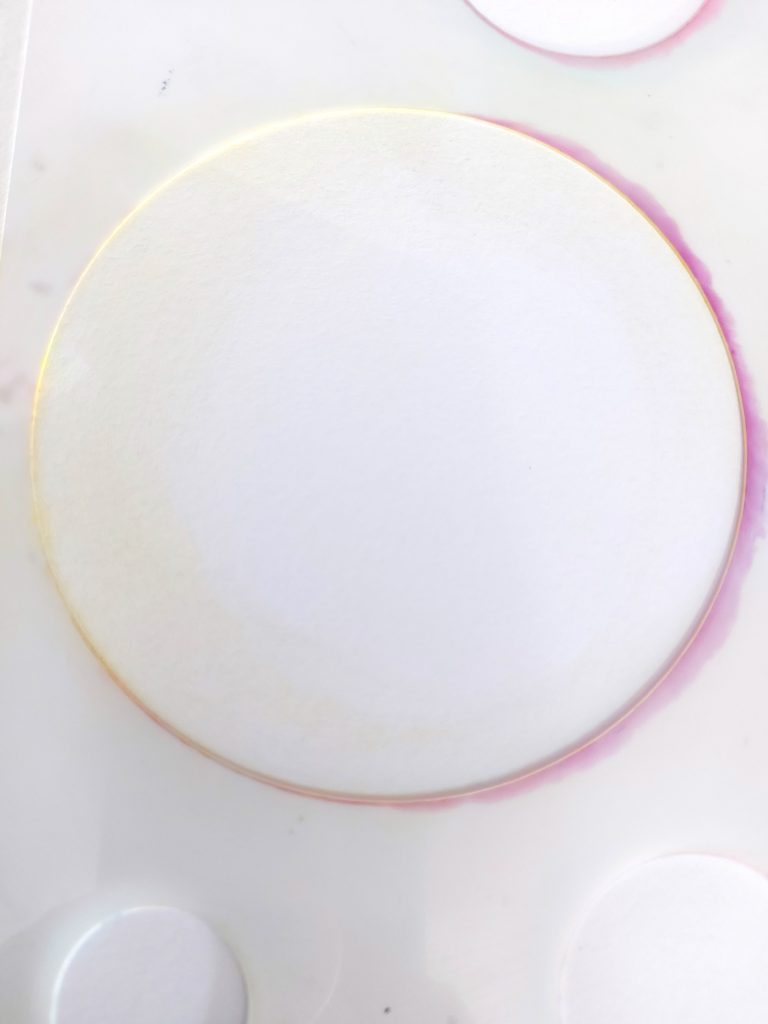
Step 3. Build up your colour by brushing your ink ¾ of the way round in a sweeping motion to one side of your circle, until you reach the desired depth of colour, keep checking back by lifting the stencil on the hinge. Go once around the circle with an almost dry brush. When you are happy with this remove the stencil and stencil tape carefully. Put the brush and stencil to one side, if you’ve got inky fingers wipe them to ensure that you’re not adding additional fingerprint interest to your art. Although nothing a butterfly doesn’t fix or a sentiment.
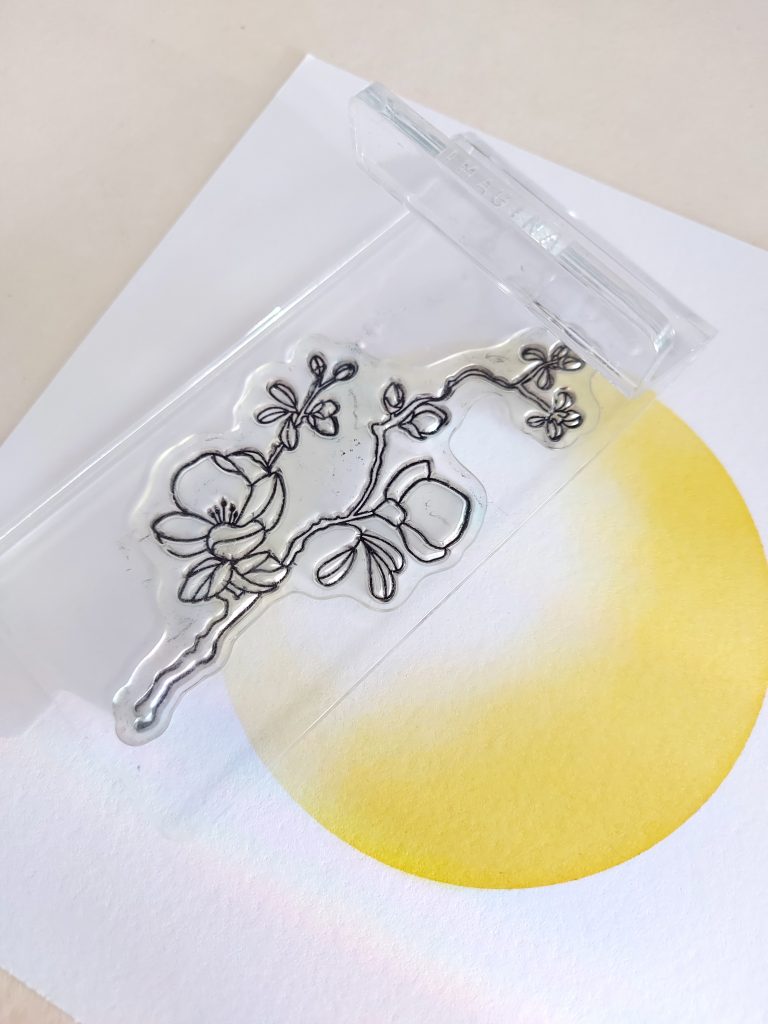
Step 4. Take your mounted stamp and cover the stamp with the black Archival ink, stamp your JAPONICA on the lightest or white side of your circle. Stand up to the stamp if you have dexterity problems as this helps provide an even pressure, leave the stamp on the paper for a few seconds or so to allow the ink to absorb, pressing firmly all over the stamp. (don’t worry if you have missed a bit – micron pens are your friend).
Step 5. Take your white pencil (perga liner B1) and flick some lines into the two largest flowers, flicking from the bottom up toward the top of the petal, this will resist the ink we will be painting on, using your coloured ink.
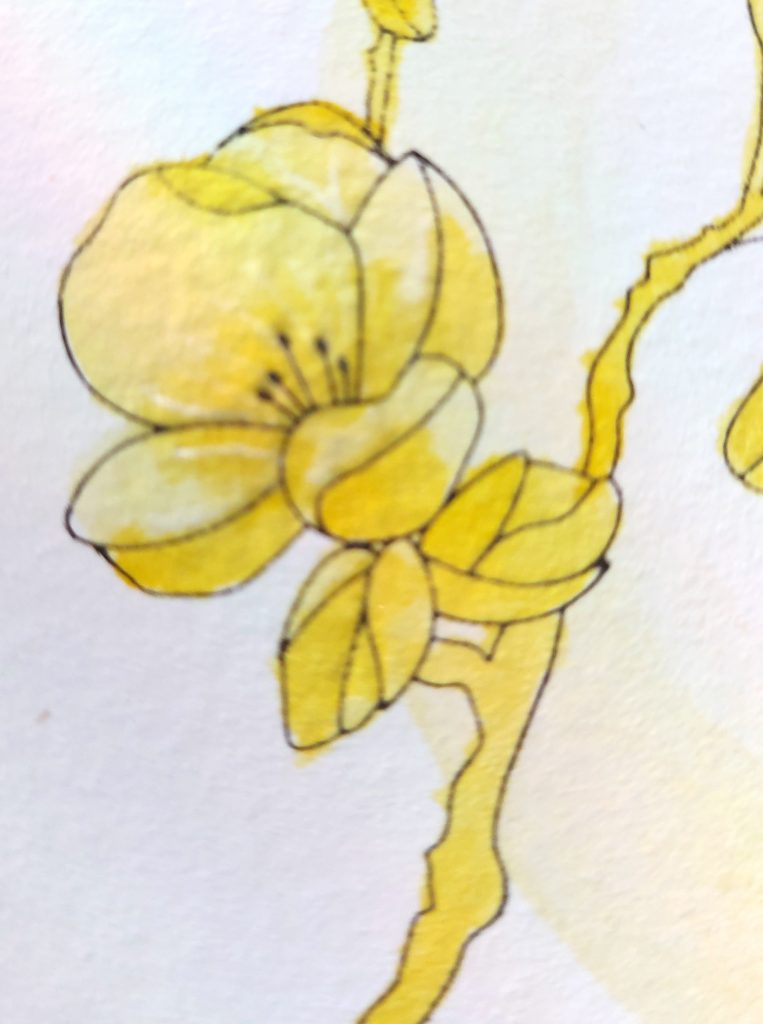
Step 6. With your coloured ink: Splodge a small amount onto your mix / Blending mat. Take your water brush and squeeze a drop of water onto the colour on your palette, and mix to a watery glaze.
Take any additional water off your brush using a paper towel. We don’t want to drown the paper. Lightly paint the Japonica – leaves flower and stem if you like. Or you can avoid the stem and leaf and colour this with Blending pencils. Pergaliners or polychromos will do.

Step 7. Using more of the darker colour on your palette go in and shade, remember if your light sources are coming from above the underside of your flower will be darker. Dab with your paper towel if you have gone in too dark or too wet. Continue until you are satisfied with your result.
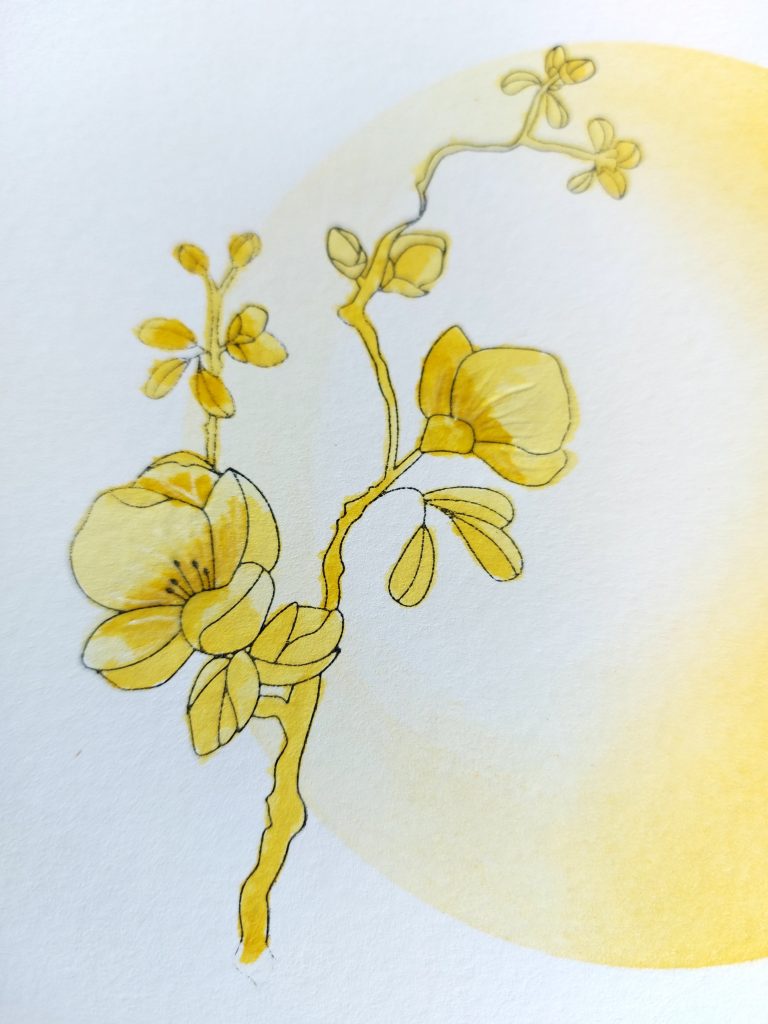
Step 9. If you like CAS (clean and Simple) cards, ignore the next step, if you like grungy inky cards, load your water brush with colour making sure it’s fairly wet, holding the water colour brush firmly, take your stencil brush tap the water brush from above and the colour should flick all over your artwork.
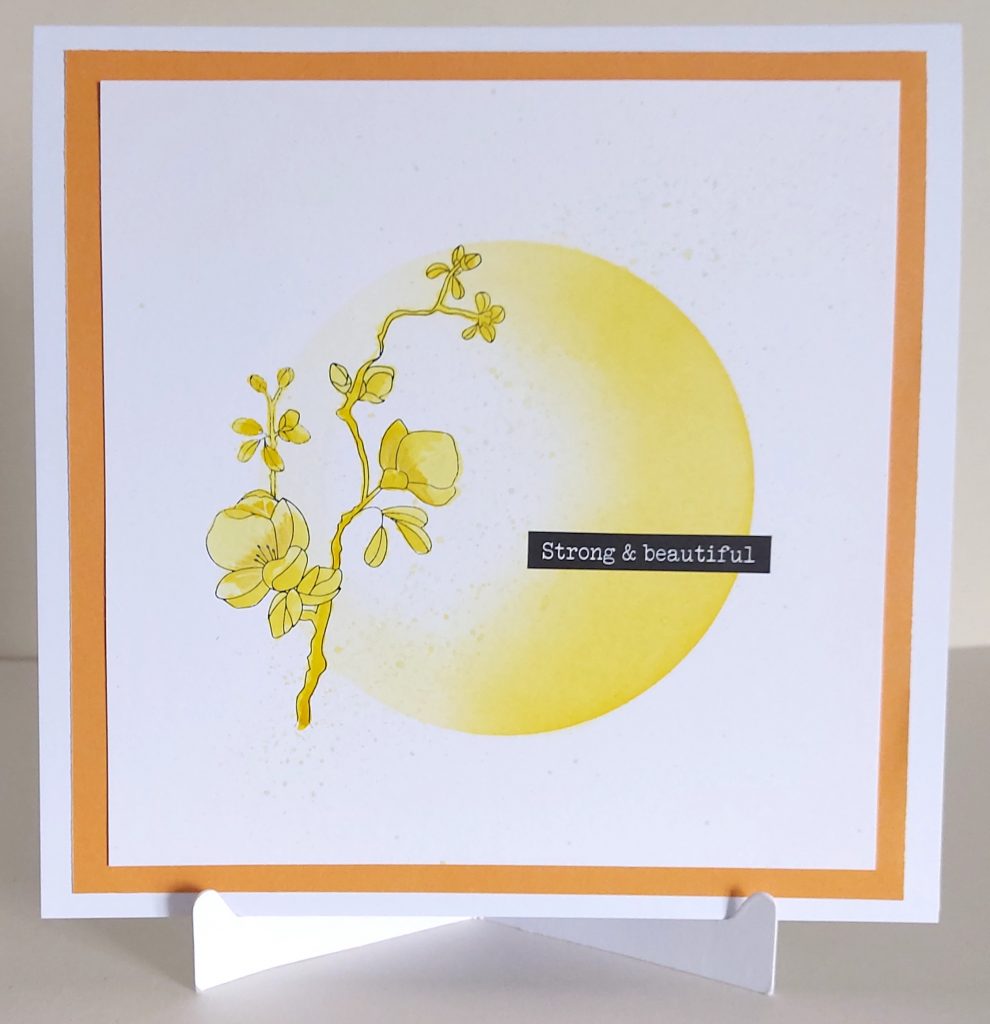
Step 10. Once you have finished your inking & painting choose a sentiment to add to your art, and make sure your work is dry. stick your layers down to your card.
If you want to add additional interest to your card, add a black edge to your 7×7 card as shown in previous blogs and by Barb on numerous occasions.
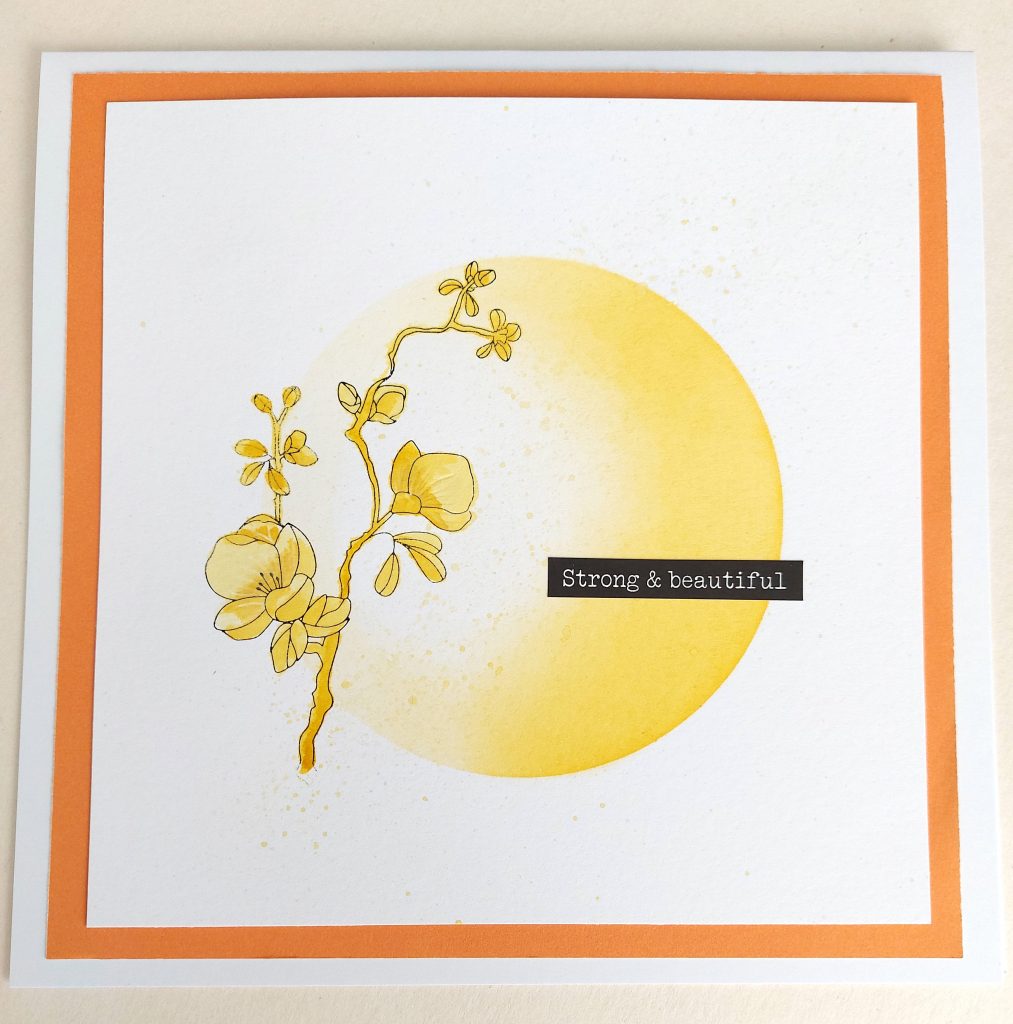
Wow. That is a stunning project!
What an effective technique. Thanks for sharing your tips and tricks with us, Tina! I’m sure many crafters will find this very helpful.
Everything that Tina has used in this particular project can be found on the Clarity website in an ingredients list, HERE.
Now, what’s coming up in the week ahead? Let’s have a look…
Monday 27th November:
In the SHAC with Barbara – 10am Live on Facebook & YouTube
Tuesday 28th November:
Groovi Tuesday with Paul – 10am Live on Facebook & YouTube
Thursday 30th November:
Craft Along with Barb in the SHAC – 6pm Live on Facebook & YouTube
Sunday 3rd December:
Clarity Classics with Barbara on Create & Craft – 3pm-5pm – 2 hours
See you there!
Travel gently, friends.
Lotsa love, Grace & Tina xoxo
Clarity – The Home of Art, Craft, and Well-Being.
Good morning Grace, I was lucky enough to be there for the Open Days this year & did this project with Tina & Sonia. I loved the process & the effect of doing it all in one colour. Its good to have the step by step though as I probably would have forgotten the white pencil as a resist on the petals & the order of doing the layers. Thanks Tina for doing the project here & thanks again to you both for doing the Open Days – it was full on with 20+ people each session all at different stages of their stamping journey for 2 days. You were probably doing it in your sleep for a few days afterwards !!
Cold & grey this morning but I will be watching Tina on her FB live this afternoon & then get ready for the SHAC sessions this week including the craft along on Thursday xx
Love this project thank you both. Xx
Lovely project which I will try later but will have to improvise as I haven’t got the japonica stamp.
I missed this years open day but met Tina at the previous years one, I think it was before she joined the design team and we chatted a few times. I love her samples.
I do hope I can make next years open day and hope the dates are made available soon as I need to book my week in Scotland soon and would hate to miss the next one!
Great step by step, a lovely card, thank you Tina and Grace. xx
Lovely project Tina……I may use this to create a stash of varying coloured versions, leaving the message off for now and then dipping into the stash when I need a quick card to hand for all sorts of occasions such as; get well, sympathies, well done, congratulations, good luck, new home etc…. Simple but effective, thanks for the inspiration 👍🏻
Great step by step. Thank you. I’m not a stamper but really enjoyed doing this at the Open Day. I say I’m not a stamper but obviously have so much Claritystamp gear from almost 11 years ago when I joined the Stamp Club.
I also attended the session with Tina at the open day and have made a few more cards for friends using this idea and the Scots Pine stamp.
Thank you for sharing Tina
Janet Cummings xx
Love this clean and simple design. I might try a variation of this for my Christmas cards, as I still haven’t started them yet!!! Thanks Tina x