Clarity Matters Blog Tutorial: How To Use The 4 In 4 Tool
Hello hello! Grace here.
I hope this finds you well, safe, and enjoying your Sunday morning.
Have you been following Paul and his Groovi Tuesday sessions on Facebook & YouTube? He is currently working his way through the various multi-needle tools that are showcased in the Pergamano Handbook for Multi-Needle Tools – Volume 2. This week he moved on to the next tool in the book – the 4-In-4 Tool.
If you missed those last sessions, then you can catch up here:
Picot V Small Perforating Tool – HERE
Picot V Medium Perforating Tool – HERE
Picot V Large Perforating Tool – HERE
Angle Perforating Tool – HERE
Cross Perforating Tool – HERE
During Groovi Tuesday this week, Paul started working with the 4-In-4 Tool. You can catch up on that episode, HERE.
Meanwhile, the lovely Glynis Whitehead has made two more projects to go with this most recent tool tutoring. I’ll hand you over to Glynis…

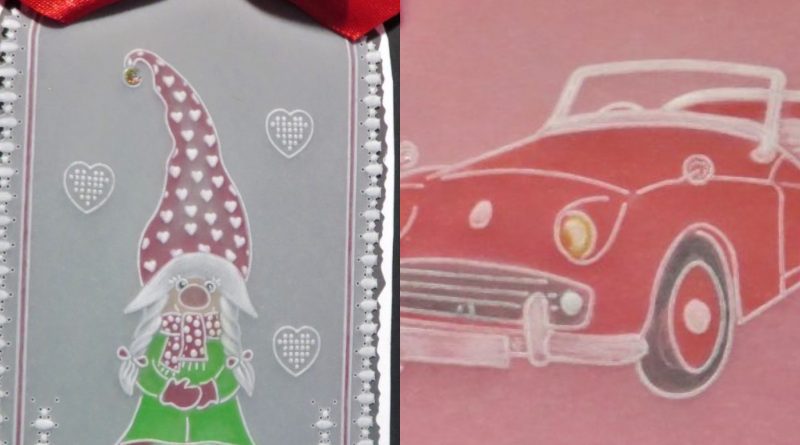
Four-in-Four Tool – Project 1
Ingredients
Pergamano Handbook for Multi-Needle Tools Vol 2 by Linda Williams (PER-BO-70355-XX)
Nested Arch Tags Groovi Plate A5 (GRO-PA-41465-04)
Barb’s Christmas Gud Gnome & Sentiments A6 Sq Groovi Plate (GRO-CH-42027-01)
Barb’s Gud Gnomes A5 Sq Groovi Plate (GRO-FY-41982-03)
Four in Four Perforating Tool (PER-TO-70020-XX)
Two-Needle Perforating Tool Fine (PER-TO-70037-XX)
Four Needle Perforating Tool Fine (PER-TO-70036-XX)
Single Needle Perforating Tool (PER-TO-70035-XX)
1mm Embossing ball Tool (PER-TO-70011-XX)
1.5mm Embossing Ball Tool (PER-TO-70004-XX)
3mm Embossing Ball Tool (PER-TO-70005-XX)
4.5mm Embossing Ball Tool (PER-TO-70015-XX)
Groovi Embossing Tool 1&2 (GRO-AC-40026-XX)
Faber-Castell Polychromos Pencils (ACC-PE-30797-XX)
Or Perga-Liner Pencil (B) (PER-CO-70063-XX)
Blending Nibs (PER-AC-70300-XX)
Dorso Oil (PER-CO-70066-XX)
Perga Glue (PER-AC-70133-XX)
Method
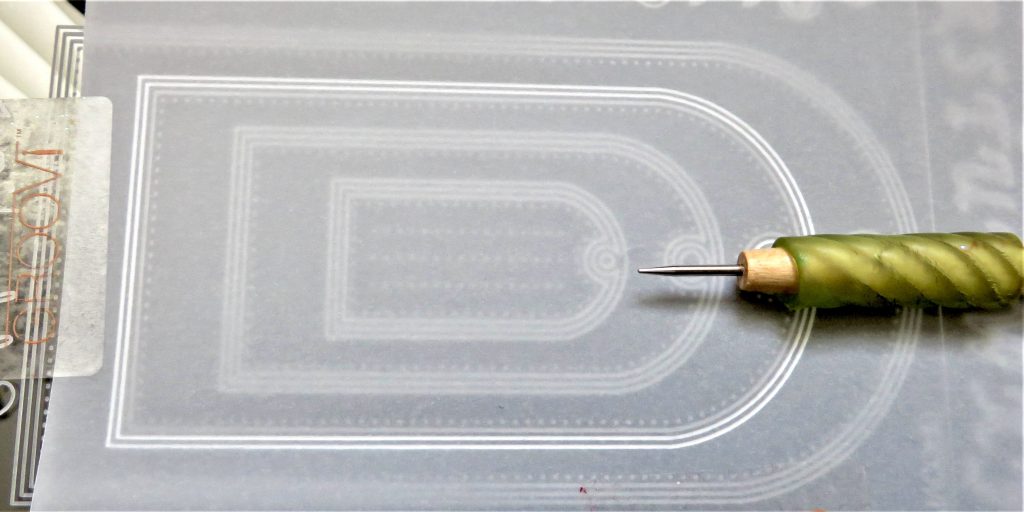
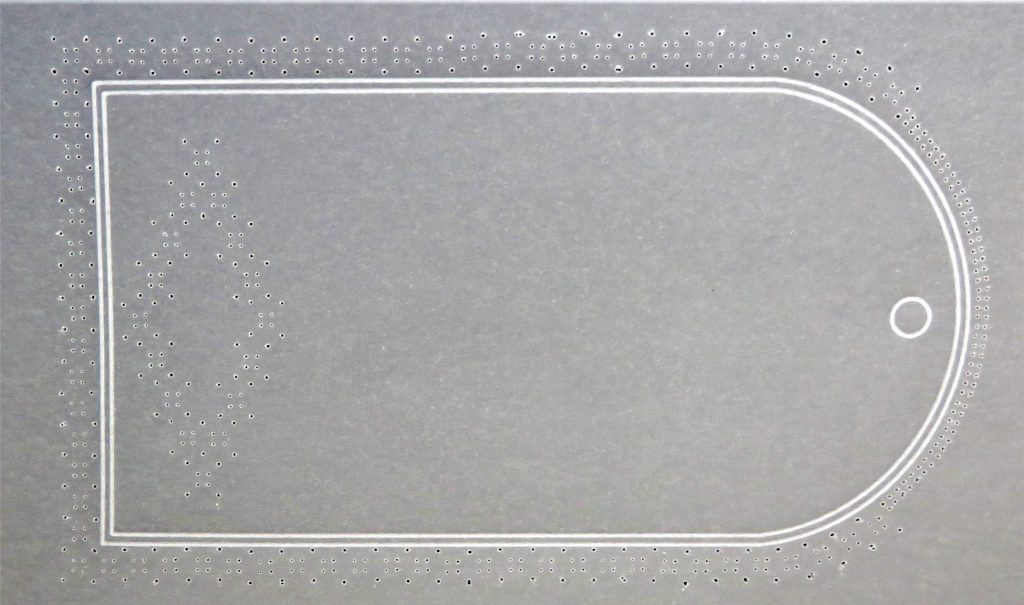
Step 1. Trace the 2nd largest tag from the nested arch tag plate.

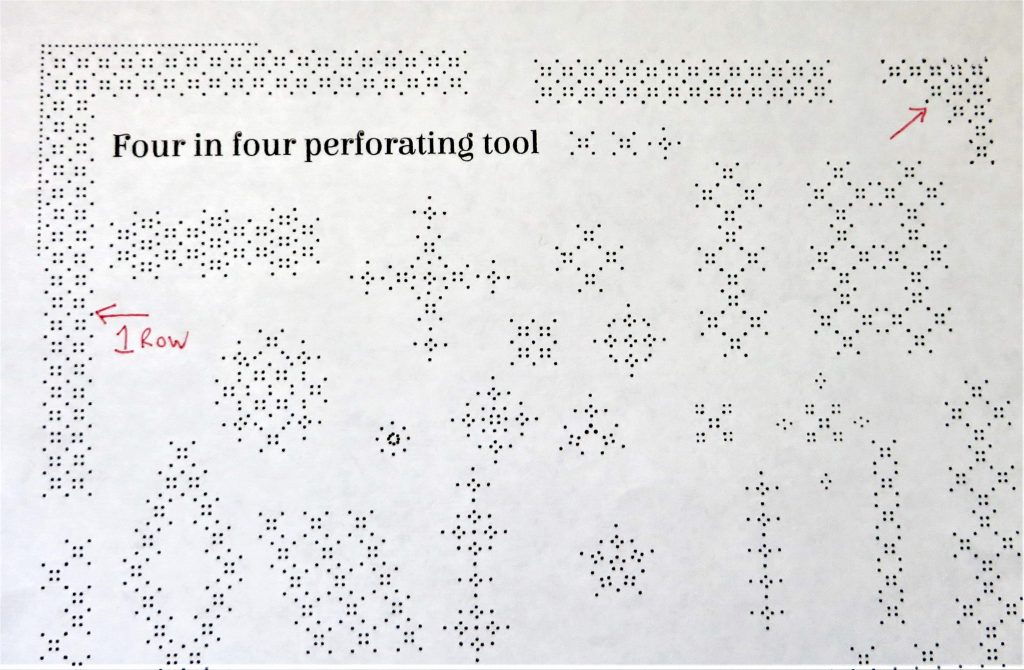
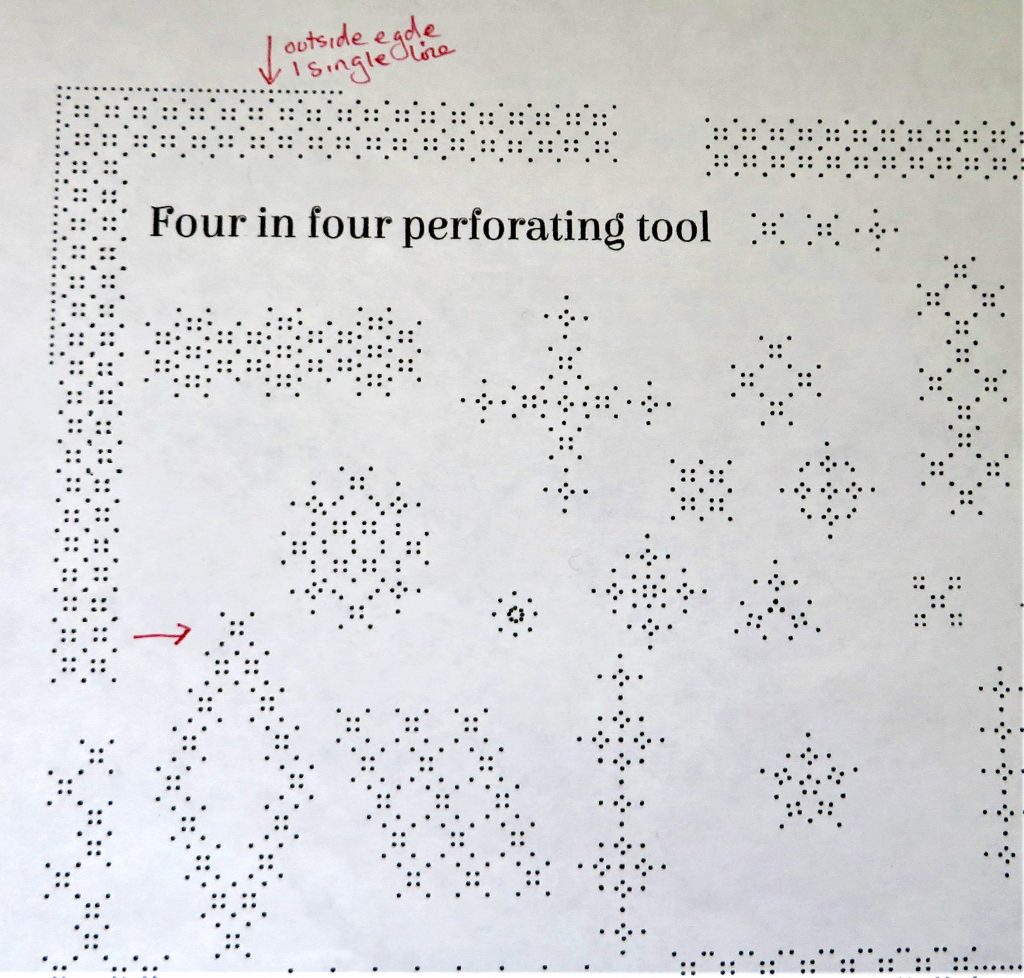
Step 2. The Four in Four perforating tool is illustrated by Linda in her Handbook on pages 34 – 37 and the sampler on page 37 is the one you need to photocopy. I have marked the perforations we shall use with a red arrow.
Step 3. Rather than perforate outside the corner of the tag, I have decided to move the pattern inside the embossed lines and change of embossing within the perforations. Perforate onto a shallow mat.
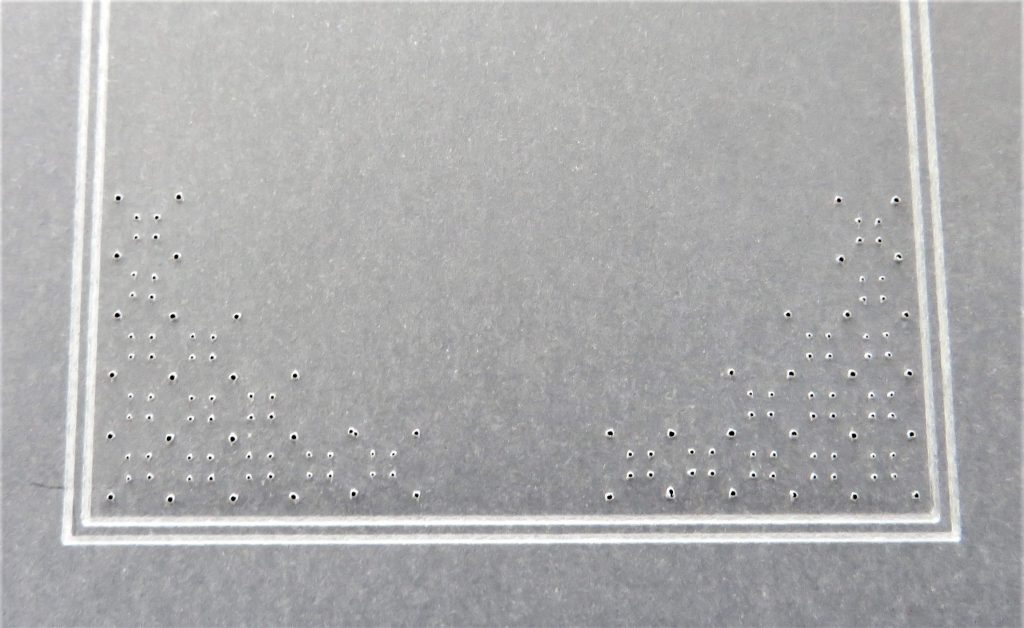
Step 4. The Four in Four perforations around the edge just done up to the curve at the top of the tag, as it is very difficult to get them to go around the dome shape, and the rest will be done with the four-needle fine tool, again, they are just shallowly perforated.
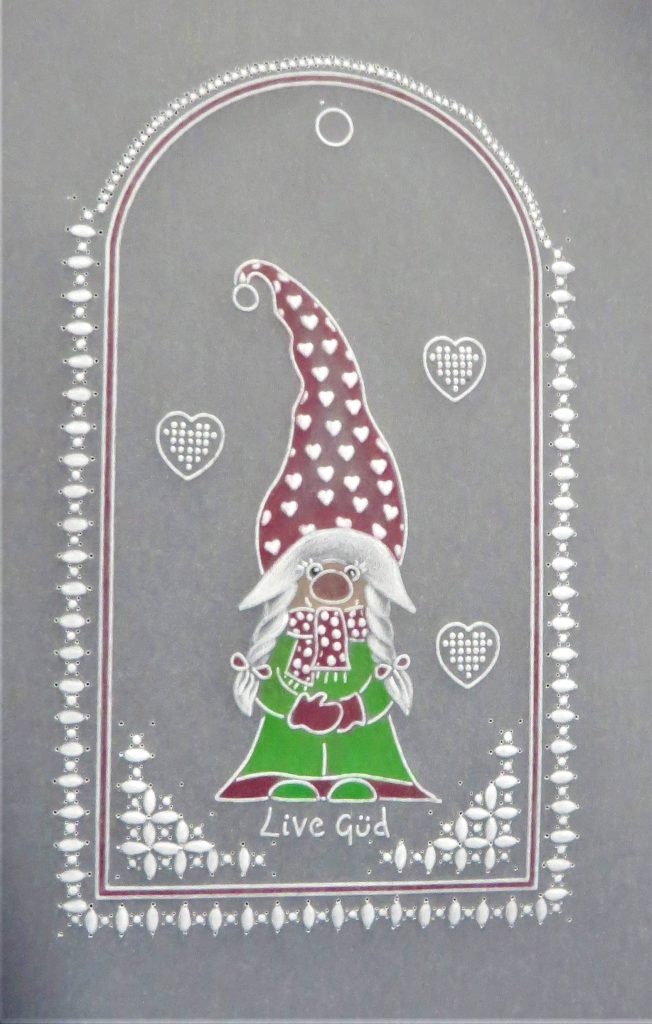
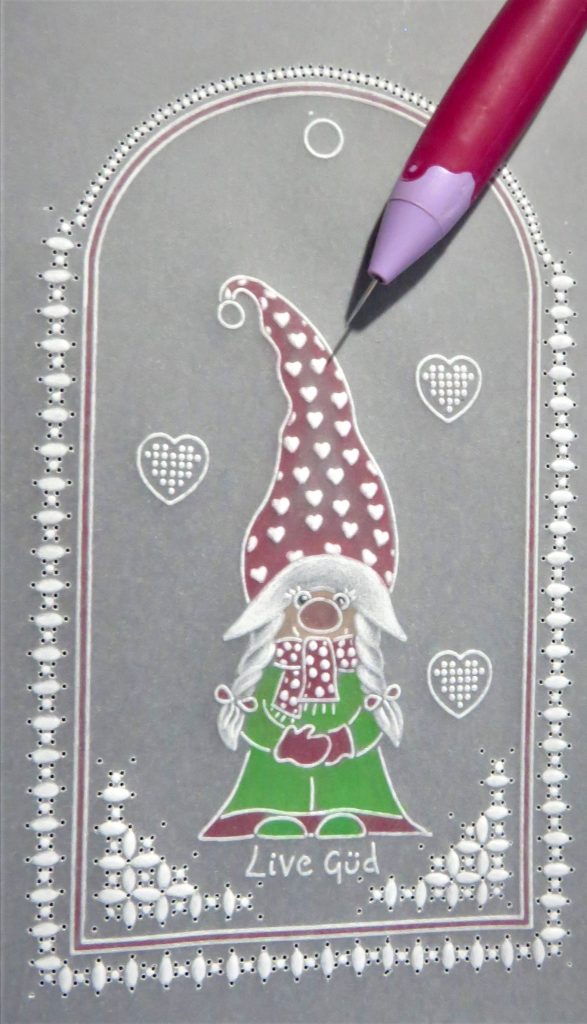
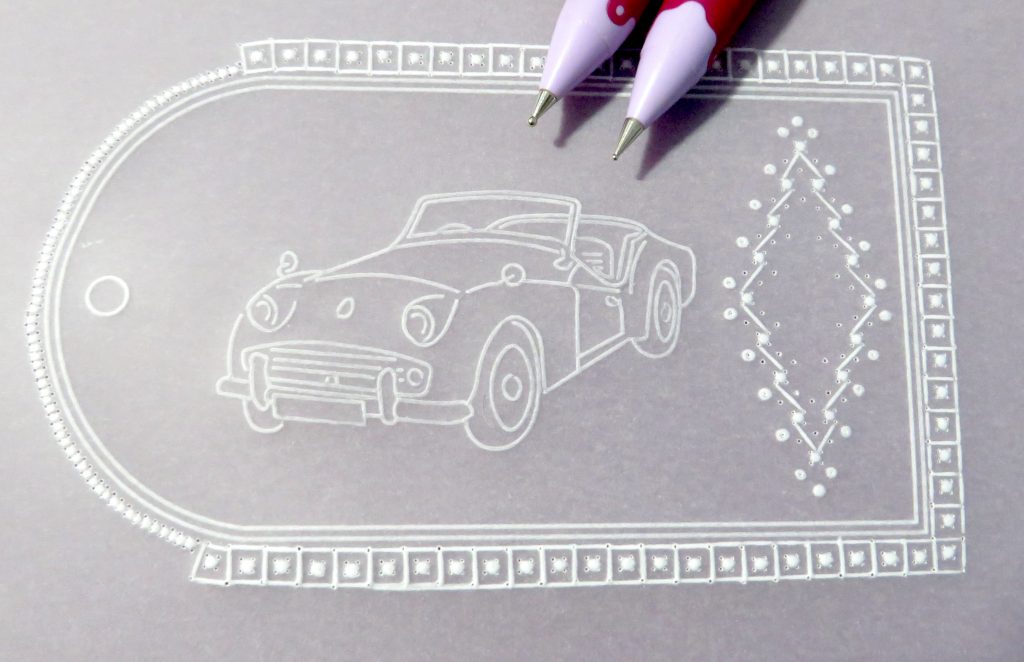
Step 5. Trace the gnome from the ‘Live Gud’ plate, use the number 2 tool from the starter kit for the elements to be embossed white, and the rest with the number 1 tool.
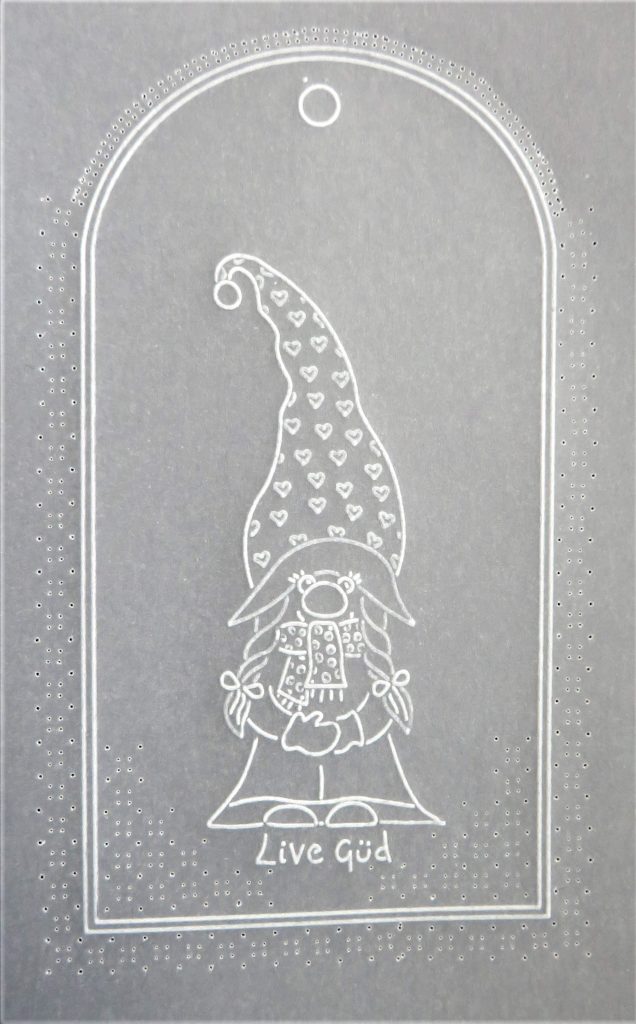
Step 6. Working on the back, emboss the tiny hearts in the gnome’s hat with a 1.5mm ball tool, the dots in the scarf with a 1mm ball tool. Work the edge of the hat, starting with the 4.5mm ball tool, rest the work and then whiten it more with 3mm ball tool. Use the 3mm ball tool to emboss into her hair. The 1mm ball tool makes the dots within the four needle perforations and the four in the middle of the four-in-four perforations. Use the 1.5mm ball tool to emboss an oval shape between the perforations.

Step 7. Using Pergaliners (B pencils) or Polychromos pencils, and on the back of the work, colour the gnome and the margin of the tag with your choice of colour, using one of the colour in the tag margin also. Blend the pencil with some Dorso oil and blending nibs. Add some hearts from Barbara’s Feel Gud Gnomes – A5 square Groovi plate.
Step 8. Re-perforate all the shallow perforations using the single-needle fine tool.
Step 9. Snip out the tag, picot cutting all the diagonal perforations first as they have the longest span between the holes, keeping the rest of the parchment stabilized.
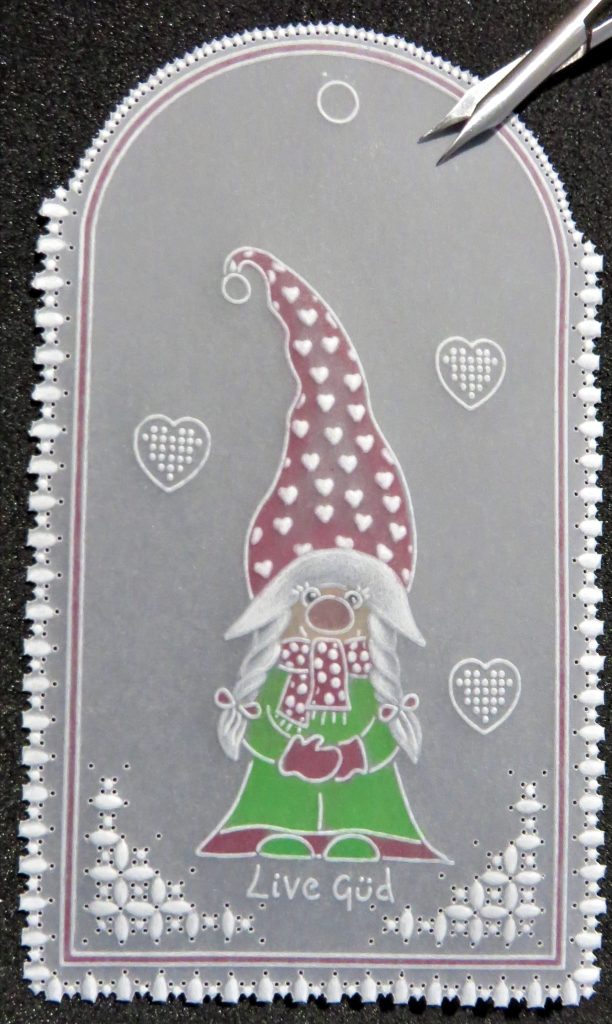
Step 10. Mat and layer the tag onto your choice of backing paper/card and add a bow. Also, add a gem to the ‘pom-pom’ on the hat.

Four-in-Four Tool – Project 2
Ingredients
Pergamano Handbook for Multi-Needle Tools Vol 2 by Linda Williams (PER-BO-70355-XX)
Nested Arch Tags Groovi Plate A5 (GRO-PA-41465-04)
Vintage Cars A6 Groovi Plate (GRO-TV-40666-02)
Four in Four Perforating Tool (PER-TO-70020-XX)
Four Needle Perforating Tool Fine (PER-TO-70036-XX)
Single Needle Perforating Tool (PER-TO-70035-XX)
Two-Needle Perforating Tool Fine (PER-TO-70037-XX)
1mm Embossing Ball Tool (PER-TO-70011-XX)
1.5mm Embossing Ball Tool (PER-TO-70004-XX)
3mm Embossing Ball Tool (PER-TO-70005-XX)
4.5mm Embossing Ball Tool (PER-TO-70015-XX)
Groovi Embossing Tool 1&2 (GRO-AC-40026-XX)
Faber-Castell Polychromos Pencils (ACC-PE-30797-XX)
Or Perga-Liner Pencil (B) (PER-CO-70063-XX)
Blending Nibs (PER-AC-70300-XX)
Dorso Oil (PER-CO-70066-XX)
Perga Glue (PER-AC-70133-XX)
Method
Step 1. Trace the 2nd largest tag from the Nested Arch Tag plate.
Step 2. The Four in Four perforating tool is illustrated by Linda in her handbook on pages 34-37, and the sampler you need to photocopy is on page 37. The perforations used for this project are marked with red arrows and in numerical order.
Step 3. Place the parchment over the photocopy and perforate through the parchment and paper pattern, working on a shallow mat. Always perforating on the front, also put a line of perforations around the outside as in the sampler but just one line.
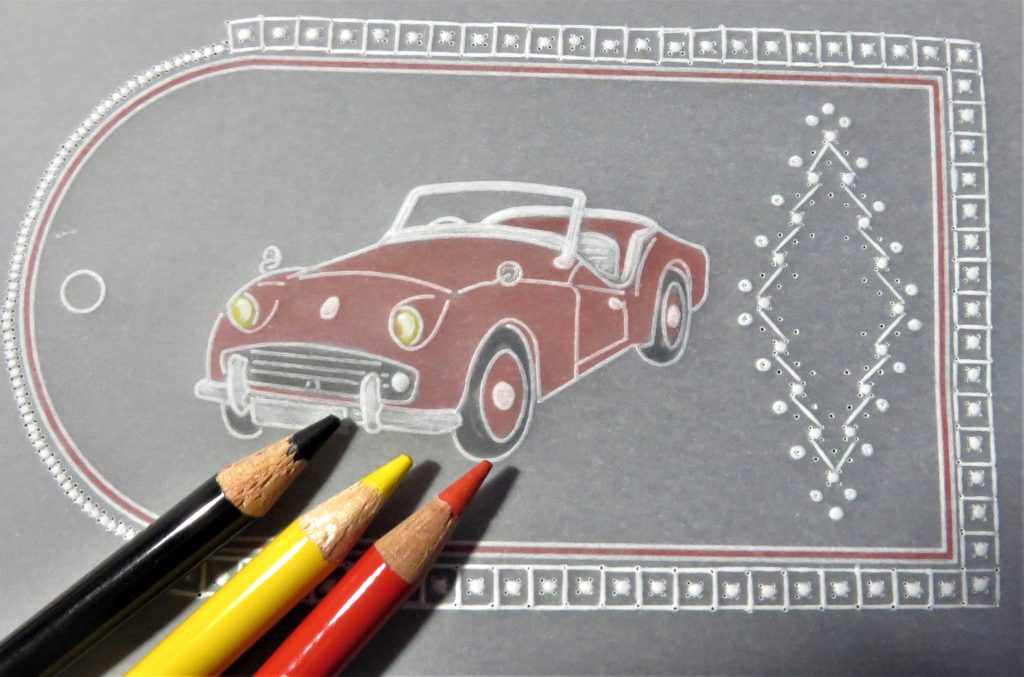
Step 4. Trace the sports car from the Vintage Car plate.
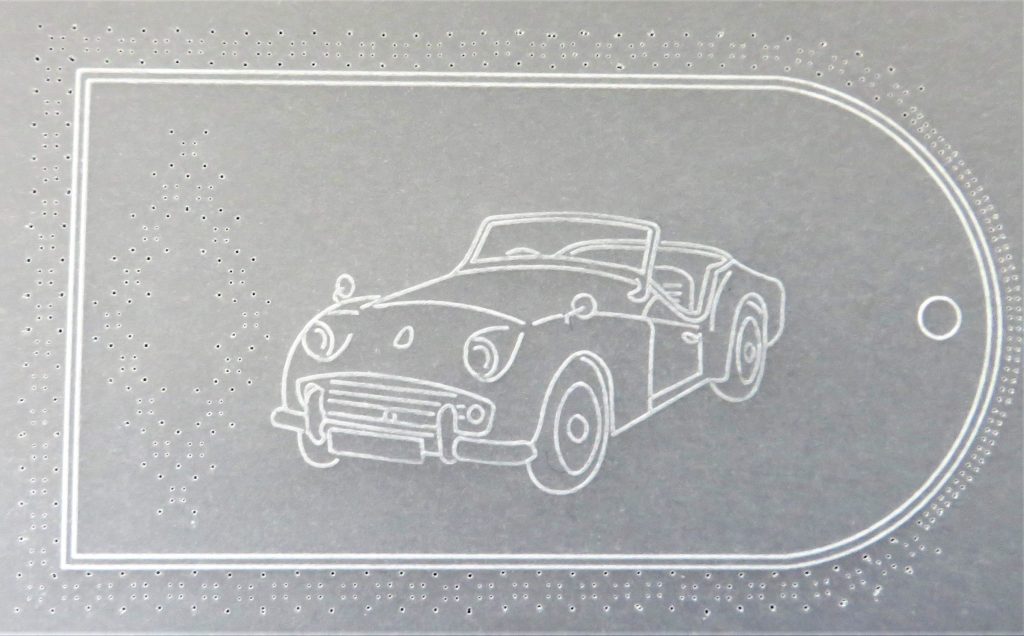
Step 5. Following the map provided by Linda on page 35 and emboss between all the perforations – all the grey areas are the ones to emboss.
Step 6. Emboss the elements in the car and colour with B pencils or Polychromos pencils, blended with some Dorso oil and blending nib. Also, colour in the margin around the tag.
Step 7. Go around the outside of the tag with the two-needle fine tool.
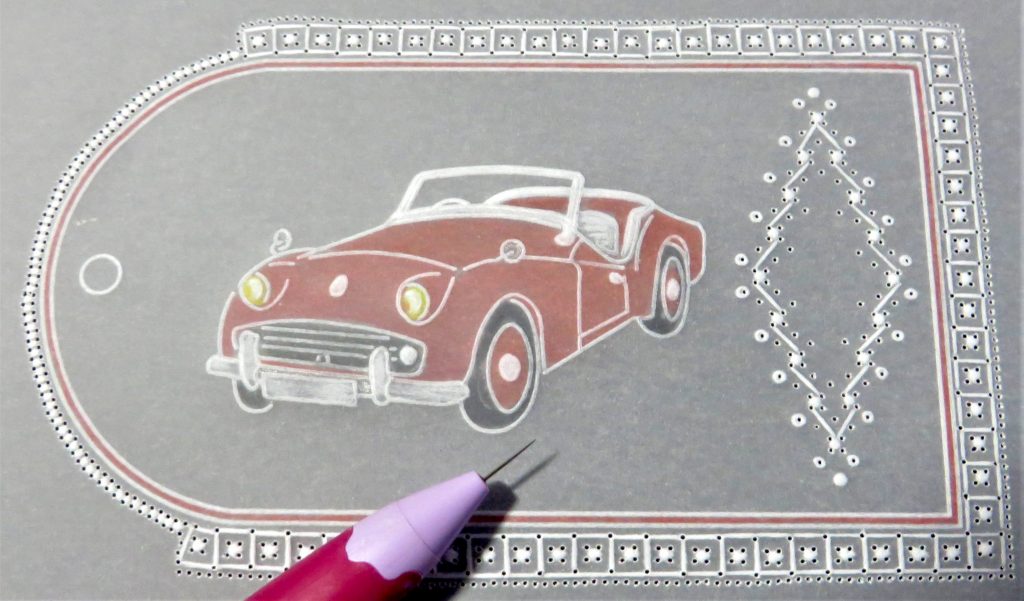
Step 8. Picot cut around the tag.
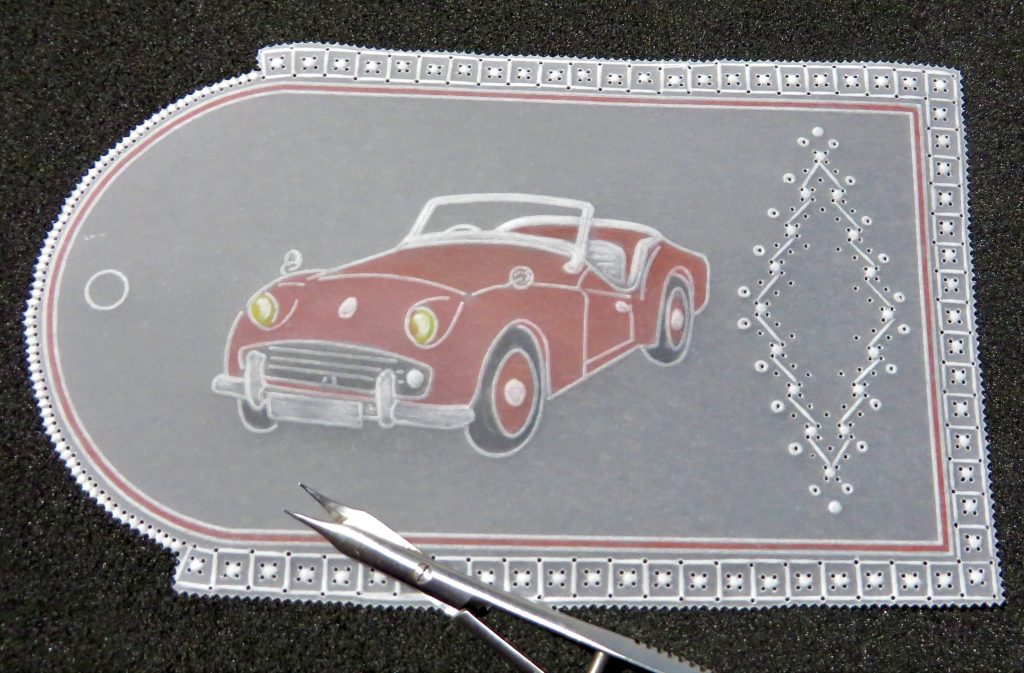
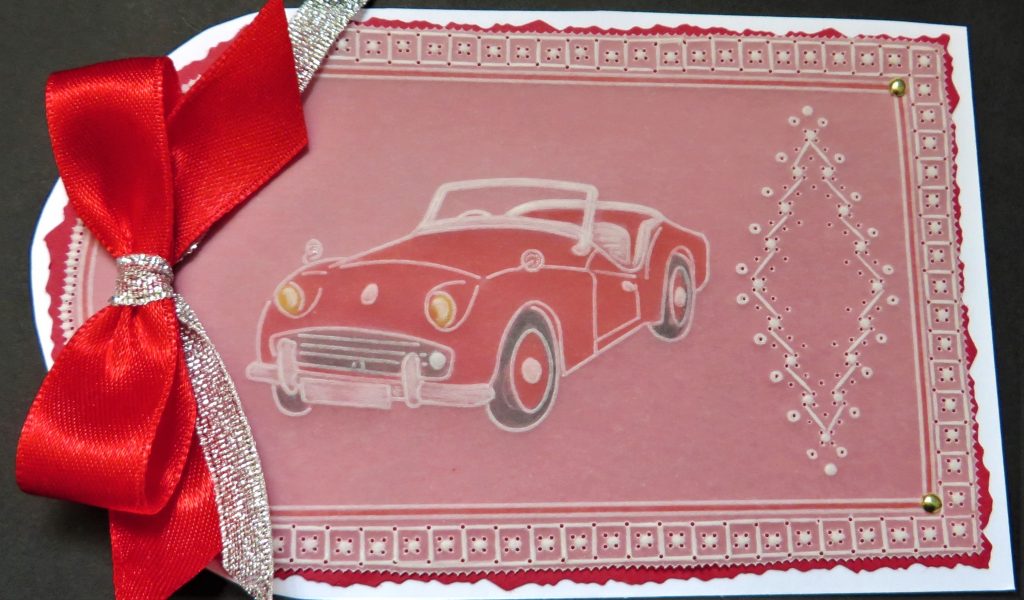
Step 9. Mat and layer the tag onto your chosen backing paper/card and add a bow. And your second project is complete!
Absolutely brilliant! Double whammy. Two beautiful projects. Thank you, Glynis, for sharing your expertise, tips and tricks with us.
Everything that Glynis has used can be found on the Clarity website, HERE.
Now, looking at the week ahead. A busy one! 🙂 Lots to enjoy.
Tuesday 26th September:
Groovi Tuesday with Paul – 10am Live on Facebook and YouTube
Thursday 28th September:
New & Exclusive with Paul Church on Create & Craft, 4pm & 8pm
Friday 29th September:
New & Exclusive with Paul Church on Create & Craft, 8am
Friday 29th September:
Crafting with Clarity with Barbara Gray on Create & Craft, 9am & 1pm
Sunday 1st October:
Clarity Classics with Barbara Gray on Create & Craft, 3-5pm
Hope to see you there!
Travel gently, friends.
Lotsa love, Grace & Glynis xoxo
Clarity – The Home of Art, Craft, and Well-Being.
Love these, Glynis. Thank you for your brilliant ideas. I’ll certainly be having a go. Sheila x
Thank you Glynnis, will certainly have a go these are brilliant and thank you Grace for the blog’s every week, don’t always comment but do read them all
Have a good week x
As always, lovely tags Glynis. Thank you for putting details up. Certainly great for Christmas presents.
Thanks Grace & Glynis for bringing us another 2 great projects this week. I have sorted my plates out & will give them ago later on this afternoon. Looks like a day for crafting as its grey & damp outside so not the weather for getting out into the garden & tidying up.
Certainly a busy week ahead, Barbara will have to hit the ground running but hopefully all was prepped before they left for the USA. Looking forward to all the shows as usual, I wonder what is going to tempt us this week !!
Have a good week everyone xx
Great step by step demo, thank you Glynis and Grace. x