Clarity’s Blog Tutorial: How to 4 NEEDLE TOOL (Part 2)
Hello hello! Grace here
Lesson 3 this week of The Pergamano Summer School covered part 2 of the 4 Needle Tool. Linda showed us a neat trick with this tool – if you missed it or want to find out more, you can catch up below, or go to our YouTube page HERE
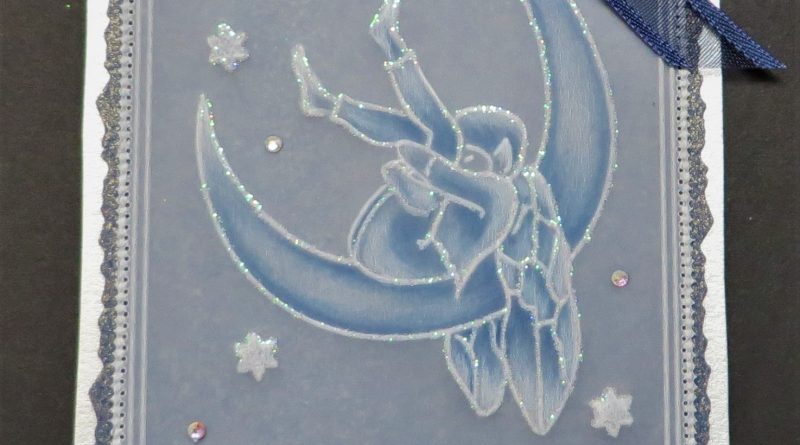
Here is another project from the lovely Glynis using the 4 Needle Tool.

Ingredients
- Pergamano Handbook for Multi-Needle Tools Volume 1 by Linda Williams – PER-BO-70291-XX
- Nested Arch Tags Groovi Plate A5 – GRO-PA-41465-04
- Moonfairy A5 square Groovi Plate – GRO-FY-40465-03
- 4-Needle fine Perforating tool – PER-TO-70036-XX
- 2-Needle fine Perforating tool – PER-TO-70037-XX
- 1mm Embossing Ball tool – PER-TO-70011-XX
- 1.5mm Embossing Ball tool – PER-TO-70004-XX
- 3mm Embossing Ball tool – PER-TO-70005-XX
- 4.5mm Embossing Ball tool – PER-TO-70015-XX
- 6mm Embossing Ball tool – PER-TO-70016-XX
- Tools from the starter kit.
- Powder Blue Parchment – GRO-AC-40404-A4
- Faber-Castell Polychromos Pencils – ACC-PE-30797-XX or Perga-Liner Pencil (B) – PER-CO-70063-XX
- Blending nibs – PER-AC-70299-XX
- A4 Translucent Perforating mat – GRO-AC-40307-A4
- A4 Translucent White Super Foam – GRO-AC-40603-A4
- Pergamano Sticky Ink – PER-AC-70134-XX
- Pergamano Mapping Pen – PER-TO-70039-XX
- Perga-glitters – PER-AC-70252-XX
Method
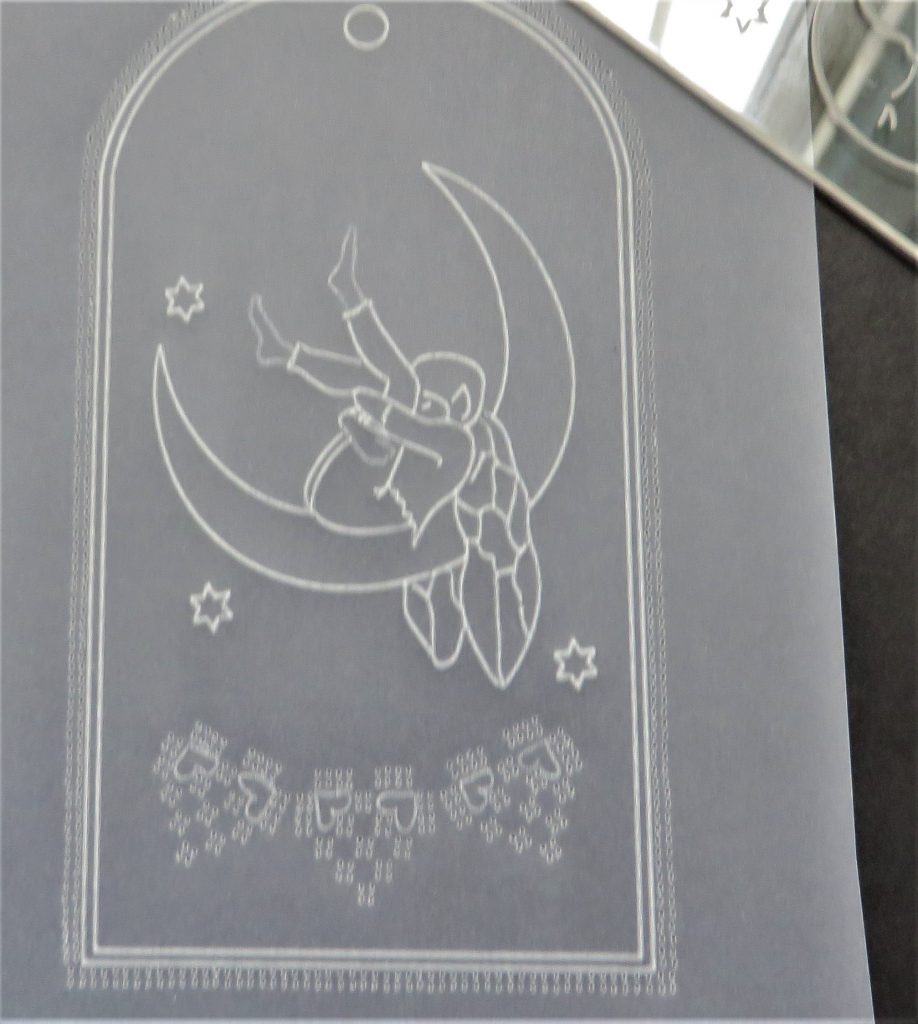
1. Check that you are working on the right side of the parchment by testing it in a corner where it will not be involved in the work. You need to be working on the back and getting lovely white lines on the front. Trace out the 2nd tag in, from the nested arch tag plate.
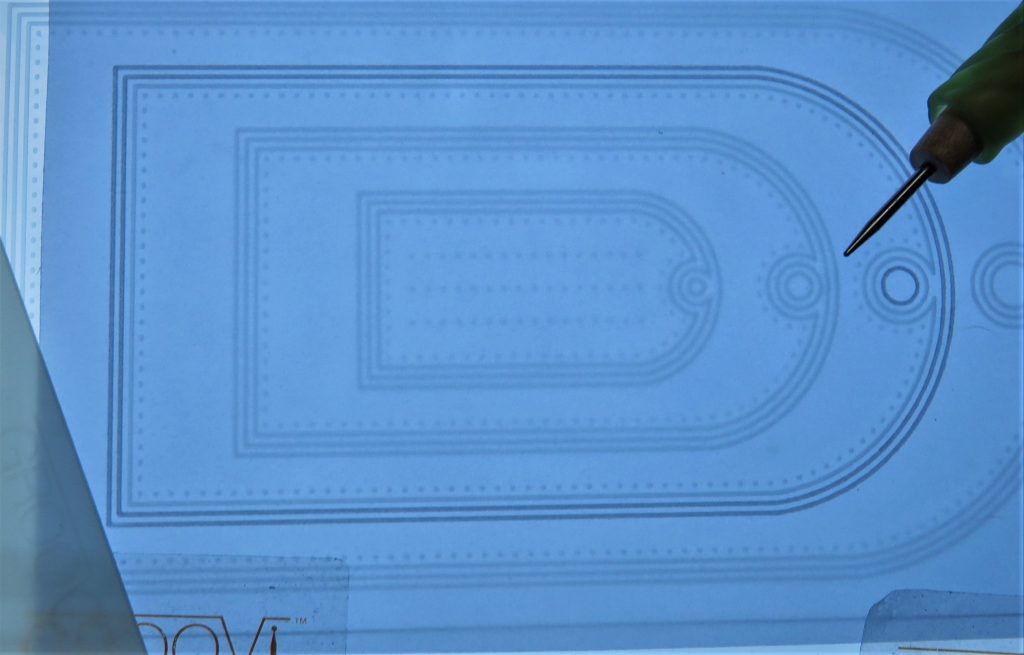
2. Using the photocopy from Linda’s pattern on page 21. Line up the tag onto the needle pattern indicated by the red arrow at the bottom centre of the tag.
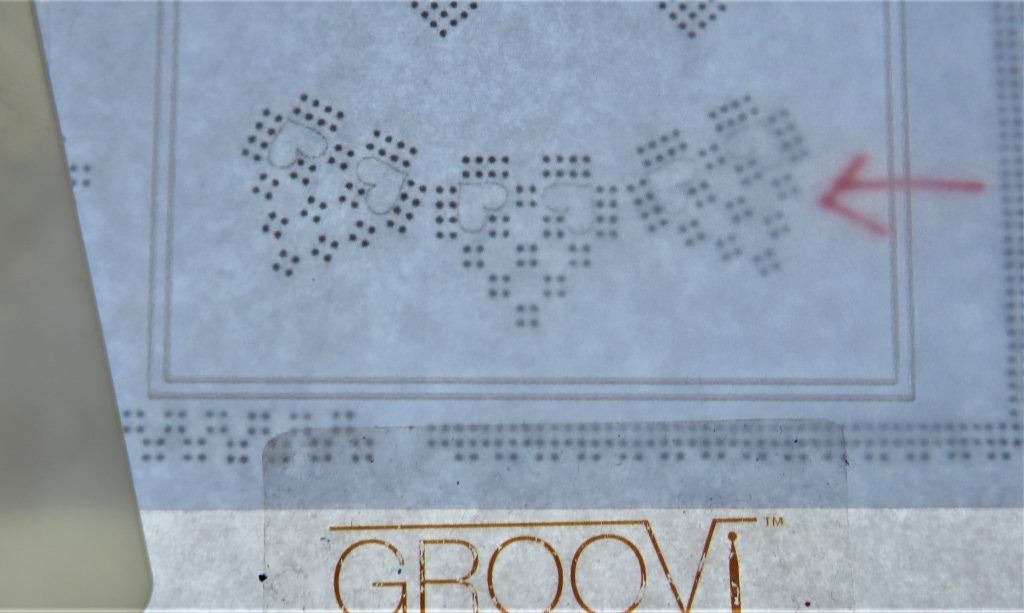
3. Take a very sharp white pencil and trace the little hearts within the design and then shallow perforate through the pattern, matching up the dots with the needles of the 4-needle tool. Also go around the outside of the tag with the 4-needle tool.
4. Add the image from the Moonfairy Groovi plate. The middle sized one fits perfectly. Use the number 1 tool, for the feet and hand of the fairy, which need to be traced with the number 2 tool. Add some small stars from the plate here and there.
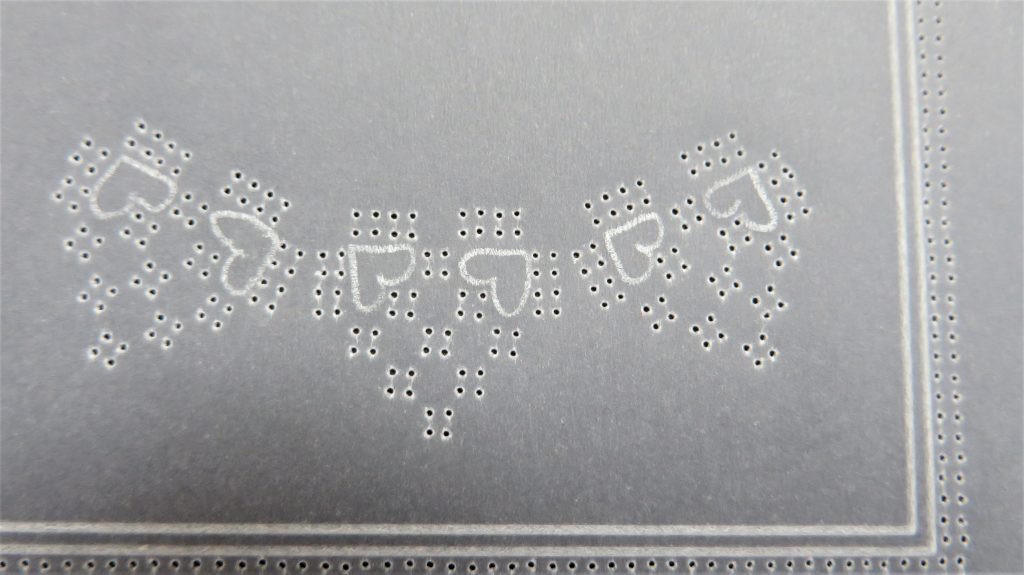
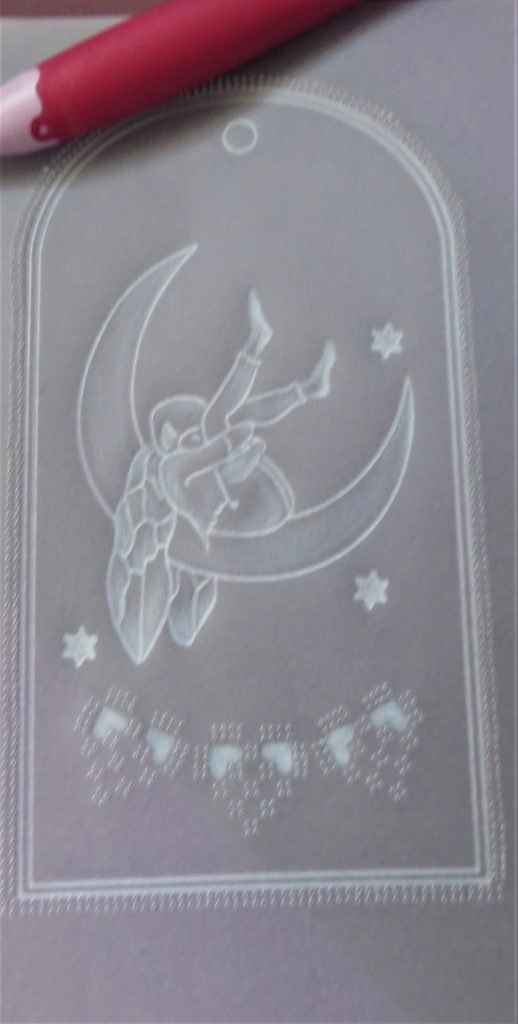
5. Work on the back and use the 6mm ball tool to emboss highlights into the moon, wings, feet, cap, shoulder, hands and trousers of the fairy. Use the 3mm ball tool to emboss the hearts within the multi-tool work.
6. Stipple the small stars. To do this, place the work onto a stout piece of card, still working on the back. Stipple using a single needle tool – just light tapping until you have covered the area with little white dots. Be careful not to puncture the parchment.
7. Keep working on the back and use the darkest blue you have. Stroke the colour towards the embossing without actually colouring over the whiteness. Blend the colour out with a dry blending nip.
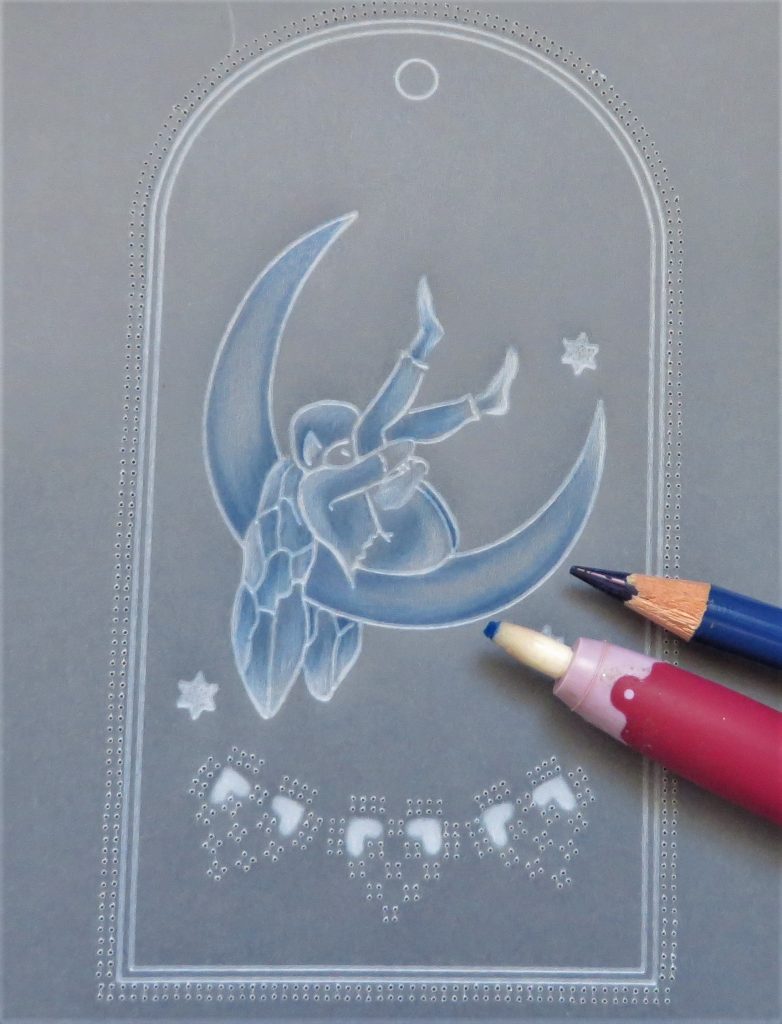
8. Following Linda’s sampler on page 18 of the handbook, use the 1mm ball tool and emboss little dots between the 4-needle perforations.
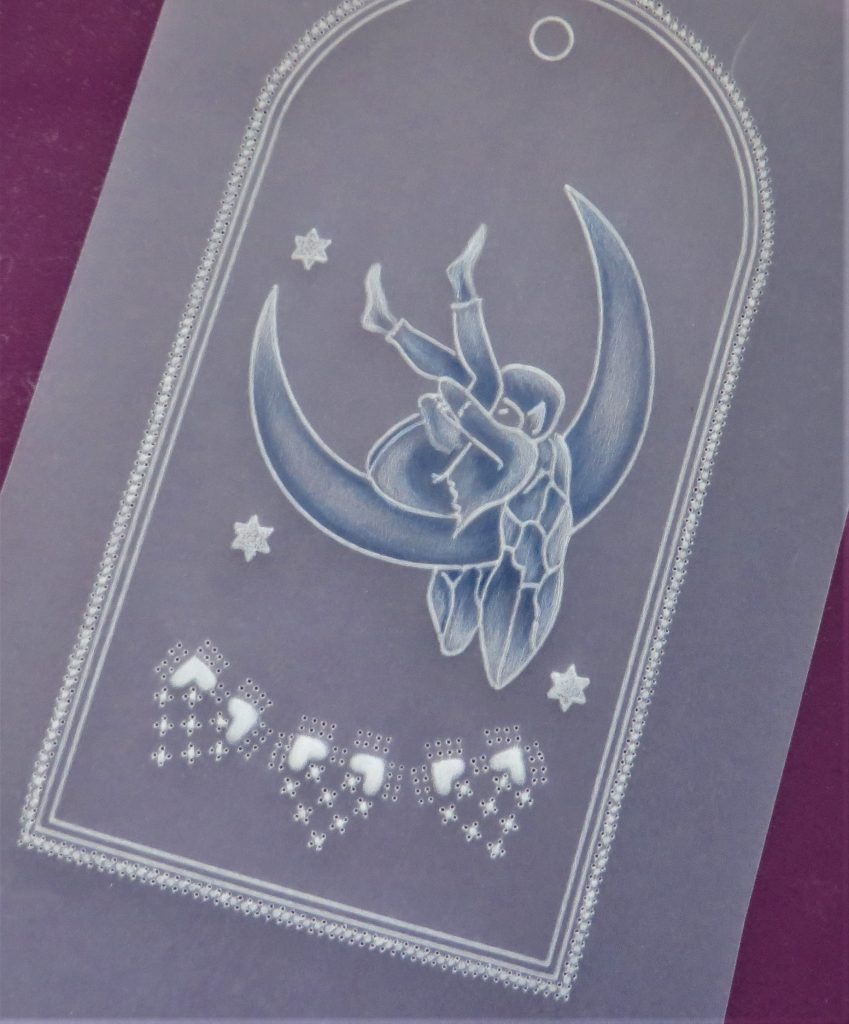
9. Working on the front, re-perforate with the 4-needle tool. If you do have trouble relocating the needles, then use the fine single tool to help you.
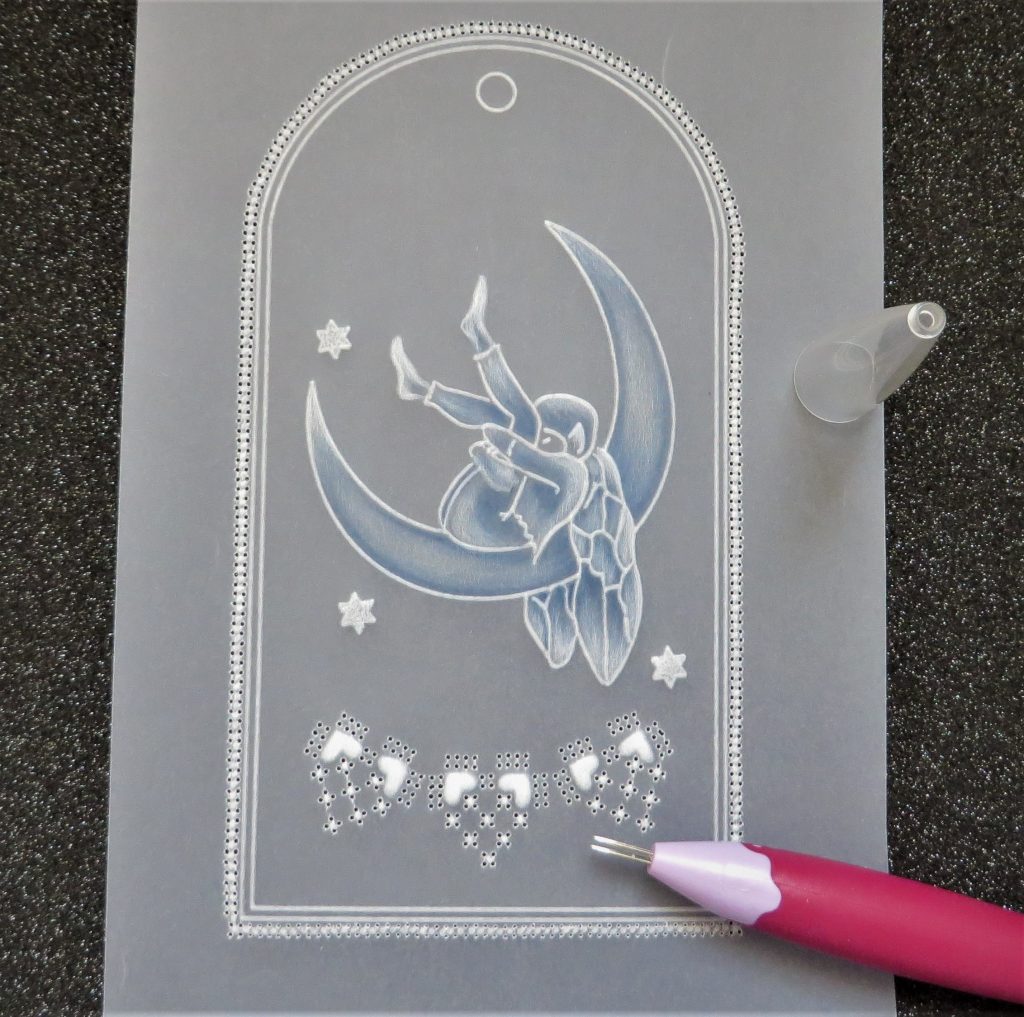
10. Cut out the slots and crosses of the 4-needle design (see page 18 of Linda’s handbook) and snip out the tag. Attach it to a backing card and cut around the tag (I used fancy scissors this time) then mat and layer it onto some silver card. Add some glitter, gems and a bow.
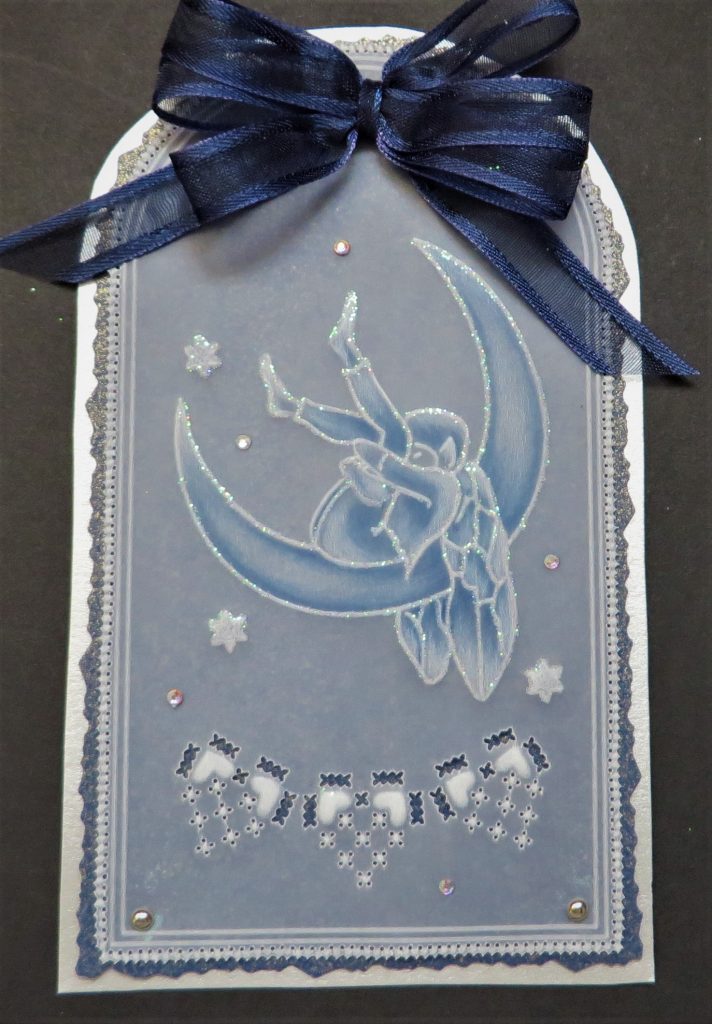
Another stunning piece of artwork from Glynis. Everything that Glynis has used is in one place over on the Clarity website HERE and everything for the Pergamano Summer School is HERE
On Tuesday, Linda will be moving on to the 5 Needle Tool.
Don’t forget, Mum is on The Craft Store (aka Hochanda) today at 2pm for 2 hours of crafting with some beautiful new stamps!
Sky 673 (24/7)Freesat 817 (24/7)Freeview 85 (7am – 10pm)
Lotsa love Grace & Glynis xo
Clarity – The Home of Art, Craft and Well-Being.
Another amazing tutorial , thank you Glynis
All set to watch Barb later
Hope your journey home went smoothly Grace
Have a good week everyone xx
Another lovely piece, thanks Glynis & Grace. I must have a go and use the tools more. Welcome home Grace, hope you’ve recovered from your flight. Sorry you didn’t get to see your Grandad, I hope he’s still recovering well. It must have been lovely to be back amongst your family again and i hope you wont have to wait so long until the next time. X
Hi Grace – hope your journey home went well & that your enjoying a relaxing time back home – sending prayers for a speedy recovery for granddad .
Glynis – what another outstanding beautiful project from you – thank you so much .
Take care – Love Seta Xx
Hi Grace, hope you had a good flight home, sorry you still didn’t get to see your Grandad but hopefully he will be back home with your Oma soon.
Another beautiful tag from Glynis, I need to sort out where I do my Groovi work when working with the fine tools as I am struggling to see comfortably to snip the fine picot when working on my lap tray – waiting for an appointment for cataracts operation following recent eye test. I think it will be a daytime at the table occupation for now with my magnifier at the right angle. Thought I had the A5 Moon fairy plate but its not ticked in my catalogue so need to have a hunt, if not I am sure I will find something to use from my stash.
Take care & have a good week
Hey Grace, meant to ask what you thought of Erik and Ragna, or, more to the point, what did they think of you and Mark ?! X
Hi Grace, I hope you had a good flight home and arrived safe and sound.
Hi Glynis, Another stunning tutorial and culminating in a stunning parchment tag.
Take care all.
Lots of love from Patricia xx
Hi Grace. Just been catching up on some of the blogs. Hope you enjoyed your time at home, even though it wasn’t quite as planned, and you didn’t manage to see your Grandad, do hope he is recovering and will soon be home. Hope your journey home was ok, also Marks back to SF. Enjoyed seeing the photos of you while here.
I was looking forward to watching your Mums today, but my TV has stopped working. Hopefully can watch some other way. Xxxx